Many knitting patterns contain shaping or patterning. The latter may be lace, cables, knit/purl patterning, color work or a combination of these. These instructions may be written out completely. But, especially with more complex patterning, this can become a veritable wall of text pretty soon.
Enter charts! A knitting chart is a compact visual representation of the knitting project shown from the right (or front) side. Each box on a chart represents a stitch, and every chart includes a legend explaining what to do for each symbol included. My patterns always contain both charted and written out instructions, because there just are differences in how people parse information best. That said, charts can be intimidating if you don’t quite know how to read them.
So, in this tutorial I’ll tell you all about it, for both knitting flat and knitting in the round.
Where to start reading knitting charts?
Yes, there are differences in reading charts for knitting flat back and forth and for knitting in the round. There are, however, more commonalities than differences. I’ll show you, using the chart for my (free!) Autumn Leaves Shawl pattern.
As you can see, there are numbers at the top and at the bottom. These represent the stitches that are to be worked horizontally. Also, there are numbers at the sides of the chart, these indicate the rows or rounds to be worked. Since this is a chart for flat knitting, the numbers are alternated on the right and left side of the chart.
The rule of thumb is always to begin reading your chart at the box marked “1” for both stitch and row indication. In this chart that’s in the lower right corner. Then, proceed going left to the stitch marked “2” in the same row etc until you’ve finished the row.
Since this is a chart for flat knitting, after we’ve finished the row we have to turn the work. Next is row number 2, this one is to be worked from the left to the right. If you have your knitting in front of you, it really makes sense. You’re working the back (the wrong side) of the work, but looking at the chart from the front, so the chart is to be worked backwards when compared with the previous row.
If you’re working in the round, all vertical numbers will only be on one side of the chart. See for an example the chart above. And since every round is worked with the right side showing (towards you), you just move up vertically and work the second round from the bottom from right to left as you did for the first round.
Decoding the symbols
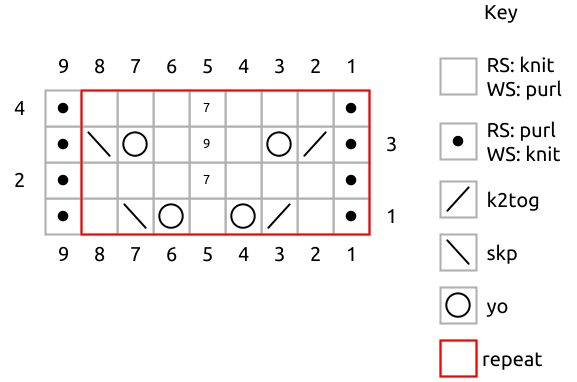
As I told you above, every chart includes a legend. The legend is very important, because it defines the stitches or colors that correspond with the stitches on the chart. Quite good to know when trying reading knitting charts! Also, do make sure to closely examine the legend before you begin knitting. There may be different meanings to certain symbols in the particular chart, than you’re used to.
In the leafy border chart posted above, there are 2 stitches for which the symbols have a different meaning on the wrong side and right side of the fabric. In this example, a blank box is knitted on the right side (odd rows) and purled on the wrong side (even rows). Boxes containing a black dot are purled on the right side (odd rows) and knitted on the wrong side (even rows).
The other stitches used, also have their wrong side equivalents. They are, however, not mentioned in the chart because they are not used on wrong side rows. This makes the chart “cleaner”.
Another symbol you may encounter is the gray “no stitch” box. These may be used in a chart to make the charted representation more clear. When you encounter one, just ignore and skip it in the chart. It does not represent a stitch to be worked on your needle. As a matter of fact, the leafy border chart also had some of these stitches on the left side of the chart. I just hid them to make the chart look more clean and save toner/ink for folks wanting to print it.
Repeats
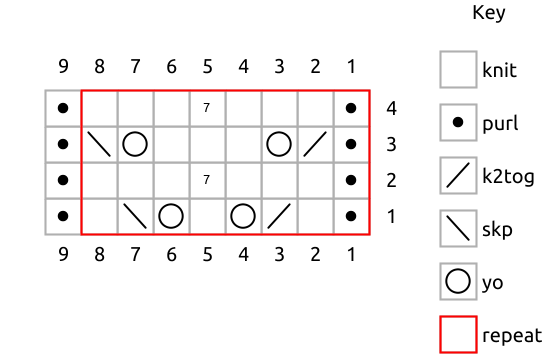
Many patterns feature a repeat. This is a section of patterning that is to be repeated both horizontally and vertically. Repeats are typically indicated by a box or frame in a contrasting color. In the example below a red frame is used.
In this chart, stitches 1-8 are to be repeated until 1 stitch before the end of the row. After that stitch number 9 is worked. When working repeats, it may be useful to place a marker between the repeats. This helps you keep your place and makes it easier to identify and correct mistakes. Once all 4 rows in the repeat are worked, they can be repeated too if the pattern asks for it.
Reading your knitting = reading your chart
Remember that I said that a knitting chart is a compact visual representation of the knitting project shown from the right side? Let’s put both the chart and the resulting piece of knitting next to each other:
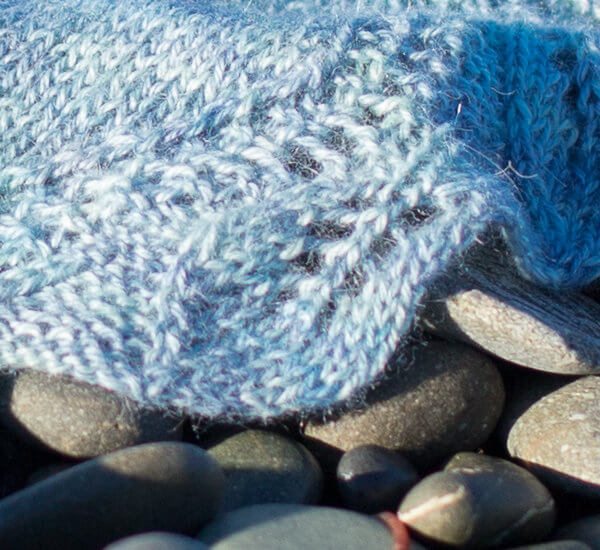
Unfortunately, I don’t have a picture of the knitted leaf detail in the same orientation as the chart. So, trust me when I say that the leaf pictured above, was started at it’s upper right corner. The stitches that were bound off in row 18, can be seen in the lower left corner of the shawl edge.
Do you see that the elements in the chart are very recognizable in the resulting knitting? Take for example the rows with “yo, k1, yo”, in the knitted leaf they form the very recognizable “midrib” and “veins” of the leaf. Similarly, the centered double decrease in row 17 forms the apex of the leaf.
In other words: once you get more comfortable in reading your knitting, this will also enable you to see at a glance where you are in the pattern (chart) and whether any mistakes are made. If there are any errors, this will usually be noticed because things don’t “look” right, don’t line up correctly or because there are not enough stitches to work the chart.
And that’s how to go about reading knitting charts!

Thanks to my Patreon supporters for bringing you this freebie! Creating quality patterns and tutorials is a lot of work and resource-intensive. However, I find it important to give you free content like this tutorial. Thanks to the generous support of my Patreon supporters, I can make it happen. Thank you, patrons! Click here to join, or click here to read more about La Visch Designs on Patreon.


