inspiration

the anatomy of a spinning wheel


Anatomy of a spinning wheel

Spinning wheels, who doesn’t know them? Even if it is just from fairy tales like Sleeping Beauty and Rumpelstiltskin. Because of the fairy tales spinning wheels are also the best-known method to make your own yarn for knitting, crochet or weaving. Spinning wheels come in lots of different shapes, sizes and also have many different components. With this post, I want to make you a bit more familiar with the latter.

The anatomy of a spinning wheel

Due to the large differences between wheels, the various parts are sometimes shaped differently or located in a slightly different spot. The following components can, however, be found in most spinning wheels, in one form or the other. Much of the information on spinning and spinning wheels online, is in English. Being Dutch I found that a lot of information is not available in my own language. Therefore I have I included both Dutch and English in the notes below about the various parts and components.

Anatomy of a spinning wheel


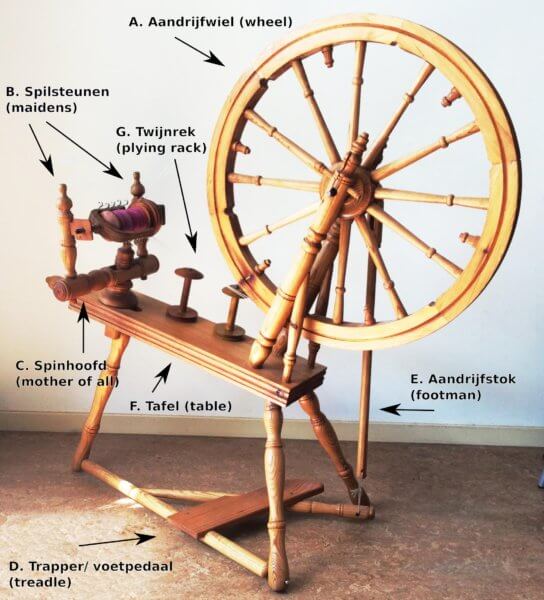
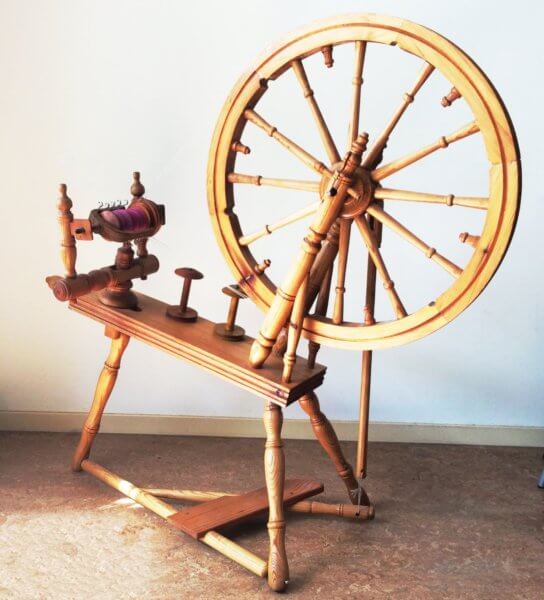
A. Wheel (aandrijfwiel): The wheel that spins around and doing so puts the other parts of the spinning wheel in motion.
B. Maidens (spilsteunen): The vertical supports that hold the flyer and bobbin.
C. Mother of all (spinhoofd): The horizontal bar on which the maidens, flyer, bobbin and tension screw are attached.
D. Treadle (trapper/voetpedaal): The treadle that lets you bring the drive wheel in motion. Some spinning wheels have one treadle (single treadle wheels), other versions have two to be used with both feet (double treadle).
E. Footman (aandrijfstok): The part that connects the treadle to the drive wheel, causing it to rotate when treadling.
F. Table (tafel): This is the central component of a spinning wheel, where everything is built upon which gives a wheel its structure.
G. Plying rack (twijnrek): Raised pins that are used to place bobbins filled with spun singles on, in order to ply them together in a plied yarn. They can of course also be used to store additional bobbins when not plying.

Anatomy of a spinning wheel


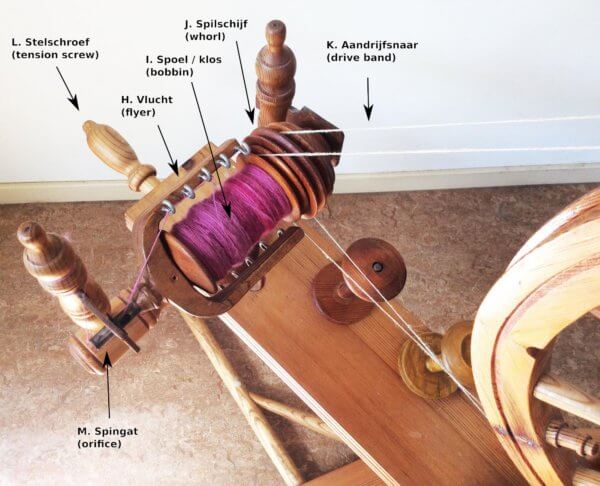
H. Flyer (vlucht): U-shaped component with hooks at one or both sides of the arm of the U. The hooks are used to divide the yarn neatly over the bobbin. The flyer is rotated by the drive belt, causing rotation (twist) to insert into the wool. The fibers themselves are relatively weak but combined in this manner, they are much stronger.
I. Bobbin (spoel/klos): The bobbin is placed on the flyer spindle and rotates, along with the flyer. Here, the yarn is wound up, when sufficient twist has entered the wool.
J. Whorl (spilschijf): A pulley which is placed on the spindle, is connected with the flyer, and is driven by the drive belt. The different dimensions of the grooves in the whorl determine how fast the wheel is spinning and have an important impact on the ratio of the spinning wheel. With ratio is meant how many times the flyer goes around with one turn of the wheel. The higher the number, the faster the wheel spins.
K. Drive belt (aandrijfsnaar): A cord placed around the wheel and whorl, which thus transfers the rotation of the wheel onto the other parts of the wheel. Modern spinning wheels typically have a flexible plastic drive belt, I use hemp packaging twine on mine.
L. Tension screw (stelschroef): This part is used to put tension on the drive belt by moving the Mother of All.
M. Orifice (spingat): The opening at the end of the flyer spindle, where the wool goes through before it is wound through the flyer hooks onto the bobbin.

In this post, I’ll tell you about the various types of spinning wheels.

the anatomy of a spinning wheel Read More »

Introduction to Slip Stitch Crochet - a tutorial by La Visch Designs

introduction to slip stitch crochet

Introduction to Slip Stitch Crochet - a tutorial by La Visch Designs

As you are probably aware, there are lots of different crochet stitches. The basic stitches (in US terminology) being single crochet (sc), half double crochet (hdc), double crochet (dc) and the slip stitch (slst). What is perhaps less known is that there is a very special form of crochet, which only uses slip stitches. This is called Slip Stitch Crochet, abbreviated as SSC.

Depending on how the hook exactly is inserted into the stitch, the result can look very similar to knitting. The stitches can look a lot like stockinette stitch, and the fabric is thinner, more flexible and requires less yarn for a similar surface than with traditional crochet.

History

Slip stitch based crochet has been around for a very long time. Many believe it is actually the oldest form of crochet. Fact is that it was and is traditionally much practiced in several European countries, including Norway, Sweden, and Bosnia. This particular type of crochet is therefore also known as “Bosnian crochet”. However, traditional Bosnian crochet is mainly done in the round, where the work at the end of a round is not reversed. In modern versions of slip stitch crochet, the work is reversed, if desired.

Introduction to Slip Stitch Crochet - a tutorial by La Visch Designs

How to work SSC?

First, it is important that you use the right type of crochet hook. The kind where the entire head of the needle is cylindrical with a “cut out” to make a hook shape, as with the above-depicted bamboo crochet hook works best. These are also called “in-line” hooks. With the other type, it is more difficult to insert the hook into the correct part of the stitch.

A big difference between regular crochet and SSC is the size of the crochet hook needed. A much larger size than usual is required to ensure that the work does not end up too thick and stiff. Take for example worsted weight yarn where the label recommends needles in size 4-4.5 mm. For that yarn, a crochet hook in a size of approximately 6 mm would be the better size for SSC.

With regular slip stitches, the hook is usually under both loops of the stitch from the previous row. With SSC the hook can also be placed under only one of the loops. The exact orientation and direction determine what the stitch and thus the resulting work will look like. Variables here are front/back loop, inserting from the front to back or from back to front and yarn in front of the work vs yarn at the back of the work.

In the photo below you can see the differences between the six basic stitches in slip stitch crochet:

Introduction to Slip Stitch Crochet - a tutorial by La Visch Designs

The basic stitched explained

F (front loop only slip stitch)
Hold the yarn behind the work and the hook. Insert the needle from front to back under the front loop of the stitch, yarn over and pull the yarn through both loops on the hook.

B (back loop only slip stitch)
Hold the yarn behind the work and the hook. Insert the needle from front to back under the back loop of the stitch, yarn over and pull the yarn through both loops on the hook.

iF (inverse front loop only slip stitch)
Hold the yarn in front of the work and the hook. Insert the needle from back to front under the front loop of the stitch, yarn over and pull the yarn through both loops on the hook.

iB (inverse back loop only slip stitch)
Hold the yarn in front of the work and the hook. Insert the needle from back to front under the back loop of the stitch, yarn over and pull the yarn through both loops on the hook.

S (slip stitch)
This is a regular slip stitch: Hold the yarn behind the work and the hook. Insert the needle from front to back below both loops of the stitch, yarn over and pull the yarn through the loops on the hook.

iS (inverse slip stitch)
This is a regular slip stitch worked backward: Hold the yarn behind the work and the hook. Insert the needle from back to front under the two loops of the stitch, yarn over and pull the yarn through the loops on the hook.

Examples

In this swatch, I’ve tried out three different stitch patterns. These can all be made with combinations of the basic SSC stitches. The pictures show both sides of the work:

Introduction to Slip Stitch Crochet - a tutorial by La Visch Designs

A: Looks very much like garter stitch and the resulting fabric does not curl. This is made by working F every row.

B: Looks very much like stockinette stitch in a sideways orientation, the fabric curls up (just like stockinette stitch). It can be made by alternating rows in F and iB.

C: Rib stitch: because of its high elasticity, this pattern is very suitable for cuffs and hems. This can be made by working every row in B.

And that’s how you work slip stitch crochet! Although I still have to work on my edges, looking at the swatch below…

Introduction to Slip Stitch Crochet - a tutorial by La Visch Designs

introduction to slip stitch crochet Read More »

knitting history

A woman wearing a light blue cablesd sweater

It is quite possible that you are not the only one in your immediate family, who knits or crochets. Perhaps a mother who likes to click the needles. Or maybe a grandmother who regularly made you a sweater when you were little. In this blog I want to share a bit of my personal knitting history with you.

My grandmother was a good knitter. Unfortunately I haven’t experienced this first hand, because she died very young, only a couple of weeks after I was born. All these years my mother had been saving a big pile of sweaters made by my grandmother. Then, about 35 years later my mom visited me and brought along all these sweaters with the question if I would like some. The rest she would finally let go.

One of the sweaters really does suit me, is very much my style and one I have since worn every winter. That’s the sweater you see pictured above. One of the other sweaters was not wearable for me, but so beautifully made that I could not find it in my heart to throw it out. A gorgeous fair isle sweater made ​in several shades of blue.

A felted fair-isle sweater in shades of blue and white

And suddenly I had the wonderful idea to use this sweater to make something for my mother, so she would still have a tangible reminder of her mother’s knitting. My mother did keep these sweaters for all these years for a reason after all. My thoughts went out to making cushions, with the front of each cushion consisting of a panel of this sweater.

In preparation I had undone all the seams and felted the sweater panels. However, once it came down to cutting the cushion pieces and sewing them I got cold feet… I have absolutely no experience with sewing and was terrified to ruin this irreplaceable piece of felt. After some thinking I put a note about it with a plea for help in the”DutchKarma Swap Group” on Ravelry. A very sweet lady came to my rescue and transformed my grandmother’s sweater into these lovely pillow covers:

The sweater turned into pillow cases

And my mother? She did not expect this gift at all and was extremely happy with this piece of our shared knitting history!

knitting history Read More »

tutorial: dyeing wool

Dyeing wool

Being a spinner, I not only have lots of lovely top and roving in my fiber stash, but also quite a few whole fleeces. A whole sheep worth of wool can get a bit boring color-wise. So, now with Easter all done, it is time to put that leftover Easter egg dye to good use and start dyeing wool!

Easter egg dye and other food coloring are perfectly suited to dye protein-based fibers and yarns. Wool, alpaca, and silk are lovely to dye yourself. These dyes, however, can’t be used to permanently dye acrylics and plant-based fibers like cotton.

Supplies needed

  • Wool or yarn: I’m using some lovely Lleyn wool, that I already scoured last year. If dyeing or over-dyeing yarn, make sure to skein the yarn if you have it in a ball put-up. Remember to tie the skein with some pieces of cotton or acrylic to make sure your wool won’t tangle beyond rescue.
  • Easter egg dye or other food colorings
  • Vinegar to change pH value and improve the dye take up by the wool
  • Non-aluminum pot and spoon

Let’s get started!

1. Fill the pot with hot water from the tap, add some glugs of vinegar (I know, very scientific this way) and put in the wool to pre-soak. Leave it like that for 10 to 15 minutes.

Dyeing wool - a tutorial by La Visch Designs

2. While waiting I made myself a cappuccino and pondered what colors to use. I decided to use red and blue to hopefully end up with purple.

Dyeing wool

3. Added the dye to the pot and put it on the stove until the water had reached a slow simmer. Then I put the fire out and let it be. Do not let it come to a rolling boil and don’t stir a lot or vigorously, we don’t want to felt our wool!

Dyeing wool

4. Checking the progress, you can see that the red dye has disappeared completely from the water. There is however still a lot of blue in the water and not in the wool.

Dyeing wool

5. A couple of hours later I’m satisfied with how much dye has been taken up by the wool. Other colors may need less time. Now it is time for a rinse. I have filled the sink with hot water and gently swooshed the wool around int it, to rinse out any leftover dye. Only use cold water, if your wool is also completely cooled down. Rapid cool-down can also cause felting. Therefore I always use hot water for rinsing, just to be sure I don’t accidentally felt my wool.

Dyeing wool

6. Then it is time to remove all the excess water from the wool. After a gentle squeeze, I use my dedicated salad spinner for this. You can, of course, also use a stand-alone spin dryer. When using the one in your washing machine, make sure it does not automatically involve rinsing as well, because that may again cause felting.

Dyeing wool

And there you have it: a nice crate full of purple wool! Dyeing wool is pretty fun, isn’t it? When completely dry I had even more fun carding the wool into batts for spinning, read all about it here.

Dyeing wool

tutorial: dyeing wool Read More »