
Stumped by how to go about picking up stitches to work a neckline? Many garment designs consist of working the body first, and working the neckband later on. This is often done to have the cast-on or bind-off edge at the neck help in stabilizing the fabric. This prevents it from sagging when worn. In those cases, picking up the stitches to work the neckband, is one of the last steps in completing the garment.
Usually, patterns give an indication of how many stitches to pick up. Still, it can be a challenge to pick up the correct number. And, more importantly, have them distributed evenly over all sections of the neckline. As with all knitting things, there are multiple ways and techniques for picking up stitches around a neckline. In this tutorial, I’ll show you how I go about it.
In this tutorial, I’m using my Hay tee as an example. It’s a design by Annarita Ceretti, you can find the pattern here (LoveCrafts link). On a side note, I often work the neckband when I’m midway the miles of stockinette of a garment body. It breaks it up a bit. It also has the added benefit that the neckband already done by the time most of the knitting is completed.
Materials used
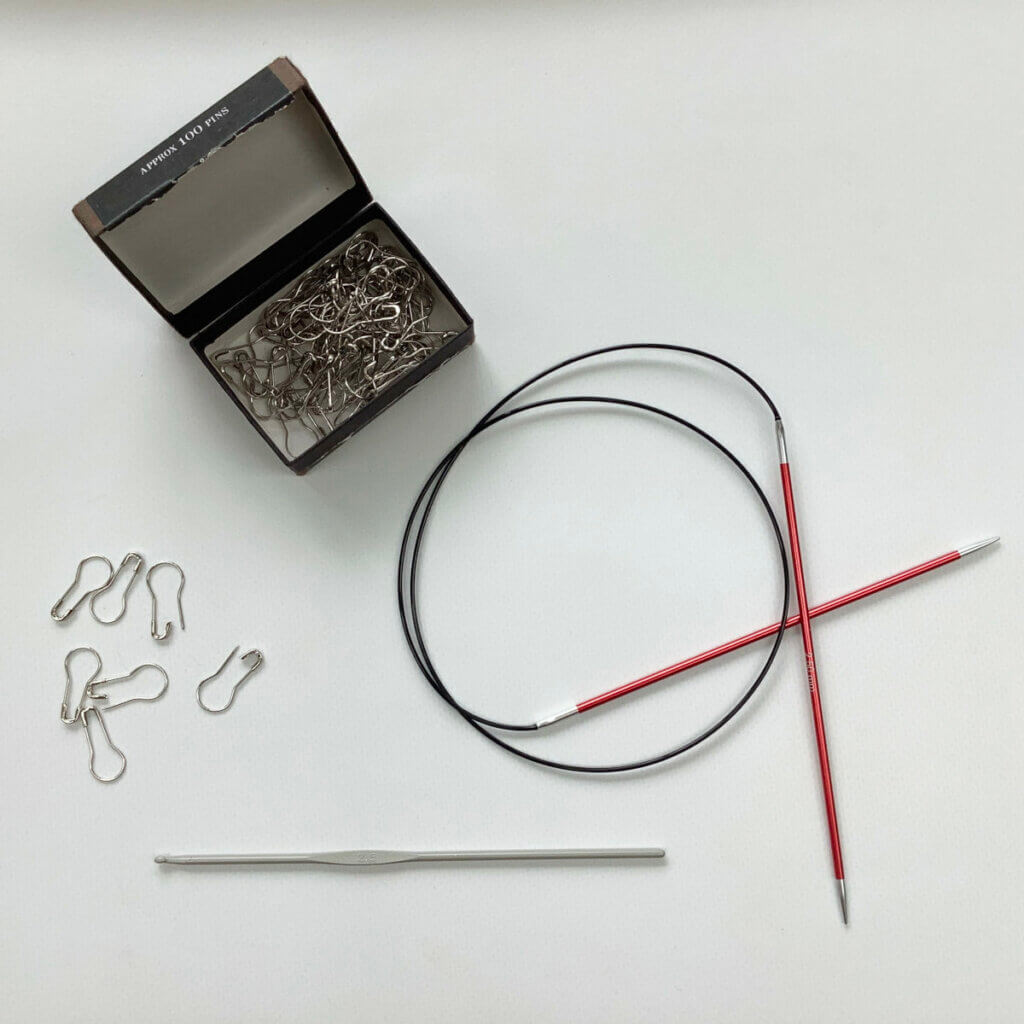
Garment WIP: Hay tee work-in-progress, you’ll also need yarn to work the neckband. Here I’m using a mercerized cotton.
Other materials: Bulb pins or removable stitch markers, a circular knitting needle in a size 0.5 mm smaller than used for the body of the garment and a crochet hook in a similar size. The crochet hook is optional, but I find it makes picking up stitches a lot easier. Therefor, I certainly recommend using one.
Marking the sections
Let’s get started with picking up stitches to work a neckline! Every neckline consists of sections. Picking up the correct number of stitches from them is easier if you plan ahead. Part of this is marking the sections with your bulb pins or removable stitch markers. Most necklines have a combination of types of sections. Horizontal sections; bound off or cast on, depending on if you’re working bottom-up or top-down. Diagonal edges shaped with decreases, and vertical edges that are worked even.
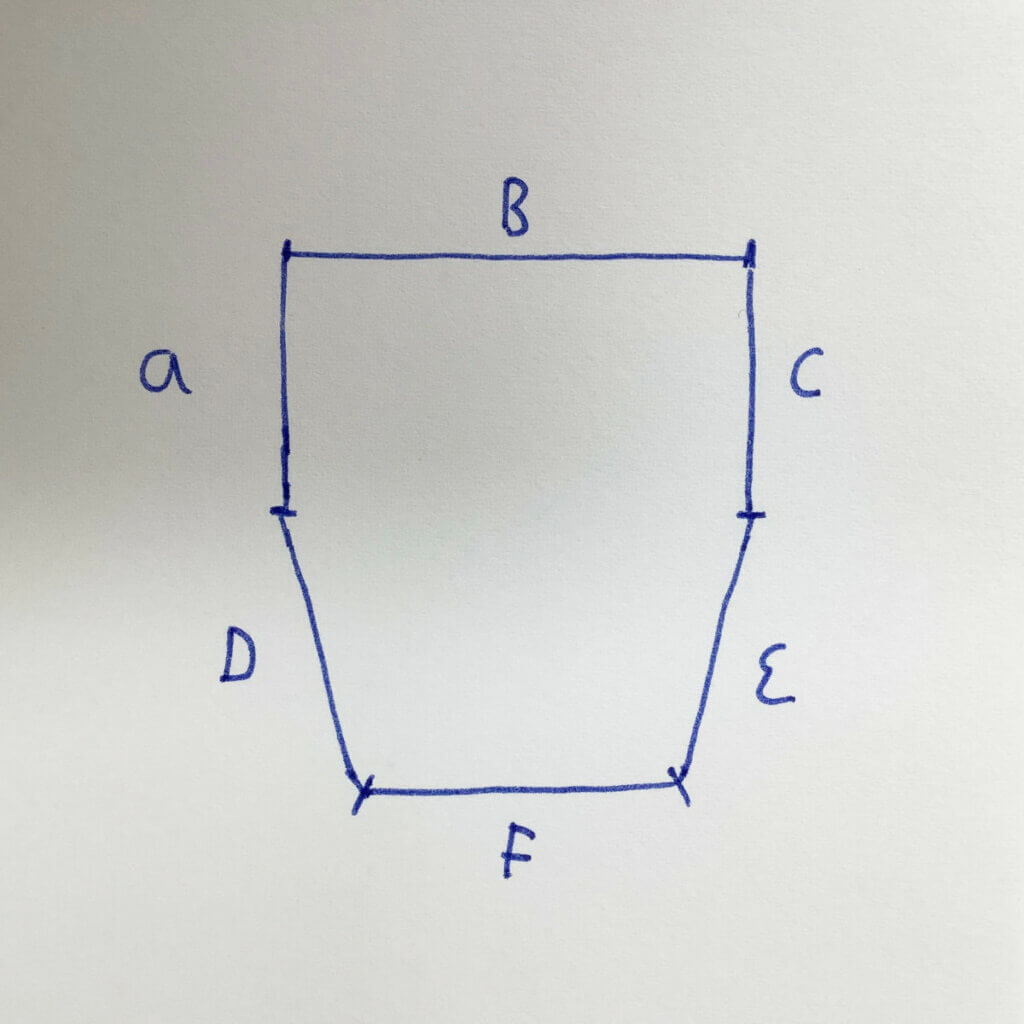
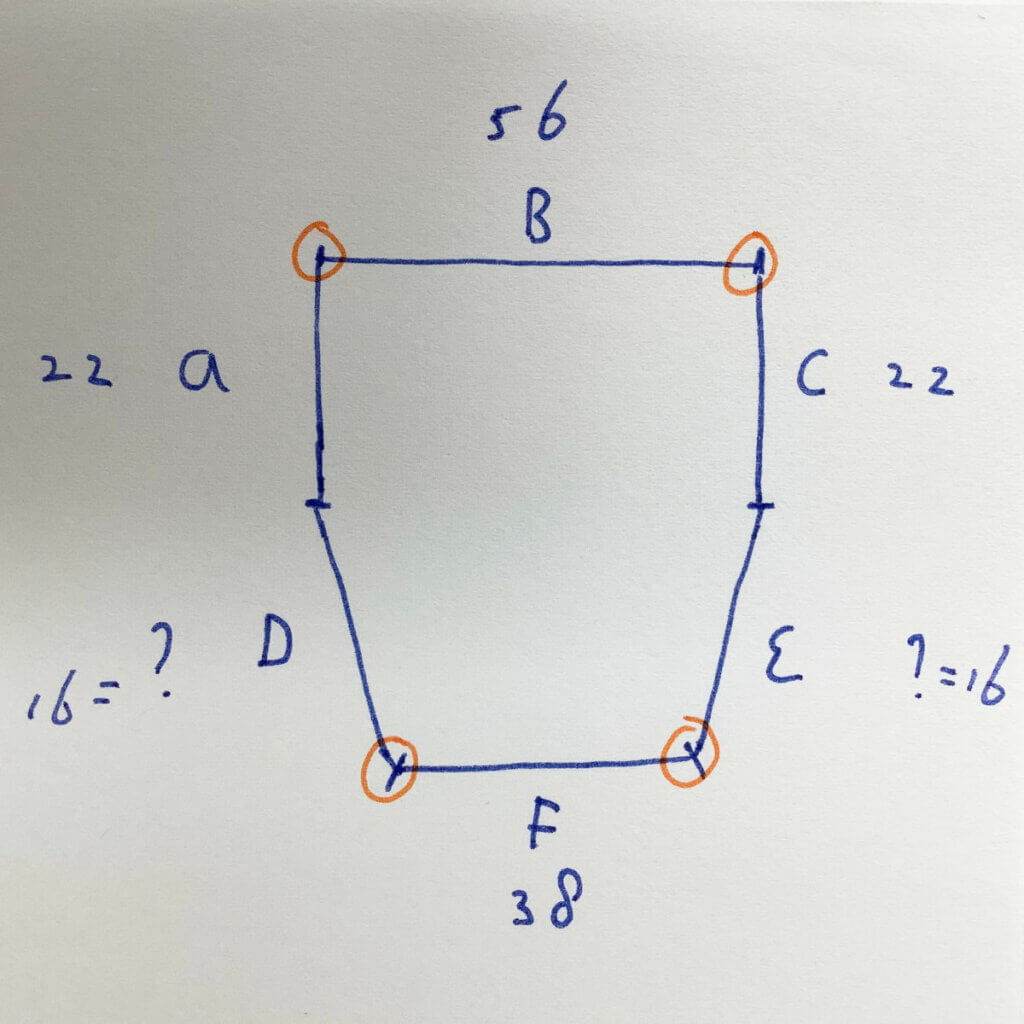
Let’s take a look at how my neckline actually looks when put in a schematic. In the below picture, A en C are the stitches over the shoulders. B is for the back stitches. F for the stitches that were cast on for the horizontal bit of the neckline in the front of the garment. D and E are the diagonal parts of the neckline, where shaping was worked.
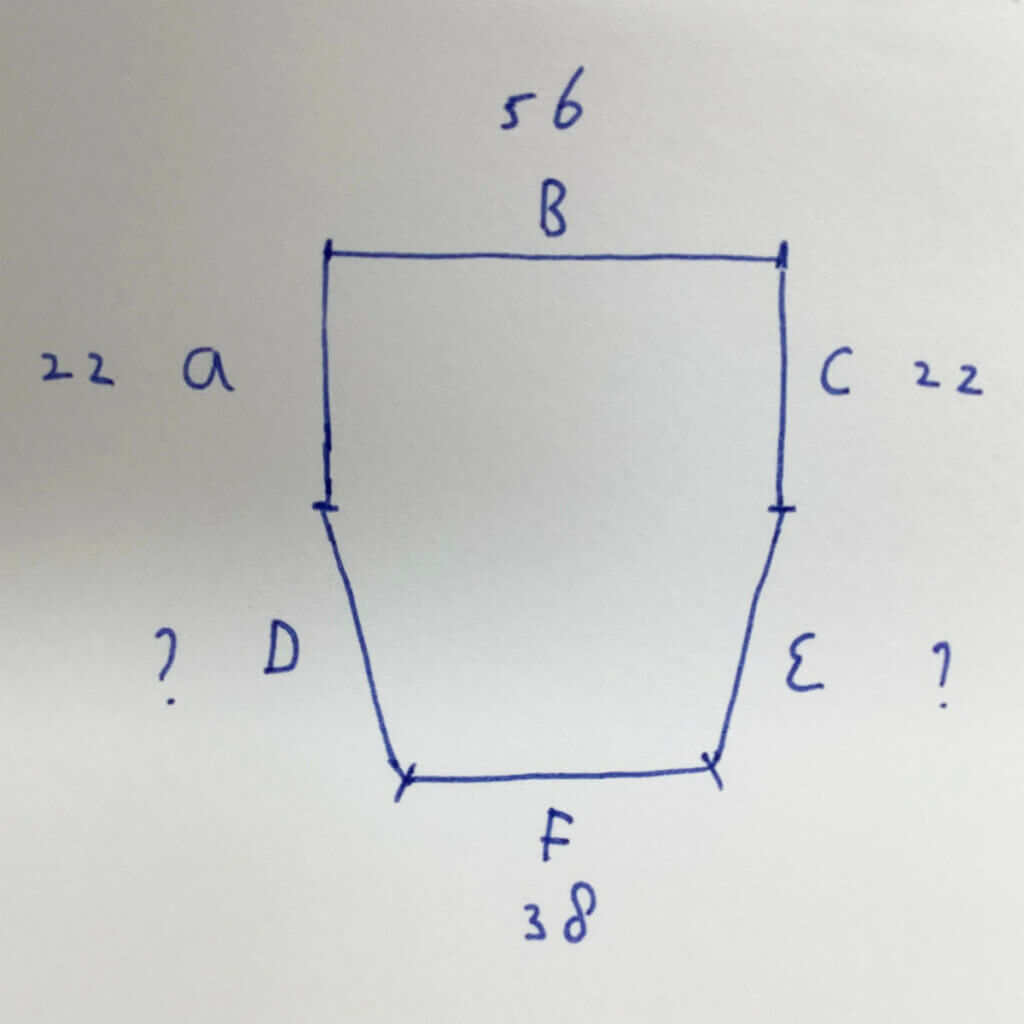
Now we have to take a look at the pattern to see how many stitches are in every section for the size we’re making. The neckband instructions in the pattern may indicate a specific number of stitches to pick up for each section. Alternatively, the pattern may indicate how many stitches to pick up in total. This is often paired with suggested pick-up ratios in each section to help you hit the target number. For my size, my Hay tee pattern instructs me to pick up a total of 162 sts. But how are those to be divided over the various sections?
In my tee, I had to CO 100 sts for A + B +C. A further instruction on the placement of stitch markers gave me the information that my B = 56 sts, and A = C = 22 sts. The instructions for the front yoke CO tell me my F = 38 sts.
But how to deal with D and E?
Pick-up ratio’s
For sections D and E we will have to pick up stitches along the diagonal edge. This means we can’t just pick up every stitch at the edge that we encounter. This is because stitches are usually wider than that they are tall, and there will be more rows than stitches per given length. In other words: picking up every single one would end up in a distorted neckline. That’s where the pick-up ratio’s come in.
If no ratio is specified in the pattern, picking up approx. 2 stitches for every 3 rows or 3 stitches for every 4 rows for stockinette fabric is a good rule of thumb. Do you have a different kind of fabric, or does your gauge differ a lot from the one in the pattern? Then you can easily calculate the ratio by dividing your stitch gauge by your row gauge. Don’t forget to wash and dry the swatch as you would do with the garment before measuring, though, or the results won’t be reliable.
The diagonal edges in my tee
Going back to my tee! My pattern said to pick up 162 sts total, which would mean that I would need to pick up 12 sts for both D and E. However, my gauge is a tad tighter than the pattern was written for. To counter that, I worked more rows in the yoke increase section. This means that for me, it’s a better approach to see how many rows of knitting are actually in the diagonal section and use the rule of thumb to calculate my stitches. I counted 24 rows, using the 2 stitches for every 3 rows ratio, this gives me D = E = 16 sts.
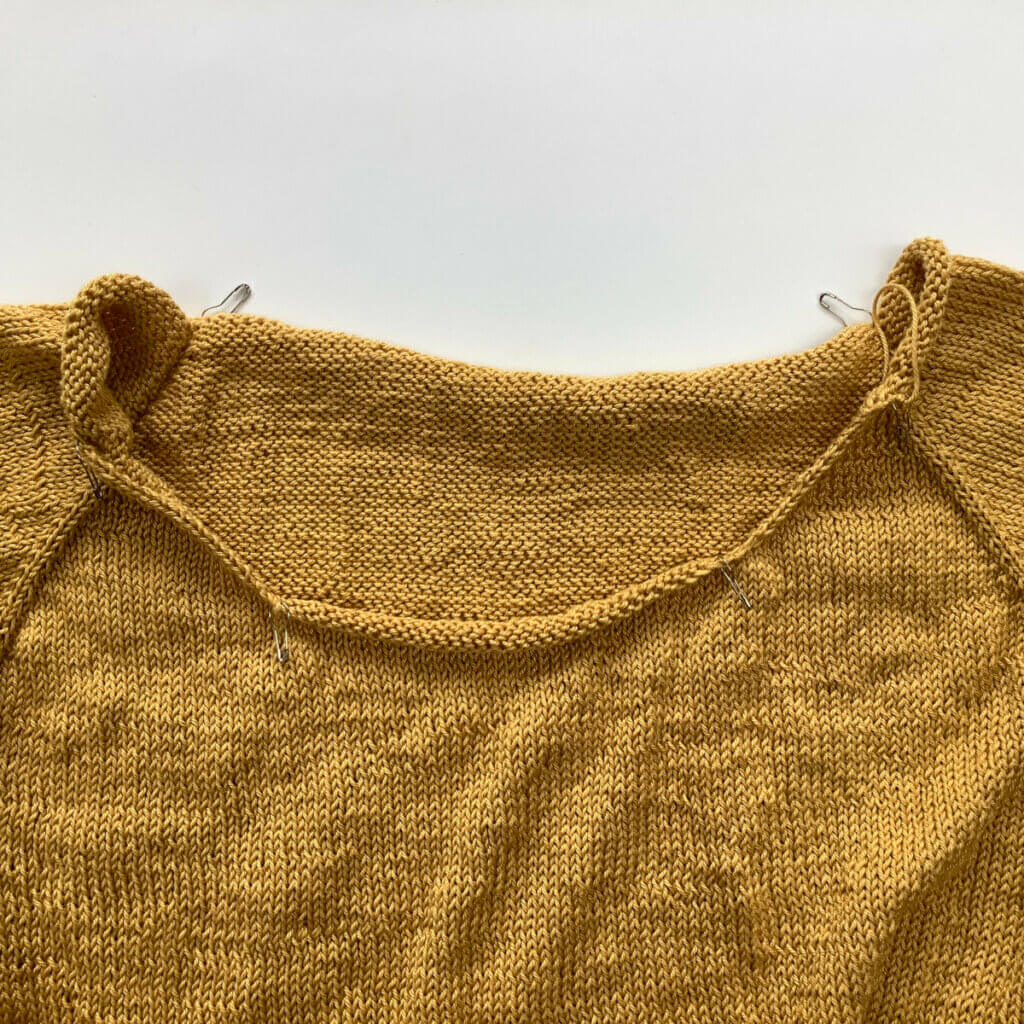
Please note that I also like to pick up stitches in the corners on both sides of the front yoke CO to prevent any gaps there. These I decrease away again on the first round of knitting the neckband.
Now we have the totals of stitches, we should also check to see if we run in any issues with the ribbing. In my case, I’ll be working 1×1 rib, so it works out alright. If you’re working 2×2 rib or another pattern requiring a certain multiple of stitches, you should do the check and adjust if necessary. You can do this by decreasing in one or more of the orange corners indicated above. You can also adjust the pick-up of stitches in the diagonal sections D and E towards the other pick-up ratio to get a number that works better.
Once we have all our numbers, we can go ahead and put the bulb pins or locking stitch markers in place for the various sections.
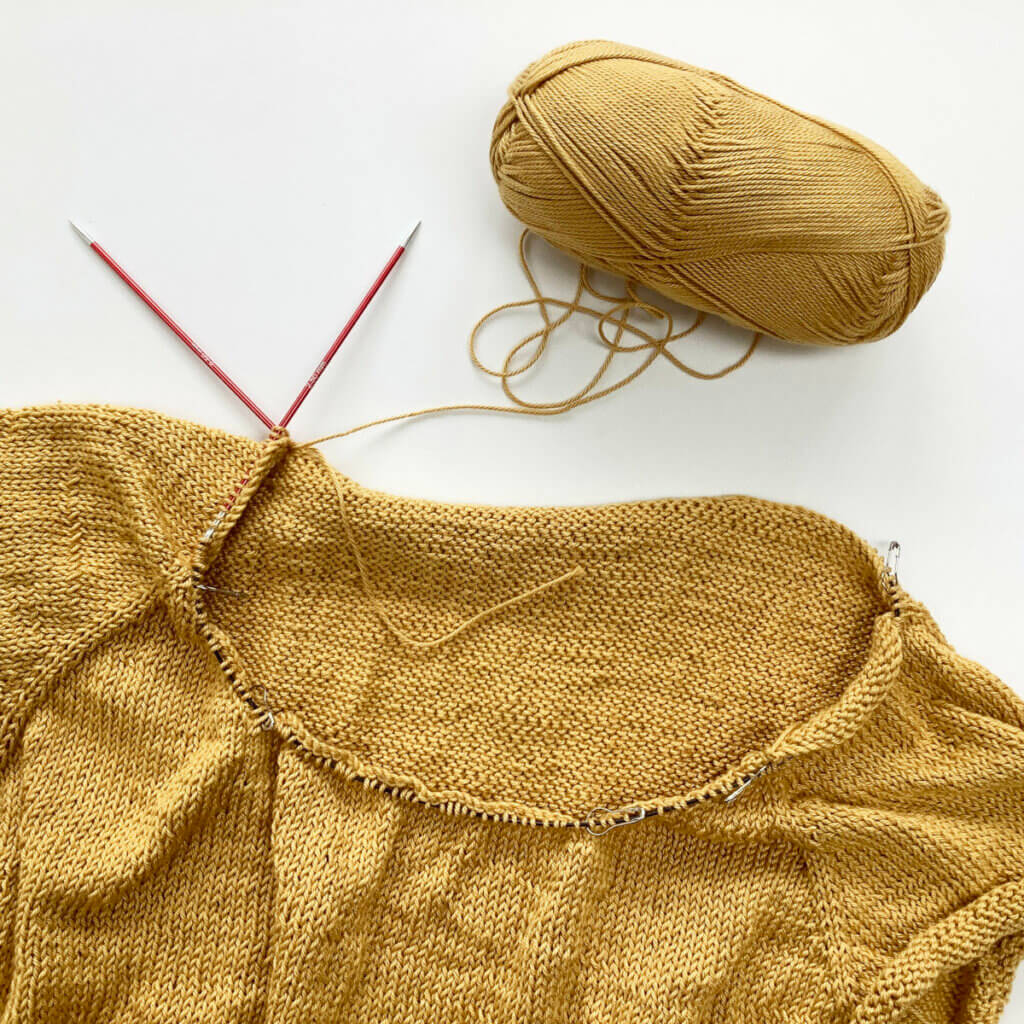
Let’s start picking up those stitches!
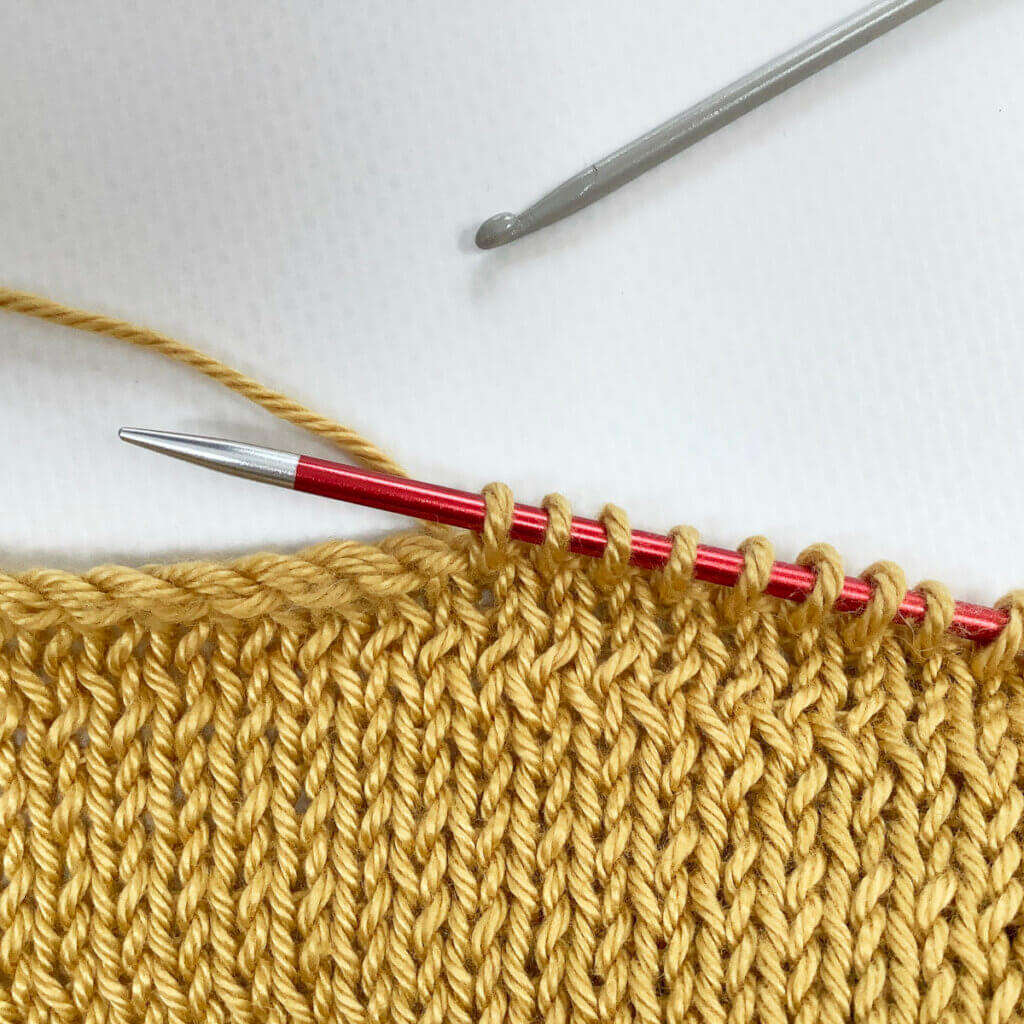
I like to start at the back because it makes it easier to hide the ends that have to woven in later on. Also, it means I can start with an “easy” section, just pick and knit one stitch for every stitch in the CO or BO edge that I encounter. For this, I insert my crochet hook through the center of a stitch below the edge, wrap the working yarn around the hook, pull it through the stitch to the front, then place it on my knitting needle.
You can find a detailed tutorial on doing this without a crochet hook here.
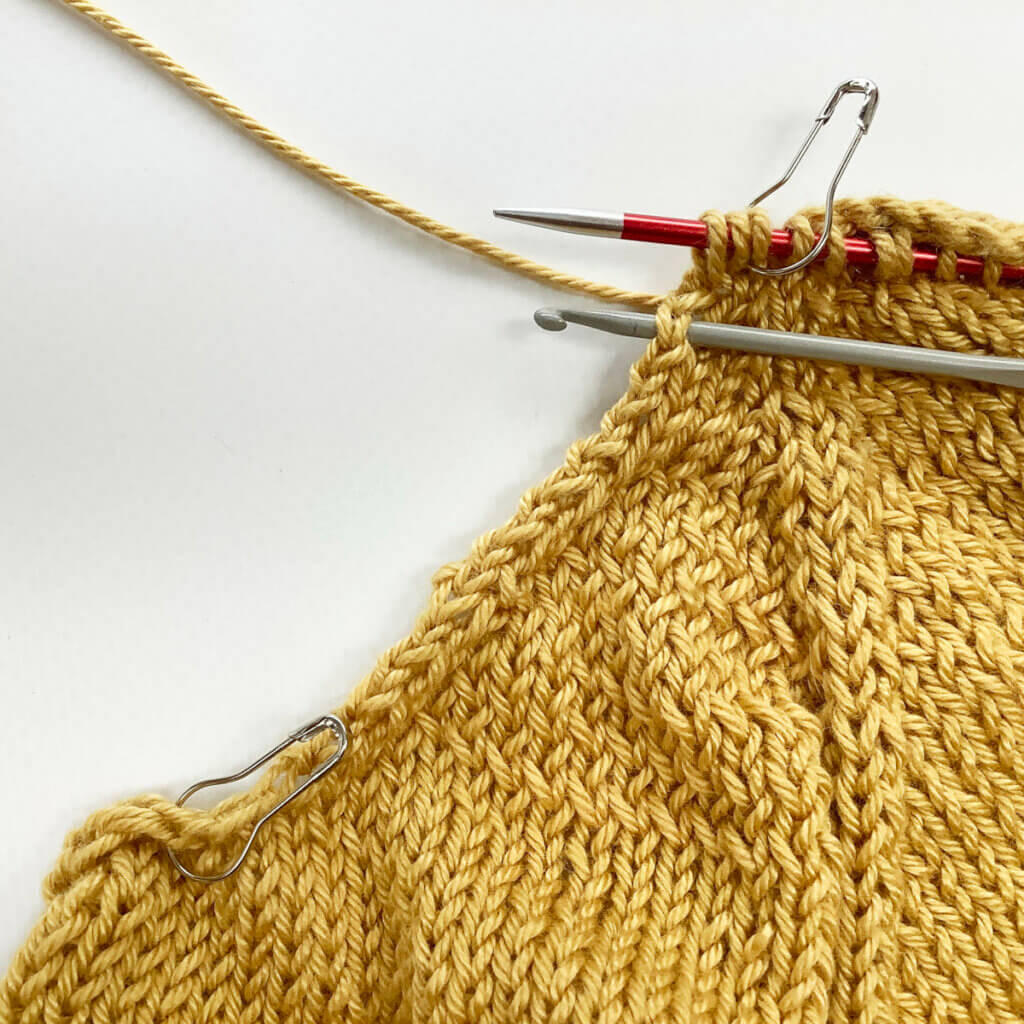
From the back stitches (B) I continue with the shoulder stitches (C). I’m putting the bulb pins on my knitting needle whenever I encounter one. This is also a good point to count the number of stitches picked up in the previous section, to make sure that we’re on track. The bulb pins or stitch markers on the needle form an indication of the transition points between the various neckline sections, and help in keeping track of the stitch count per section.
Next up, is picking up the stitches along the first diagonal edge (E). To do so, insert the crochet hook through the space between the selvedge stitch and the next stitch, wrap the working yarn around the hook, pull it through to the front, and put it on the knitting needle.
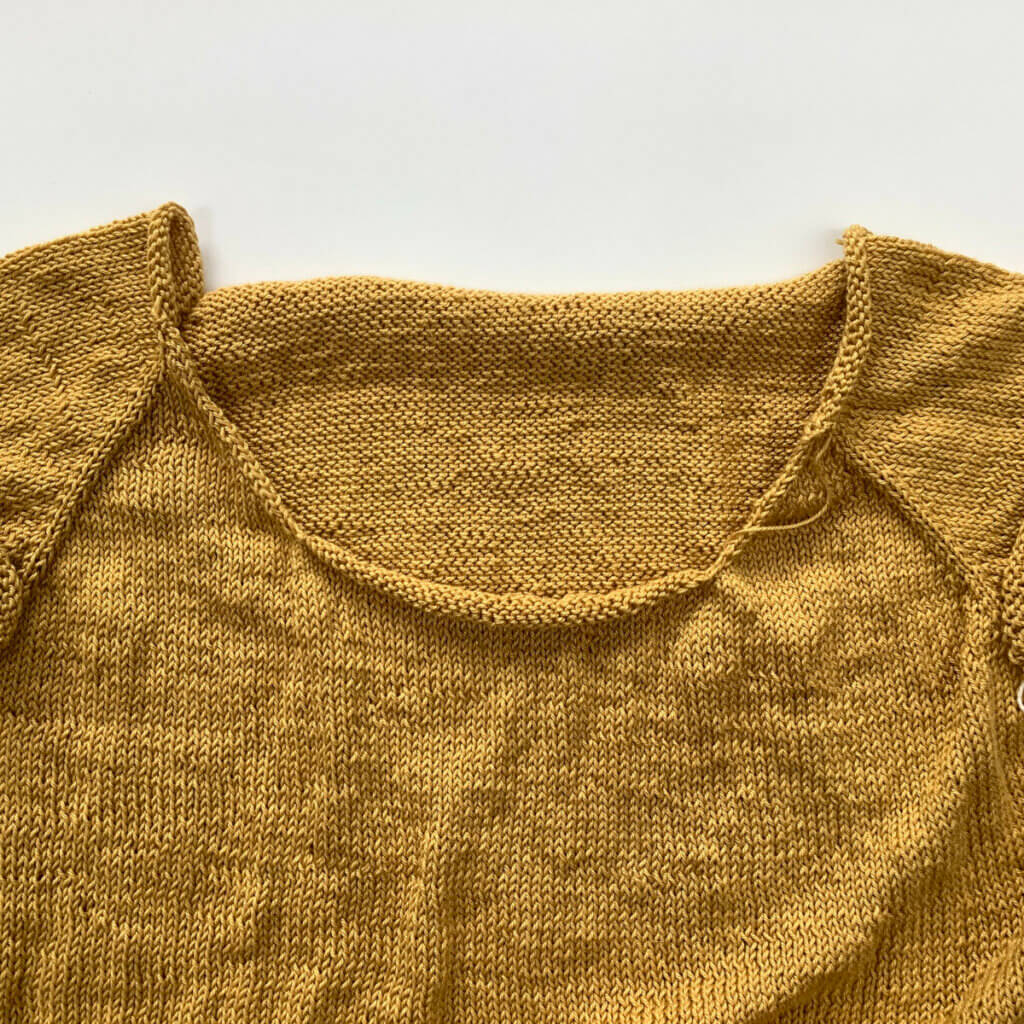
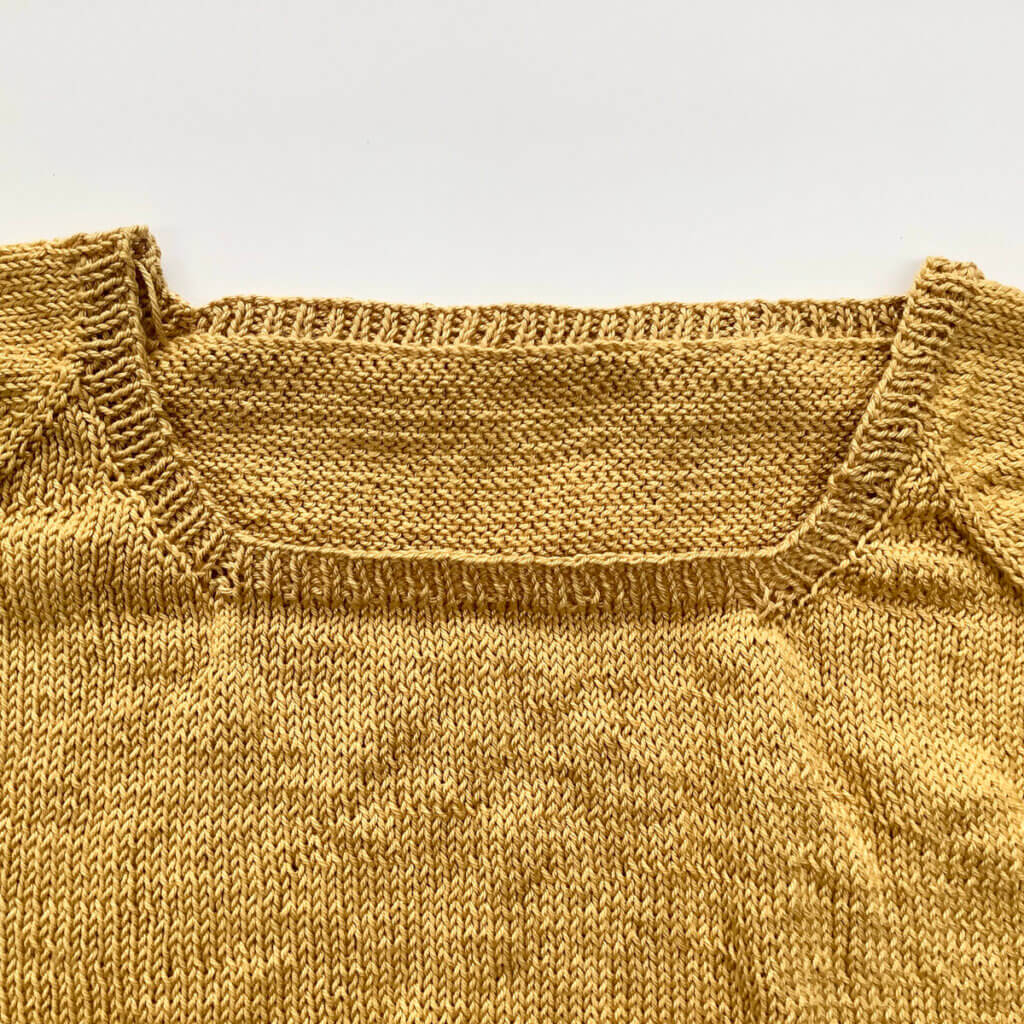
Continue picking up and knitting the stitches along the various horizontal and diagonal sections. The result you can see below, ready to work the neckband!
The result
After working the neckband (in my case in 1×1 rib), not forgetting the decreases in the first round, and working the BO in pattern, this is the result. Please note, both pictures are before blocking!
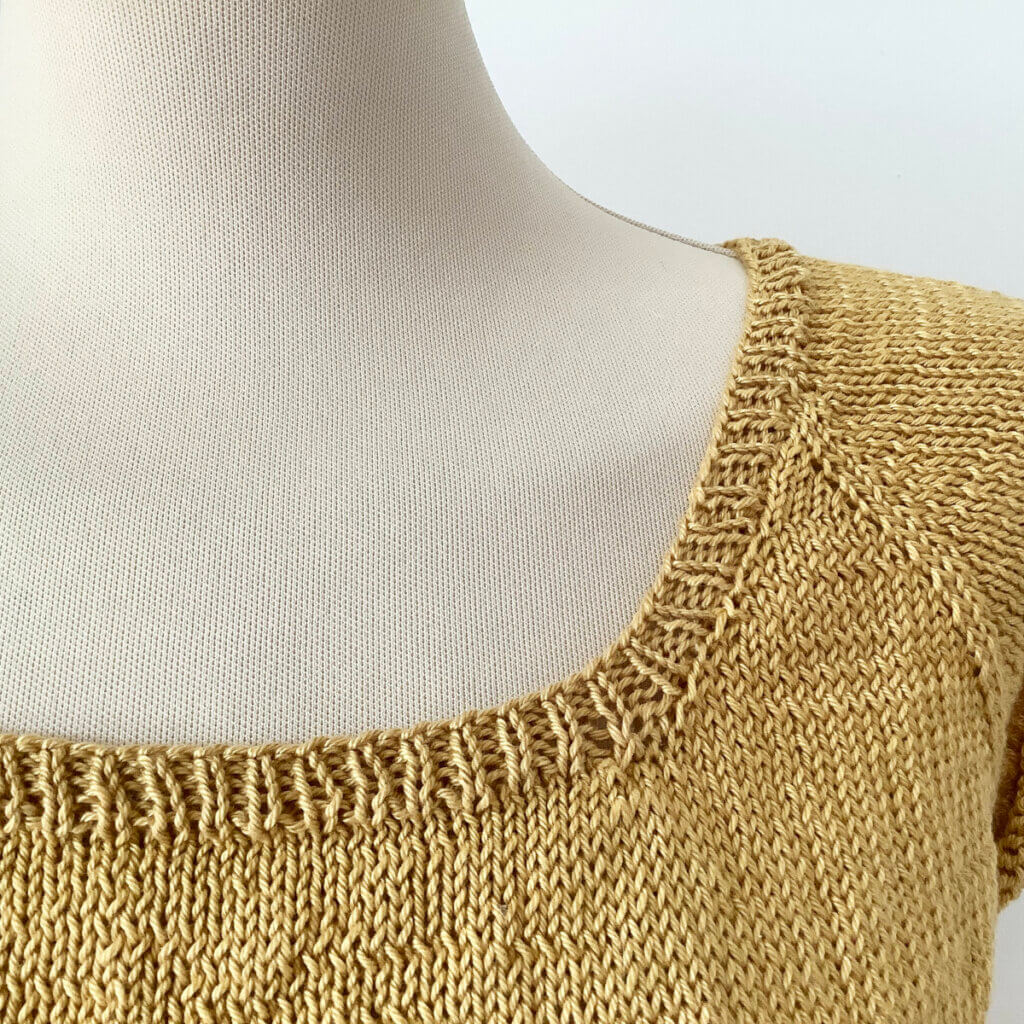
This is how to go about picking up stitches to work a neckline!

Thanks to my Patreon supporters for bringing you this freebie! Creating quality patterns and tutorials is a lot of work and resource-intensive. However, I find it important to give you free content like this tutorial. Thanks to the generous support of my Patreon supporters, I can make it happen. Thank you, patrons! Click here to join, or click here to read more about La Visch Designs on Patreon.


