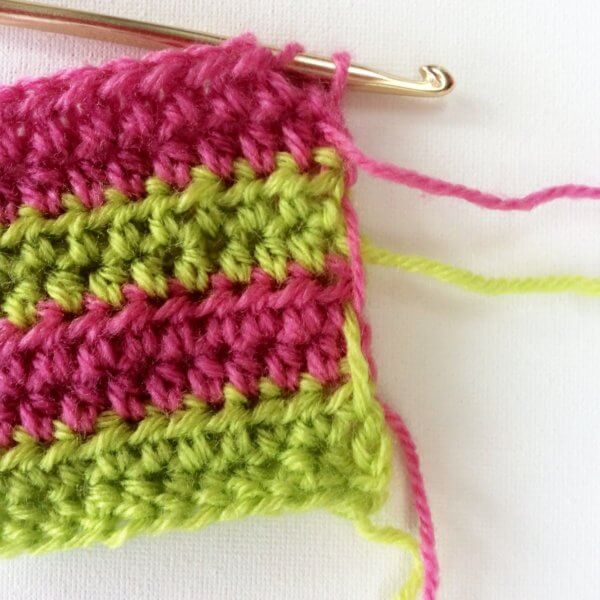
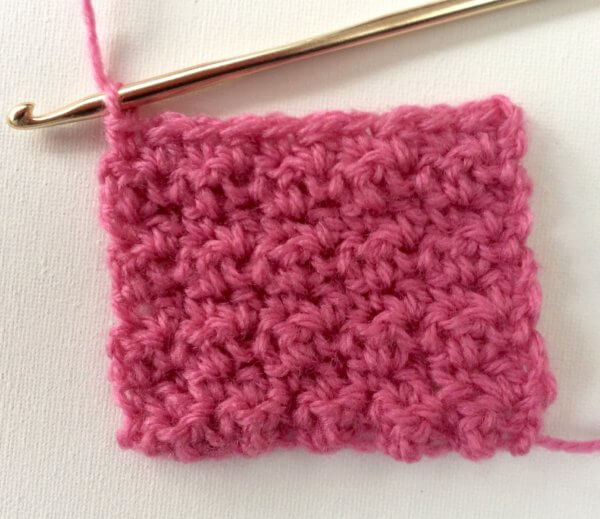
In this post I will show you how to crochet the “seed stitch”. In this stitch single crochet stitches are alternated with double crochet stitches (US crochet terminology!). This gives a really lovely and dense fabric, very suitable for projects like scarves, blankets and bags. Let me show you step by step how it is done.
Seed stitch step by step
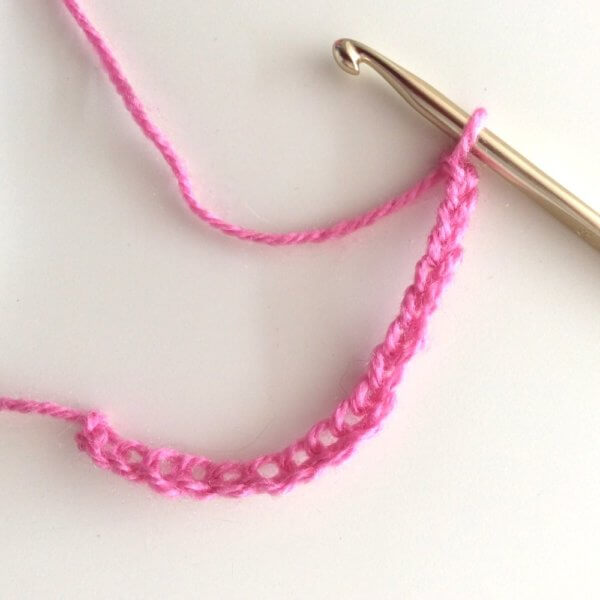
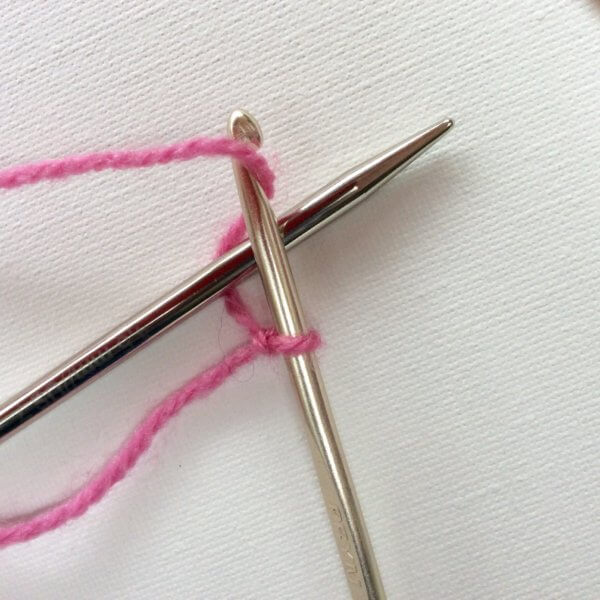
1. Start with a loose chain, when working flat back and forth it doesn’t really matter if you start with an even or odd number of chain stitches. If you will however be working in the round, start with a multiple of 2 + 1 turning chain. In this example, I started with a chain of 12.
2. Turn and make 1 single crochet in the second stitch from the hook. In this example, I made my stitch in the back of the chain, instead it can of course also be made in one of the other parts of the chain.
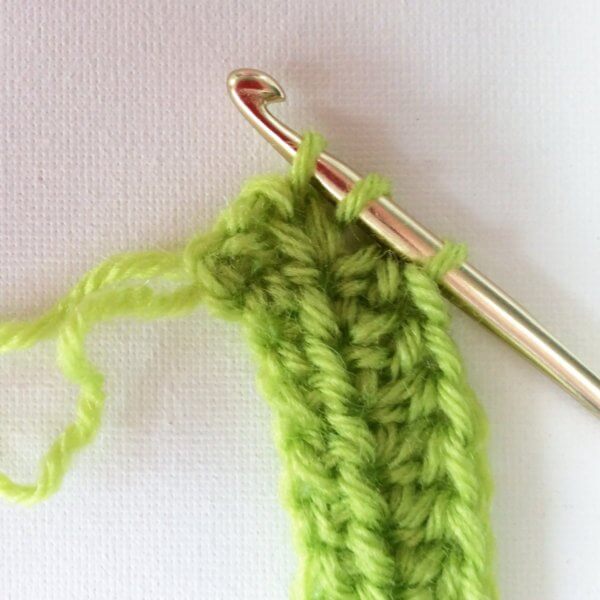
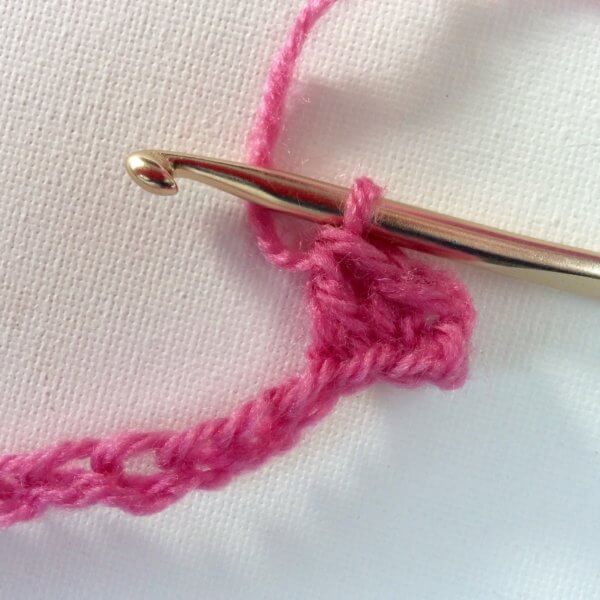
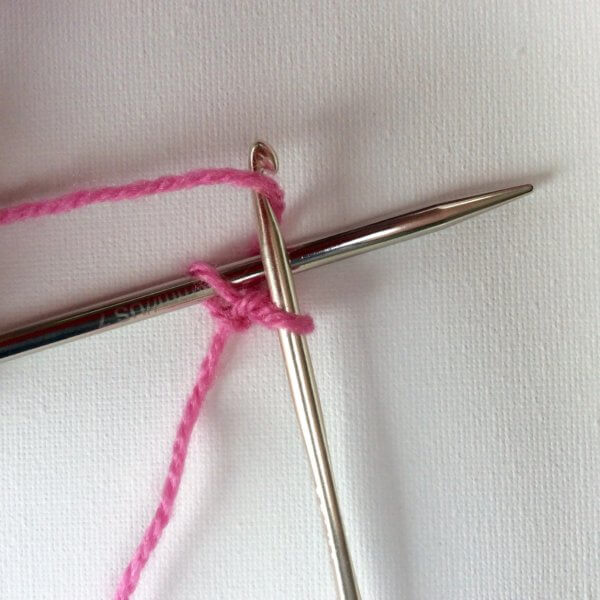
3. Make 1 double crochet in the next stitch.
4. Make one single crochet in the next stitch.
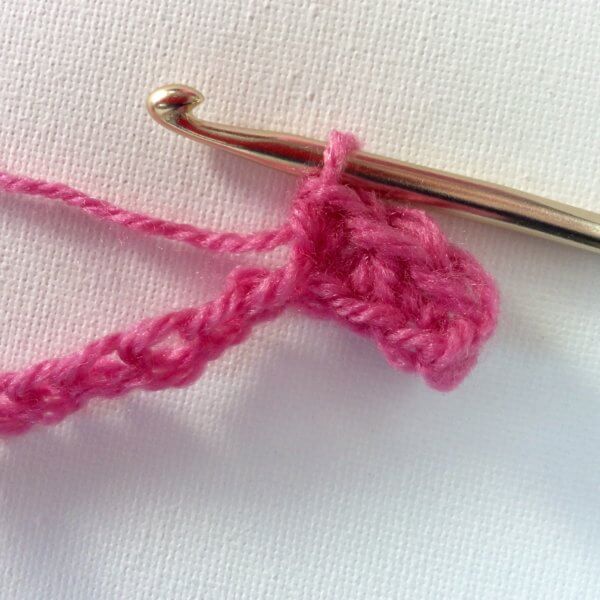
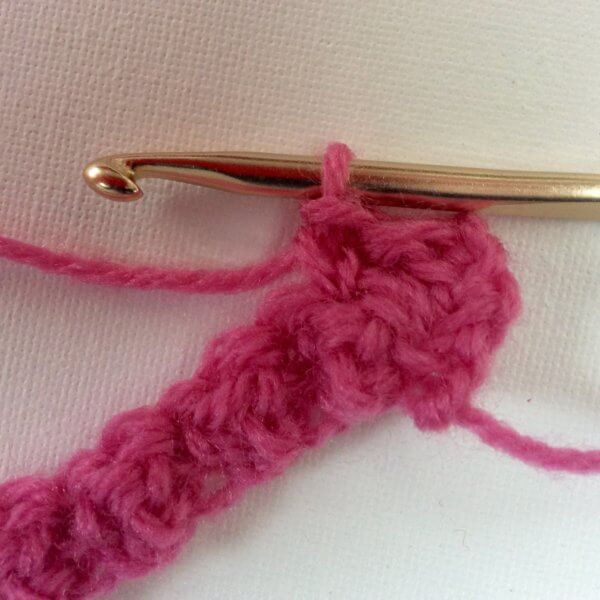
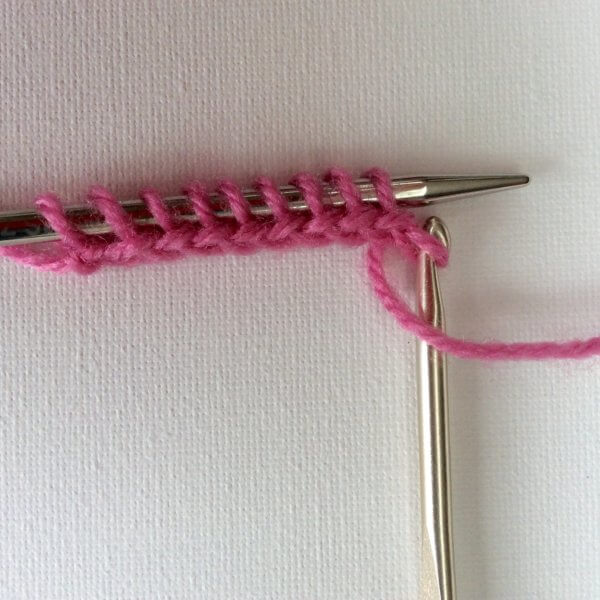
5. Repeat steps 3 and 4 until the end of the row.
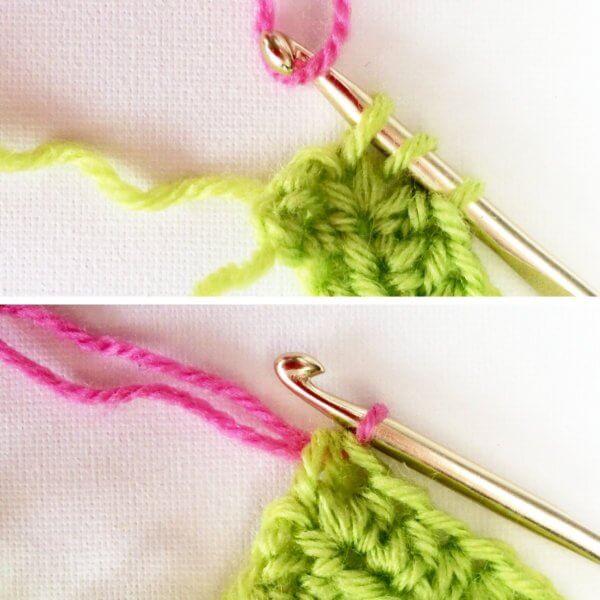
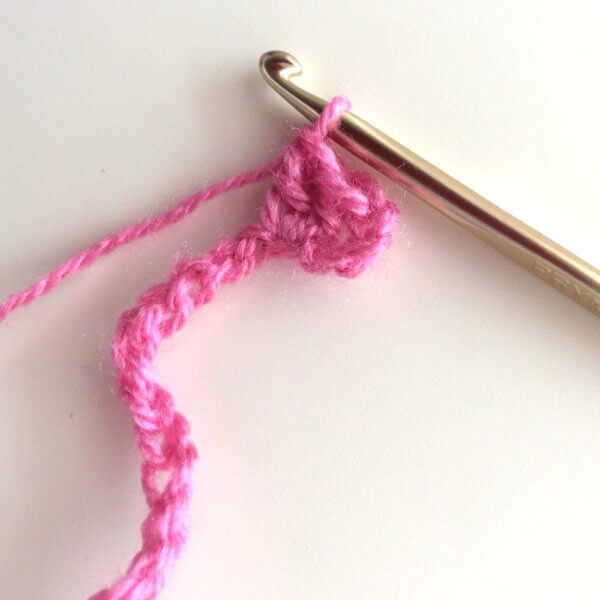
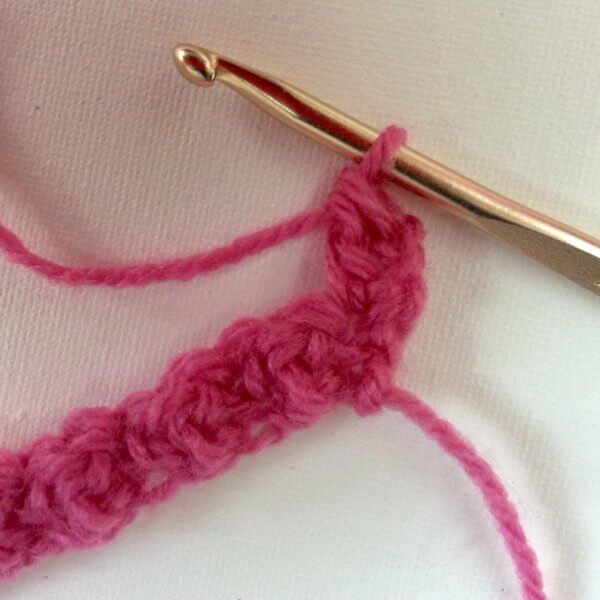
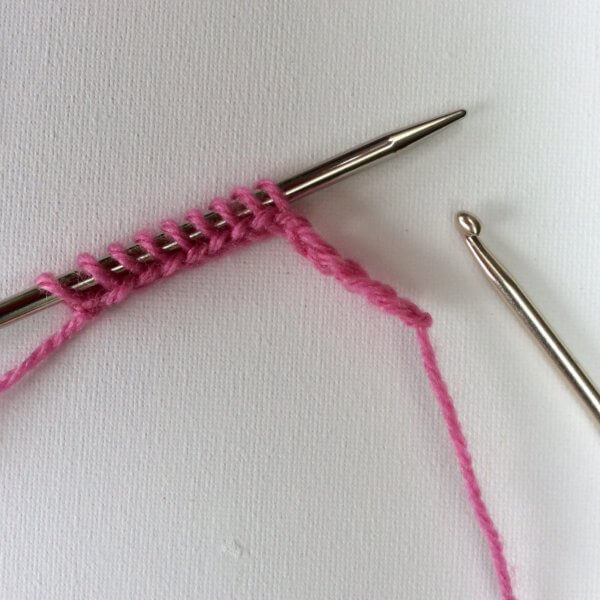
6. In this example, I ended the previous row with a single crochet. The new row will therefore start with 2 turning chains, followed by a double crochet in the first . If your previous row ended with a double crochet, the new row would begin with 1 turning chain, followed by a single crochet in the first stitch.
7. Work 1 single crochet in next stitch, or (if your previous stitch was a single crochet) 1 double crochet.
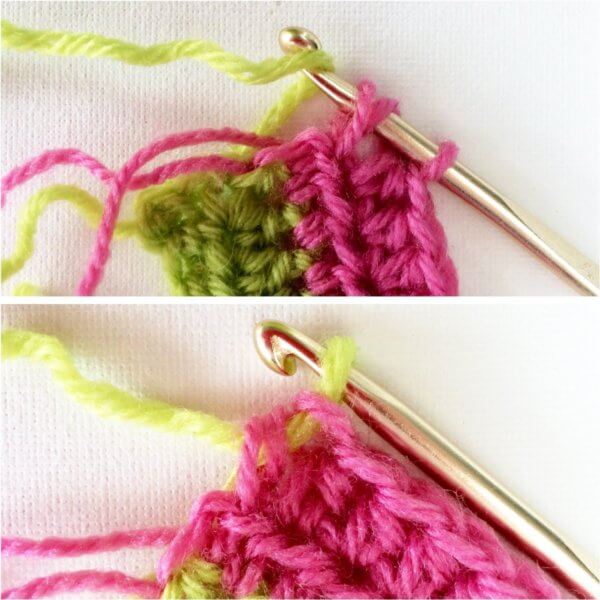
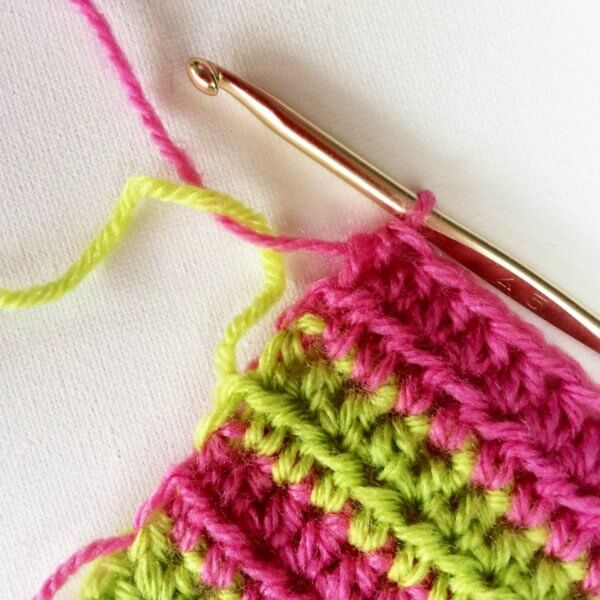
8. Continue the row by alternating double crochet stitches with single crochet stitches. Please note, that you always crochet a double crochet in the single crochet of the previous row. Similarly, if the stitch of the previous row was a double crochet, you are making a single crochet into it.
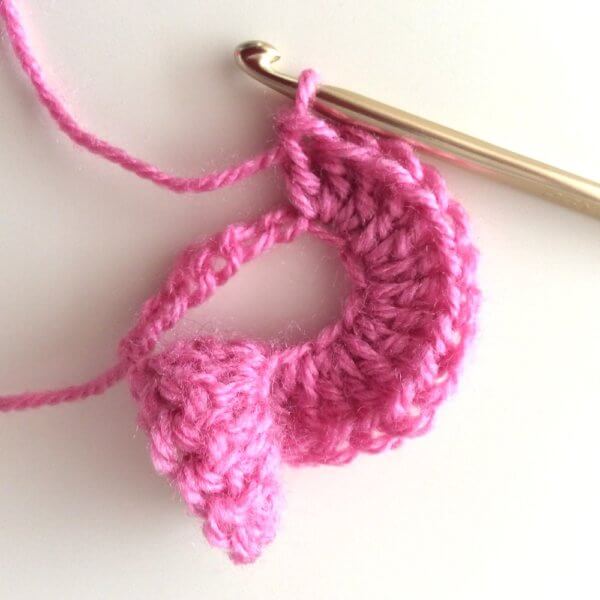
9. Repeat steps 6 to 8 until your piece has the desired size.
A provisional cast on is a way to make it possible to “release” the initially cast on stitches and knit with them in the other direction of the piece. This can be very useful, for example when knitting a completely symmetrical stole. Most cast ons have a different look than the bind off, but when completely avoiding a visible cast on, both ends will have exactly the same bind off look.
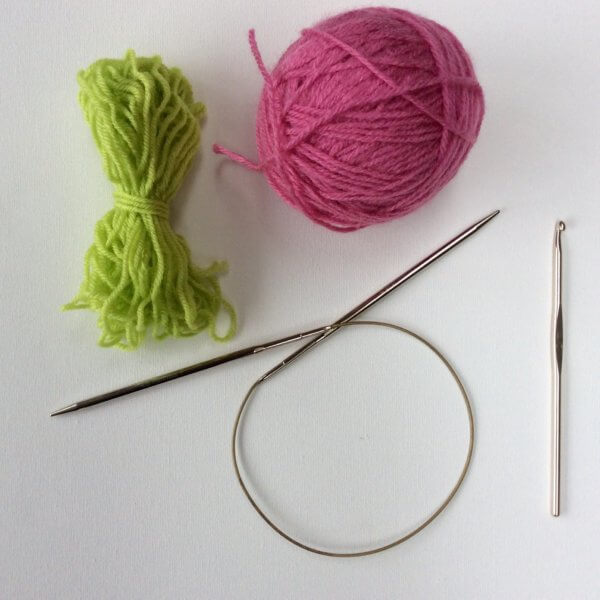
I really like the crochet provisional cast on, because it is also very simple and can be undone quickly. Besides the yarn for your project, you will also need a length of (smooth) waste yarn in a contrasting color and a crochet hook.
Crochet provisional cast-on step by step
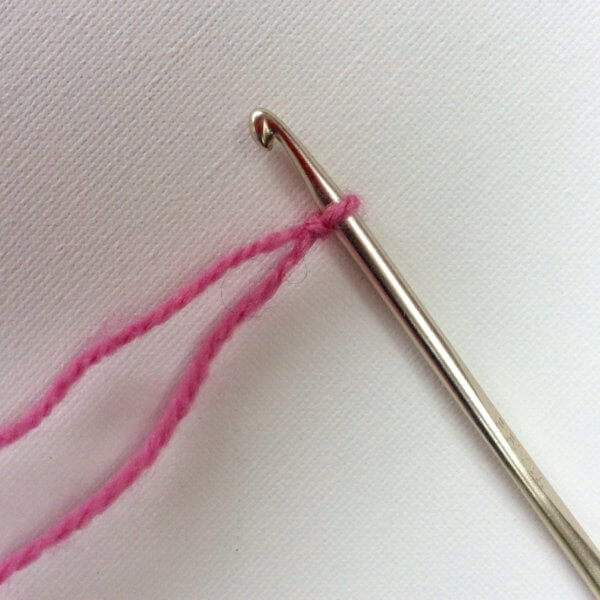
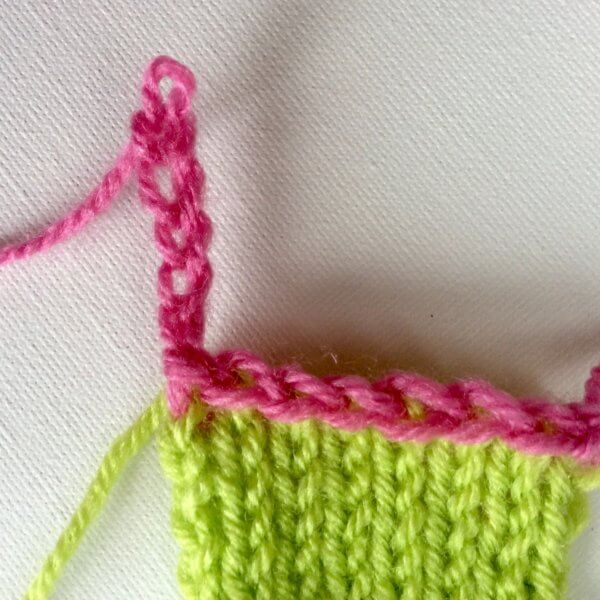
1. Make slipknot with the waste yarn (pink in the example) and place it around the hook.
2. Get your knitting needle and put it on the piece of yarn as pictured and pull up a loop through the loop on the hook. This is actually pretty similar to crochet a slip stitch around the knitting needle.
3. Wrap the yarn around the knitting needle again and make another slip stitch around the needle.
4. Repeat this until you have made the desired number of stitches (loops) on the knitting needle.
5. Next, crochet a small chain of about five stitches, break the yarn and pull the yarn tail through the last stitch.
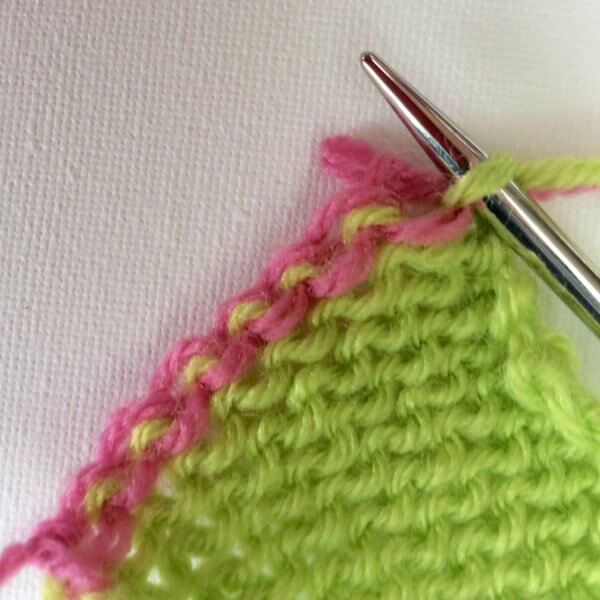
Now you can start your knitting project with the good yarn, using the temporary stitches on the needle. In the example after the temporary set-up I started with a small swatch of green.
Undoing the crochet provisional cast-on
The whole idea of a provisional cast on is of course that this is a temporary cast on. In the next couple of steps I will show you how to undo the cast on and free up the stitches for further knitting.
6. The side where you have created the crocheted chain, is the beginning. Loosen the yarn tail again and gently pull out the stitches of the chain.
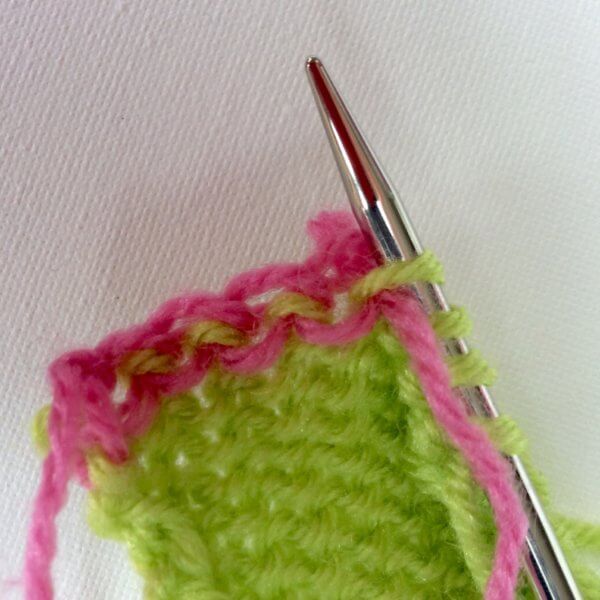
7. Once a stitch of the project itself is released, catch it with your knitting needle. Note: In this example, I catch the stitches from the wrong side of the work from bottom to top. This releases the stitches in such a manner that their orientation on the needle will be twisted. If you catch the stitches from top to bottom instead, the orientation of the stitches will be as usual.
8. Pull for each stitch the waste yarn a bit more out of the work.
9. The last stitch might look like a weird half kind of stitch. Count your stitches to be sure that you have the correct number.
Now you can continue knitting on this side of the piece! Take care to see whether the stitches are positioned normal or twisted:
Left in this picture is the regular orientation, on the right, there is a twisted stitch on the needle. This is no problem though: Just knit (or purl) the twisted stitch through the back loop to untwist the stitch mount.
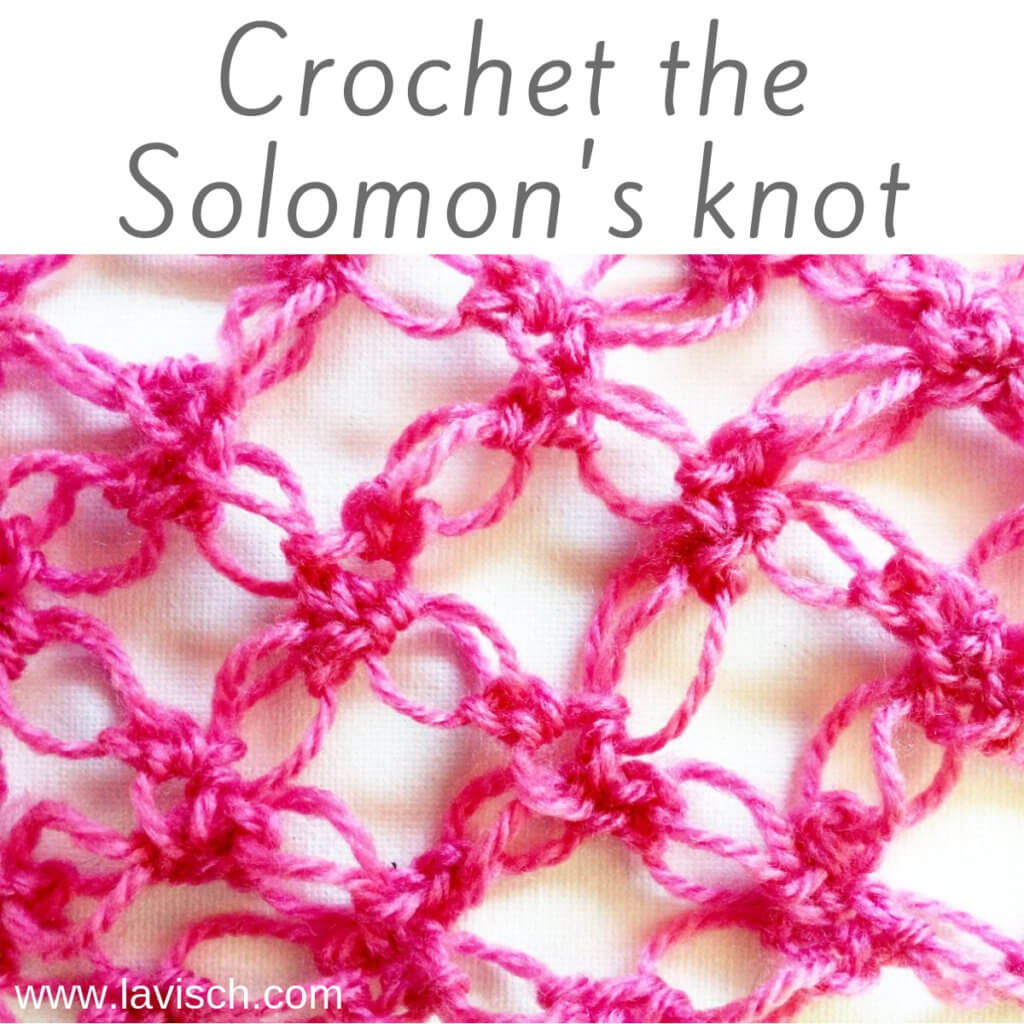
In this post, I want to introduce you to a very lovely crochet stitch: The Solomon’s knot stitch. This particular crochet stitch is also known as the “Lovers Knot.” This stitch is ideal for scarves and shawls with an open and airy structure.
The Solomon’s knot stitch gives a beautiful result when worked in a very thin yarn, as well as when it is made in a thicker yarn. And because the stitch is very “airy”, it also gives very quick results. Perfect for when you need a last minute present!
Do not be put off by the many steps, this stitch is easier than it seems!
Solomon’s knot step by step
In this example, I used a relatively thick acrylic yarn, to be able to show you well how to work it. However, as said, the result is also very nice when using a very thin and light fluffy yarn like a kid-silk type yarn. These instructions are written in American English crochet terminology.
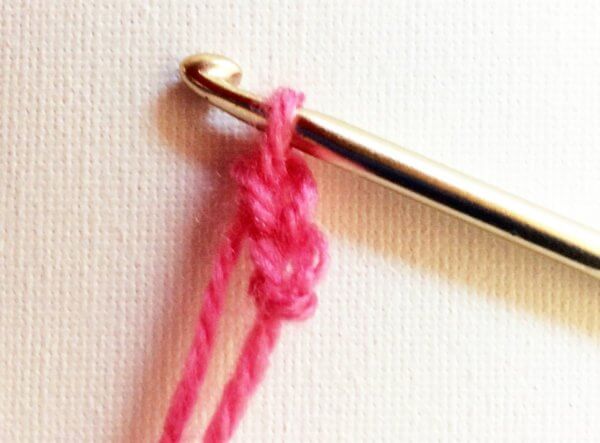
Row 1
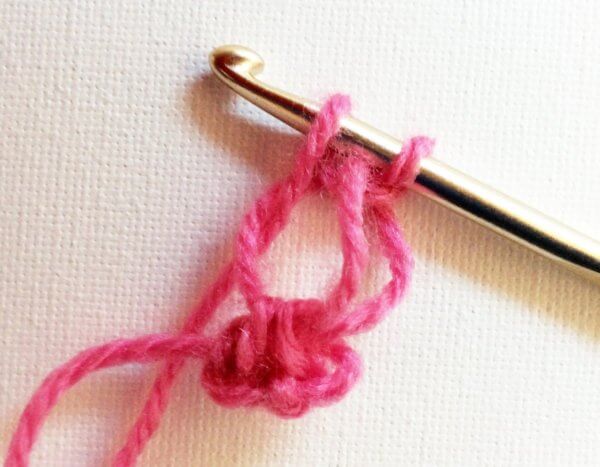
1. Crochet 2 chains.
2. Make a single crochet in the first stitch of the chain. Insert your hook under both loops of this first stitch.
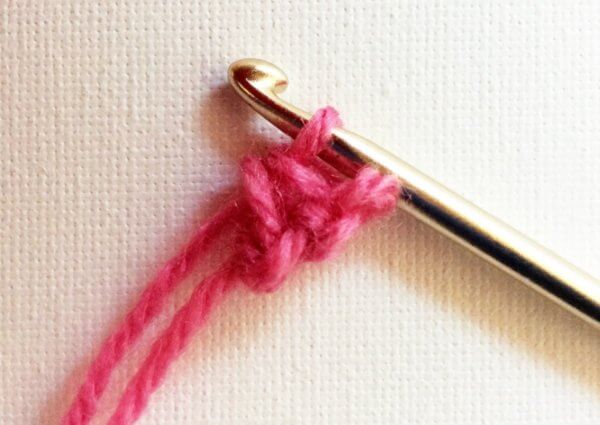
3. Make the loop on the hook bigger, with this it is important to maintain a constant size. I used my finger to assist with this. Next, make a yarn over and loosely pull up a loop through the enlarged loop.
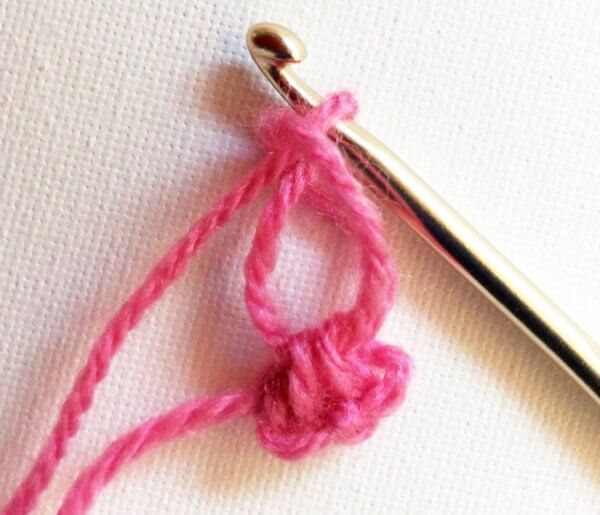
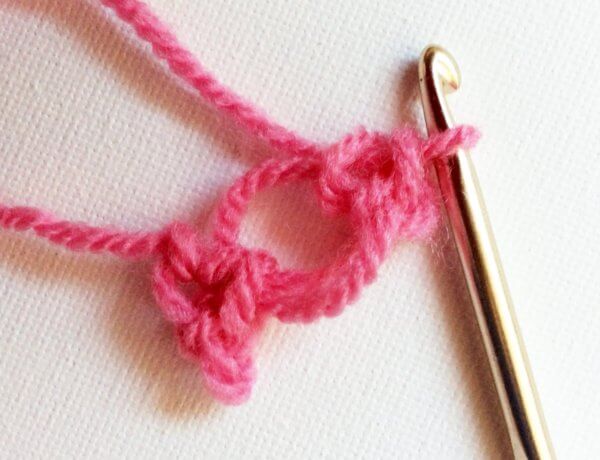
4. Insert the hook from front to back through the enlarged loop you just created. Yarn over and pull up a loop through the first loop on the hook. You now have two loops on your hook.
5. Again make a yarn over and pull through both loops on the needle. You have now created one elongated loop.
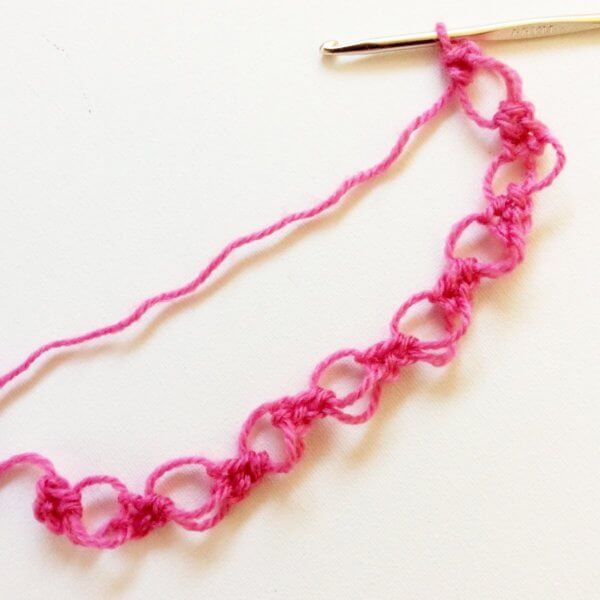
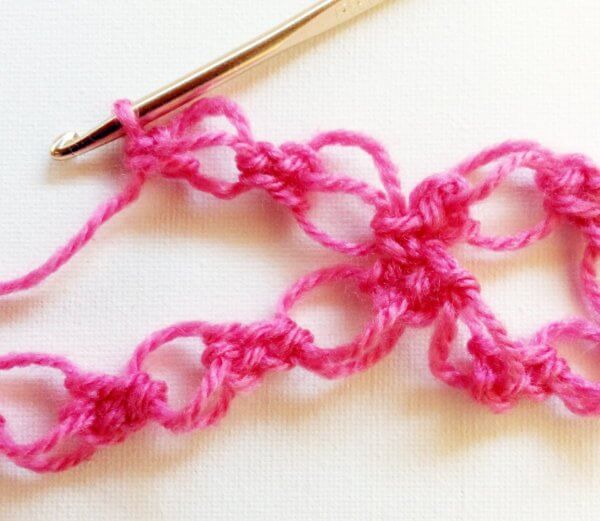
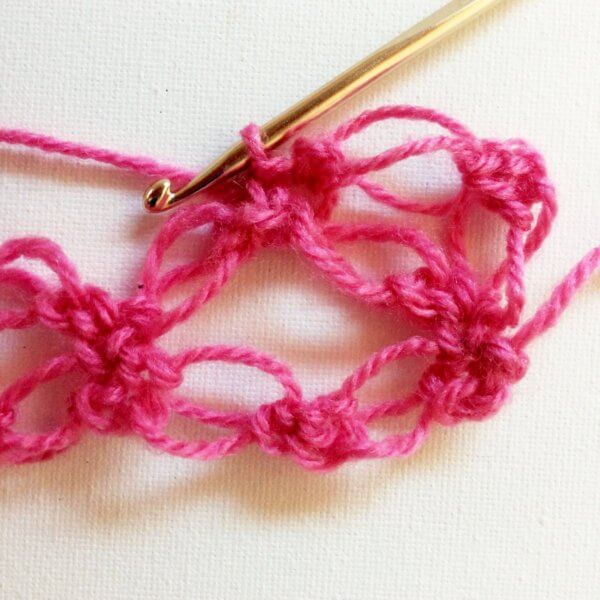
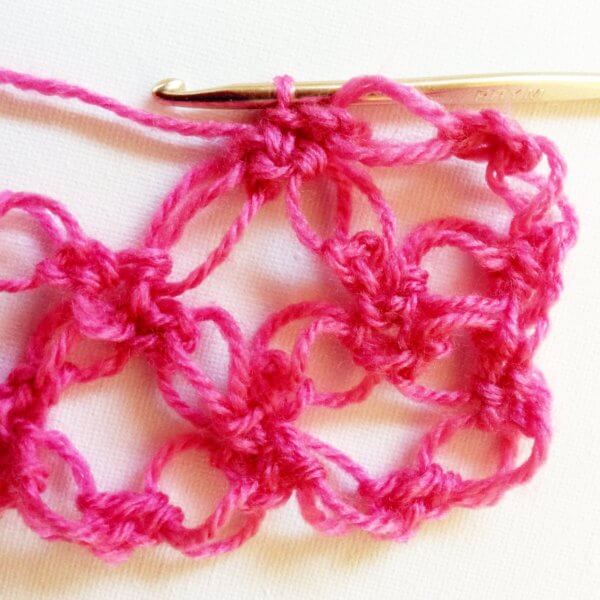
6. Repeat steps 2 to 5 for a multiple of 2 + 3 times. When starting with Step 2, insert the hook in the single crochet (the “knot”) that has been made last. In this example, I repeated steps 2 to 5 for a total of 7 times.
Row 2
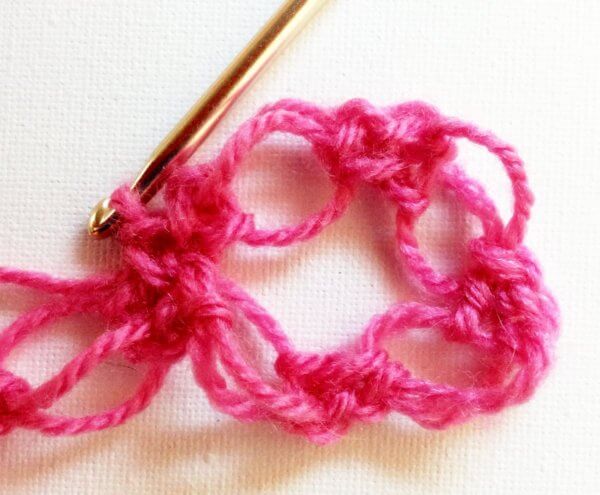
7. Turn piece, skip the first four knots, insert the needle in the middle of the next knot (the fifth from the hook) and make 1 single crochet.
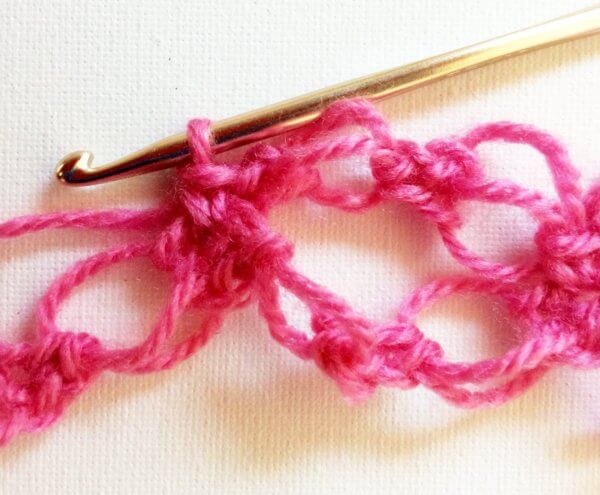
8. Make 2 elongated loops by working steps 3 to 5 as before, followed by steps 2 to 5 once more.
9. Skip 1 knot, insert the hook in the middle of the next knot and make 1 single crochet.
10. Repeat 8 and 9 until the end of the row, finish with 1 single crochet in the last knot.
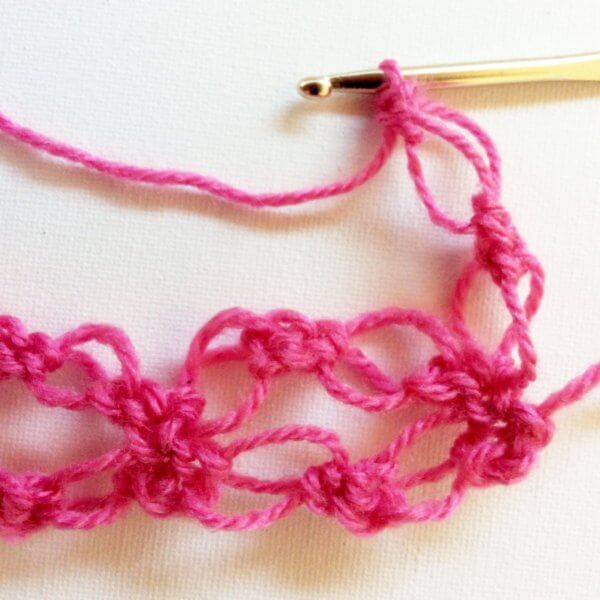
Row 3
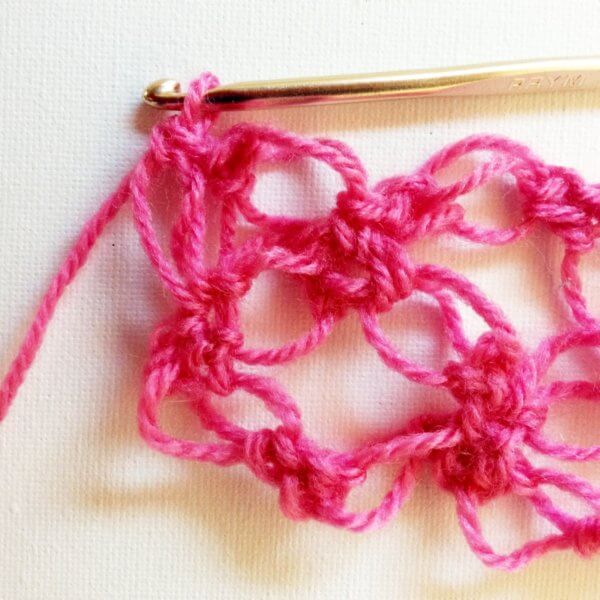
11. Make 2 elongated loops by working steps 3 to 5 as before, followed by steps 2 to 5 once more. Turn the piece.
12. Make 1 single crochet in the next knot.
13. Make 2 elongated loops by working steps 3 to 5 as before, followed by steps 2 to 5 once more. Skip 1 knot, insert the hook in the middle of the next knot and make 1 single crochet. Repeat this until the last knot of the previous row.
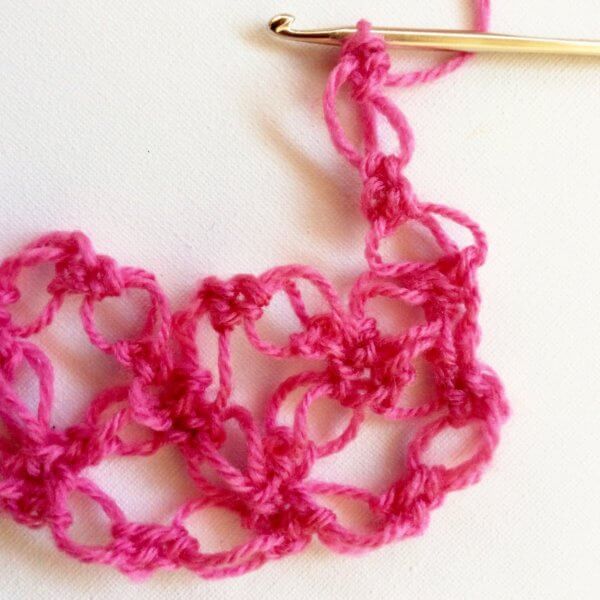
14. Make 2 elongated loops by working steps 3 to 5.
15. Then insert the hook into the knot of two rows below and make an extended loop. Then, make a yarn over and loosely pull up a loop through the enlarged loop. Next, repeat steps 4 and 5.
Row 4
16. Make 2 elongated loops by working steps 3 to 5 as before, followed by steps 2 to 5 once more. Turn the piece.
17. Skip 1 knot and crochet 1 single crochet in the next knot.
18. Repeat steps 16 and 17 until the end of the row, and finish the row with 1 single crochet in the last single crochet/knot.
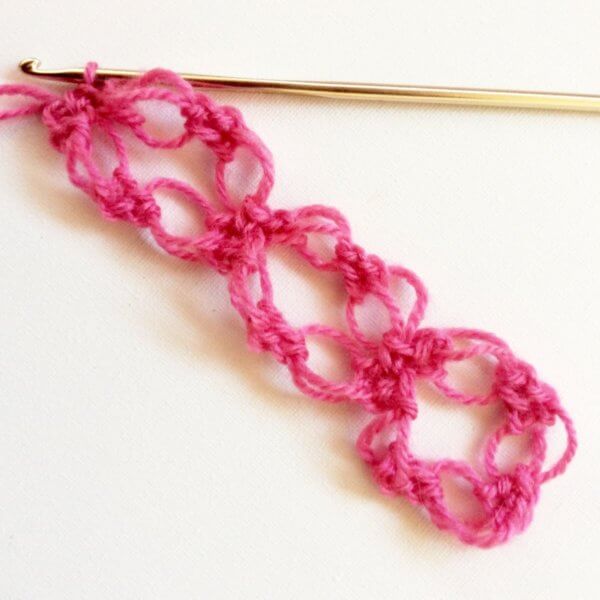
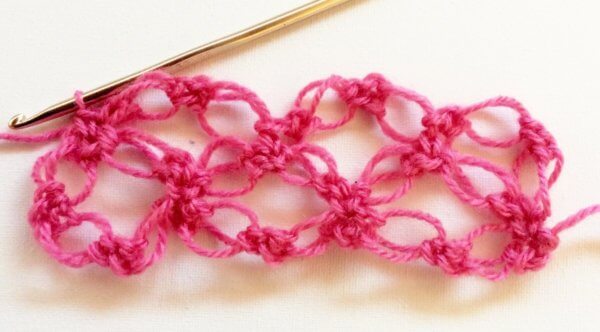
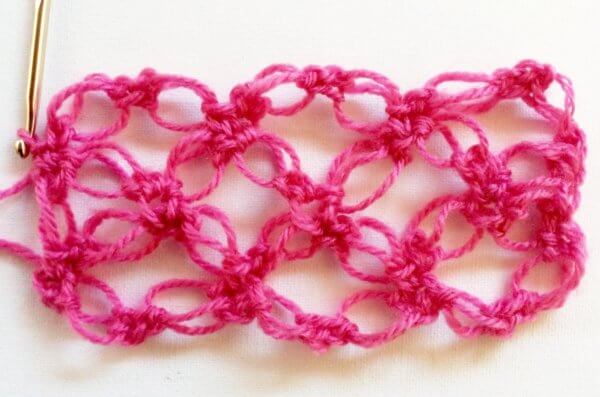
Repeat rows 3 and 4 until your work has the desired height.
And this is how to work the Solomon’s knot stitch!
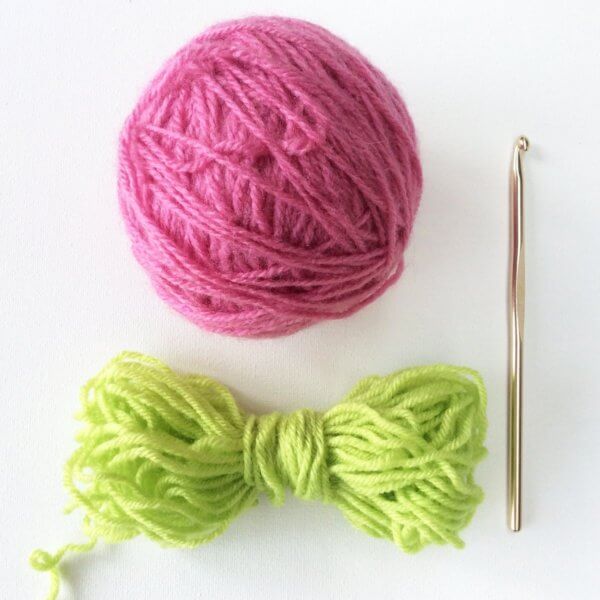
Making stripes is the simplest way to use color in your project. This way you can give it that little bit extra. This works especially well with a simple stitch pattern, such as single crochet, half double crochet and double crochet. But what are the things to pay attention to when making stripes in crochet?
In this post, I will tell and show you some things with respect to striping technique in crochet. Please note that American crochet terminology is used in this tutorial.
Changing colors the tidy way
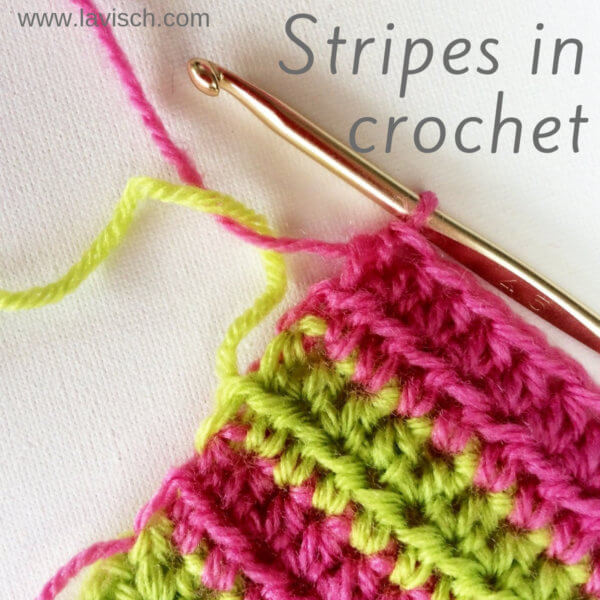
When you crochet your rows as usual and switch colors after completion of a row, you will see that a bit of the old color appears in the new row. To prevent this, do the following:
1. Crochet to the very end of your row, but do not complete the very last stitch. In this example of hdc fabric, it means that I have three loops left on the hook and have not finished this last stitch by pulling the yarn through these stitches.
2. Next, pick up the yarn in your other color and pull through the last loops to complete the stitch.
Stripes in crochet without breaking your yarn
Weaving in ends is something most people do not find pleasure in. Therefore, it is good to know that it is also possible to crochet stripes without breaking the yarn. To do this, you just let the yarn in the color you are not using for that stripe alongside the edge of the work. This method works best with an even number of rows and using only two colors.
1. Work as usual until the end of your row, but do not complete the final stitch as described above. Pick up the other colored yarn from the side of the work, where you left it. Finish the last stitch with the new color. Make sure not to pull this thread too tight!
2. In the case of a wider stripe, you do not want your contrast color yarn to form a long loop on the edge of your piece. To avoid this, do the following: Whenever both colors of yarn are on the same side of your work, you twist them. This “catches” the thread of contrasting color behind that of the color where you are currently working with.
3. When switching to another color, do it the same way as described above under 1.
And this is how to work stripes in crochet!
One last tip: Only crochet stripes without breaking the yarn if the stripes are not too wide. With wider stripes, it can be difficult to keep the tension of the thread running along on the side just right. Often it just gets too tight or too loose. The result in these cases is usually better if you indeed just break the yarn.
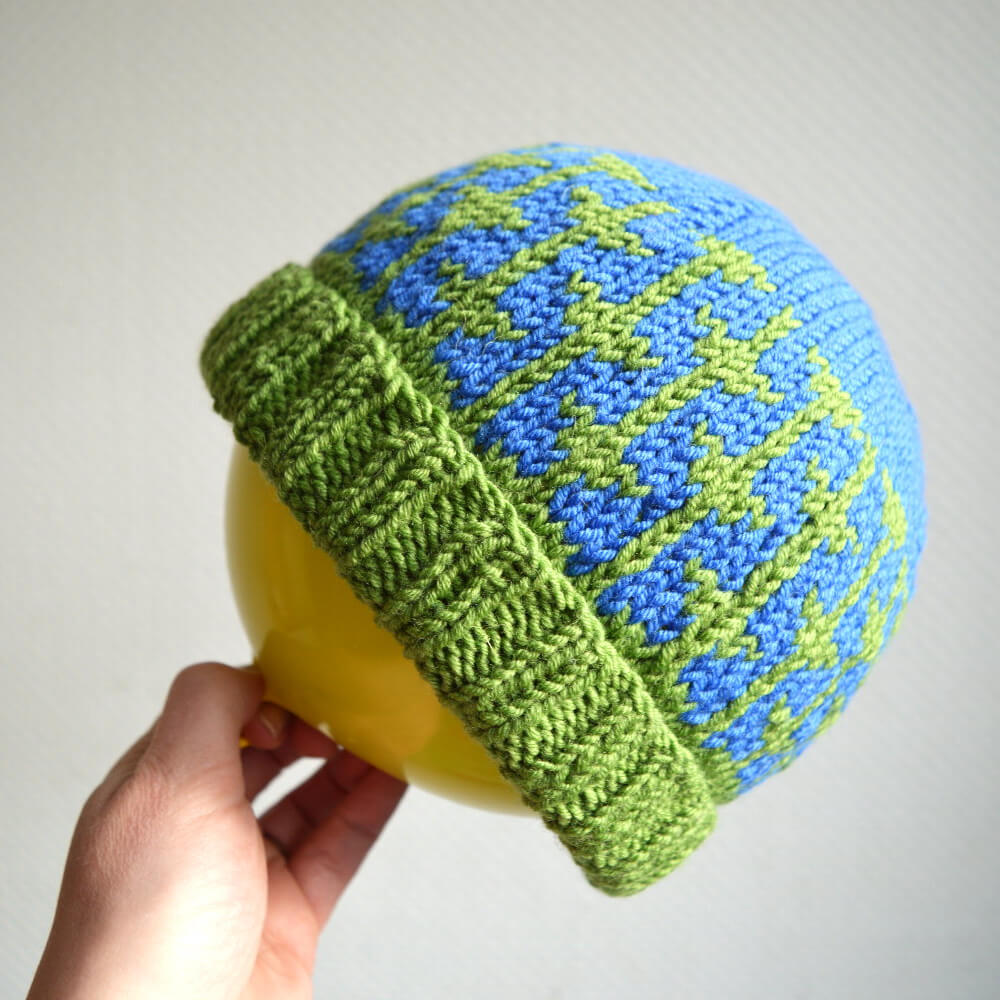
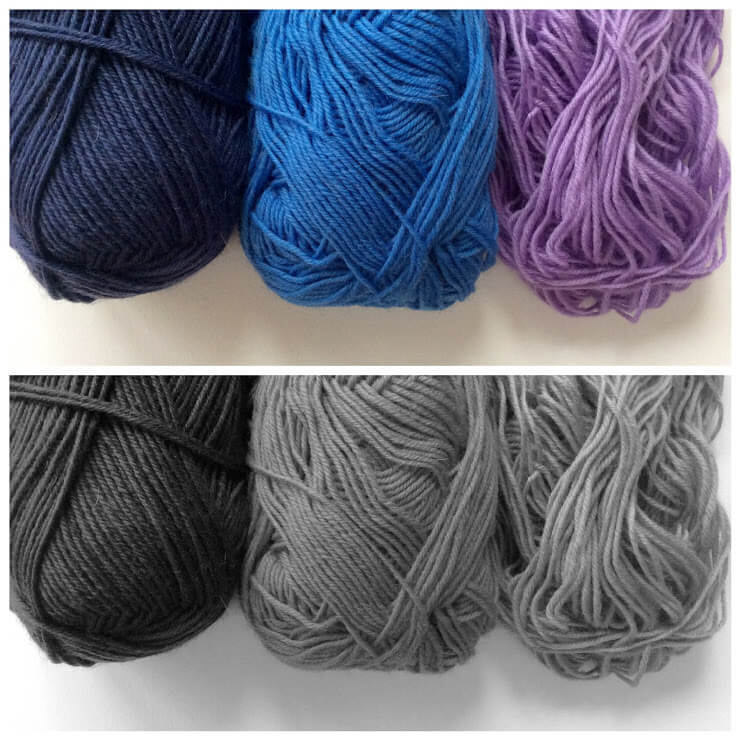
It seems so simple, but contrast in color really is a thing for color work projects: one combination of colors can very much differ from the other. One aspect of color theory in relation to knitting and crochet consists of the contrast of the colors chosen. You can go for big contrasts, or just for subtle differences if you so desire.
But how can you tell what kind of contrast you have with the yarns and colors chosen?
Luckily there is a very handy trick to determine whether a particular color combination has big contrast or only a little. To do so, just take a photo of the yarns together and make the picture black and white!
Take for example the yarns below, quite different from each other, don’t you think?
The black and white version, however, tells a different tale!
It turns out that the light blue version combined with the lilac hardly differ in contrast. This means that when you combine both in a project, the colors won’t really “pop”. An excellent choice, if that is your intention. If on the contrary a lot of contrast is desired, the dark blue combined with the light blue or the lilac would be a far better choice.
Try finding the contrast in color out for yourself!
Want to try some simple color work yourself? Take a look at the Pijl hat (also pictured above) and the Bloem hat!
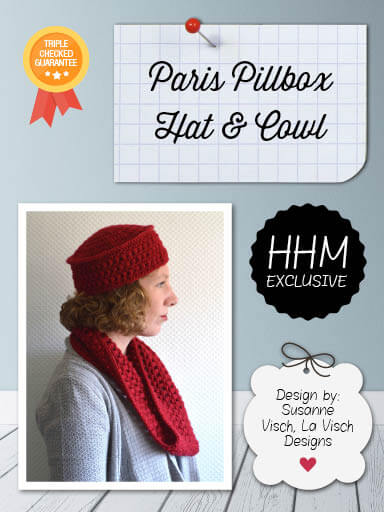
Happily Hooked Magazine Issue 20 is all about Vintage-Inspired Designs with Contemporary Flair. And both my Paris Pillbox Hat & Cowl are an exclusive feature!
The hat in this set is in the pillbox shape reminiscent of the Forties and Fifties of the previous century. A most stylish way of keeping your head warm! To complete the set there is also a matching cowl.
These designs are now also available directly through La Visch Designs.
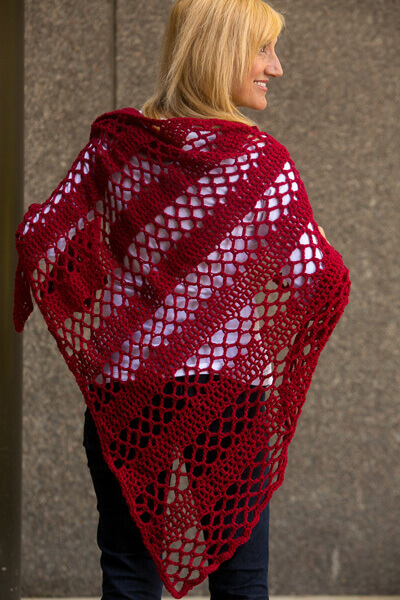
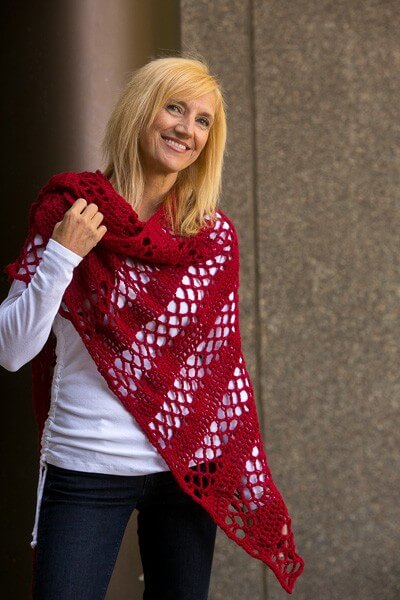
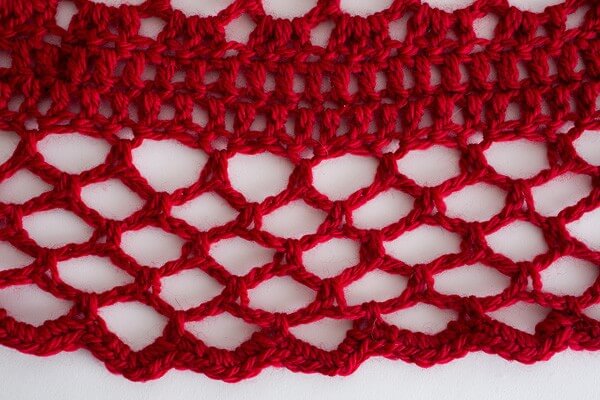
In the December 2015 issue of I Like Crochet the magic of the winter season is captured in sparkly new patterns to crochet your dream Christmas. For the “baby it’s warm inside” section in this issue, I have designed the Asymmetrical Wedge Shawl. Pictures courtesy of I like Crochet Magazine.
This wedge shawl has a distinct asymmetrical shape, setting it apart from more traditional crochet shawls. Make a fast, large and cozy shawl in an aran weight yarn as described here, or make it a scarf in a fingering weight yarn. Because this wedge shawl is worked in a single piece from the tip up, it can easily be made in any size you want.
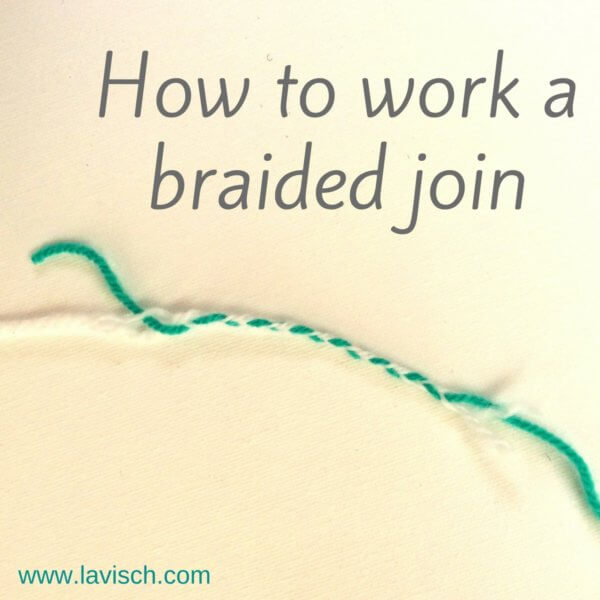
Earlier, in my blog about the Russian join, I’ve already shown you how my favorite way to attach a new ball of yarn works. But how do you join new yarn just as invisible and strong when you do not have a needle with you?
In that situation, I like to use the braided method where the old and new yarn are braided together. Just as with the Russian method this makes a very strong join, which remains in place even with slick yarns like satin and mercerized cotton. Also, after you have complete your project no ends are to be woven in, as these are already woven in when making the join.
A prerequisite for this method is that your yarn consists of at least two plies. Why is this important, you will see later in this blog. The braided join makes for a locally thicker thread, but this does not need to be a problem, because it is often not very visible.
The braided join step by step
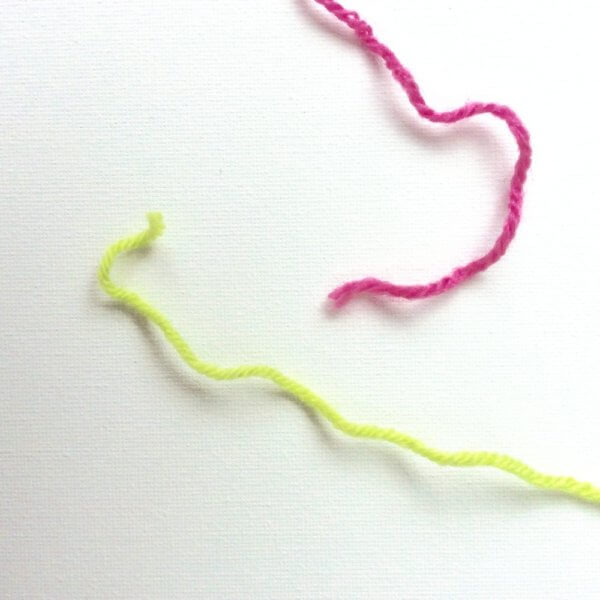
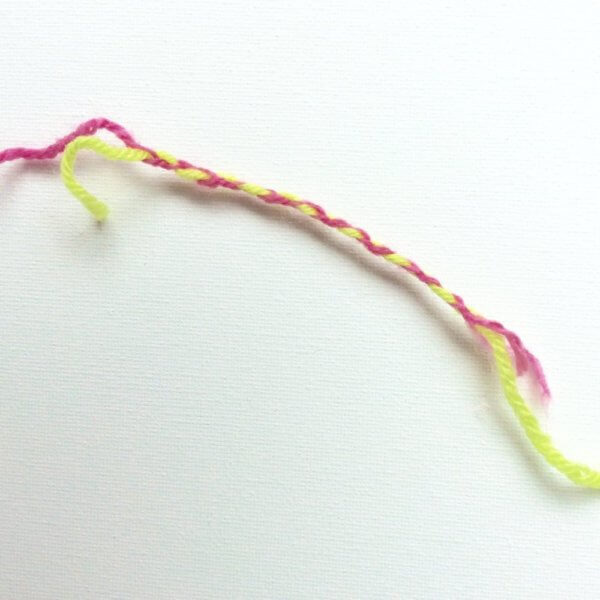
In this example I have used two different colors of yarn to show you exactly how to work this type of join.
1. The two threads to join, the pink yarn comes from the project, the yellow-green is the new ball of yarn.
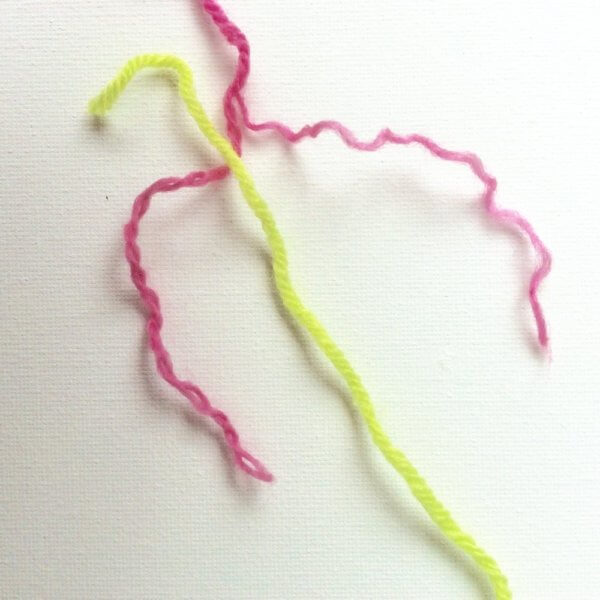
2. In the “old” yarn loosen the plies over a length of approx. 10 cm (4 inch) and divide into two. Place the new yarn on top of it as shown in the photograph.
3. Hold the threads together at the top. I like to hold them between my forefinger and middle finger, but you can also use a paperclip or something similar.
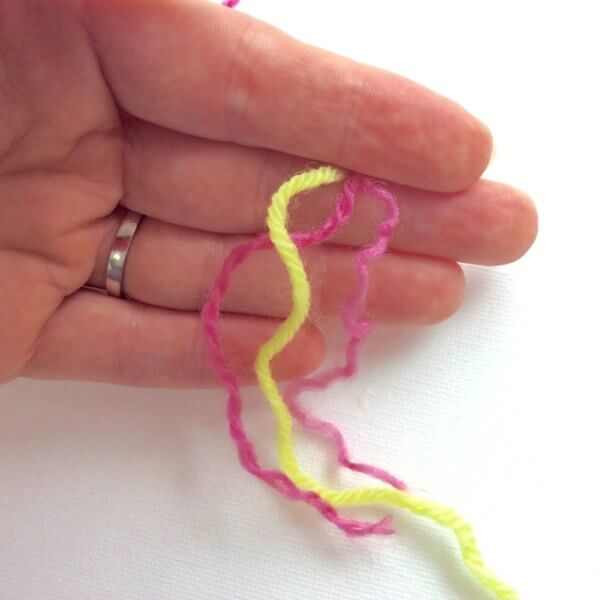
4. Braid the three pieces of yarn (two of the “old” and one of the new ball of wool) together to join them.
5. Braid until you reach the end of the three threads, you have a braided portion of about 5 up to 7.5 cm (2 to 3 inch).
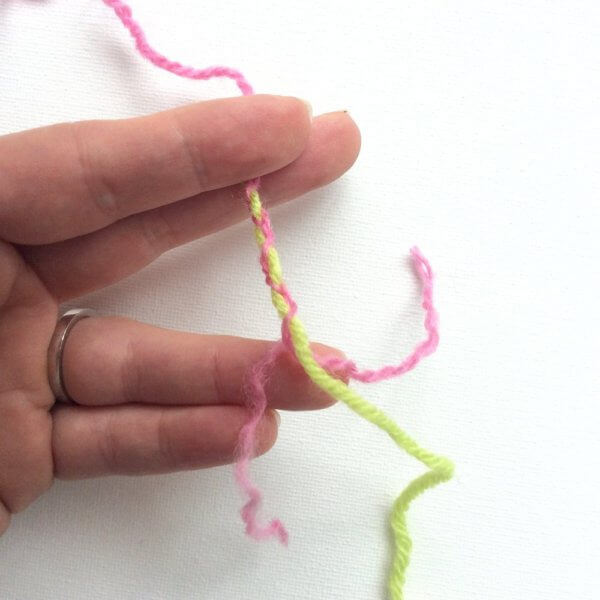
And now you can continue knitting again. As you see in the picture below, there are three stitches in this sample in which both threads are visible. However, if you join the same color of yarn, the join would be hardly visible in the finished piece.
The back of the work looks like in the photo below. The loose ends I usually leave until after washing and possibly blocking the work. Then it’s just a matter of (carefully!) cutting them off.
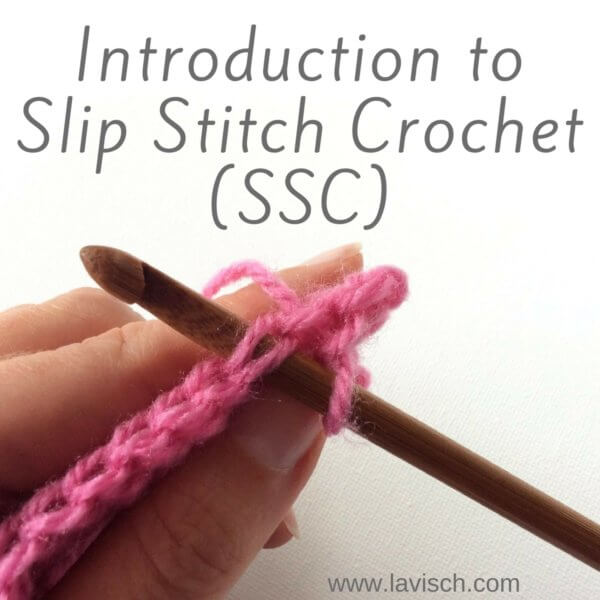
As you are probably aware, there are lots of different crochet stitches. The basic stitches (in US terminology) being single crochet (sc), half double crochet (hdc), double crochet (dc) and the slip stitch (slst). What is perhaps less known is that there is a very special form of crochet, which only uses slip stitches. This is called Slip Stitch Crochet, abbreviated as SSC.
Depending on how the hook exactly is inserted into the stitch, the result can look very similar to knitting. The stitches can look a lot like stockinette stitch, and the fabric is thinner, more flexible and requires less yarn for a similar surface than with traditional crochet.
History
Slip stitch based crochet has been around for a very long time. Many believe it is actually the oldest form of crochet. Fact is that it was and is traditionally much practiced in several European countries, including Norway, Sweden, and Bosnia. This particular type of crochet is therefore also known as “Bosnian crochet”. However, traditional Bosnian crochet is mainly done in the round, where the work at the end of a round is not reversed. In modern versions of slip stitch crochet, the work is reversed, if desired.
How to work SSC?
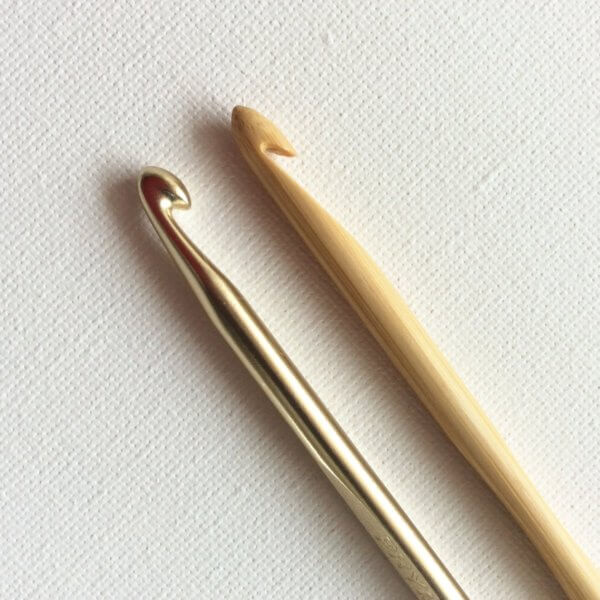
First, it is important that you use the right type of crochet hook. The kind where the entire head of the needle is cylindrical with a “cut out” to make a hook shape, as with the above-depicted bamboo crochet hook works best. These are also called “in-line” hooks. With the other type, it is more difficult to insert the hook into the correct part of the stitch.
A big difference between regular crochet and SSC is the size of the crochet hook needed. A much larger size than usual is required to ensure that the work does not end up too thick and stiff. Take for example worsted weight yarn where the label recommends needles in size 4-4.5 mm. For that yarn, a crochet hook in a size of approximately 6 mm would be the better size for SSC.
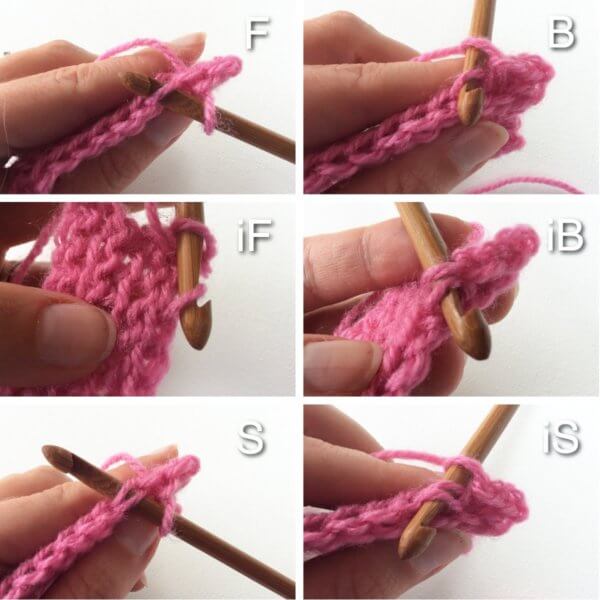
With regular slip stitches, the hook is usually under both loops of the stitch from the previous row. With SSC the hook can also be placed under only one of the loops. The exact orientation and direction determine what the stitch and thus the resulting work will look like. Variables here are front/back loop, inserting from the front to back or from back to front and yarn in front of the work vs yarn at the back of the work.
In the photo below you can see the differences between the six basic stitches in slip stitch crochet:
The basic stitched explained
F (front loop only slip stitch) Hold the yarn behind the work and the hook. Insert the needle from front to back under the front loop of the stitch, yarn over and pull the yarn through both loops on the hook.
B (back loop only slip stitch) Hold the yarn behind the work and the hook. Insert the needle from front to back under the back loop of the stitch, yarn over and pull the yarn through both loops on the hook.
iF (inverse front loop only slip stitch) Hold the yarn in front of the work and the hook. Insert the needle from back to front under the front loop of the stitch, yarn over and pull the yarn through both loops on the hook.
iB (inverse back loop only slip stitch) Hold the yarn in front of the work and the hook. Insert the needle from back to front under the back loop of the stitch, yarn over and pull the yarn through both loops on the hook.
S (slip stitch) This is a regular slip stitch: Hold the yarn behind the work and the hook. Insert the needle from front to back below both loops of the stitch, yarn over and pull the yarn through the loops on the hook.
iS (inverse slip stitch) This is a regular slip stitch worked backward: Hold the yarn behind the work and the hook. Insert the needle from back to front under the two loops of the stitch, yarn over and pull the yarn through the loops on the hook.
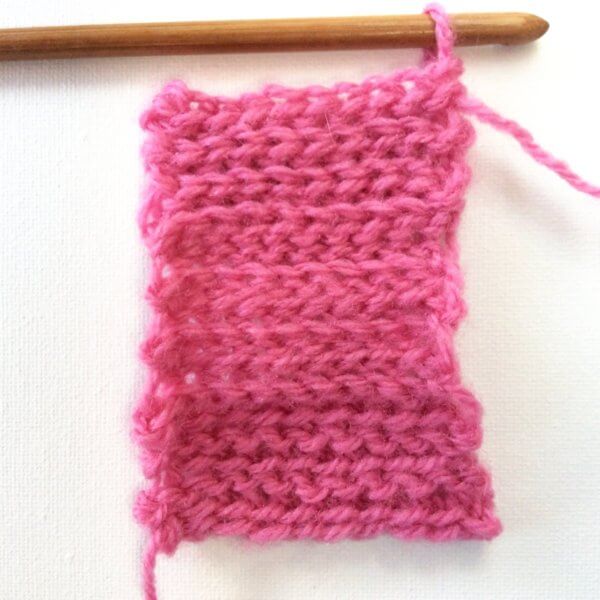
Examples
In this swatch, I’ve tried out three different stitch patterns. These can all be made with combinations of the basic SSC stitches. The pictures show both sides of the work:
A: Looks very much like garter stitch and the resulting fabric does not curl. This is made by working F every row.
B: Looks very much like stockinette stitch in a sideways orientation, the fabric curls up (just like stockinette stitch). It can be made by alternating rows in F and iB.
C: Rib stitch: because of its high elasticity, this pattern is very suitable for cuffs and hems. This can be made by working every row in B.
And that’s how you work slip stitch crochet! Although I still have to work on my edges, looking at the swatch below…
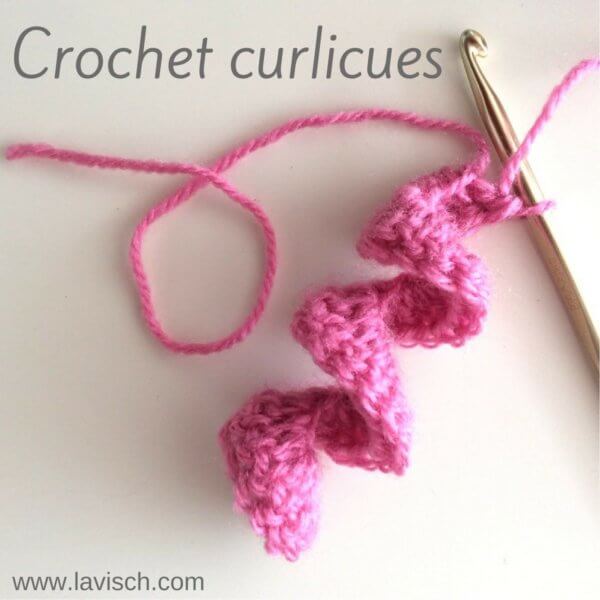
There are many ways to finish the edges of knitted or crochet projects. To name a few examples: crab stitch, shell stitches, and picot stitches. Fringe is also a lovely way to finish scarfs, shawls, blankets etc. But sometimes it is fun to just give it another twist. The answer to that is quite literally curlicues!
Curlicues not only give a lovely result, but are also very addicting to make.
Here you can find how to make curlicues yourself. For the example, I used a generic worsted weight acrylic yarn and a 5 mm (US H-8) hook. These instructions are written in American English crochet terminology.
This is how to make your curlicues step by step:
1. Make a chain in the length you would like your curlicue to have, plus 3 extra chains. In this example, I’m using 15 chains + 3 chains. Be careful not to make the chains too tight, because that will make it harder to crochet into it later.
2. Make 2 dc in the 4th chain from the hook.
3. Next, make 3 dc in each following chain. For the result, it doesn’t really matter where exactly to place your hook into the chain. Use the way you find easiest or gives the nicest result to you. When you are about halfway the initial chain, you should slowly see the curlicue shape emerge!
And here the curlicue is all done, isn’t it cute?
You can also get nice effects by not making the curlicues not in a solid colored yarn, but in a variegated one. You can also make curlicues with half double crochet (hdc) stitches instead of double crochet (dc) to get a less wide result.
Curlicues are also fun to dress up stuffed animals with, think of the arms of an octopus, or the wild manes of a lion. The sky is the limit!
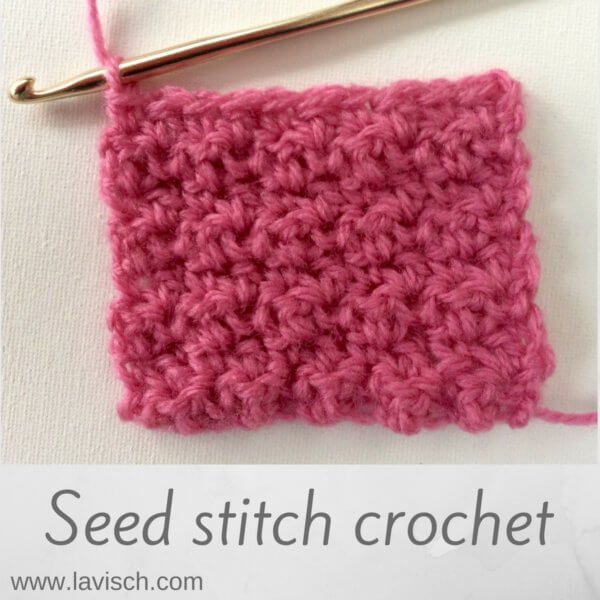 In this post I will show you how to crochet the “seed stitch”. In this stitch single crochet stitches are alternated with double crochet stitches (US crochet terminology!). This gives a really lovely and dense fabric, very suitable for projects like scarves, blankets and bags. Let me show you step by step how it is done.
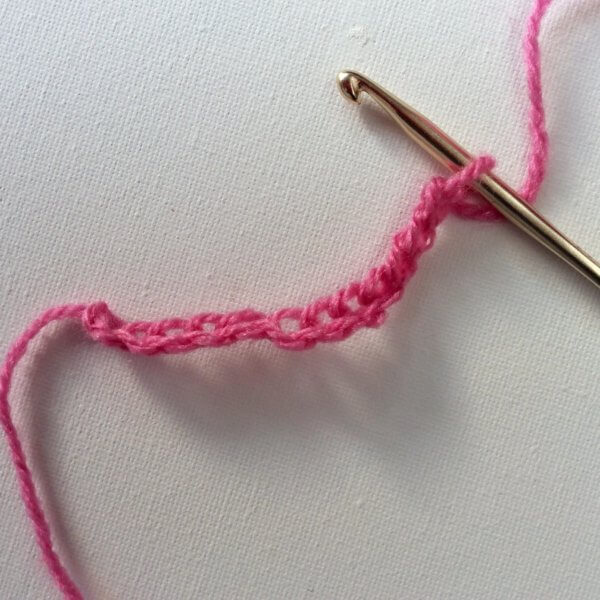


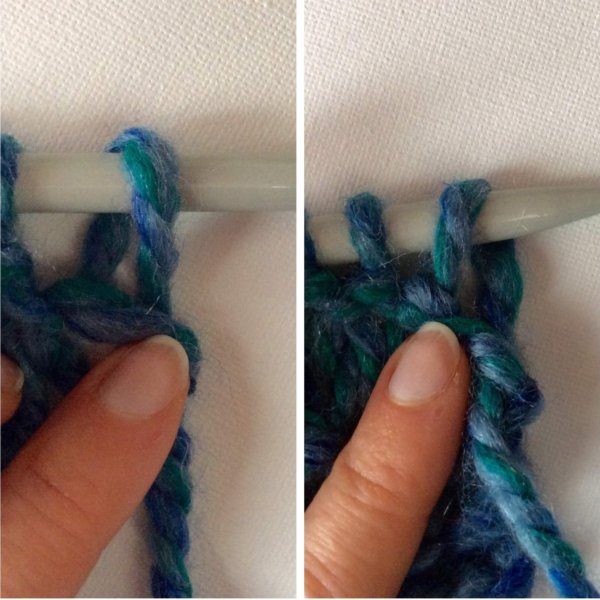 Left in this picture is the regular orientation, on the right, there is a twisted stitch on the needle. This is no problem though: Just knit (or purl) the twisted stitch through the back loop to untwist the stitch mount.