circs

tutorial: knitting in the round – travelling loop method

Travelling loop - a tutorial by La Visch Designs

In earlier posts I already told you about choosing circular needles that fit your style. “Regular” knitting in the round has also been discussed in this post. In this post, I want to talk about knitting in the round using the travelling loop method.

Why is this actually called travelling loop?

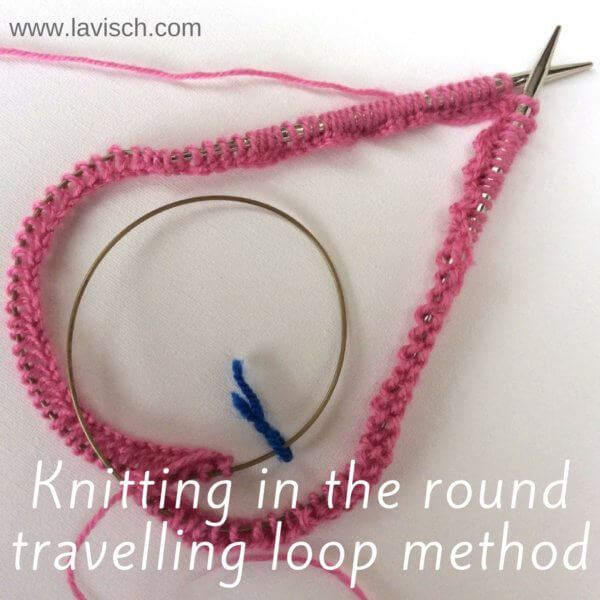
That is because with this method you use a circular knitting needle with a cable that is way too long for the project. During knitting, the excess length of the cable forming a loop will move along from the right-hand needle all the way around to the left-hand needle. The loop “travels” as it were!

Knitting with the travelling loop method works very well if two prerequisites are met:

Firstly, it is of importance that you use a circular needle with a cable too large for your project. If your project has a circumference of 50 cm / 20 inches, then circs with a length of 80 cm / 32 inches or longer would work fine with this method. For this same project circs with a length of 60 cm / 16 inches would not work, because the excess length of cable is too small to form the loop.

Secondly, make sure that the diameter of your project is not too small! Socks and sleeves will usually be too small to use this method because the length of the needle itself will be a problem. A knitted in the round cowl or (children) sweater will be fine though most of the time.

Travelling loop - a tutorial by La Visch Designs

Knitting travelling loop step by step

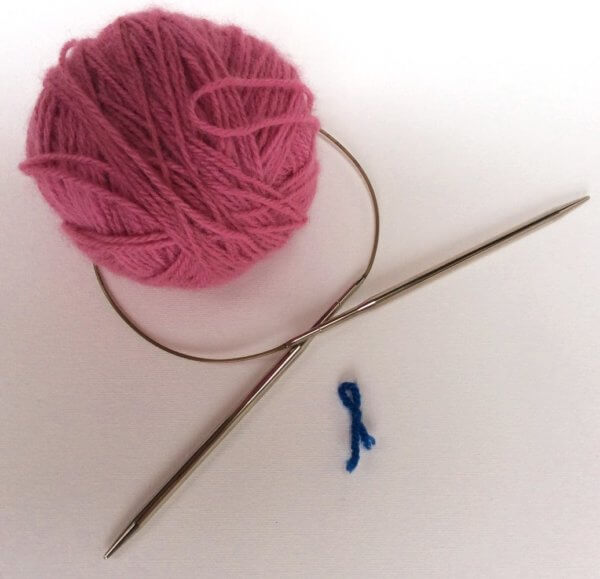
In this example, I’m using 4 mm / 80 cm circular needles as well as a stitch marker to indicate the start and end of rounds.

1. Cast on the number of stitches as required for your project. In this example I have cast on stitches by knitting them on, you can, of course, use your preferred method or the one specified in your pattern.

Travelling loop - a tutorial by La Visch Designs

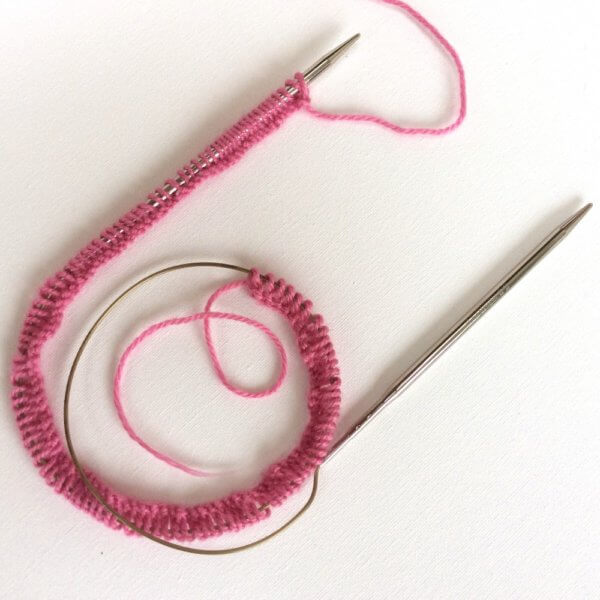
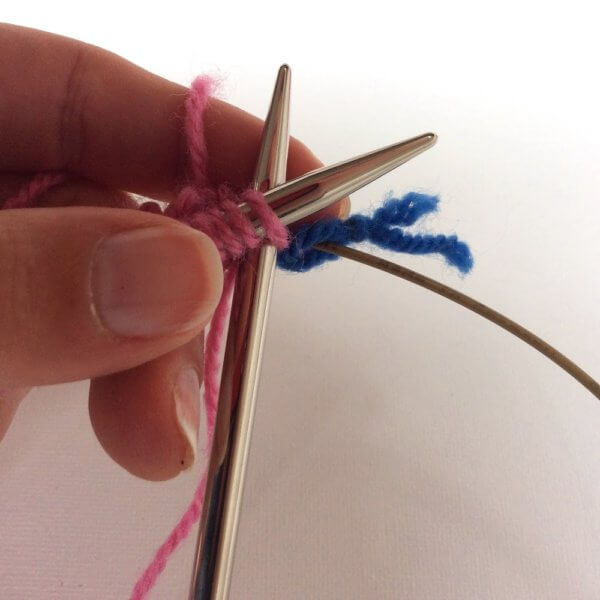
2. Move the cast on stitches over your needle in such a way that the first CO stitch is on your left-hand needle. You can recognize this stitch by the loose tail. Make sure not to twist your work, if that is what is desired for your pattern.

Travelling loop - a tutorial by La Visch Designs

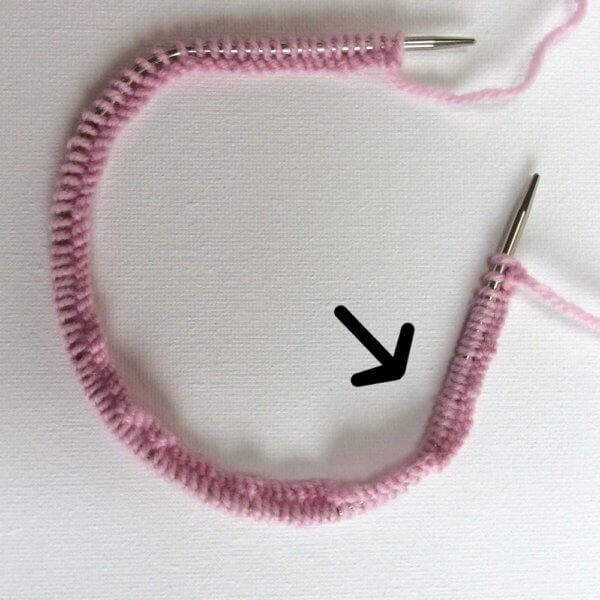
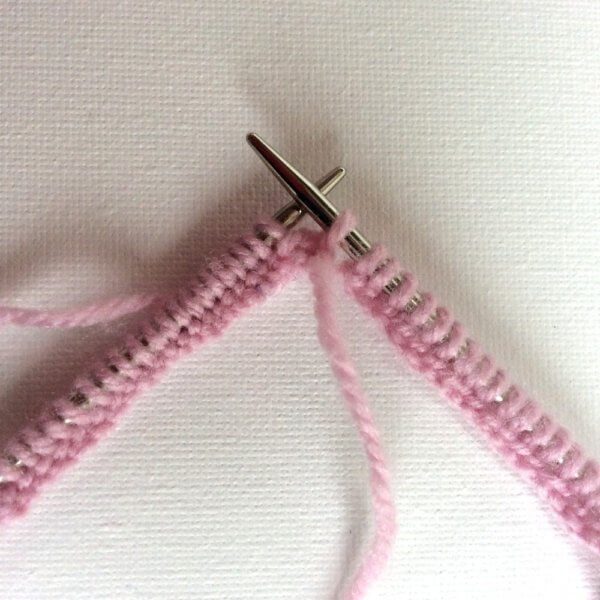
3. When you are about to close the work in the round, this is how everything looks: The needle with the beginning of your CO (with the yarn tail) at the side of the left-hand needle, the thread leading to your ball of wool coming from the last CO stitch at the back. The right-hand needle has a long length of the unused cable. Now it is also time to place your “end of round” stitch marker on the right-hand needle.

Travelling loop - a tutorial by La Visch Designs

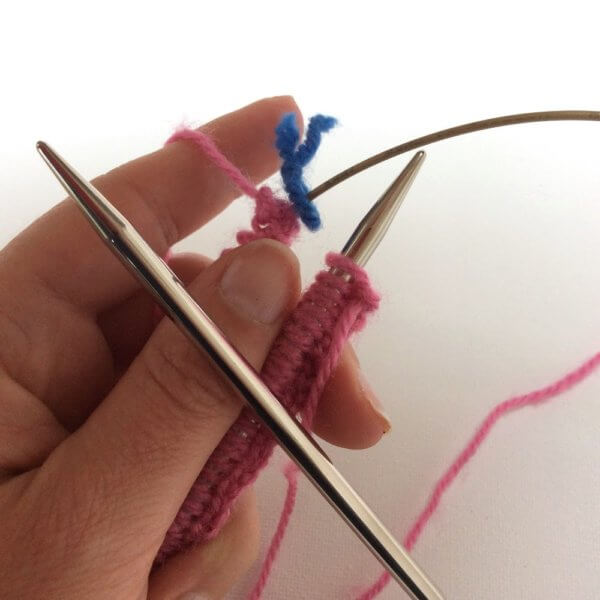
4. Insert your right-hand needle into the first stitch on the left-hand needle and knit it. There will be tension on the yarn that connects the first and last stitch of the CO. Because of this, it can help to hold the cable close to the needle with your hand.

Travelling loop - a tutorial by La Visch Designs

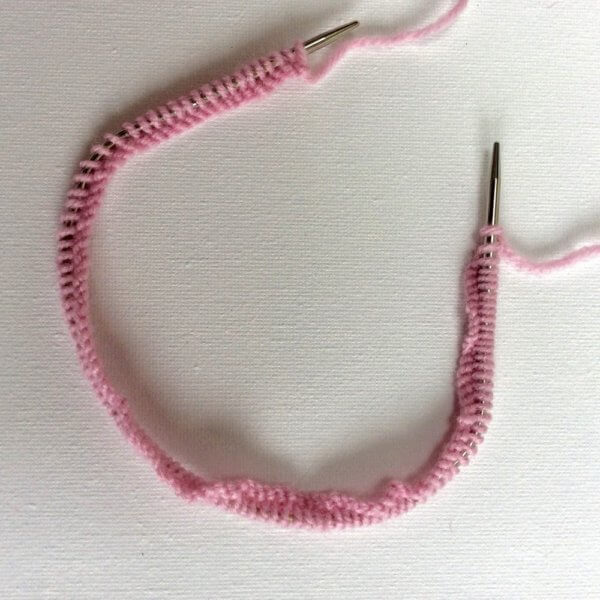
5. Once you have knitted part of the round, you will see the loop of excess cable travelling along.

Travelling loop - a tutorial by La Visch Designs

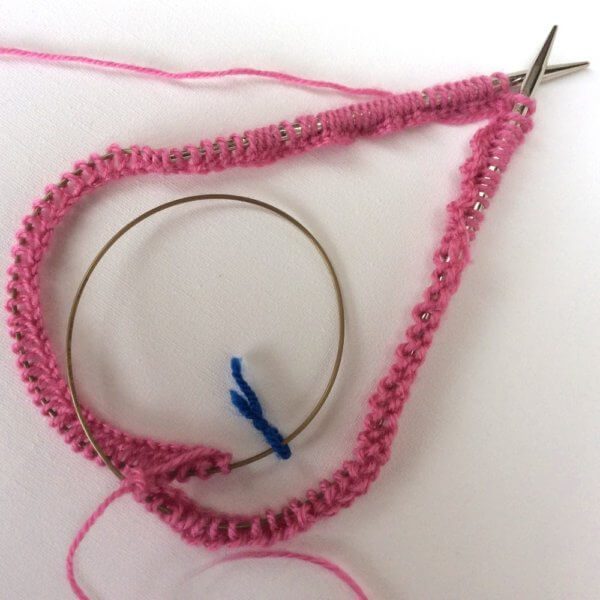
6. At a certain point when knitting with a travelling loop, it will become possible to move all remaining stitches of the round up to the left-hand needle. Do this, to lessen the tension on the yarn that connects the first and last stitch of the CO.

Travelling loop - a tutorial by La Visch Designs

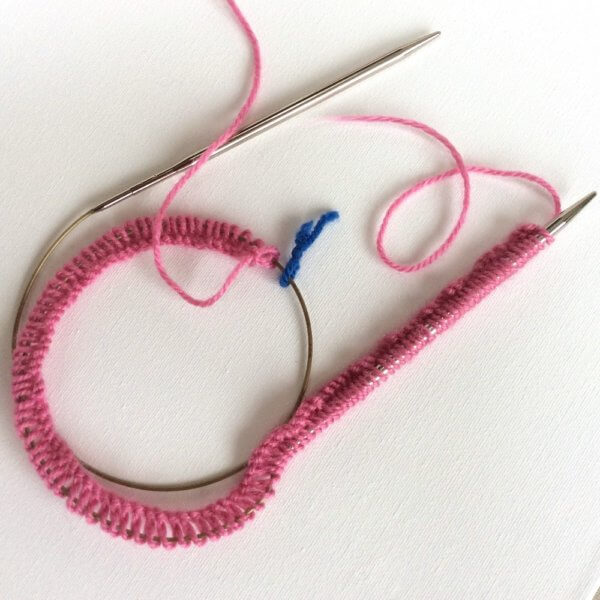
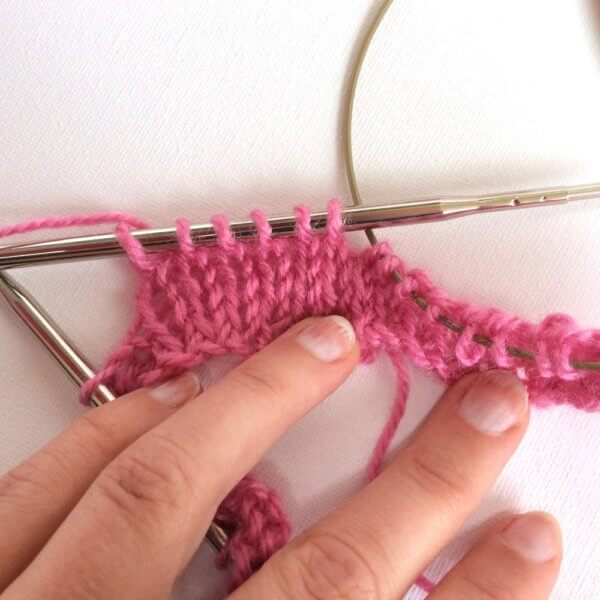
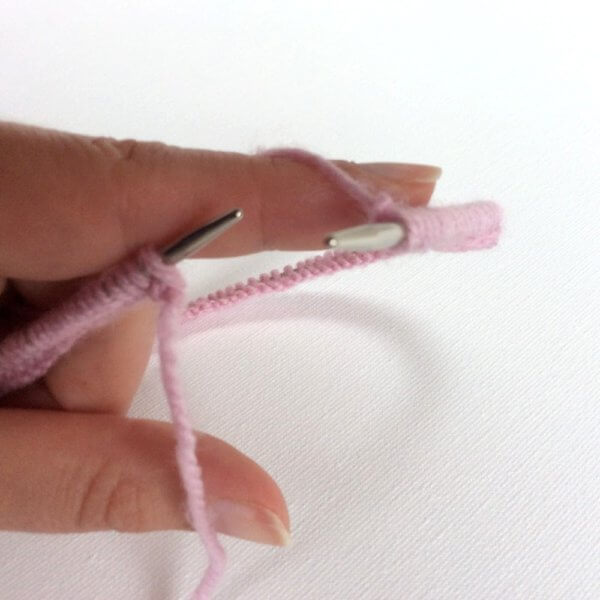
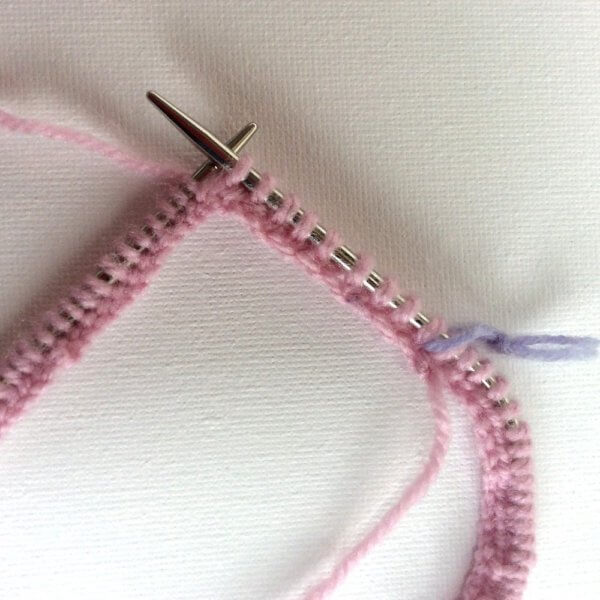
7. At the end of the round, you will have a large piece of unused cable near the left-hand needle. Pull the circular needle through your work in such a way, that all stitches are ready to knit on the left-hand needle. The right-hand needle has the excess cable. Put the stitch marker over to the other needle and knit. You can tighten up the somewhat loose connection between the end and start of each round. To do so, pull the yarn tight with the second stitch of each new round. Don’t worry about the sloppy looking join, this will fix itself.

Travelling loop - a tutorial by La Visch Designs

8. With each round making sure to pull the yarn tight with every second stitch of the round only. After knitting several rounds, it will look like this. As you can see everything has redistributed nicely and it does not look sloppy anymore!

Travelling loop - a tutorial by La Visch Designs

Stay tuned for the next blog in the series of knitting in the round using circular needles!

tutorial: knitting in the round – travelling loop method Read More »

tutorial: knitting in the round with circular needles

Knitting in the round with circular needles - a tutorial by La Visch Designs

Personally, I find knitting in the round with circular needles to be very relaxing. It goes round and round and round; very zen! This is what also made it so nice to work on my Zeeglas Cowl, pictured below. In this post I will tell and show you how knitting in the round works best, using circular needles (or circs for short).

Knitting in the round with circular needles - a tutorial by La Visch Designs

How does knitting in the round using circs work?

Knitting in the round this way works best when using a needle with a cable length that matches the circumference of your project. It is better to use a needle that is a tad too short, than one too large. Knitting is easy to compress a bit, but stretching it out can get ugly. Also, this makes for a less than optimal knitting experience: it is hard to move along stitches that are stretched tight over your needle and cable.

For a cowl regular circular needles with a cable length of 60 cm (24 inches) is usually fine. For knitting socks this way there are even special tiny circs with extra short needles and a cable of a mere 10 cm (4 inches).

Knitting in the round with circular needles - a tutorial by La Visch Designs

In this example, I will use a size 3 mm (US 2) circular needle with a cable length of 30 cm (12 inches). This specific needle has tips that are a tad shorter than regular circs. This needle by Addi is my favorite to knit baby hats from sock wool.

Knitting in the round with circular needles step by step

1. Cast on the number of stitches as required for your project plus 1. I will explain this extra stitch later on in this how-to. In this example I have cast on stitches by knitting them on. You can, of course, use your preferred method or the one specified in your pattern. In the picture below the strand of yarn at the bottom of the picture is where the CO was started. The strand at the top is the one that goes to the ball of yarn.

Knitting in the round with circular needles - a tutorial by La Visch Designs

2. In patterns where the work has to be closed in the round, there often is a note to be careful not the twist the work. An exception to this is when you actually want a twist in the work. Take for example as with a Moebius type cowl. In the picture above in the spot indicated with the arrow, you can see there is a twist. I have to untwist it before proceeding!

Knitting in the round with circular needles - a tutorial by La Visch Designs

3. Hold the needles in such a way that the last CO stitch is on your right-hand needle. You can recognize this stitch by the attached ball of yarn.

4. Slip this last CO stitch from your right-hand needle to the left-hand needle, then knit the first 2 stitches together. With this, you close the work in the round and at the same time, prevent a “gap” at the join. Also, the extra stitch cast on has been decreased away.

Knitting in the round with circular needles - a tutorial by La Visch Designs

5. Place a stitch marker to indicate the start and end of the round and enjoy the knitting!

Knitting in the round with circular needles - a tutorial by La Visch Designs

In another post on the topic of knitting in the round with circular needles, I also cover traveling loop. Posts on magic loop knitting and “two at a time” (“TAAT” for short) magic loop knitting will be done sometime in the future!

tutorial: knitting in the round with circular needles Read More »

choosing circular knitting needles

Choosing circular knitting needles - by La Visch Designs
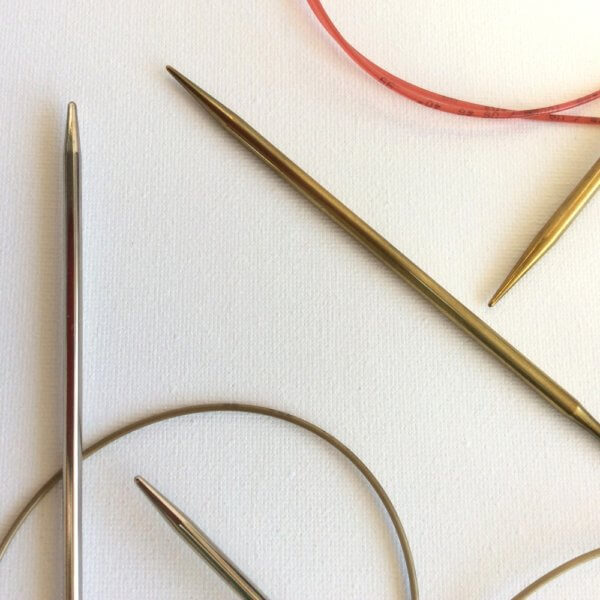
There are many types of projects where knitting in the round may be easier than knitting flat back and forth followed by sewing the pieces together. Think of socks, hats, sleeves of sweaters, round shawls etc. There are roughly two different ways to knit in the round: Double pointed needles (dpn’s) or circular needles (circs for short). Most people have a strict preference for one variant or the other.

My preference is for circulars; I once worked with dpn’s, but it felt like I was wrestling a hedgehog! For me using circs also saves the number of different knitting needles I need, because I use my circulars also to just knit back and forth.

Note that some knitting techniques are less suitable for knitting with circular needles. Think for example of those who are used to clamping the needle under the arm.

But how to go about choosing circular knitting needles?

In this post, I want to give you some background information about the different types of circulars. This because, as you can see in the picture above, there are really a lot of different types! Choosing circular knitting needles that are the right ones for you and your projects can, therefore, be a bit of a challenge.  I will of course also talk about what to look for when you are going to try knitting with circular needles. Indeed, there is nothing as personal as a circular needle: If your knitting needle is not the right one for you, the experience can be less pleasant than knitting should be.

What to pay attention to

  1. Material
  2. Point
  3. Connection to the cable
  4. Material of the cable
  5. Length of the cable

Below I will elaborate on each of these points as they are very much of importance when choosing circular knitting needles.

Choosing circular knitting needles - by La Visch Designs

1. Material

Circular needles can be made from various materials. Commonly found are needles made from wood, bamboo, nickel plated, copper finish, plastic, and aluminum. Wood and bamboo have more drag when knitting than the other materials. Because of this, it is not my preference: For me personally, the smoother the better! The picture above shows two favorites from my personal collection: The silver with gold cable is a regular Addi circular needle, the copper-colored circular needle with the red cable is an Addi Lace needle. The latter has a special coating to make it a tad less smooth than regular Addi’s to make it easier to work with very thin yarn.

2. Point

In the picture above you can see the difference in points between the two types of circular needles very well. The lace needle is significantly sharper than the other. Which variant is preferred is again very personal and depends both on the type of project you want to knit, and your knitting style.

Choosing circular knitting needles - by La Visch Designs

3. Connection to the cable

In the picture above you can see the difference between the connection of the more expensive Addi needles compared to the much cheaper Wibra circular needle: the connection on the Wibra needle is clearly less smooth. Moreover, I have no problem with Wibra needles: They are nice and pointy, have a good flexible cable and are excellent value for money.

However, depending on the type of project and your personal knitting style, the connection of the needle to the cable can be a problem. With very thin yarn, or if you knit very tight, the yarn can snag behind the edge, which can be very annoying when knitting.

4. Material of the cable

The various cables that you see in these photos are all made of different materials. As a result, there are also differences in how supple and flexible the cables are. This, in turn, has an effect on how easy and enjoyable different types of circular knitting can be done with them. I myself have not yet come across a cable too flexible for my tastes. More the opposite, with the cable being too stiff. This of course again depends on your own preferences.

Update December 13th, 2017: I have found circular needles with a (to my taste) too flexible cable, my 3.75 mm Kollage square needles.  I like the needles themselves, but the cable is the limpest noodle I have ever encountered!

5. Length of the cable

Circular knitting needles come with different cable lengths: From very short 10 cm (4 inches) with extra short needles to knit socks, to cables with a length of 150 cm 60 inches) for very large projects. Most commonly, however, are cable lengths of 60, 80 and 100 cm (24, 32 and 40 inches). In my experience, the 80 cm (32 inches) length is sufficient for most needs.

When you have the need for multiple cable lengths, an interchangeable needle set with loose points and cables like the one below could be just the thing for you. I know this Addi Click set was for me the best investment in knitting tools in years!

Choosing circular knitting needles - by La Visch Designs

In summary

If you have no experience with knitting in the round with circular needles and don’t know yet what you prefer: If possible, go and visit a friend who already has several and try them out before you invest yourself. Choosing circular knitting needles this way is a lot more budget friendly than buying them all!

choosing circular knitting needles Read More »