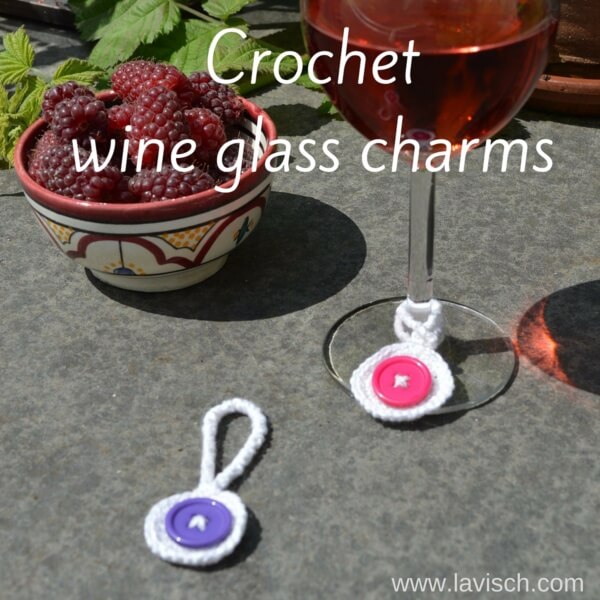
Here in the Netherlands Summer is having a somewhat hesitant start. The time for garden parties is bound to arrive soon though. Those I really enjoy: Firing up the BBQ, eating tasty sandwiches and salads and of course enjoying yourself with friends and family until the early hours. On those occasions I like to have a glass of wine. At busy parties there however usually comes a time that I really don’t know which one of the glasses on the table is mine…
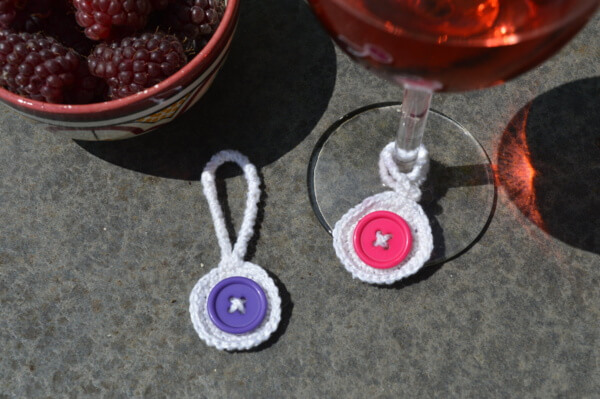
For this I have found a solution: Wine glass charms! The idea is that you attach a unique charm to every glass, so you can always easily see which one is yours. Of course I wouldn’t be me if I didn’t make such charms myself!
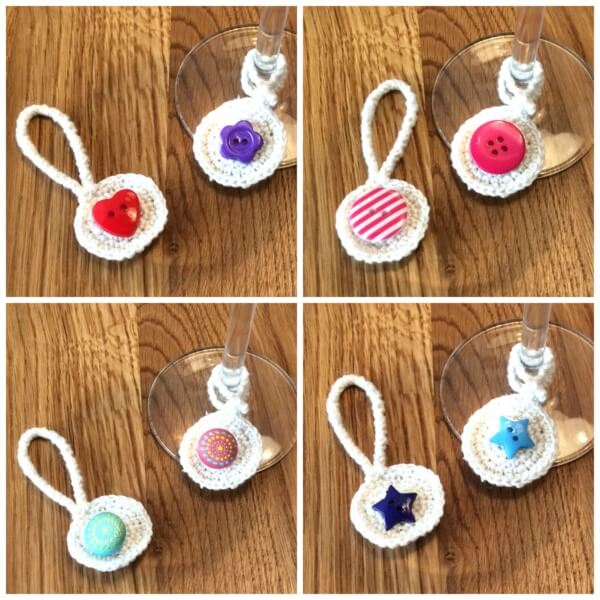
In this post I’m giving you the pattern for wine glass charms that I designed to use with leftover bits of crochet cotton and a variety of buttons. These charms can of course also be used on other glasses with a stem. This pattern uses lobster stitch cord, that I explained step by step in this tutorial.
Pattern wine glass charms
This pattern is written in American English crochet terminology.
Materials
Crochet Cotton, I used Schoeller + Stahl Manuela Häkelgarn No. 5 [100% mercerized cotton; 220 m / 50 g]
Various different buttons with a diameter of 10 to 20 mm (3/8 to 13/16 inch)
1 crochet hook in size 2 mm (US steel crochet hook size 1)
Instructions
Round 1: Ch 2, 6 sc in second ch from hook and sl st closed to first sc. (6 sts) Make sure you keep a yarn tail of about 30 cm (12 inch).
Round 2: Ch 1, 2 sc in each st, sl st to first ch of round. (12 sts)
Round 3: Ch 1, [2 sc in next st, 1 sc] 6 times, sl st to turning ch to close the round. (18 sts)
Round 4: Ch 1, [2 sc, 2 sc in next st] 6 times, sl st to turning ch to close the round. (24 sts)
Round 5: Ch 1, [2 sc in next st, 3 sc] 6 times, sl st to turning ch to close the round. (30 sts)
Next: Close the cord into a loop by attaching the end with a sl st to the point where the start exists the crochet circle. Break yarn.
Finishing Use the yarn tail from the center of the circle to sew on a button and weave in all ends.
Below you can find some examples of different types of buttons used. As you can see you can achieve very different effects by using various kinds of buttons!
Considerations when extreme knitting When knitting a pattern on such a large scale, there are several things that have to be taken into account. For example, it is often not possible to use a large stitch pattern where one repetition requires a large number of stitches and rows: unless you are making a blanket your piece is very likely just not big enough to knit one of multiple repeats of the pattern.
In addition, the impact of extremely large stitches is on its own already very big. Adding a complex stitch pattern to that can be just too much for the eye. A simple stitch pattern with a limited number of stitches and rows is therefore my motto.
Extreme knitting and lace Lace patterns are indeed very beautiful, but you have to remember you that if you knit with very thick yarn and big needles, the holes in your work will also be very large. This of course does not have be a problem, depending on the type of work you want to do.
However, it is something you do need to take into account, because the effect with a tension of 20 stitches over 10 cm / 4 inch is very different from that with a tension of 2 stitches per 10 cm / 4 inch.
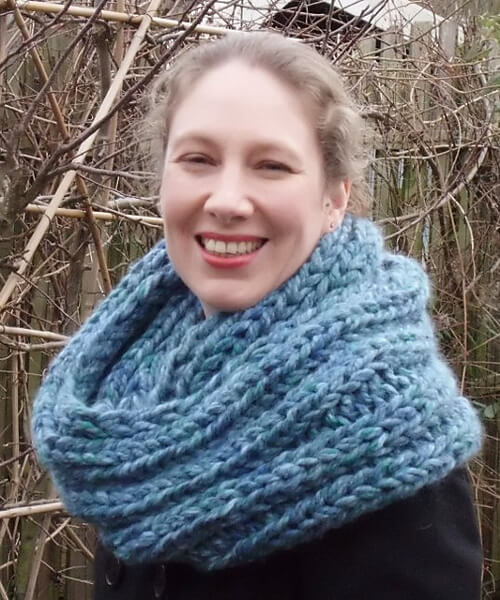
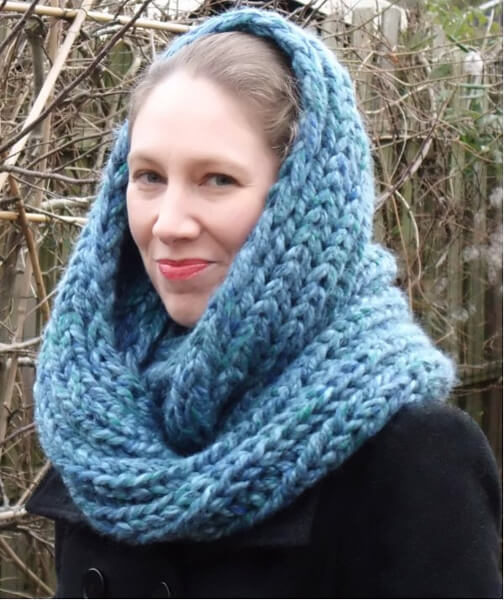
Reversibility Depending on the type of project, it can be desirable for the stitch pattern to be reversible. In other words, that your project will be pretty on both sides. For a long scarf or cowl I think that’s really nice to have, because both sides are often visible. That is why I have chosen a simple straight-purl stitch pattern for this cowl: A two by two rib pattern.
Gymir Cowl pattern
This simply huge cowl has been named after the giant Gymir, who was in Norse mythology the giant whose daughter, Gerðr, ultimately married the god Freyr.
Instructions Cast on 8 stitches, I used the “knitting on” method.
Row 1: *K2, p2; rep from * to the end of the row.
Repeat row 1 until your yarn almost runs out, making sure to leave enough to bind off and connect both ends of the piece. Bind off.
Finishing “Sew” both edges of the piece together to form a loop by pulling the remaining yarn through the fabric of both edges by hand. Enjoy your GIANT result!
And for comparisons sake, below my Gymir cowl in progress as well as another project on 5 mm needles.
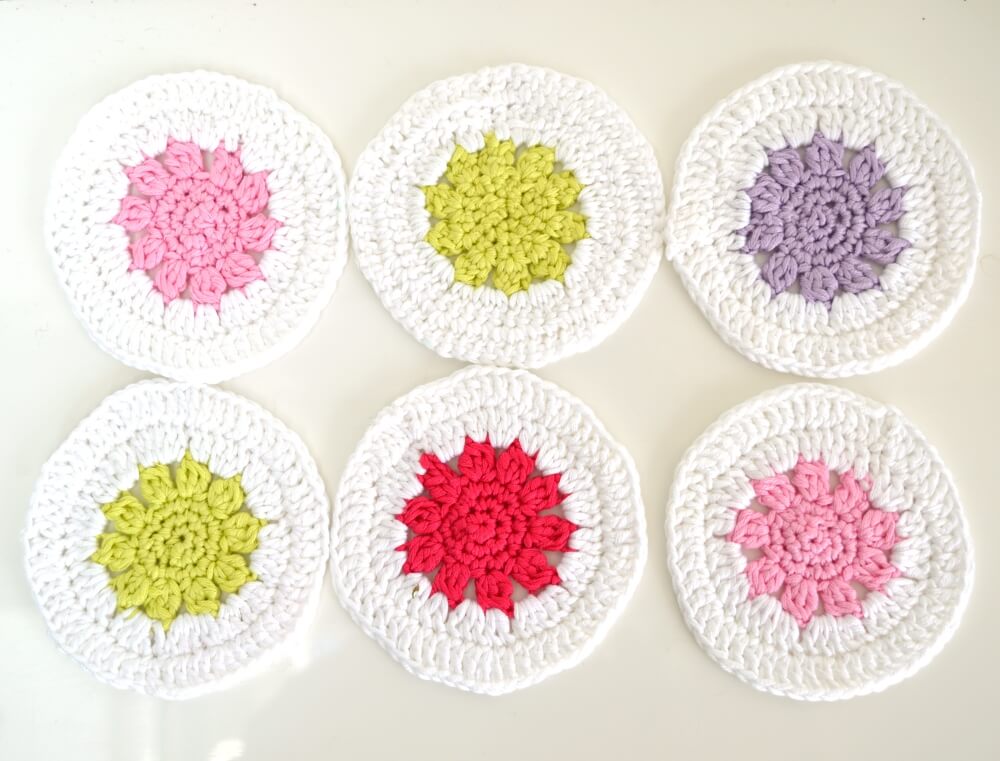
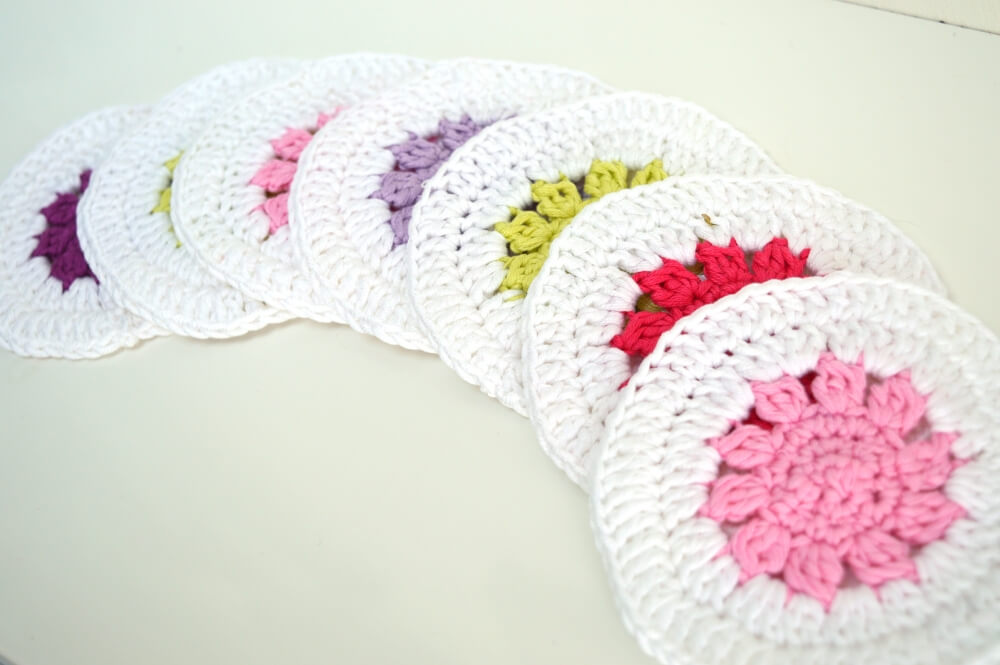
Sometimes it’s just fun to dress up the table a bit. And what is better suited for that than these fun crochet coasters? I used small amounts of cotton left over from previous projects, making them easily washable. Of course, other types of yarn would also work perfectly fine. A very cheerful way to use up those little ends of yarn!
This pattern is written in American English crochet terminology.
Materials
A small amount of sport weight yarn. In the sample coasters, Wibra Nova was used (100% mercerized cotton; 110 m (120 yds) / 50 g), per coaster 11 m (12 yds) / 5 g in the main color and 7 m (8 yds) / 3 g in the contrast color.
Crochet hook size 3.5 mm (US # E/4).
Special stitches
Popcorn stitch: [Yo, insert hook in indicated st or sp, yo, pull lp through st, yo, pull lp through first 2 lp’s on hook] 3 times, yo and draw through all lps on hook (popcorn made).
Beg popcorn: [Yo, insert hook in indicated st or sp, yo, pull lp through st, yo, pull lp through first 2 lp’s on hook] 2 times, yo and draw through all lps on hook (popcorn made)
Instructions
Round 1: With CC ch 1, 6 sc in first ch and sl st closed to first sc (6 sts). Round 2: Ch 1, 2 sc in each st, sl st to first ch of round (12 sts). Round 3: Ch 1 (counts as 1 sc), 1 sc in 1st st, *1 sc in next st, 2 sc in next st; rep from *, sl st to turning ch (19 sts). Round 4: Ch 3 (counts as 1 dc), beg popcorn in 1st st, ch 2, skip next st, *1 popcorn in next st, ch 2, skip next st; rep from *, sl st to top of first popcorn. Break yarn.
Round 5: With MC ch 3 (counts as 1 dc), 1 dc in top of popcorn, *3 dc in next ch-2 sp, 2 dc in top of next popcorn; rep from *, end with 3 dc in last ch-2 sp, sl st to 3rd ch of turning ch. Round 6: Ch 3 (counts as 1 dc), 1 dc in 1st st, *1 dc in next 4 sts, 2 dc in next st; rep from * to last 4 sts, 1 dc in each of next 4 sts, sl st to 3rd ch of turning ch. Break yarn and weave in ends.
In what colors will you be making your fun crochet coasters?
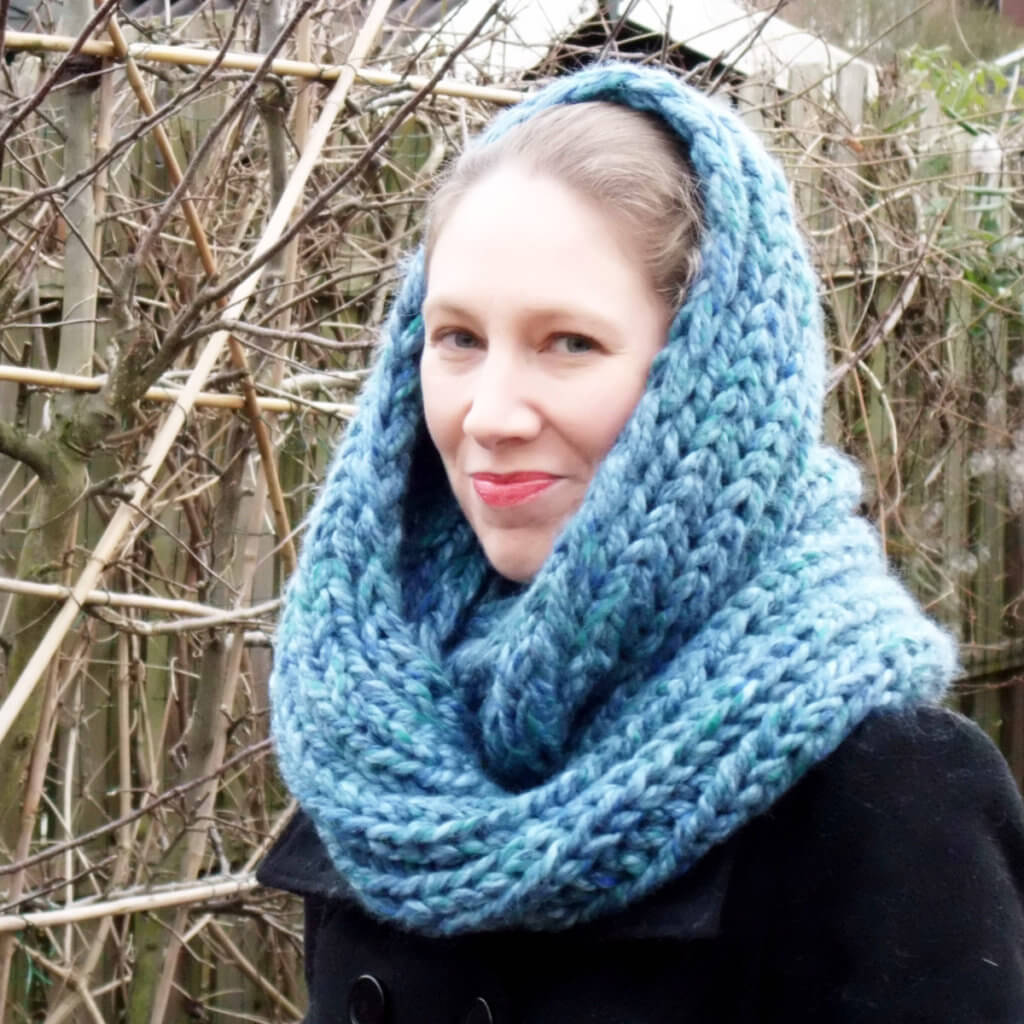
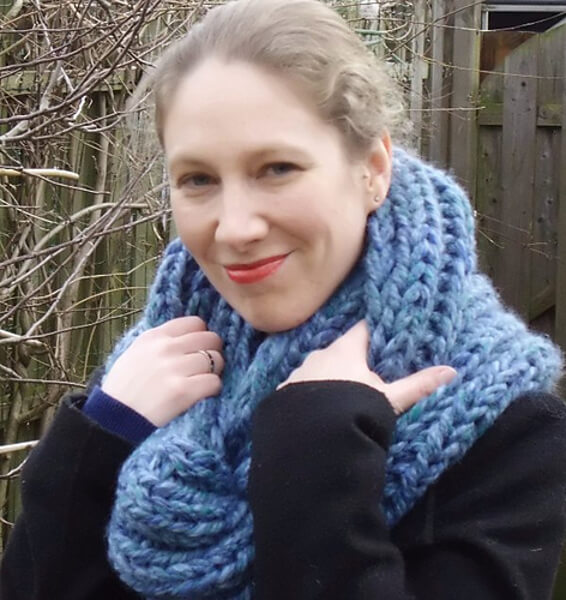
Sometimes you just want to get warm and make a statement. With the Frost Giant Cowl, you can achieve both. The cowl is worked flat and has two finishing options, choose the one you feel most comfortable with. The finishing options consist of either plain seaming or a three-needle-bind-off.
Materials
Yarn The sample cowl was knit using 270 m (297 yards) / 450 g Wibra Myrna [80% acrylic, 20% wool; 60 m (66 yds) per 100 g skein] held double. Substitute any (extra) bulky weight yarn for a similar result. Using a thinner yarn will result in a less humongous cowl.
Recommended needles Needles in your preferred style in the following sizes (or to match gauge):
Size 14 mm (US #18)
1 extra needle in size 14 mm (US #18) or slightly smaller (only needed with the three-needle bind-off finishing option)
Adjust needle size appropriately when using a less bulky yarn for a smaller cowl.
Other
Yarn needle
Waste yarn (optional) – only needed with the three-needle bind- off finishing option, worsted or aran weight yarn held double or triple can be used
Gauge
Gauge is not critical in this design. For the sample cowl: 5.5 sts / 8 rows = 10 cm (4 inches) measured over 2×2 rib.
Sizes and Finished Measurements
27 cm (11 inch) wide (unstretched), 70 cm (27 ½ inch) long.
Skills required
The plain seaming finishing option in this pattern is suitable for the beginning knitter. The three-needle bind-off finishing option requires a provisional cast on. Because this is a more advanced knitting technique, this version is suitable for the intermediate knitter. Stitches used include knit, purl and slipping stitches.
Abbreviations
BO – bind off CO – cast on k – knit p – purl rep – repeat sl – slip st(s) – stitch(es) wyib – with yarn in back
Pattern notes
Yarn is held double throughout.
Always slip the first stitch of the row purl-wise with the yarn held to the back.
When you run out of yarn, a new skein will be attached by knitting a few stitches with both the new and old yarn held double. The ends can be woven in later.
Instructions
Seamed finishing option: CO 18 sts with the yarn held double. Row 1: Sl1wyib, k2, [p2, k2] 3 times, p3.
Three-needle bind-off finishing option: CO 18 sts with waste yarn held double or triple. Row 1: Knit. Switch to working yarn held double. Row 2: K3, [p2, k2] 3 times, p3.
Both finishing options: Next: Sl1wyib, k2, [p2, k2] 3 times, p3. Rep this row until length of piece is 148 cm (58 inches) or desired length.
Bind-off Seamed finishing option: BO using your BO of choice, for example, the knit bind-off.
Next: Hold the ends of the piece together and use the yarn needle to sew both ends together and form a loop. Be careful not to twist the loop before seaming the ends together.
Three-needle bind-off finishing option: Transfer the stitches from the waste yarn to the extra needle, be careful not to twist the loop when holding the beginning and end of the piece together.
Step 1: Hold both needles holding sts next to each other. Step 2: With the third needle, knit each st through both the first st on the needle closest to you as well as through the first st on the back needle at the same time. Wrap as for a knit st and complete the stitch as usual. Step 3: Rep step 2 one time. Step 4: There are now 2 sts on your right hand needle. Lift the first st worked over the second st worked, using the tip of your left hand needle. Step 5: Rep steps 3-4 until all sts are BO.
Tip: Use a crochet hook to weave yarn ends in, when the yarn is to thick to use regular yarn needles. Just grab the yarn with the hook, pull it through the fabric and repeat.
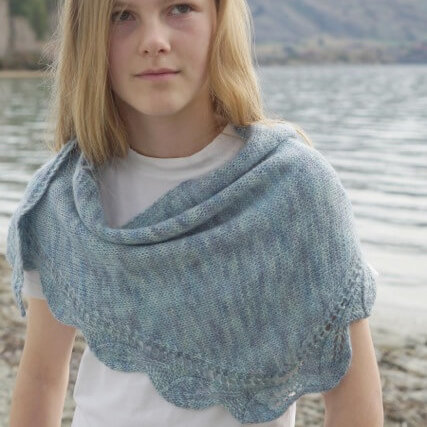
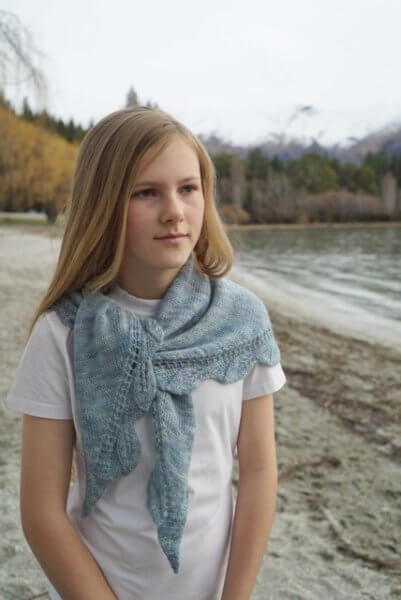
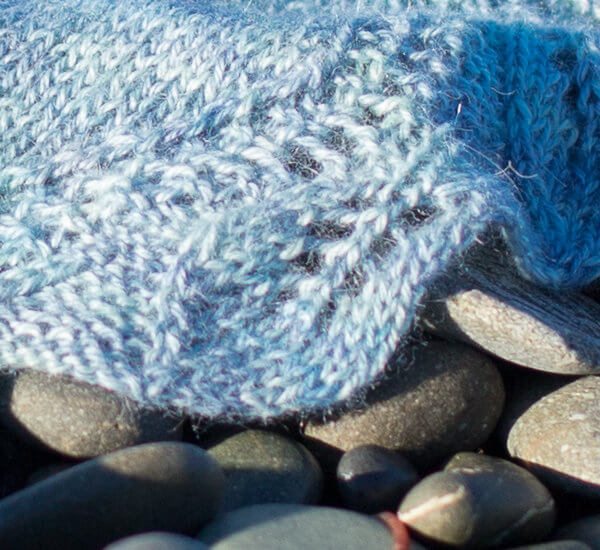
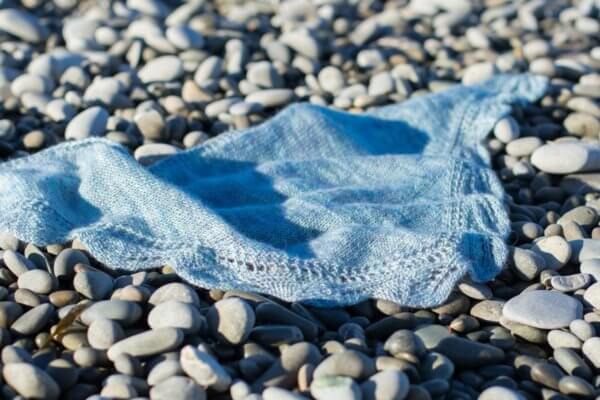
The Autumn Leaves Shawl features a simple stockinette body knit sideways in a shallow triangle shape. The leafy border is knitted on at the same time. Made in a loose gauge, Autumn Leaves is an airy layering piece, just enough for when there’s a chill in the air.
This design works great with that special skein of fingering weight yarn. The Autumn Leaves Shawl can, however, be made in any size, using any weight of yarn. Just knit until you have reached half of your yarn or half the size you want the shawl or shawlette to be. Since the body is in plain stockinette this pattern is also very suited to use with hand dyed yarns. Instructions for the lace border are both written and charted.
Materials
Yarn 360 m (393 yds) / 100 g Knitcola Alpaca Hand-dyed Yarn [100 % alpaca] in light blue. Substitute any fingering weight yarn in a solid or semi-solid color for a similar result.
Recommended needles Size 4.5 mm (US 7), 80 cm (32 inches) circular needles were used for the sample shawl.
Other
Yarn needle
2 stitch markers
Gauge
Gauge is not critical in this design. For the sample shawl measured after blocking: 14 sts / 22 rows = 10 cm (4 inches) over stockinette.
Size and finished measurements
Finished dimensions of the sample shawl: 140 cm (55 inches) along the upper edge and a depth of 32 cm (12 ½ inches), measured after blocking. The sample shawl has a total of 16 leaves.
This shawl can easily be made larger by using heavier yarn and/or working more repeats. This will, of course, increase the amount of yarn needed.
Skills required
This pattern features lace knitted on both right and wrong side rows. Stitches used include knit, purl, k2tog, p2tog, kfb, m1, skp, yo, and sl2-k-p2sso. Therefore, this pattern is suitable for the intermediate or lace knitter.
Abbreviations
BO – bind off CO – cast on k – knit k2tog – knit two together kfb – knit in the front and in the back of the stitch m1 – increase by lifting the loop between the stitch just knit and the next one from the front with your left needle, then knit into the back of the loop p – purl p2tog – purl two together PM – place marker rep – repeat RM – remove marker RS/WS – right side/wrong side skp – slip, knit, pass the slipped stitch over the knitted stitch sl2-k1-p2sso – slip two together, knit one, pass two stitches over (2 stitches decreased) sl1 wyif – slip 1 stitch as if to purl, with yarn in front SM – slip marker st(s) – stitch(es) yo – yarn over
Pattern notes
Work the Autumn Leaves shawl sideways from tip to tip, with increases and then decreases worked on one side every other row. The lace border is worked simultaneously.
The pattern has a garter stitch border of 4 stitches on the upper edge, with a decorative slipped stitch edge finishing.
Always slip markers as you come to them.
Instead of the skp decrease ssk can be used if desired.
Stitch guide
Slipped stitch edge: Slip the last stitch on each WS row as if to purl, with yarn in front.
Wrap and Turn (w&t): Bring your yarn to the front between the needles, slip the next stitch purl-wise, bring your yarn between the needles to the back again, slip the stitch back to the left needle, and turn work.
Rows 13-22: Rep row 11-12 five more times (13 sts).
Body – increase section
Both the written out and charted instructions for the leafy border can be found at the bottom of this page. Please note, stitch counts given here are only applicable to the body stitches.
Row 1 (RS): K4, SM, k1, m1, PM, work row 1 of Leafy border. (6 sts – 1 st increased in body) Row 2 (WS): Work row 2 of Leafy border, SM, p to marker, SM, k3, sl1 wyif. Row 3: K4, SM, k to 1 st before marker, M1, K1, SM, work row 3 of Leafy border. (7 sts – 1 st increased in body) Row 4: Work row 4 of Leafy border, SM, p to marker, SM, k3, sl1 wyif. Row 5: K4, SM, k to 1 st before marker, M1, K1, SM, work row 5 of Leafy border. (8 sts – 1 st increased in body) Row 6: Work row 6 of Leafy border, SM, p to marker, SM, k3, sl1 wyif.
Continue in this manner until all 18 rows of the border pattern have been worked. (14 sts in body)
Next: Repeat last 18 rows until 8 leaves or almost half of the yarn has been used. (77 sts in body)
Next: Rep rows 1-16 once again. (85 sts in body)
Tip: Weigh your project in between pattern repeats to get an idea the amount of yarn needed for each repeat. This way, a better estimate can be made whether another repeat is possible with your available amount of yarn.
Easing the border around the center point
Row 17: K4, SM, k to 1 st before marker, m1, K1, SM, work row 17 of Leafy border. (78 sts – 1 st increased in body) Row 18: Work row 18 of Leafy border, RM, w&t. Row 19: PM, work row 1 of Leafy border. Row 20: Work row 2 of Leafy border, SM, pick up and purl wrap together with corresponding st, p to marker, SM, k3, sl1 wyif.
Body – decrease section
Row 1 (RS): K4, SM, k to 2 sts before marker, k2tog, SM, work row 3 of Leafy border. (77 sts – 1 st decreased in body) Row 2 (WS): Work row 4 of Leafy border, SM, p to marker, SM, k3, sl1 wyif. Row 3: K4, SM, k to 2 sts before marker, k2tog, SM, work row 5 of Leafy border. (76 sts – 1 st decreased in body) Row 4: Work row 6 of Leafy border, SM, p to marker, SM, k3, sl1 wyif.
Continue in this manner until the same number of leaves as on the increase section have been completed (14 sts).
Next row (RS): K4, SM, k1, k2tog, k to end, removing marker. (13 sts – 1 st decreased in body) Next row (WS): P to marker, SM, k3, sl1 wyif. Rep these last 2 rows 9 more times, removing marker after final rep (4 sts).
Next row: K1, k2tog, k1. (3 sts) Next row: K2, sl1 wyif. Next row: K1, k2tog. (2 sts) Next row: K1, sl1 wyif. Next row: K2tog and fasten off.
Finishing
Finally, weave in ends and block your Autumn Leaves Shawl to shape.
Thanks to my Patreon supporters for bringing you this freebie! Creating quality patterns and tutorials is a lot of work and resource-intensive. However, I find it important to give you free content like this tutorial. Thanks to the generous support of my Patreon supporters, I can make it happen. Thank you, patrons! Click here to join, or click here to read more about La Visch Designs on Patreon.
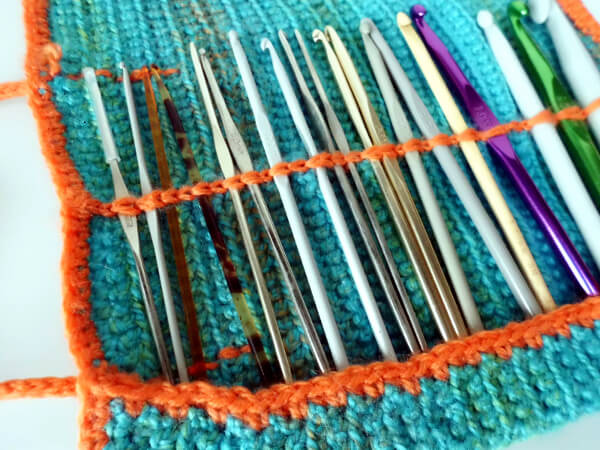
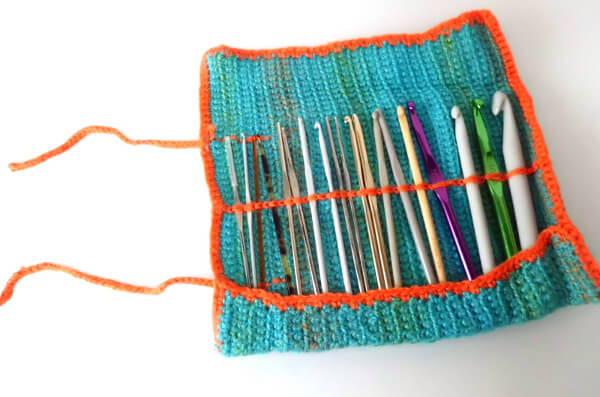
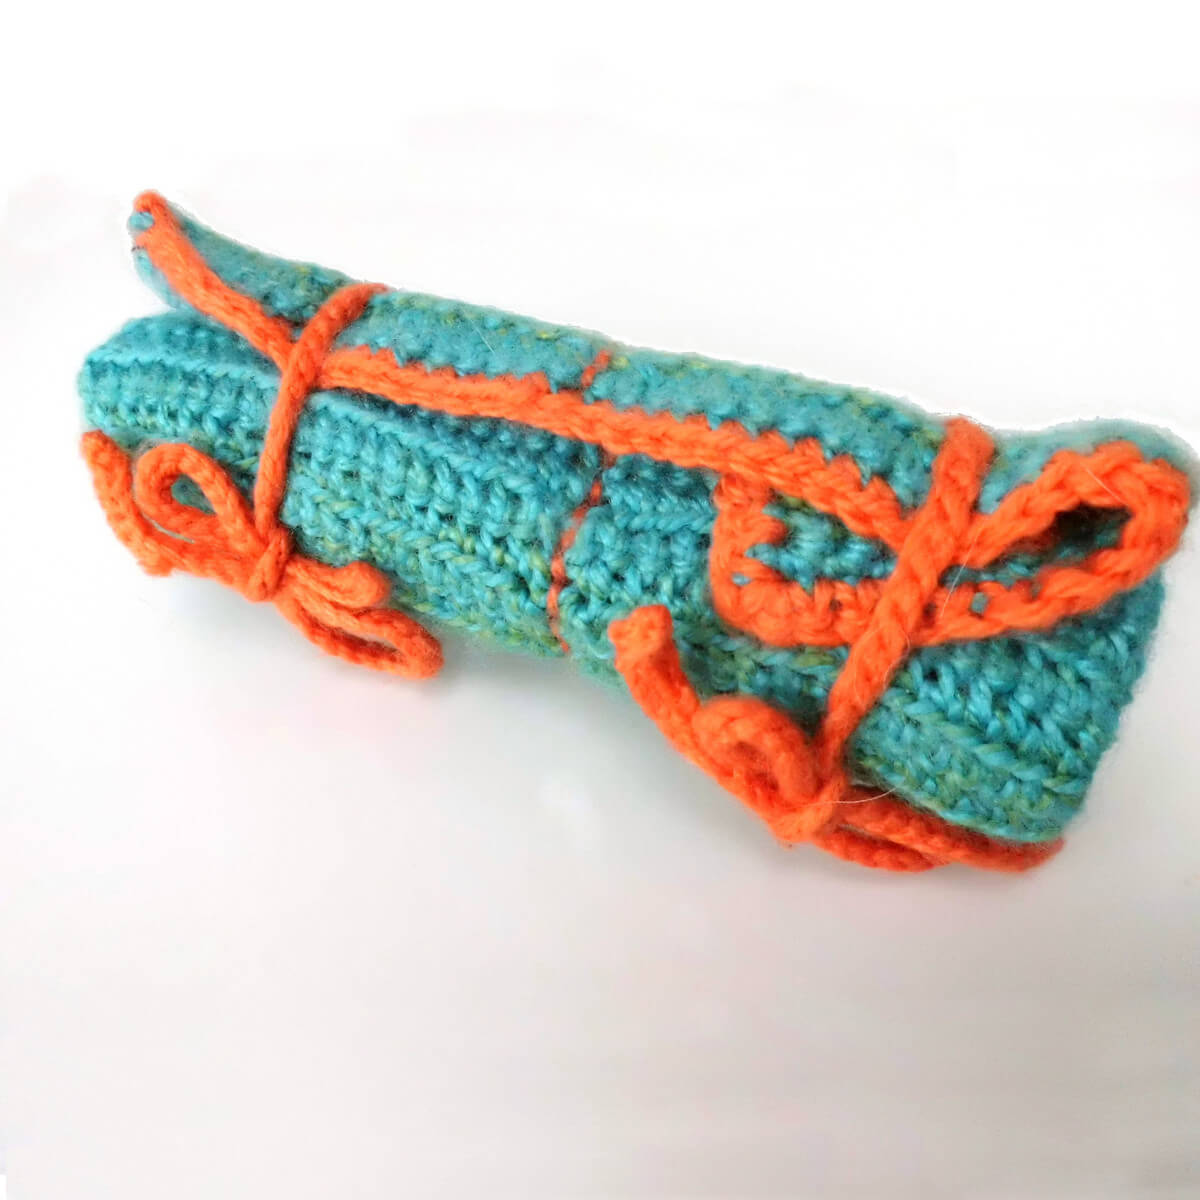
When I learned to crochet I soon found the need to store my rapidly increasing stash of crochet hooks. But where? Make it myself of course! Since I have hooks from very thin to very thick I wanted to have one in which I can easily adjust the size of the pockets. The pattern for this Roll it Up & Go crochet hook case is written more as a template instead of exact instructions.
This pattern is written in American English crochet terminology.
Difficulty
Techniques used consist of ch, sc and slst. Because of this, the pattern is suitable for the beginner.
Materials
Less than 1 skein of yarn of choice
Even less in yarn of the same weight in a contrasting color
Crochet hook size 3.5 mm (US # E)
Crochet hook size 4 mm (US # G).
Finished Size
Any size you want it to be!
Gauge
Depends on the size desired and yarn used.
Notes
The main body of this hook case consists of a rectangle shape worked in Sc in the front loops only to get a more thin and flexible fabric.
Instructions for the roll it up & go crochet hook case
The body of the hook case
Ch a length equal to the length of the longest hook you want to keep in the case + 10 cm (4 inch) for the pockets. Let’s call that amount of chains “A”. In my case A was equal to 51 sts. Make sure your A is an uneven number. Ch 1, turn.
Row 1: Sc in second ch from hook and in each ch across. Ch 1, turn. Work the sc in the single bump on the back of the chain for a finishing that will look the same on both ends of the rectangle.
Row 2: Sc (in front loops only!) in each sc for (A minus 3) / 2 sts, 1 sc in both loops of st, ch 1, skip 1 sc, 1 sc in both loops of st, sc in front loops only in each sc across, ch 1, turn
Repeat row 2 until you have twice the number of crochet hooks you want to keep in the case + 12. It is however always wise to make it bigger than you think you’ll possibly be needing. Fasten off.
Create the pocket
First, sc along one of the sides of the rectangle (perpendicular to the rows) with a contrasting color. I used orange. Then fasten off.
Next, fold up the side you just worked on perpendicular to the rows. Doing this will make a pocket, make sure the pocket is approx. 5 cm (2 inch). Fasten onto the crease with a slip stitch. Sc up the side of the pocket, making sure to crochet through both the upper and lower row. When you reach the end of the pocket, continue to sc up the side of the case, along the upper edge and down the other side. Then crochet both rows together again. Fasten off.
Holding the hooks in place
In the middle of the rectangle, the [ 1 sc in both loops of stitch, ch 1, skip 1 sc, 1 c in both loops of stitch] part created a line with “holes” in the fabric. These holes will be used to slip stitch the “holding” part of the hook case onto the rectangle. Up to 5 mm hooks, I use 1 st loop to hold the hook down. For bigger hooks skip 1 or even 2 holes and adjust the tension of your yarn to make a slip stitch loop big enough to accommodate the bigger hook. By using a contrasting color you can at any time in the future rework this part to fit more (or less) smaller or bigger hooks.
Hold your yarn at the back of your work (the outside of your crochet hook case). Push your hook into the work from the front to the back at the edge of the rectangle where column with the holes begins. Hook the yarn from behind your work and bring the new loop to the front. Be sure to hold on to the loose end of yarn!
Then, again push your hook through the fabric to the back, hook the yarn and bring it to the front of your work. This time bring your newly formed loop through the old one. Be careful not to pull the yarn too much or the fabric will pucker. When you reach the other side of the rectangle, fasten off.
Closure
In my Roll it Up & Go crochet hook case I used ties to keep it closed. Of course feel free to use buttons or something else instead.
With the larger hook make a chain big enough to wrap around your hook case when rolled up plus extra to tie into a bow. Also, add about 20 extra chains, the chain will end up shorter than it initially is. A total of 40 to 50 cm (16 to 17 inches) will probably be enough.
Next, switch to the smaller hook and slipstitch in the second chain from the hook and till the end. Fasten off. Repeat for second tie.
Finishing
Sew the ties to the outside of the Roll it Up & Go crochet hook case as pictured. Weave in ends and fill your hook case up with crochet hooks.