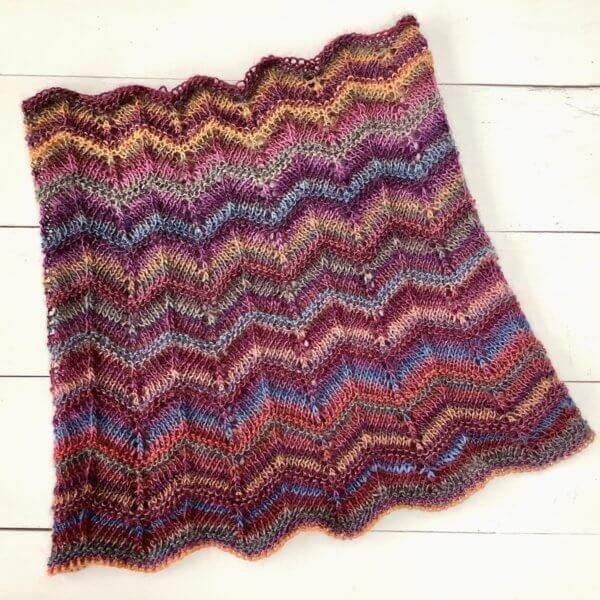
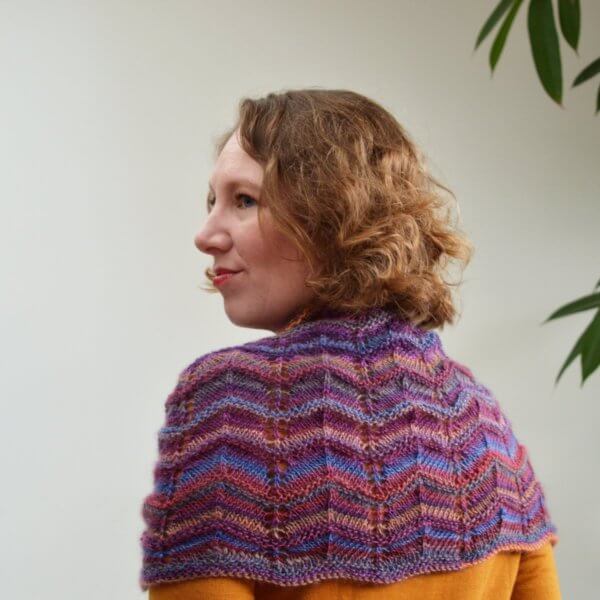
Designed for the self-striping yarn pictured, this cowl is a wonderful knit for both Spring and Fall. The lacy chevron patterning creates lovely wavy edges. The cowl is knit from the top down in a gentle conical shape for superb draping around the shoulders that will keep them nice and warm.
The Indian Summer Rye cowl is knit seamless and in the round from the top down. The instructions are provided both charted and written out.
Pay what you want: (minimum €5.50)
€
Difficulty level
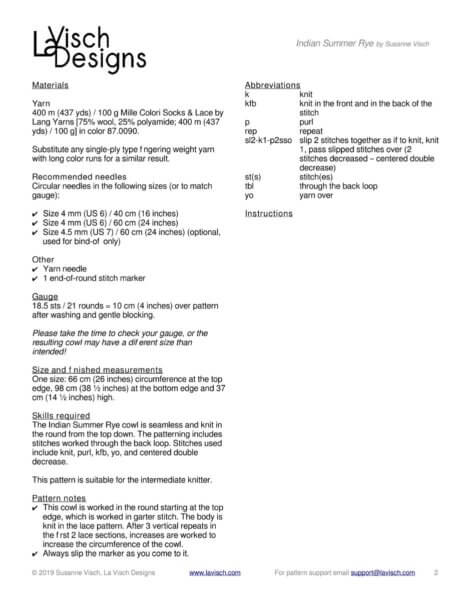
The Indian Summer Rye cowl is seamless and knit in the round from the top down. The patterning includes stitches worked through the back loop. Stitches used include knit, purl, kfb, yo, and a centered double decrease.
This pattern is suitable for the intermediate knitter.
Sizes and finished measurements
One size: 66 cm (26 inches) circumference at the top edge, 98 cm (38 ½ inches) at the bottom edge and 37 cm (14 ½ inches) high.
Pattern details
Gauge: 18.5 sts / 21 rounds = 10 cm (4 inches) over pattern after washing and gentle blocking. Please take the time to check your gauge, or the resulting cowl may have a different size than intended!
Pattern languages included: English and Dutch (Dit patroon omvat zowel een Nederlandse als een Engelse versie)
Digital PDF has 3 pages (letter size)
Materials
Yarn: 400 m (437 yds) / 100 g Mille Colori Socks & Lace by Lang Yarns [75% wool, 25% polyamide; 400 m (437 yds) / 100 g] in color 87.0090. Substitute any single-ply type fingering weight yarn with long color runs for a similar result.
Circular needles in the following sizes (or to match gauge):
Size 4 mm (US 6) / 40 cm (16 inches)
Size 4 mm (US 6) / 60 cm (24 inches)
Size 4.5 mm (US 7) / 60 cm (24 inches) (optional, used for bind-off only)
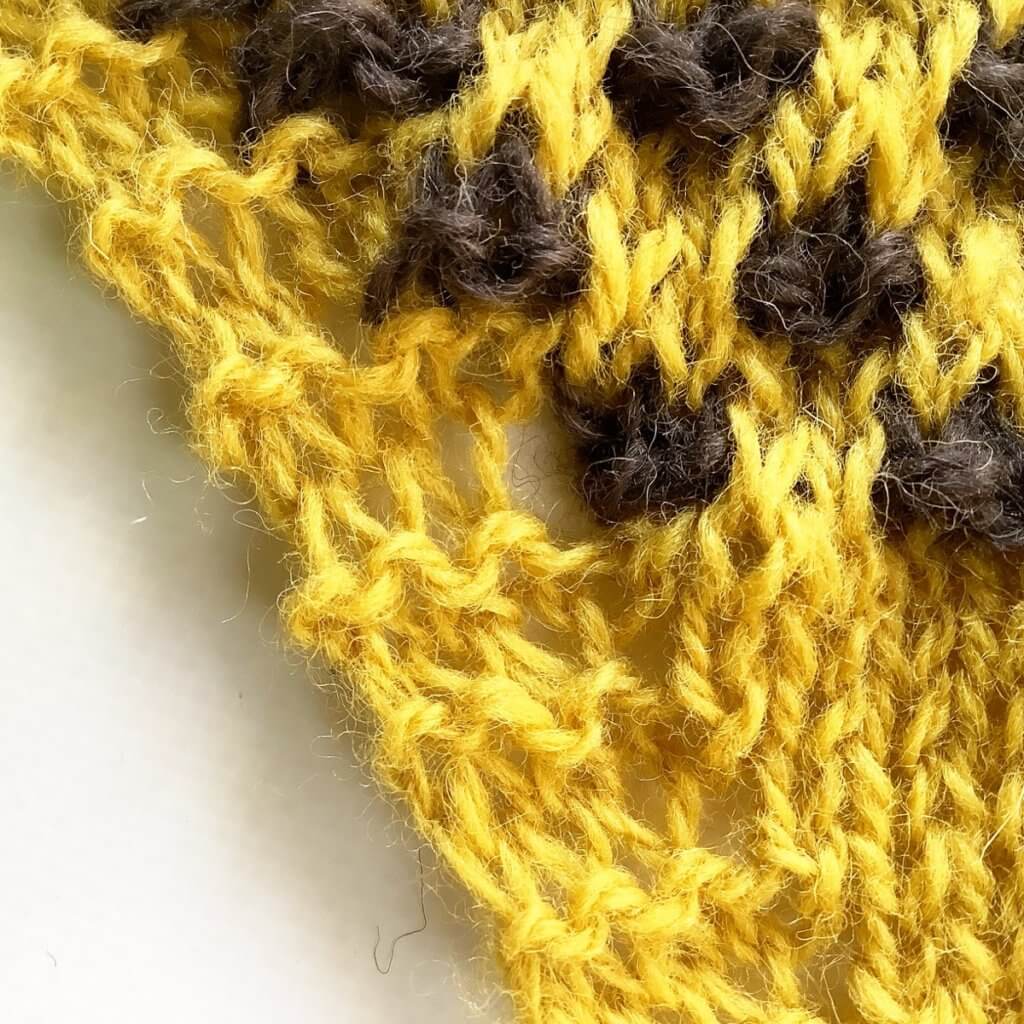
In this new design, I’m using mosaic slip-stitch patterning in the border. The beauty of this type of colorwork is that it is worked with a single color in a single row. In other words: An RS and a WS row are worked in the main color (MC). After working these two rows, the MC is dropped, and an RS and a WS row are worked with the contrast color (CC) yarn while slipping the sts indicated.
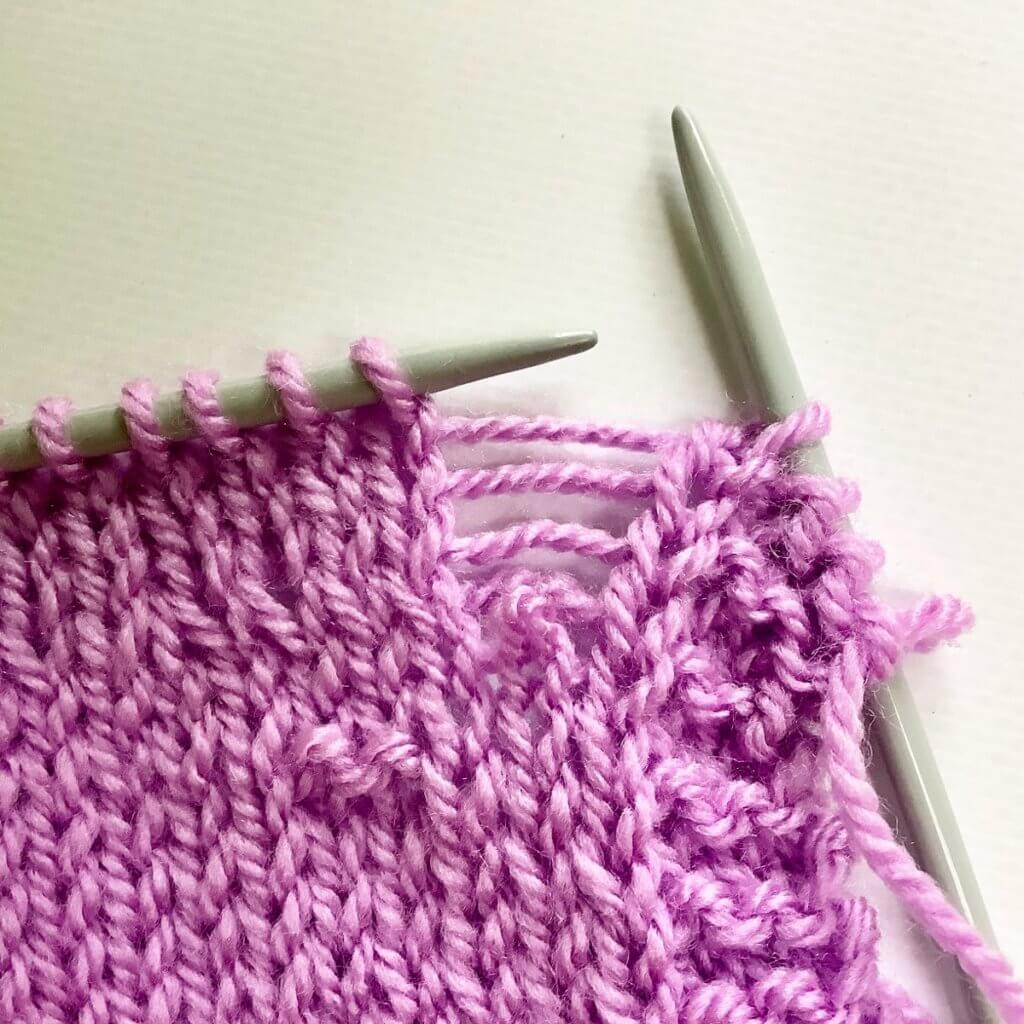
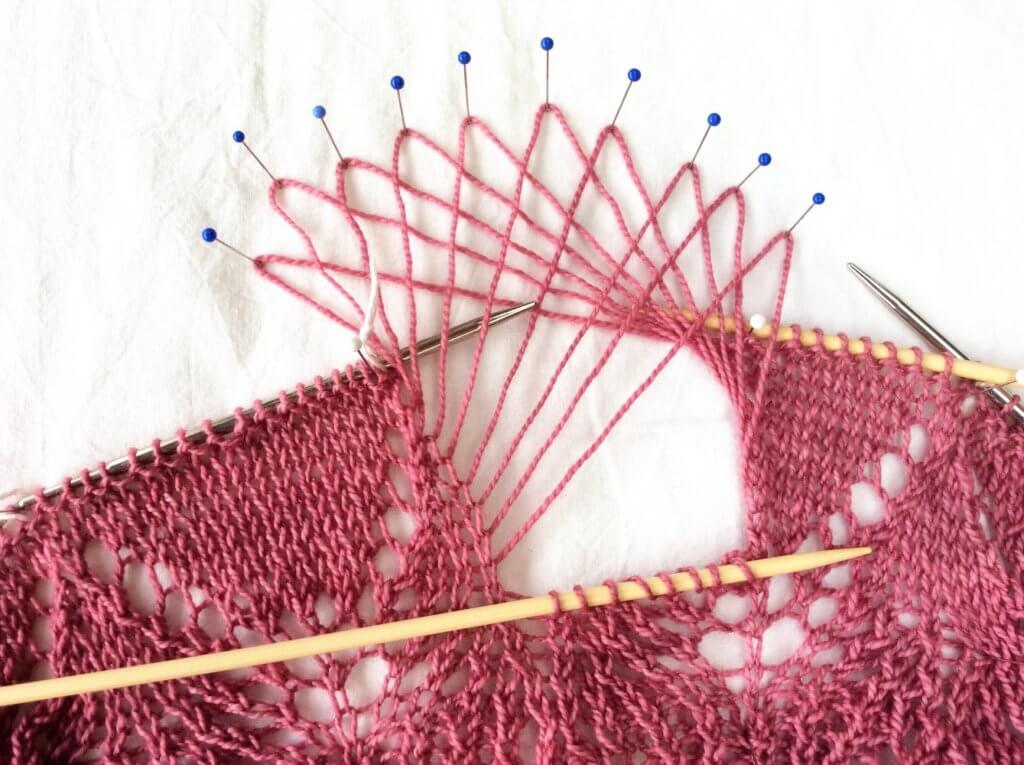
However, I didn’t want to use the CC yarn in the garter stitch border of 3 stitches on each side of the shawl. This caused the gaps to happen that you can see at the bottom dot:
So, of course, I had to think of a way to prevent these! I settled on a “wrap & turn” like approach, similar to w&t as in working traditional short-rows. Read on for the step by step how-to!
Materials used
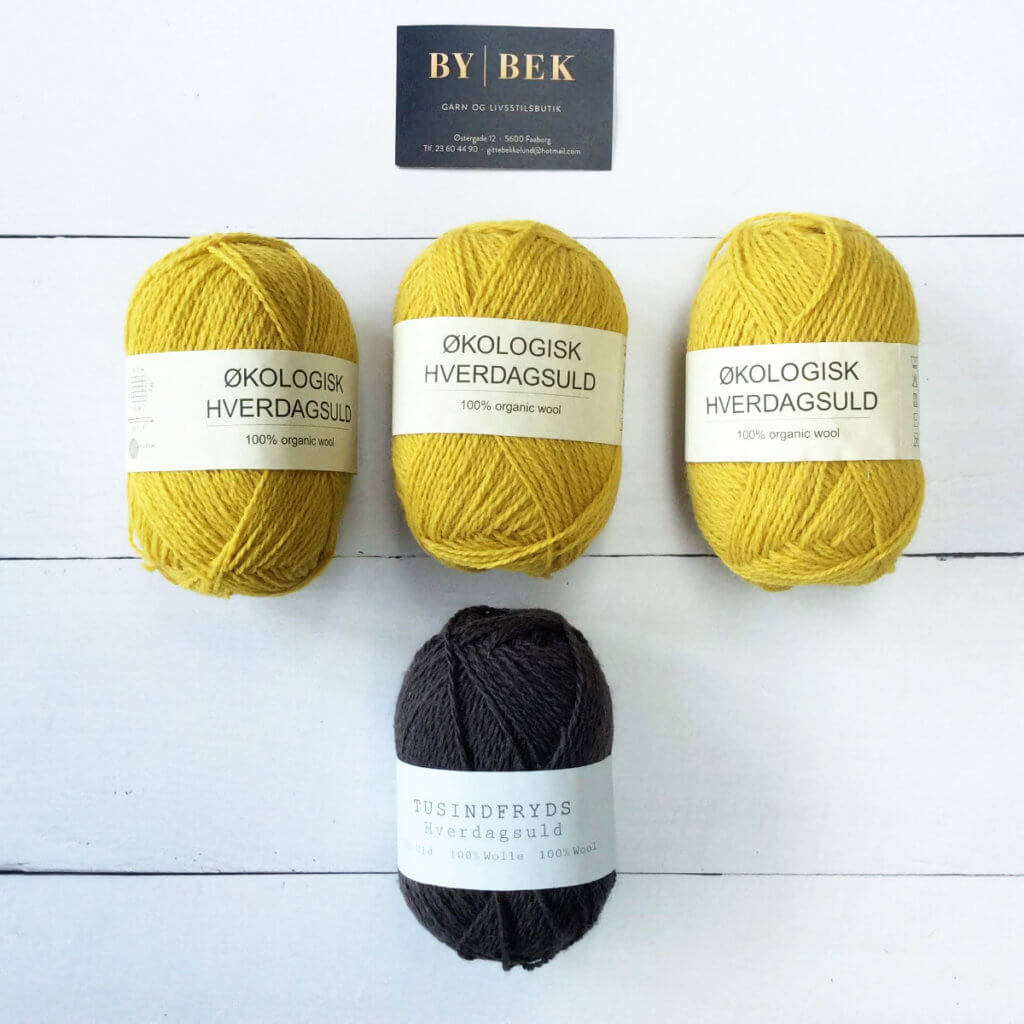
Yarn: The yellow yarn is Økologisk Hverdagsuld (“organic everyday wool”) by Camarose Dk. The brown is HverdagsUld by Tusindfryd. I got these at the lovely yarn store “By Bek” in Fåborg, Denmark when I was there on vacation.
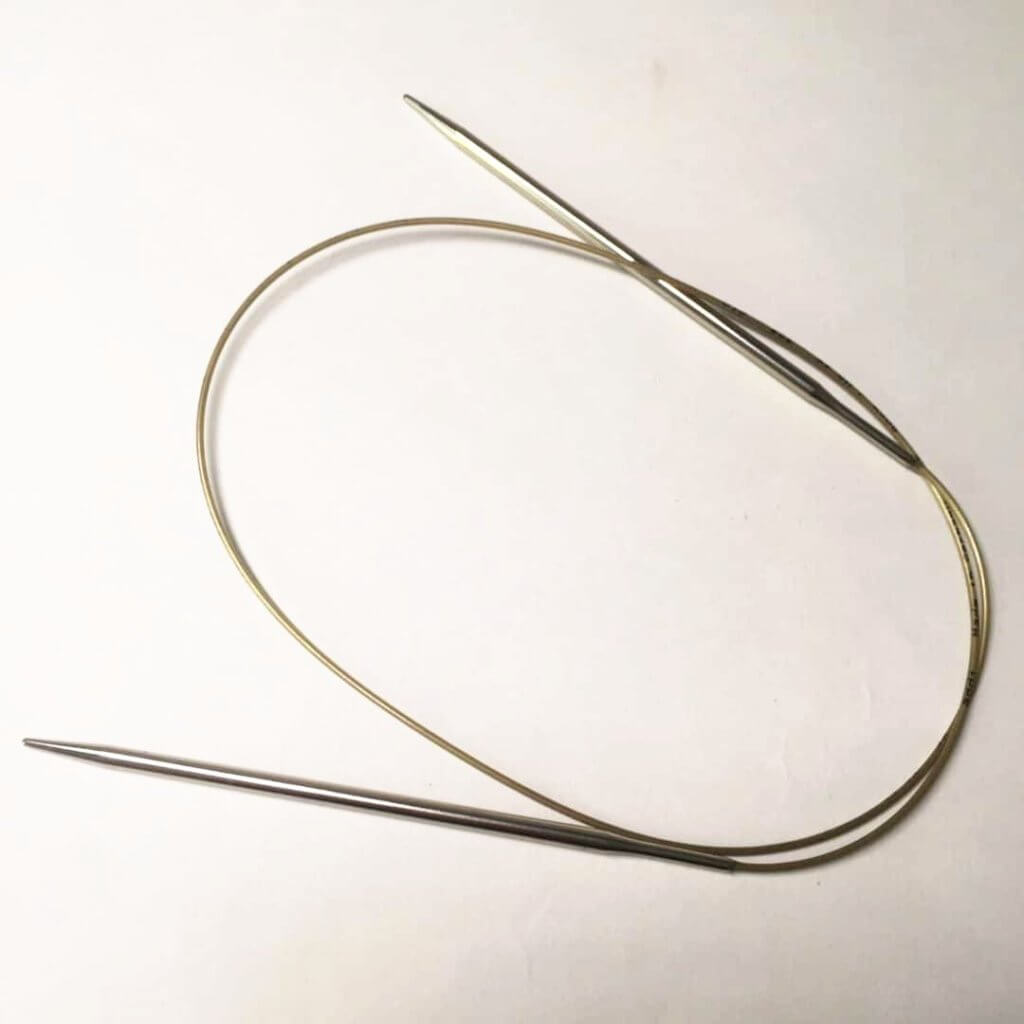
Needles: * Addi Circular Needles, pictured here in the 4 mm (US 6) size, with 80 cm (32 inches) cable.
Preventing gaps on the right step by step
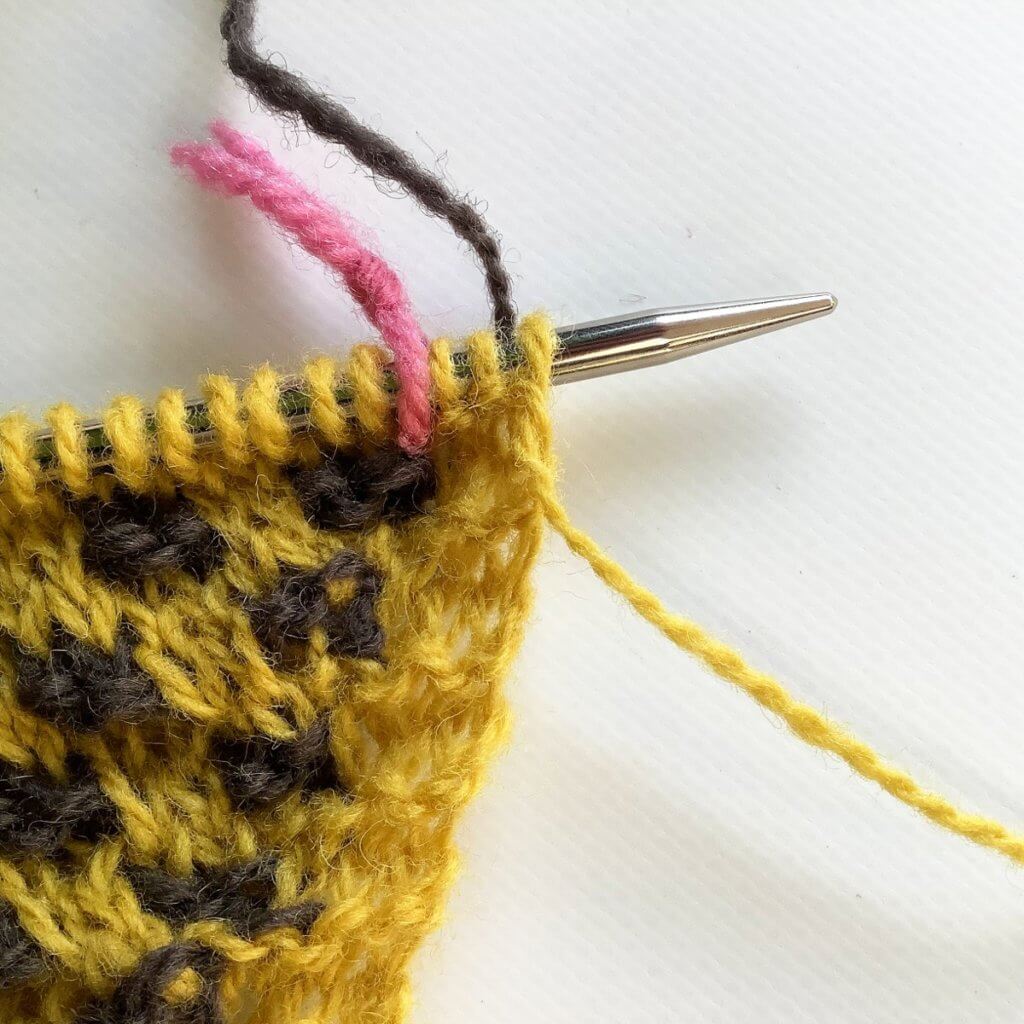
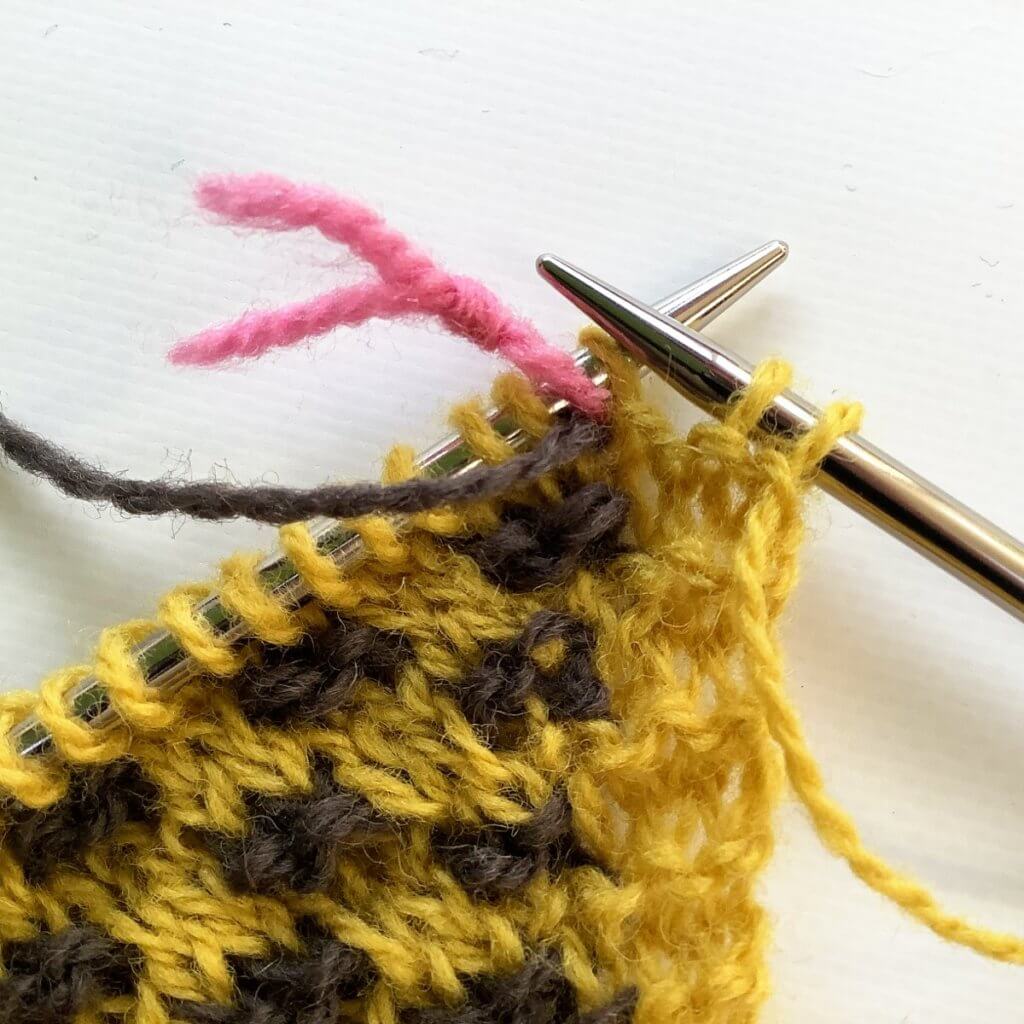
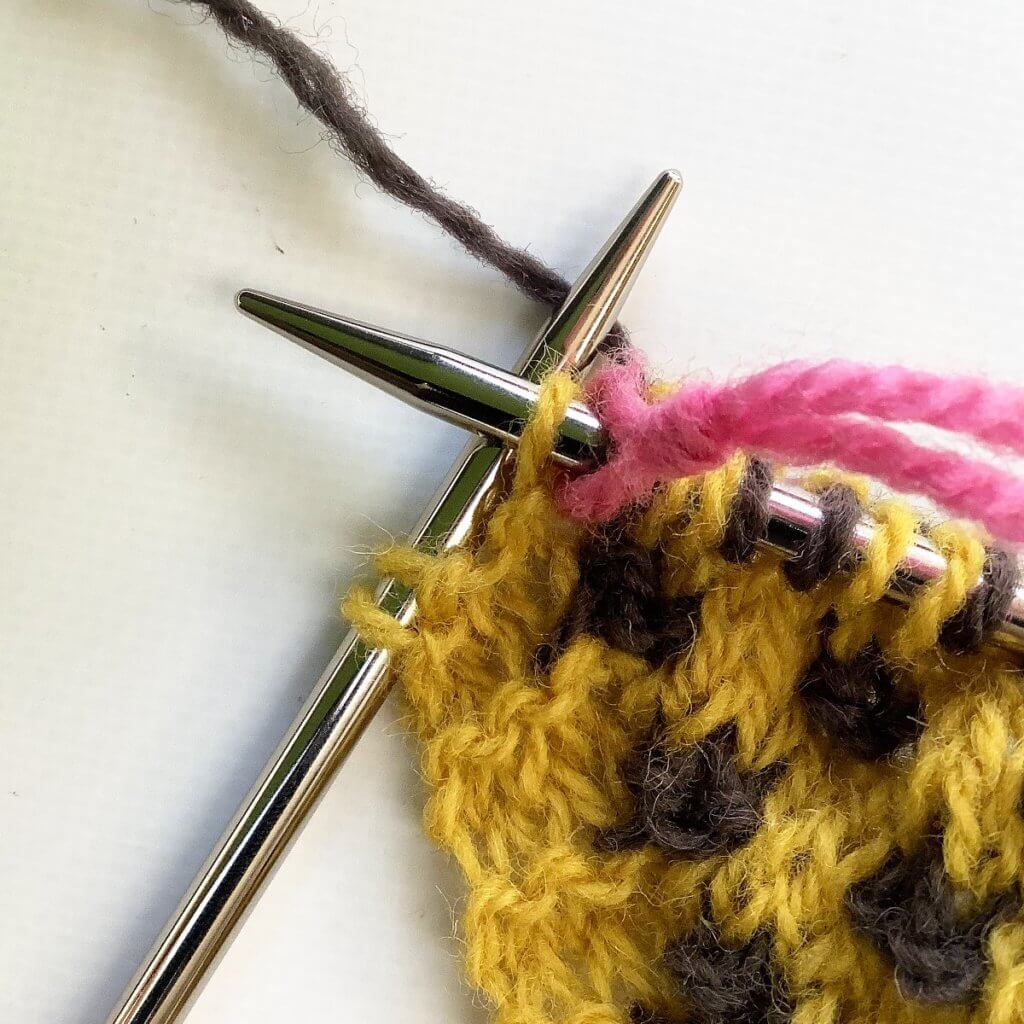
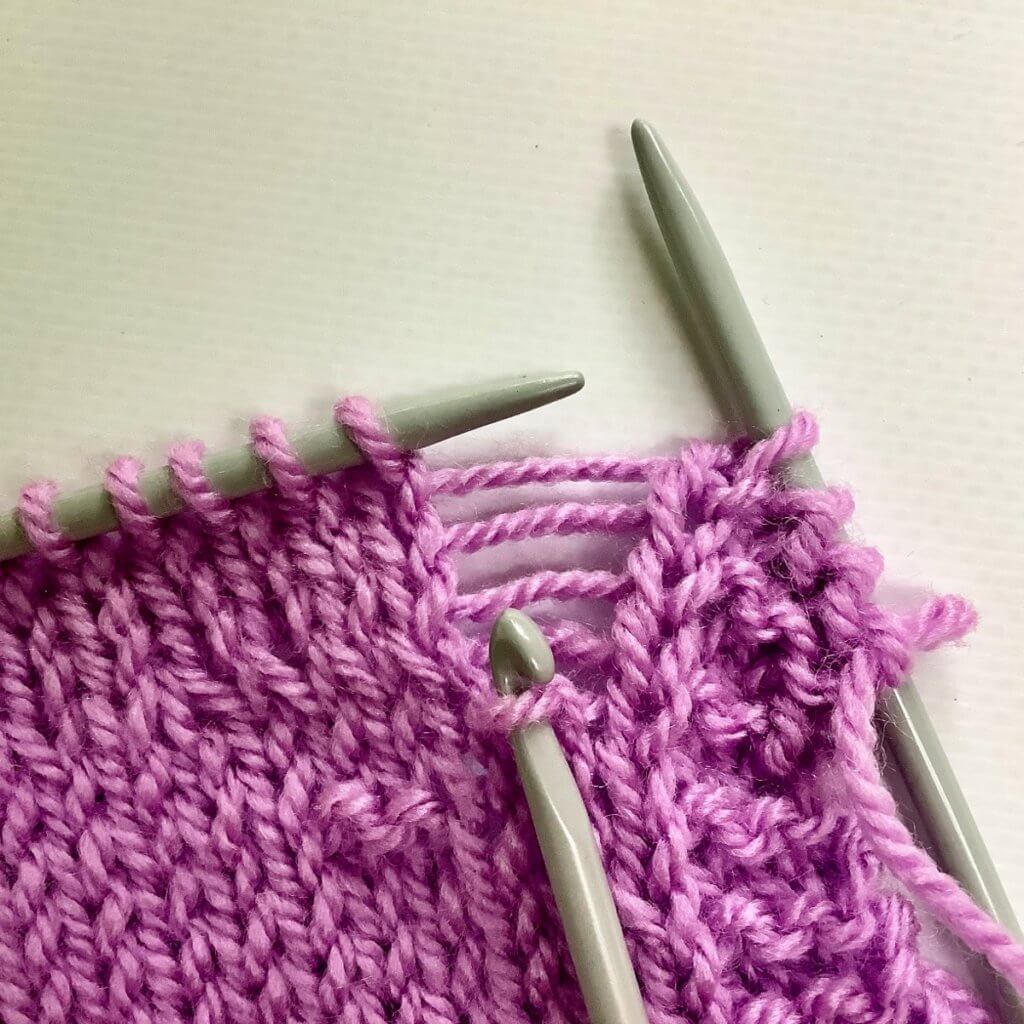
1. In this row, I’m about to start the RS row using the CC yarn. The CC yarn tail is located 3 stitches in from the edge of the work, at the WS of the fabric.
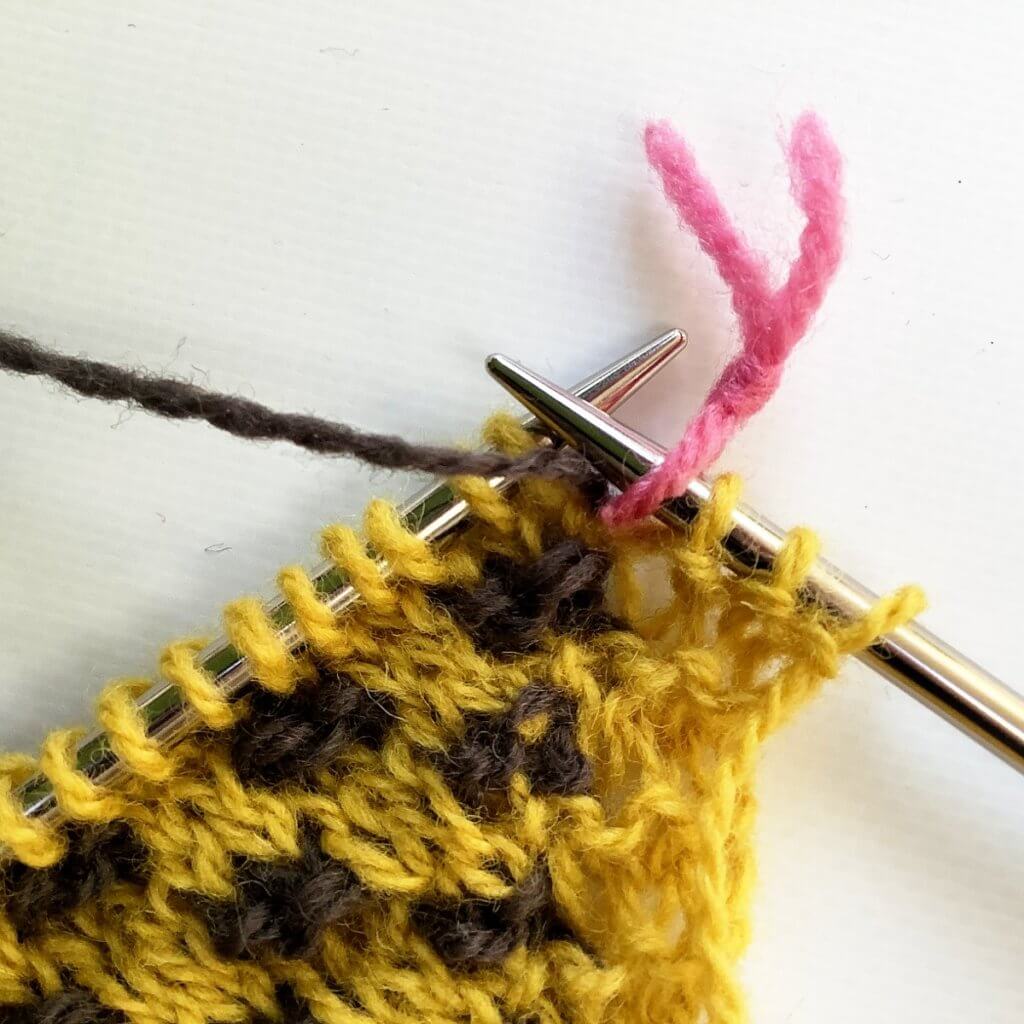
2. First, we have to reach that CC yarn tail. To do so, slip the 3 MC stitches purlwise as well as the stitch marker to the right-hand needle.
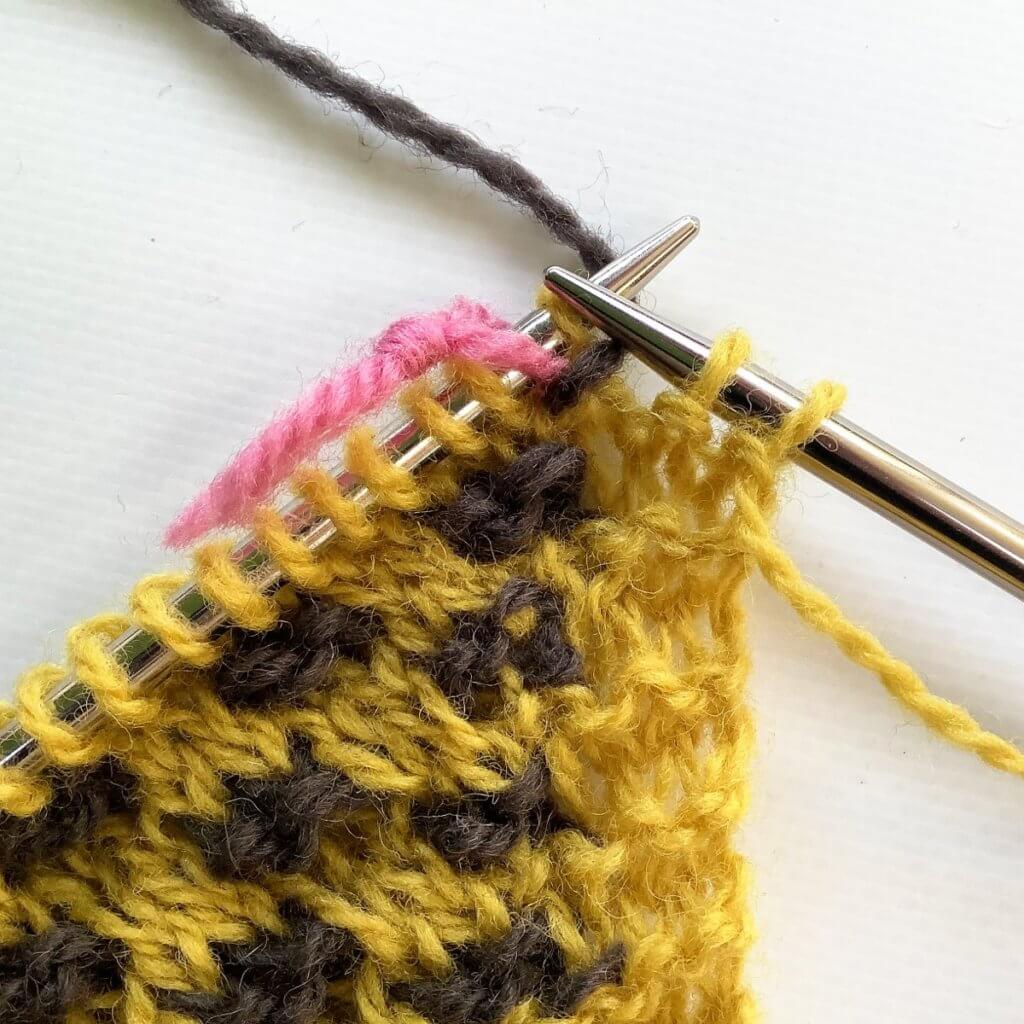
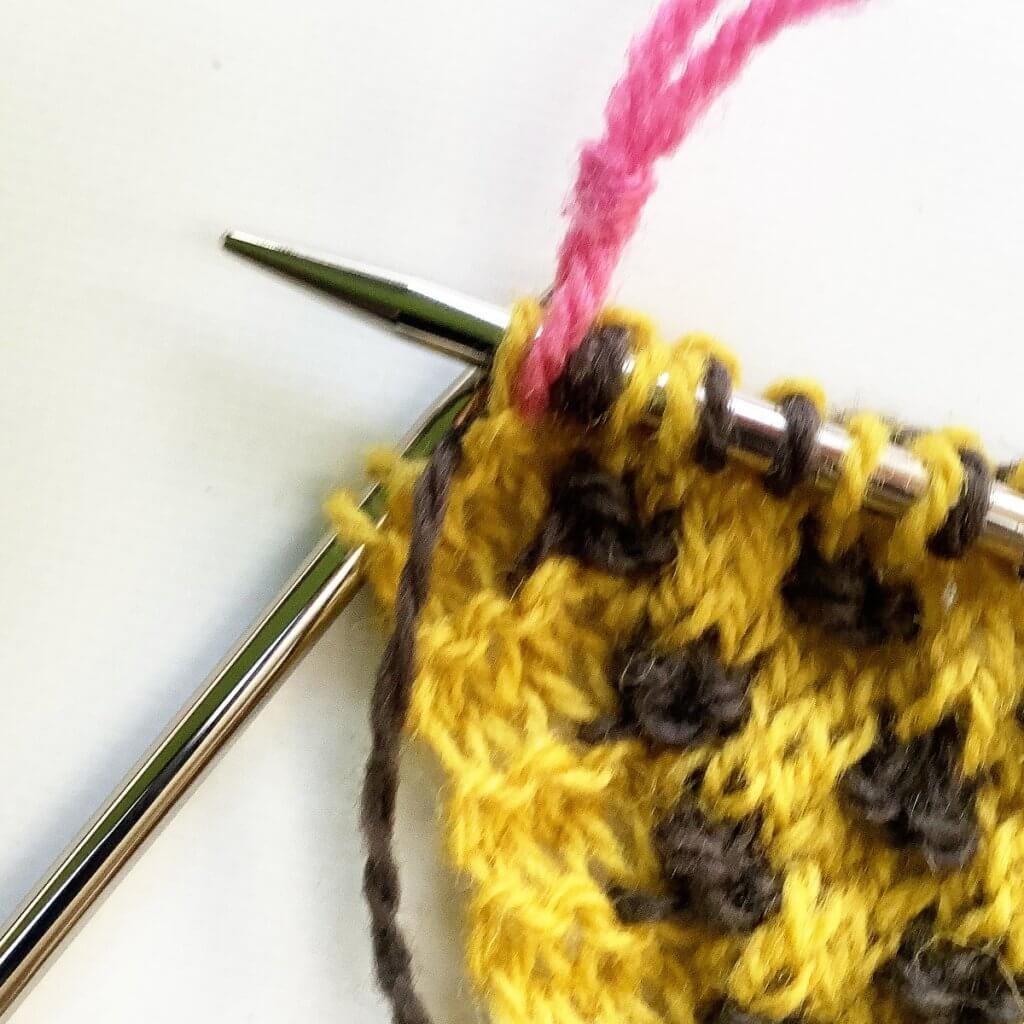
3. Next, bring the CC between the needles to the front of the work.
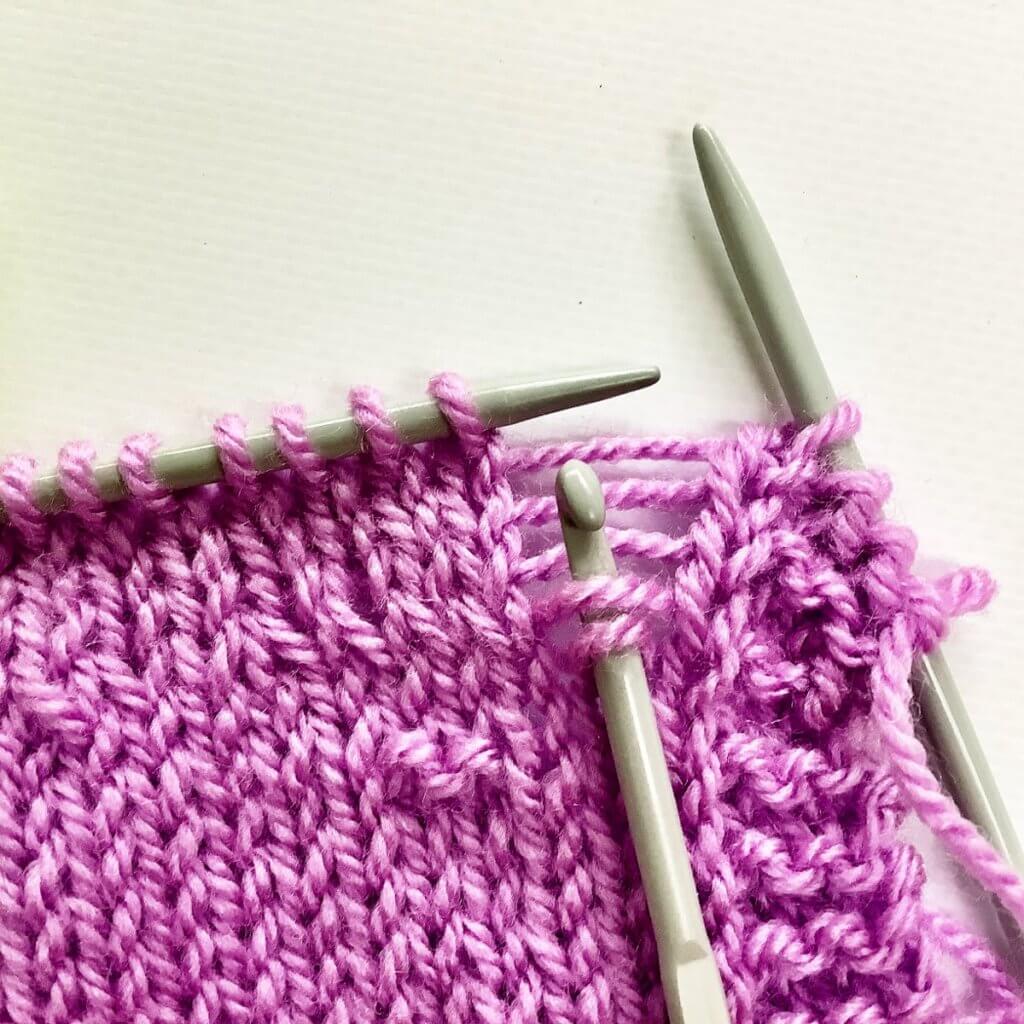
4. Slip the stitch marker and the first of the MC stitches back the left-hand needle.
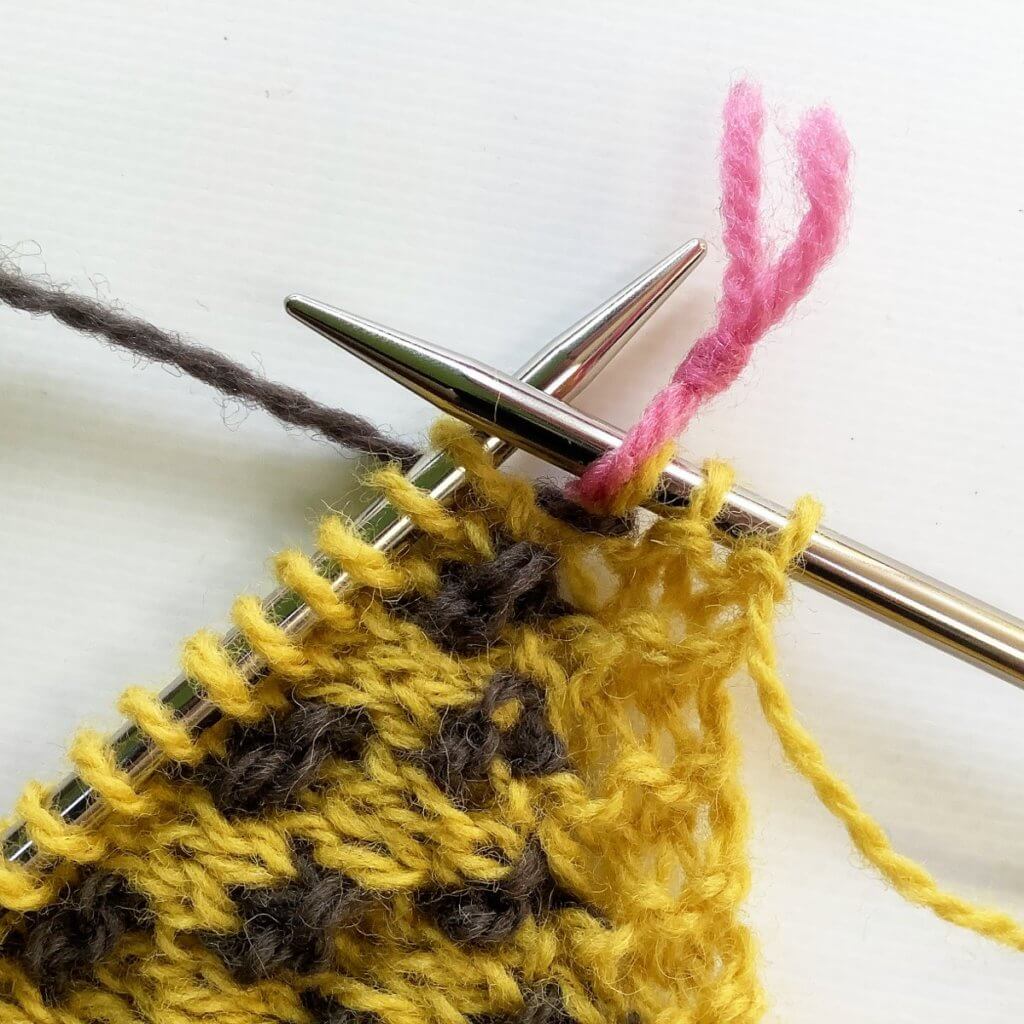
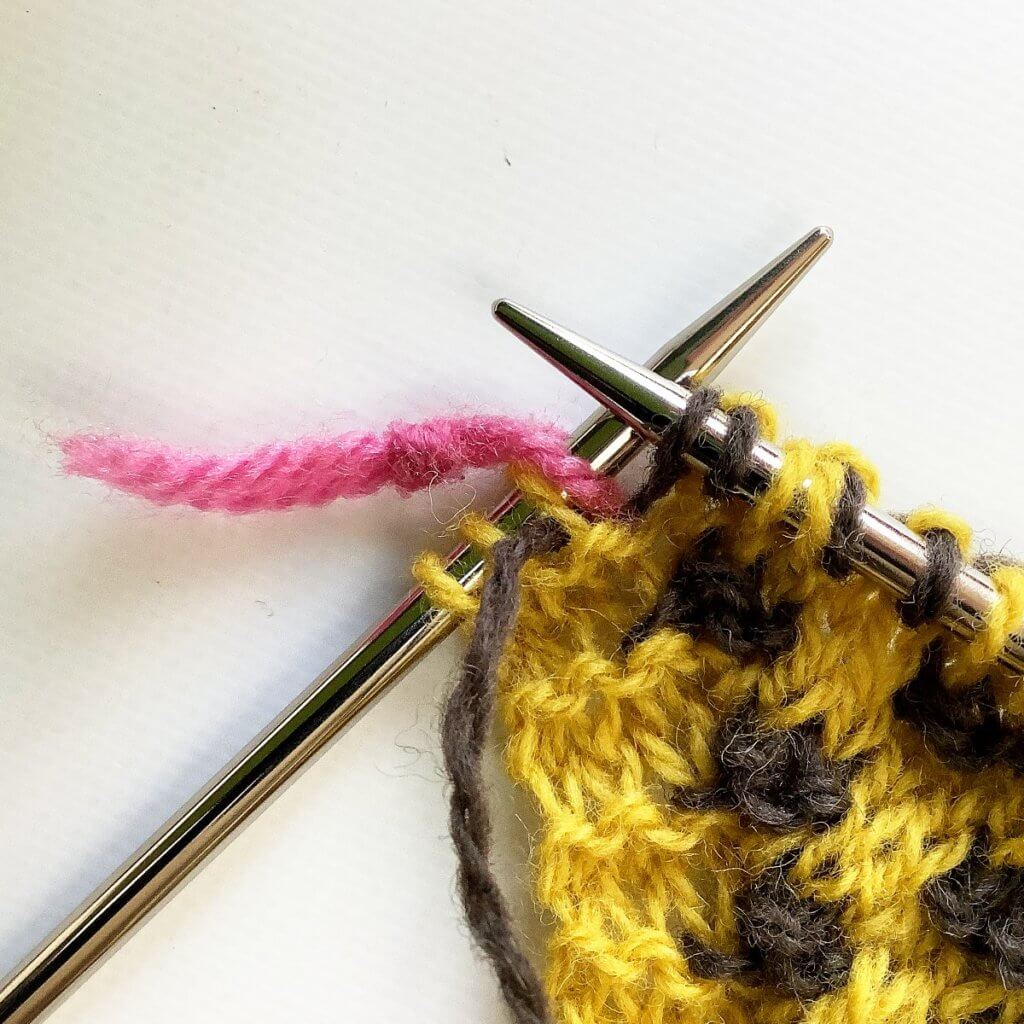
5. Now move the CC yarn between the needles back again to the WS of the work.
6. Now slip the remaining MC edge stitch and the stitch marker back to the right-hand needle and continue with the instructions in the remainder of the row.
Preventing gaps on the left step by step
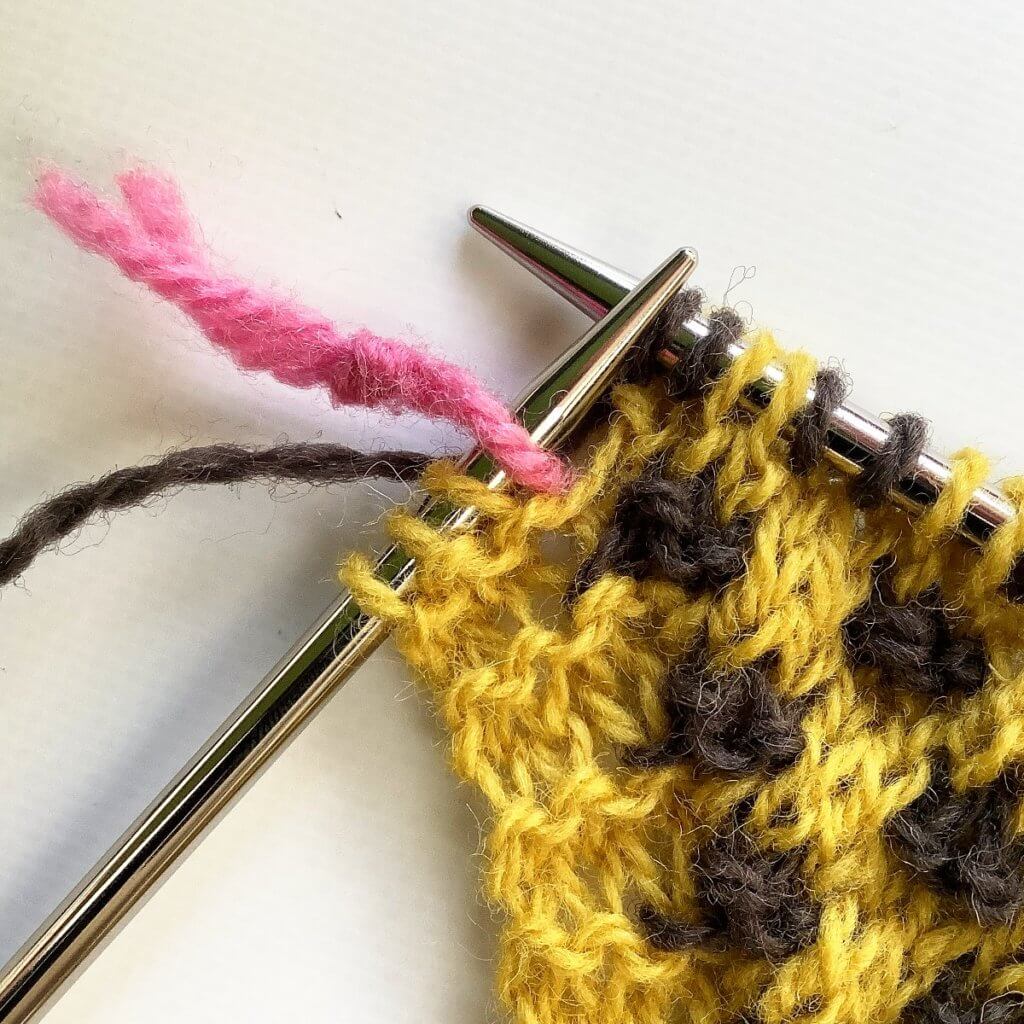
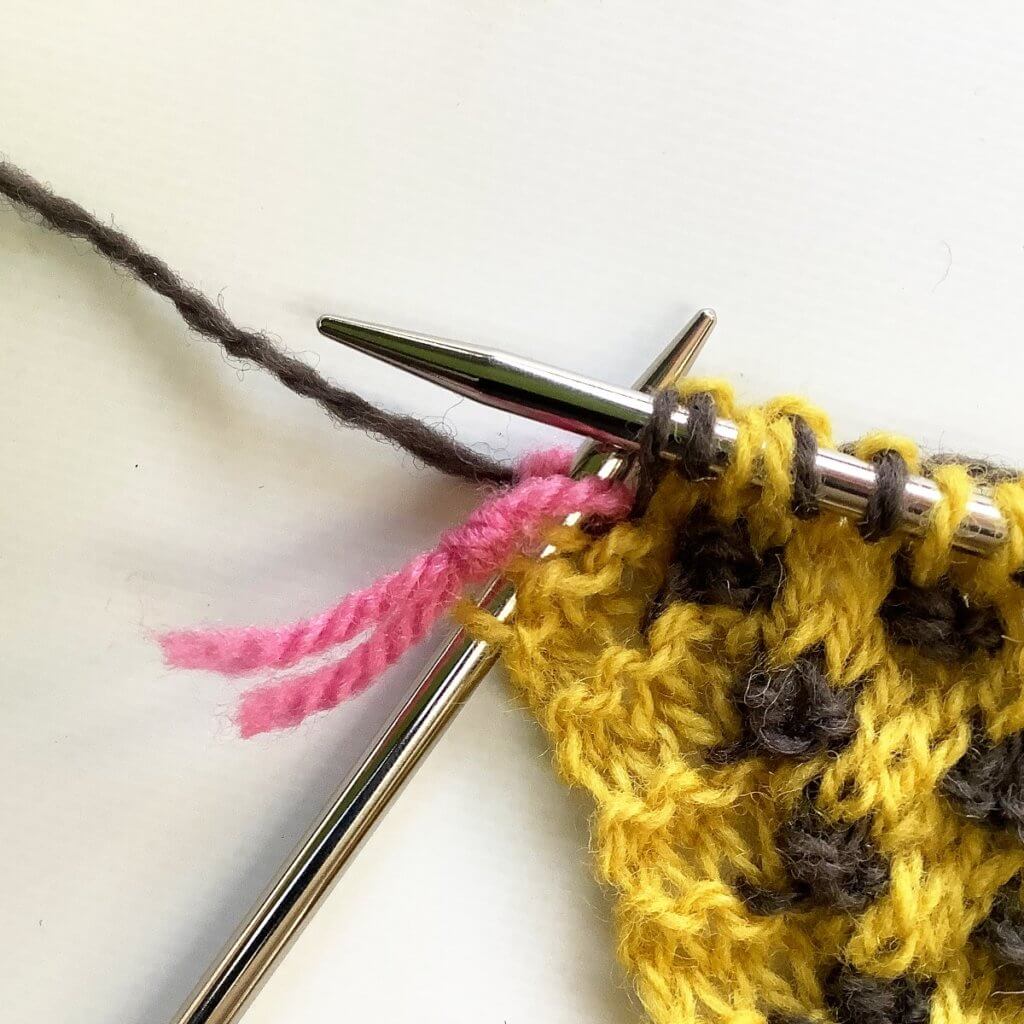
1. In this row, I’m nearing the end of the RS row using the CC yarn. Stop right before the 3 MC edge stitches, the CC yarn tail as at the back of the work at WS.
2. First, we slip both the stitch marker and the first of the MC edge stitches (purlwise!) to the right-hand needle.
3. Next, we bring the CC between the needles to the front of the work. (My apologies that this picture is a tad blurry! Didn’t notice until it was too late to redo).
4. Slip the stitch marker and the first of the MC edge stitches back the left-hand needle.
5. Now move the CC yarn between the needles back again to the WS (the back) of the work.
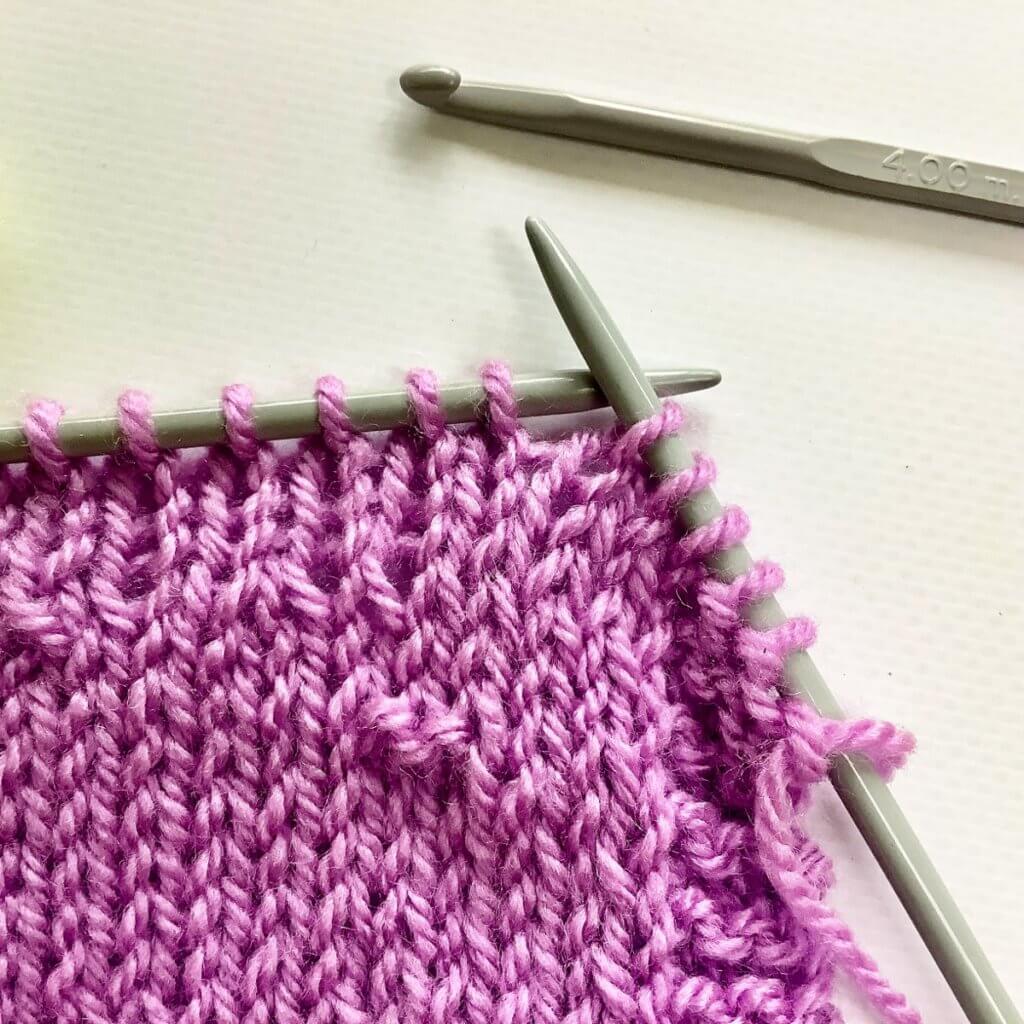
And now you’re ready to continue with the instructions for your pattern for the remainder of the row!
Thanks to my Patreon supporters for bringing you this freebie! Creating quality patterns and tutorials is a lot of work and resource-intensive. However, I find it important to give you free content like this tutorial. Thanks to the generous support of my Patreon supporters, I can make it happen. Thank you, patrons! Click here to join, or click here to read more about La Visch Designs on Patreon.
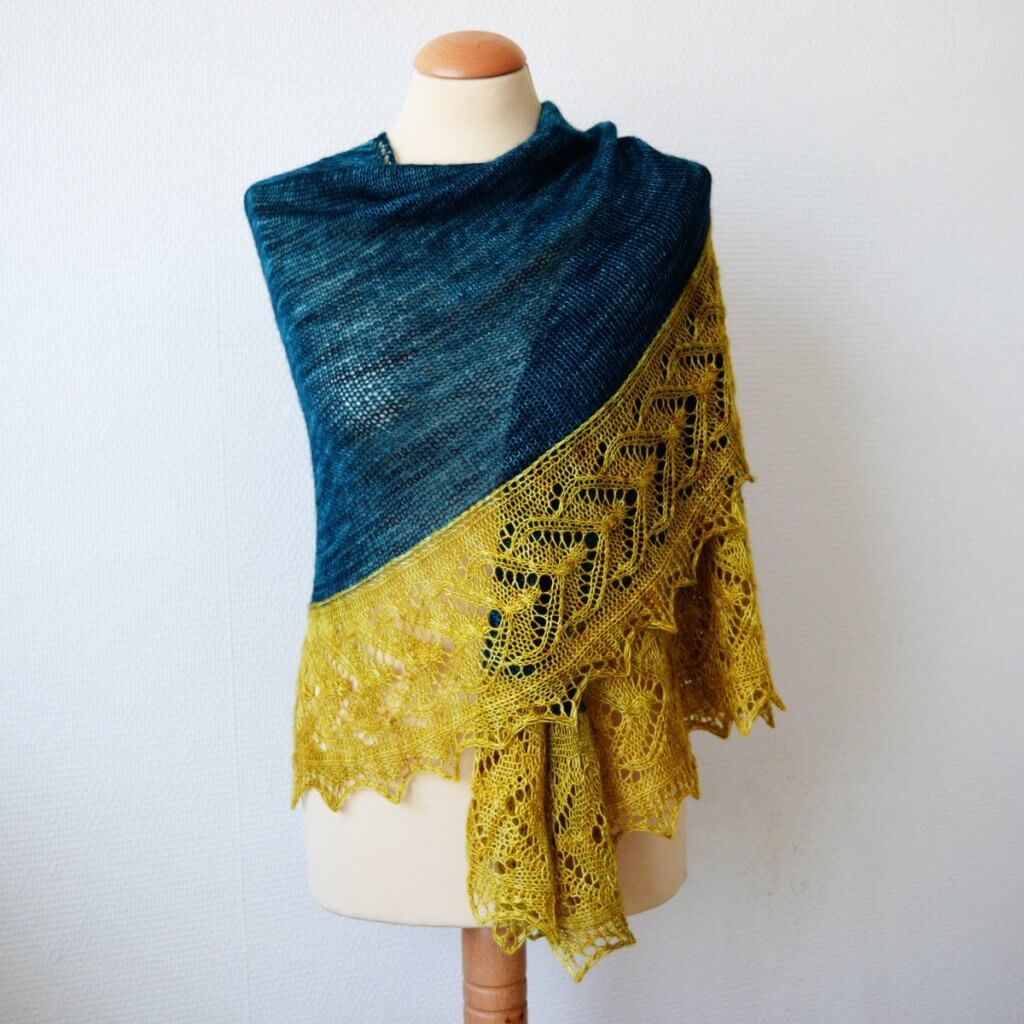
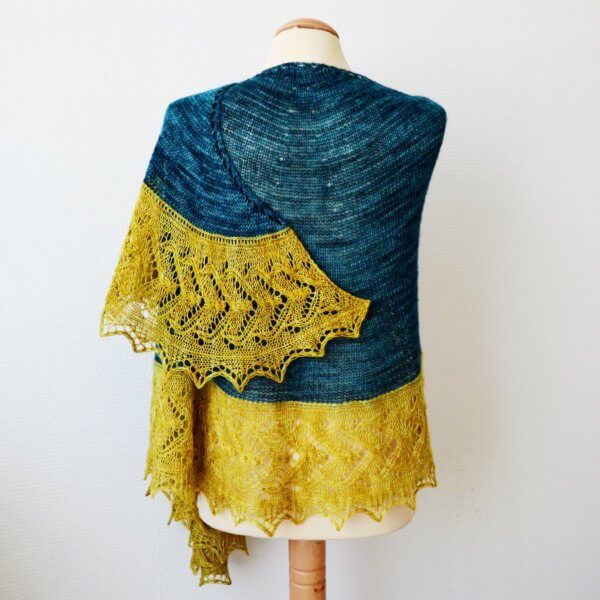
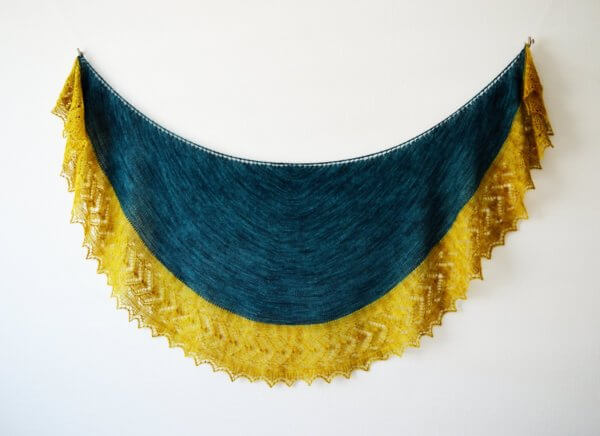
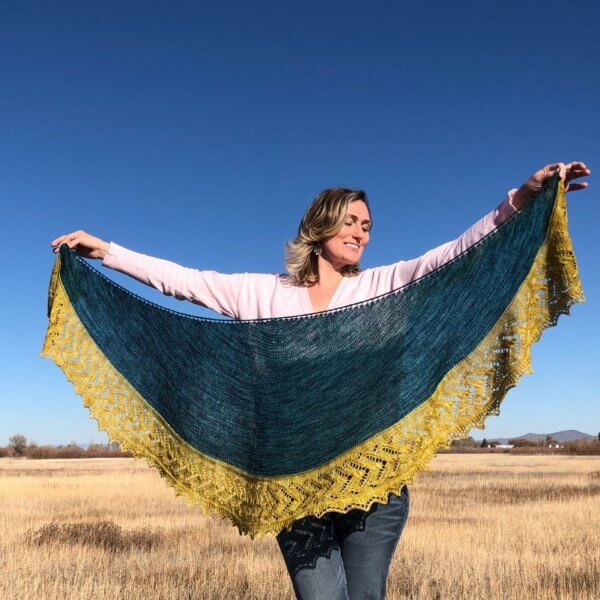
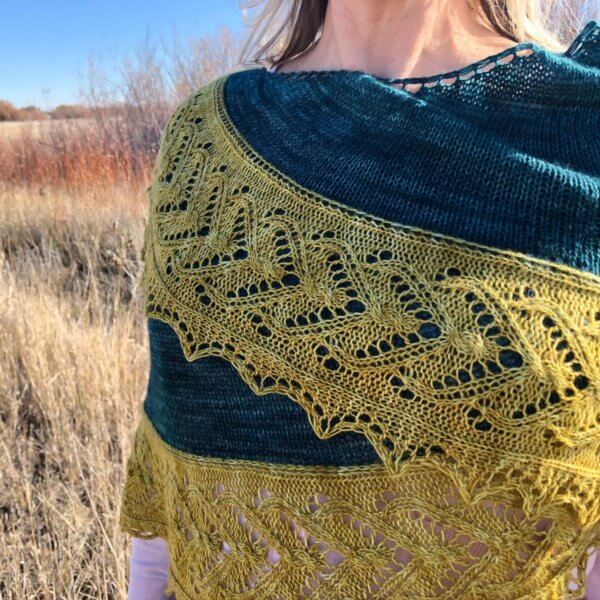
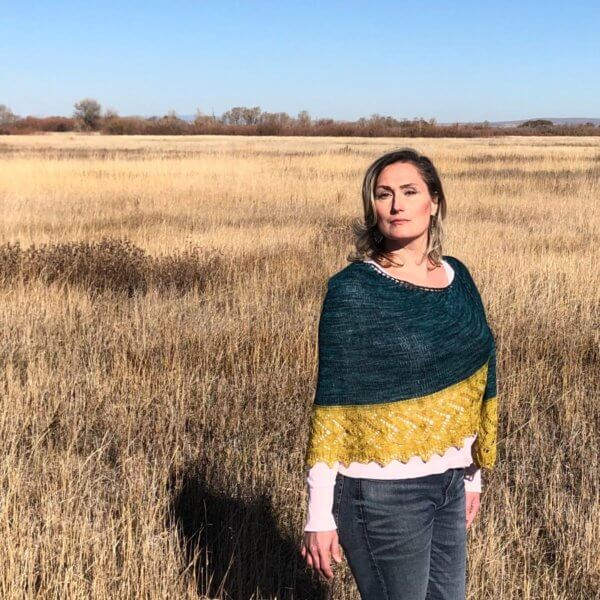
Sunglow Forest is a crescent-shaped shawl worked from the top-down. The perfect shawl to throw on for a refreshing walk in the woods!
The body of the shawl contains special shaping, which helps to avoid the “bump” in the upper edge of the shawl, so often present in crescent shawl designs. The instructions for the border of the shawl are provided both fully charted and written out.
Pay what you want: (minimum €6.50)
€
Difficulty level
This
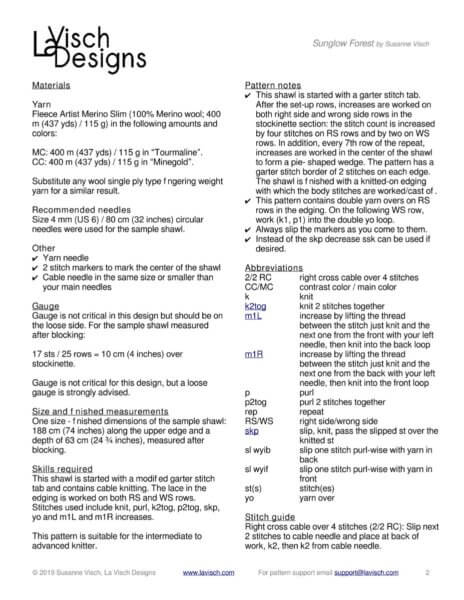
shawl is started with a
modified garter stitch tab and
contains cable knitting. The
lace in the edging is worked on both RS and WS rows. Stitches
used include knit, purl, k2tog, p2tog, skp, yo and m1L and m1R
increases.
This
pattern is suitable for the intermediate to advanced knitter.
Sizes and finished measurements
One size – finished dimensions of the sample Sunglow Forest shawl: 188 cm (74 inches) along the upper edge and a depth of 63 cm (24 ¾ inches), measured after blocking.
Pattern details
Gauge: 17 sts / 25 rows = 10 cm (4 inches) over stockinette, measured after blocking. Gauge is, however, not critical in this design.
Pattern languages included: English and Dutch (Dit patroon omvat zowel een Nederlandse als een Engelse versie)
Digital PDF has 4 pages (letter size)
Materials
Yarn: Fleece Artist Merino Slim (100% Merino wool; 400 m (437 yds) / 115 g) in the following amounts and colors: MC -400 m (437 yds) / 115 g in “Tourmaline” and CC – 400 m (437 yds) / 115 g in “Minegold”. This yarn and pattern are also available as a kit from Sweater Sisters! Substitute any wool single ply type fingering weight yarn for a similar result.
Size 4 mm (US Size 6) 80 cm (32 inches) or longer circular needle.
Yarn needle
2 stitch markers to mark the center of the shawl
Cable needle in the same size or smaller than your main needles
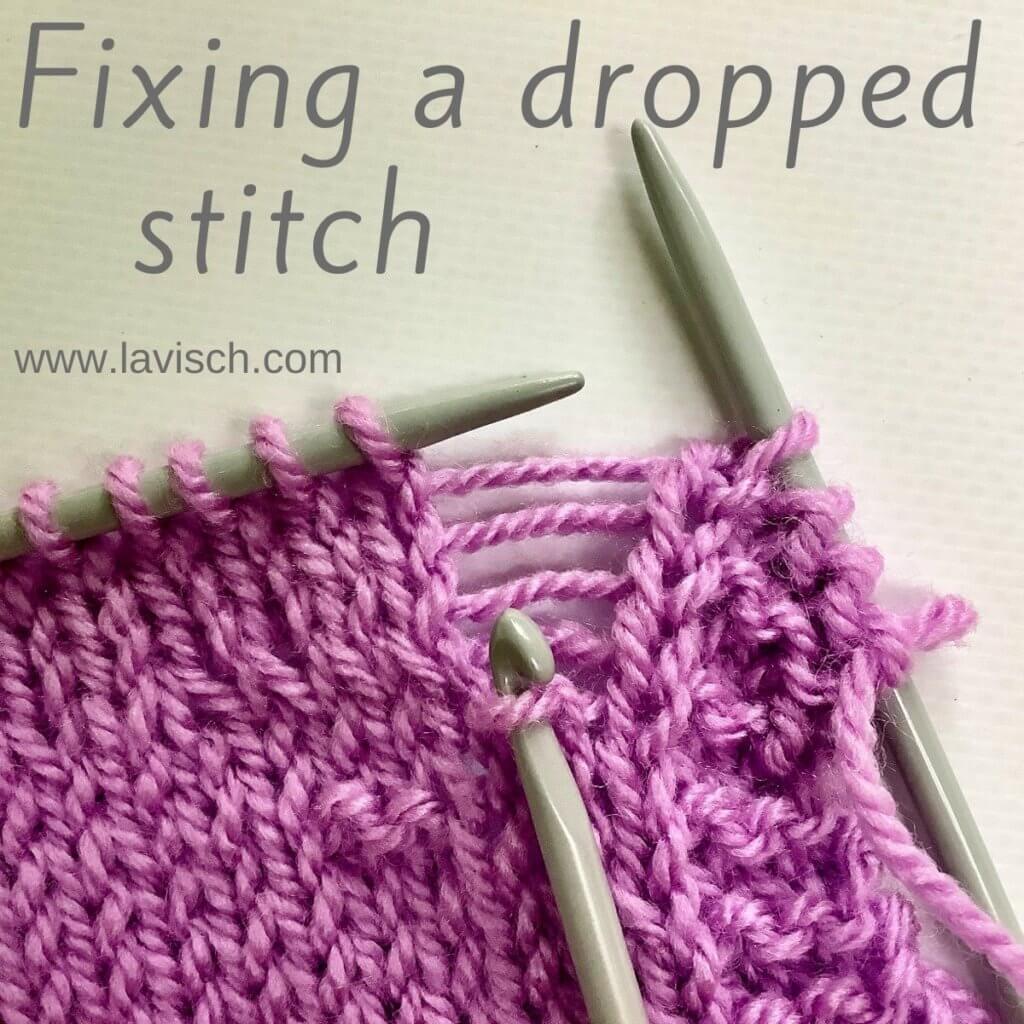
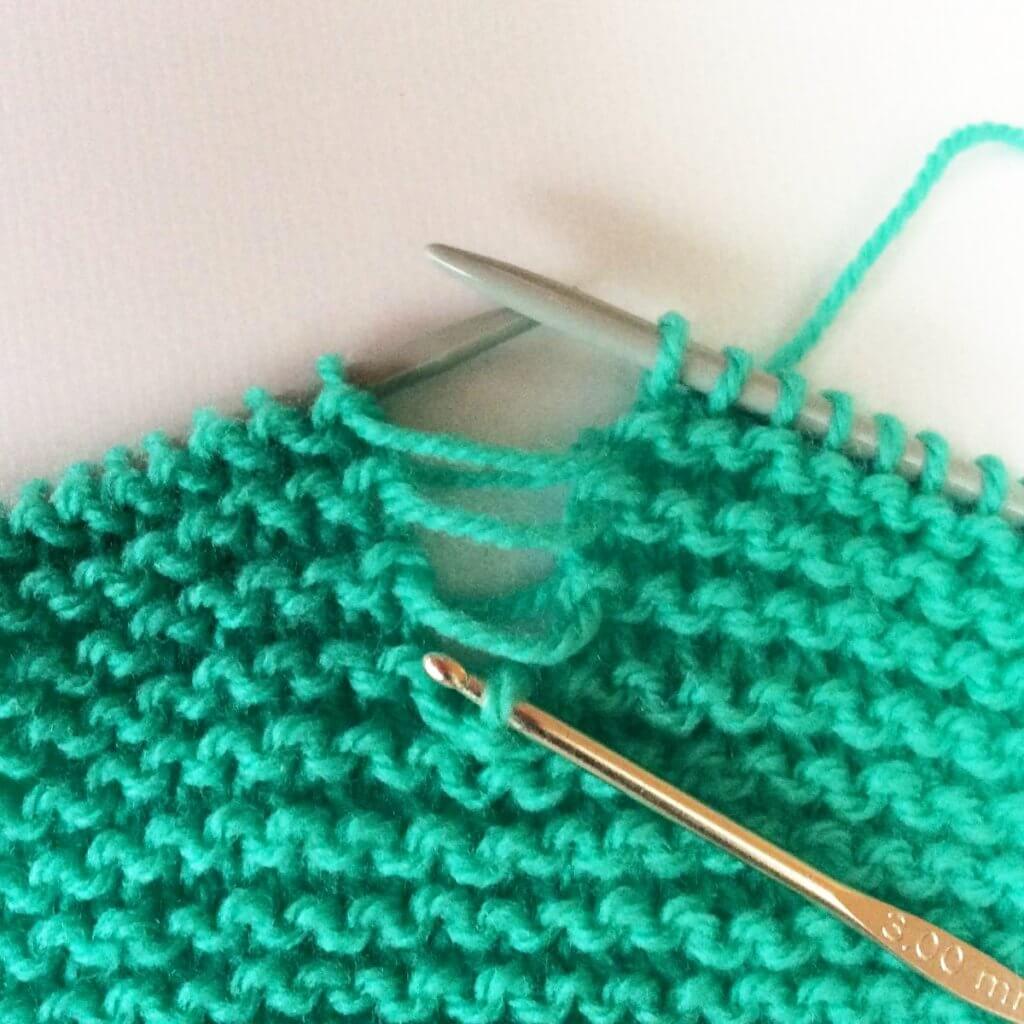
It can happen just like that: a dropped stitch in the middle of your work! When using a somewhat “sticky” yarn, it is usually a matter of putting the stitch back on the needle and continuing to knit. With a smooth yarn, however, it may be that the stitch ladders down in your work….
Do not panic, though! A dropped stitch really isn’t that hard to fix. Especially when the project is still on the needles and you’re not dealing with patterning and shaping. So, in this tutorial, I’ll show you how to fix a dropped stitch in the middle of a piece of stockinette knitting.
Materials used
Yarn: * Paintbox Yarns Simply DK, a good value, good quality 100% acrylic yarn, here in the color 142 Tea Rose.
1. First, grab your crochet hook and catch the fallen stitch before it ladders even further down!
2. Take a look at the last stitch that sits correctly in the fabric and the stitch directly below it: Here we have stockinette stitch. This means that we, therefore, insert the crochet hook through the stitch from the front to the back.
3. Next, insert the crochet hook underneath the thread directly above the dropped stitch…
4. … and pull the thread through the loop already on the hook to make a new knit stitch.
5. Repeat steps 4 and 5 (for stockinette) until you have run out of threads to pull through.
6. Place the stitch back on the knitting needle and continue knitting as if nothing happened!
An that’s all there is to it! Really not that hard, right?
Thanks to my Patreon supporters for bringing you this freebie! Creating quality patterns and tutorials is a lot of work and resource-intensive. However, I find it important to give you free content like this tutorial. Thanks to the generous support of my Patreon supporters, I can make it happen. Thank you, patrons! Click here to join, or click here to read more about La Visch Designs on Patreon.
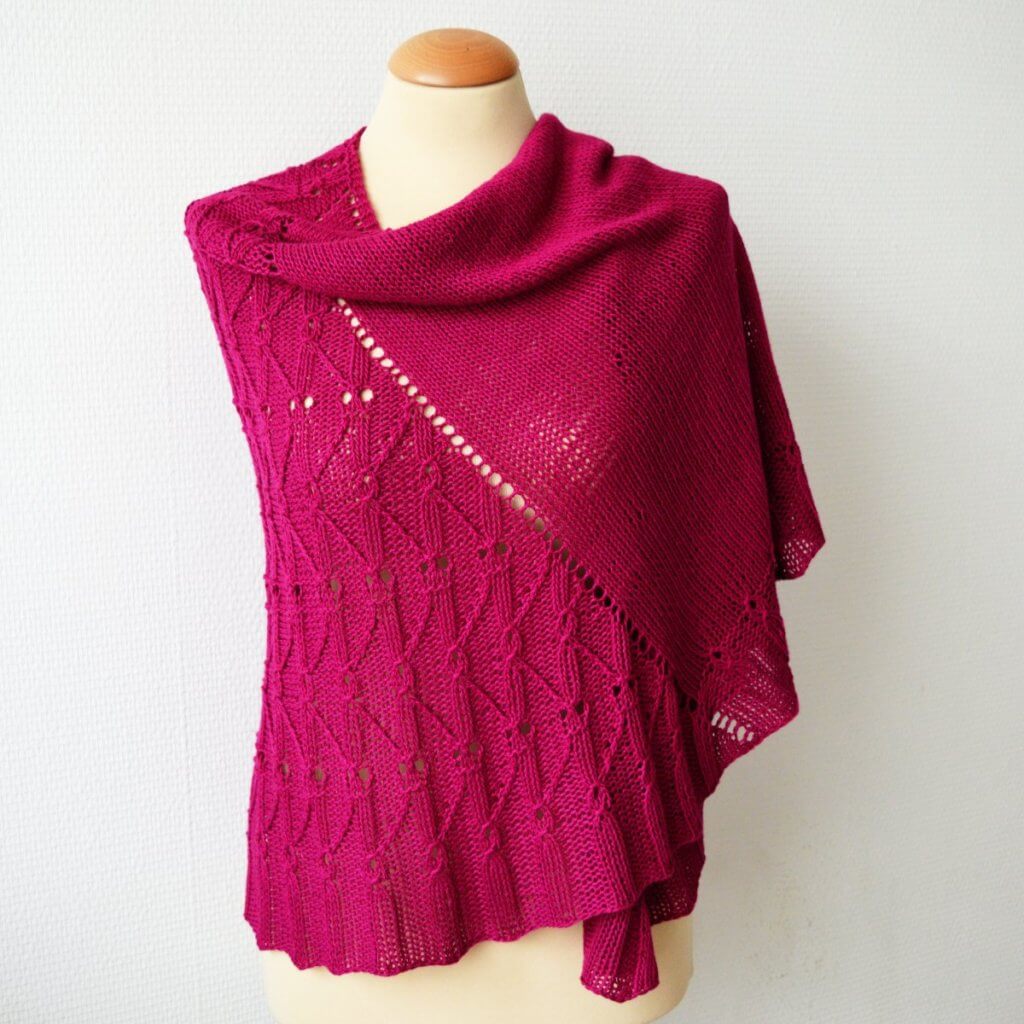
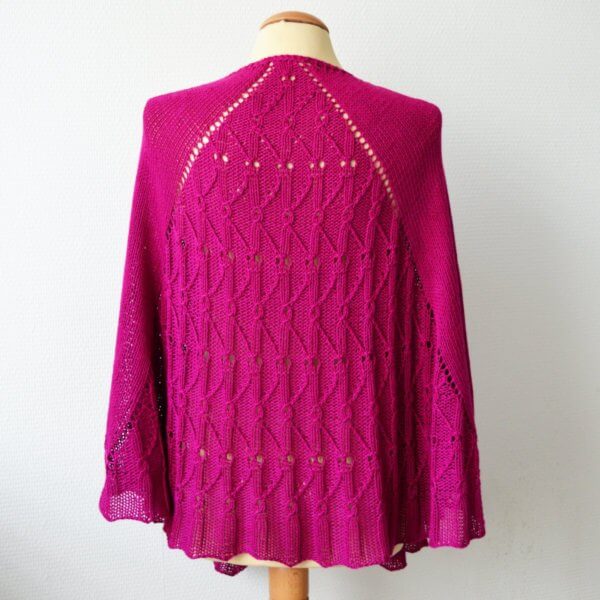
Looking for an eye-catching layering piece for when the weather and seasons turn? A knit that combines both relaxing stockinette as well as challenging patterning? Look no further! The Think Pink shawl has you covered. And yes, pun intended! Or make the shawl in a different color.
Written and charted instructions for the patterned central section are included. Written directions for the central section and plain stockinette/increase section are written separately and must be read together to work each row.
Pay what you want: (minimum €6.50)
€
Difficulty level
The Think Pink shawl starts with a garter stitch tab, and the patterning is worked on both RS and WS rows. Stitches used include knit, purl, yo, make 1 with a backward loop, right and left twist stitches, a knot stitch, a centered double decrease as well as knitting tbl.
This
pattern is suitable for the intermediate to advanced knitter.
Sizes and finished measurements
One
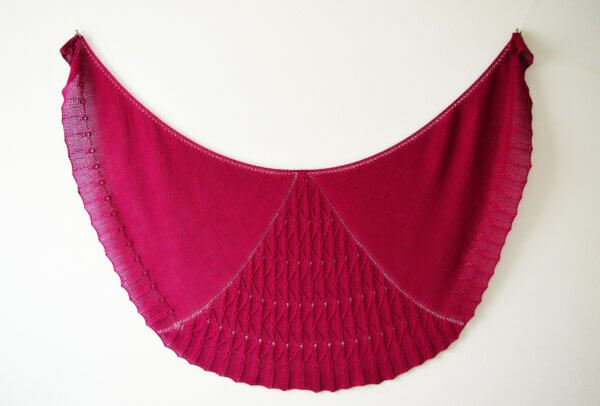
size: Wingspan of 180 cm (71 inches) along the upper edge and a depth
of 67 cm (26 ½ inches), measured after blocking.
Adjust the sizing by using a different weight yarn and/or working a different number of repeats of the body pattern or the border. This will, of course, change the amount of yarn needed.
Pattern details
Gauge: 14.5 sts / 23 rows = 10 cm (4 inches) over stockinette, measured after blocking. Gauge is, however, not critical in this design.
Pattern languages included: English, the Dutch version will be available soon. (Dit patroon omvat zowel een Nederlandse als een Engelse versie)
Digital PDF has 6 pages (letter size)
Materials
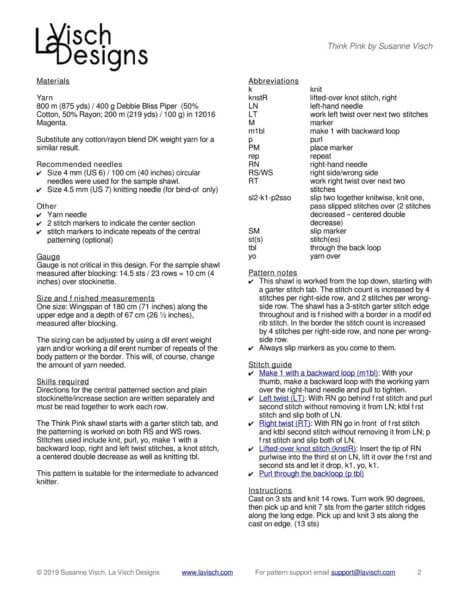
Yarn: 800 m (875 yds) / 400 g Debbie Bliss Piper (50% Cotton, 50% Rayon; 200 m (219 yds) / 100 g) in 12016 Magenta. Substitute any cotton/rayon blend DK weight yarn for a similar result.
Size 4 mm (US 6) / 100 cm (40 inches) circular needles
Size 4.5 mm (US 7) knitting needle (for bind-off only)
Yarn needle
2 stitch markers to indicate the center section
Stitch markers to indicate repeats of the central patterning (optional)
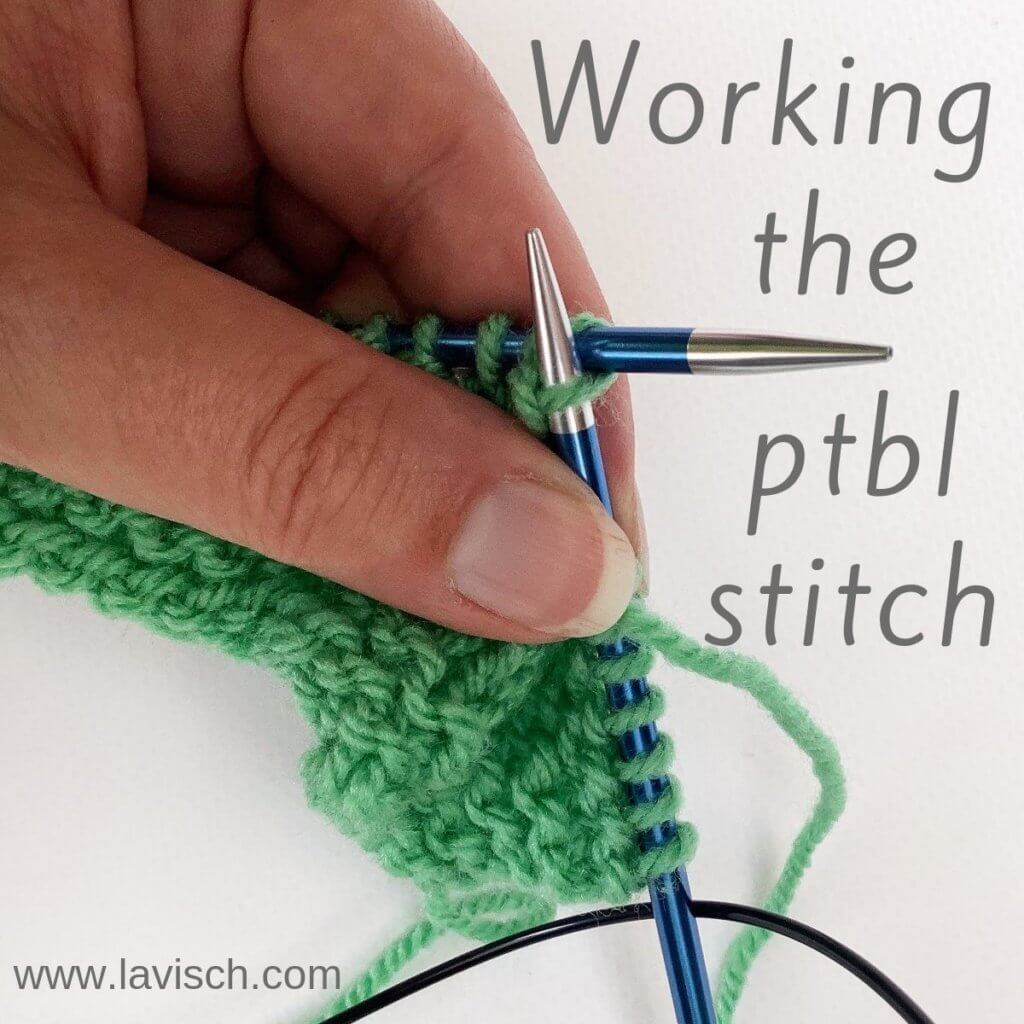
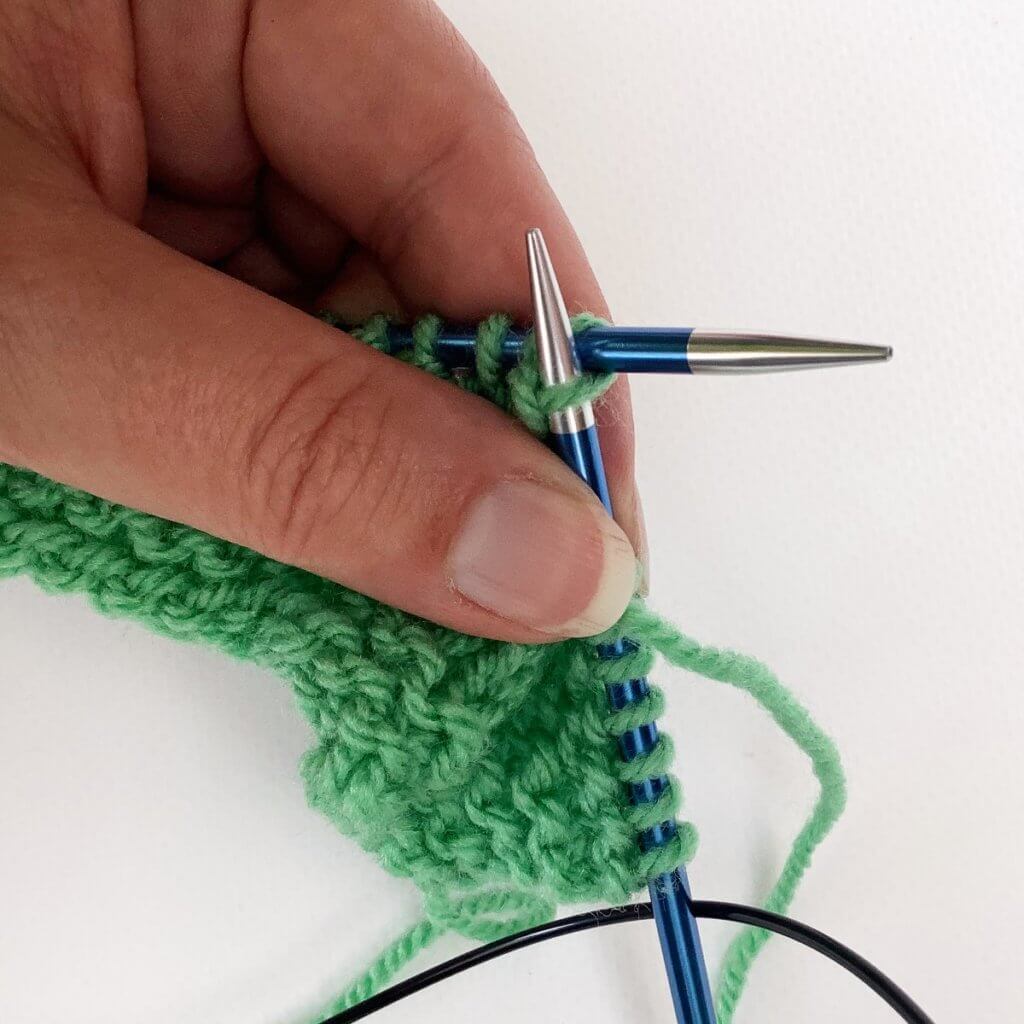
The purl through the back loop stitch (or ptbl for short) is a variation of the purl stitch. It creates a twisted stitch by slightly turning the stitch while you work it. I’ve used the ptbl in some of my patterns, for example in the Art Deco shawl pattern.
And while it isn’t a hard stitch to work, it can be a tad tricky if you’re not familiar with how to work into that back loop of a stitch. So, for that reason, it’s a good idea to get that straight. If you look at the picture below, you can see that the first stitch on the needle consists of a loop of yarn, straddling the needle. The “leg” facing is what we call the “front loop”. Likewise, the “leg” at the back of the work is the “back loop” one.
Materials used
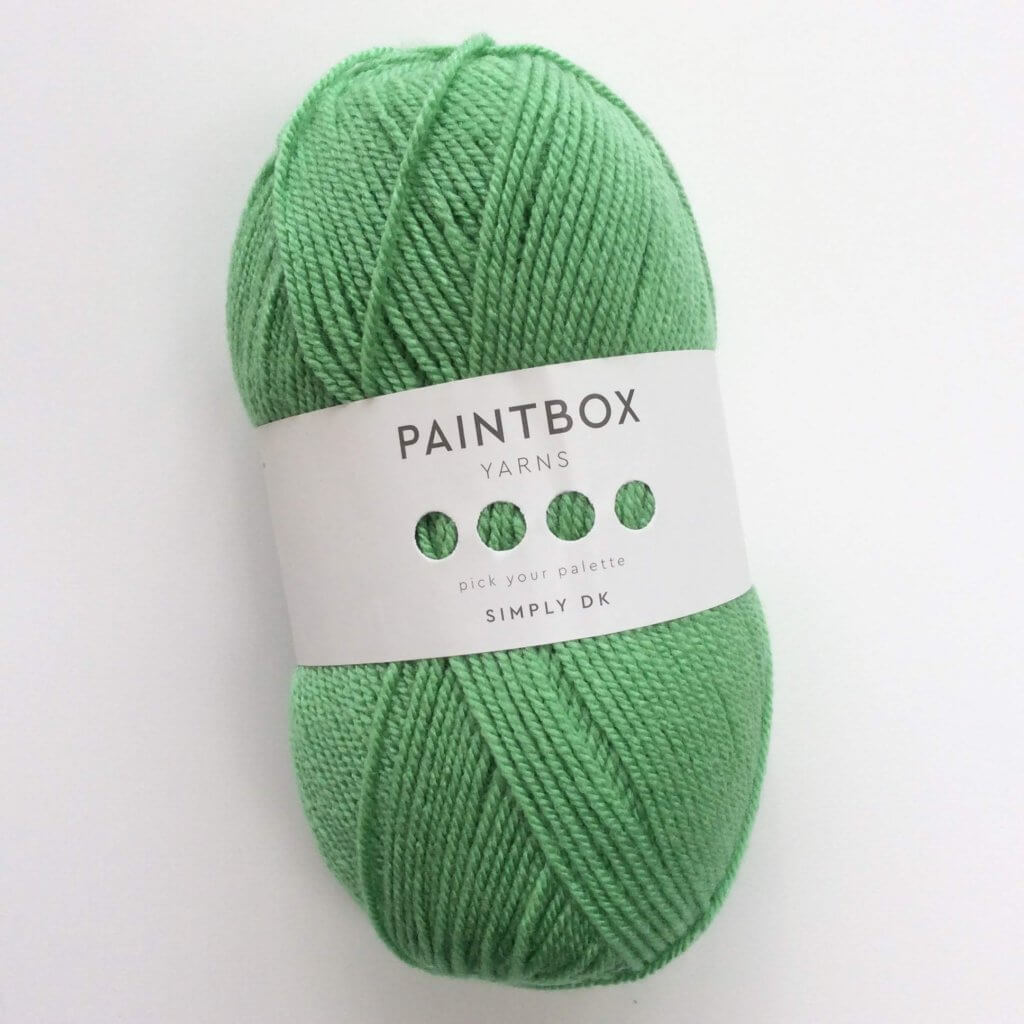
Yarn: *
Paintbox Yarns Simply DK,
a good value, good quality 100% acrylic yarn, here in the color 125
Spearmint Green.
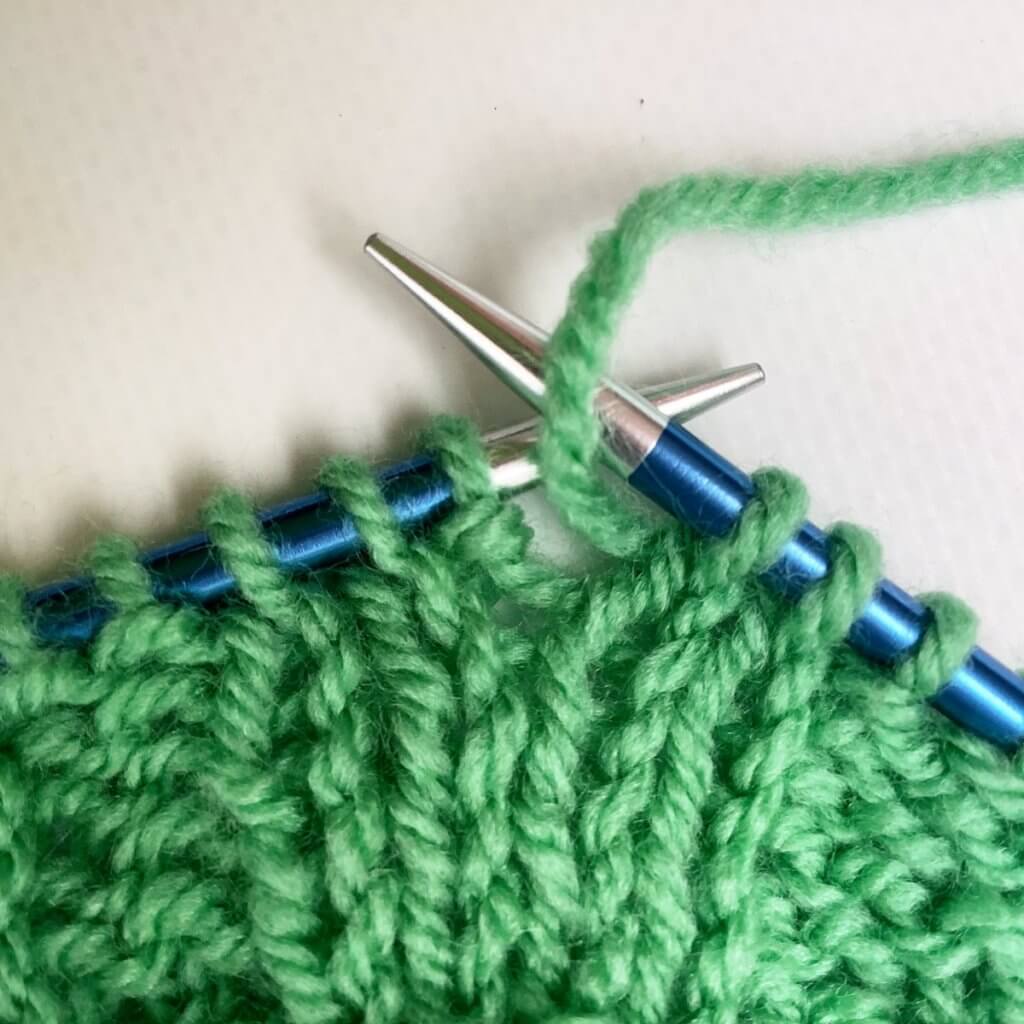
1. First, we have to make sure that the working yarn is at the front of the work since we’ll be working a purl stitch.
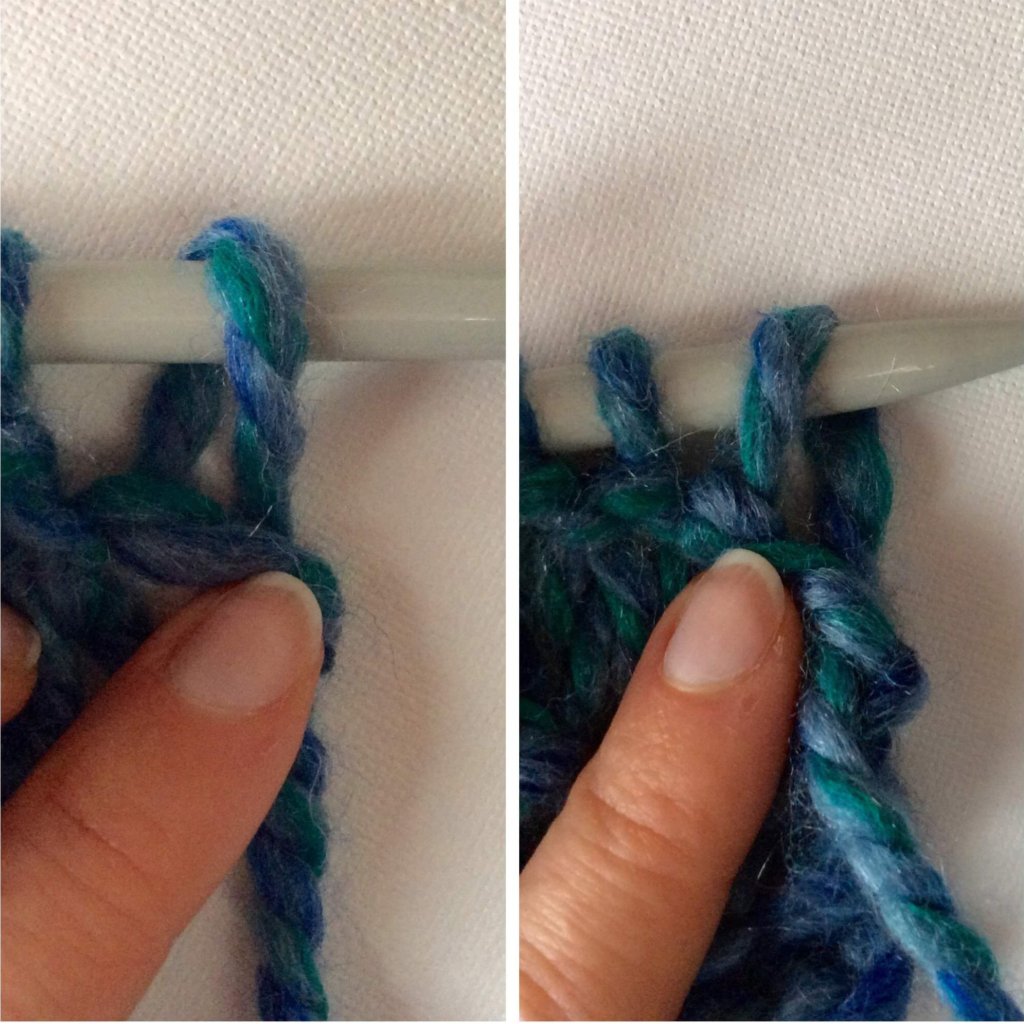
2. Next, insert the right-hand needle purlwise into the back leg or loop of the stitch. To do this, it is important to know the difference between knitwise and purlwise when talking about that back loop. To insert the needle knitwise you’d insert the needle away from the tip of the left-hand needle. In the same vein, to insert the needle purlwise you’d insert the needle towards the tip of the left-hand needle!
In the picture below the needles have become a bit twisted due to me holding everything with my left hand and the camera in the other. But if you take another look at the picture with the blue yarn above you can see exactly what I mean!
3. Now wrap the yarn around the needle…
4. … pull it through and slip the resulting stitch from the left-hand needle to complete your ptbl stitch.
And that’s all there is to it! Not that hard, right?
Thanks to my Patreon supporters for bringing you this freebie! Creating quality patterns and tutorials is a lot of work and resource-intensive. However, I find it important to give you free content like this tutorial. Thanks to the generous support of my Patreon supporters, I can make it happen. Thank you, patrons! Click here to join, or click here to read more about La Visch Designs on Patreon.
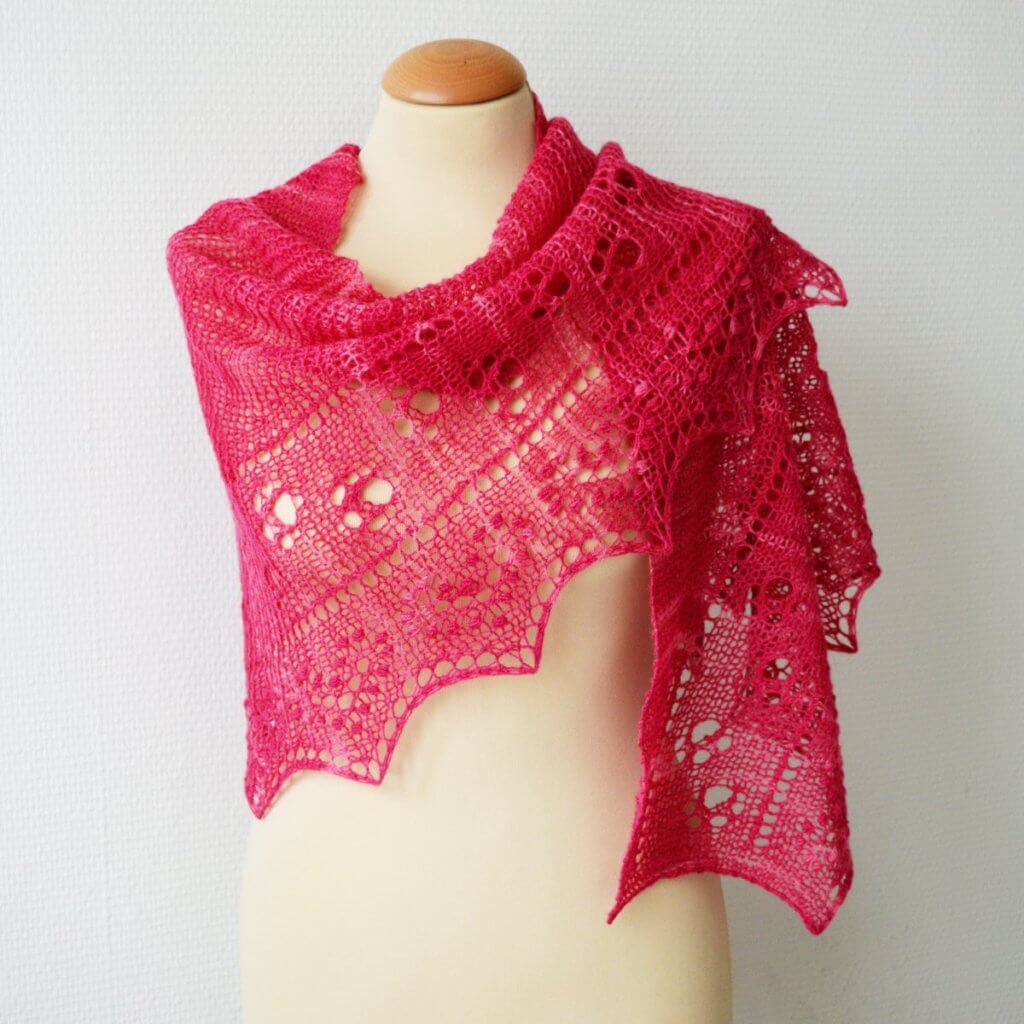
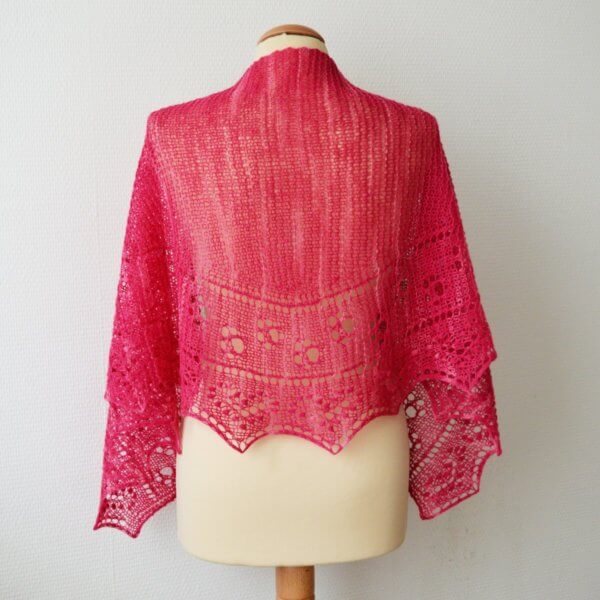
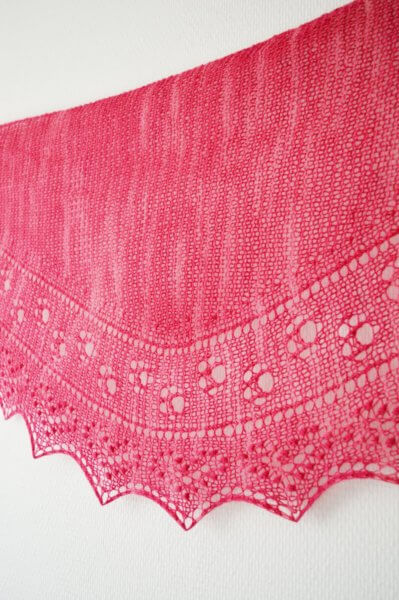
The Kitty Cat Shawl is a shallow, triangle scarf, knit sideways. It has paw prints and hearts because my daughter loves cats and therefore wanted this in her new shawl. This design features a lace edging that is worked at the same time as the body of the shawlette. Worked at a loose gauge, the Kitty Cat Shawl is a lovely and airy layering piece.
The pattern contains both fully written out as well as charted instructions for the lace. The lace in the border of the shawl is true lace knitting, worked on both wrong and right side rows.
Pay what you want: (minimum €6.50)
€
Difficulty level
Stitches used include knit, purl, yo, kfb, skp, k2tog, and nupps. This pattern is suitable for the intermediate to advanced knitter.
Sizes and finished measurements
Finished
dimensions of the sample shawl: Span
width of 155
cm (61 inches)
along the upper edge and a depth of 45
cm (17 ¾ inches),
measured after blocking.
Change the size of the shawl by using heavier or lighter weight yarn and/or working less (or more) repeats. This will, of course, change the amount of yarn needed.
Pattern details
Gauge: 14 sts / 25 rows = 10 cm (4 inches) over garter stitch, measured after blocking. Gauge is, however, not critical in this design.
Pattern languages included: English, the Dutch version will be available soon. (Dit patroon omvat zowel een Nederlandse als een Engelse versie)
Digital PDF has 4 pages (letter size)
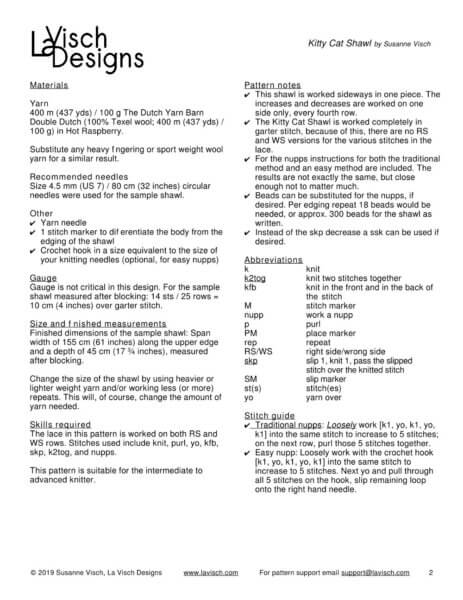
Materials
Yarn: 400 m (437 yds) / 100 g The Dutch Yarn Barn Double Dutch (100% Texel wool; 400 m (437 yds) / 100 g) in Hot Raspberry. Substitute any heavy fingering or sport weight wool yarn for a similar result.
Size 4.5 mm (US 7) / 80 cm (32 inches) circular needles.
Yarn needle
1 stitch marker to differentiate the body from the edging of the shawl
Crochet hook in a size equivalent to the size of your knitting needles (optional, for easy nupps)
Cinematic is a simple but stylish triangular shawl knit sideways in garter stitch. With its generous size, it’s perfect to wear as an elegant scarf. Eyelet rows and stripes in a contrast color, combined with a gradient yarn, make for a highly customizable accessory. Wear it with a shirt and jeans for a casual look or with that little black dress for a more dramatic look.
The KAL will start this Friday, August the 30th and will run for a month until and including September the 30th 2019. The pattern can be found on Ravelry and, of course, on the La Visch Designs website. Every person posting a picture of the FO before or on September 30th will receive a 25% discount code for a La Visch Designs pattern of choice 😃
Want to share your progress social media? Go ahead, I love to see what folks do with my designs! Make sure to tag your posts with #cinematickal, #lavischdesigns and #cinematicshawl so I can find your post.
So, get your yarn and pattern today, I’m looking forward to seeing you over in the KAL group for the Cinematic knit-a-long!
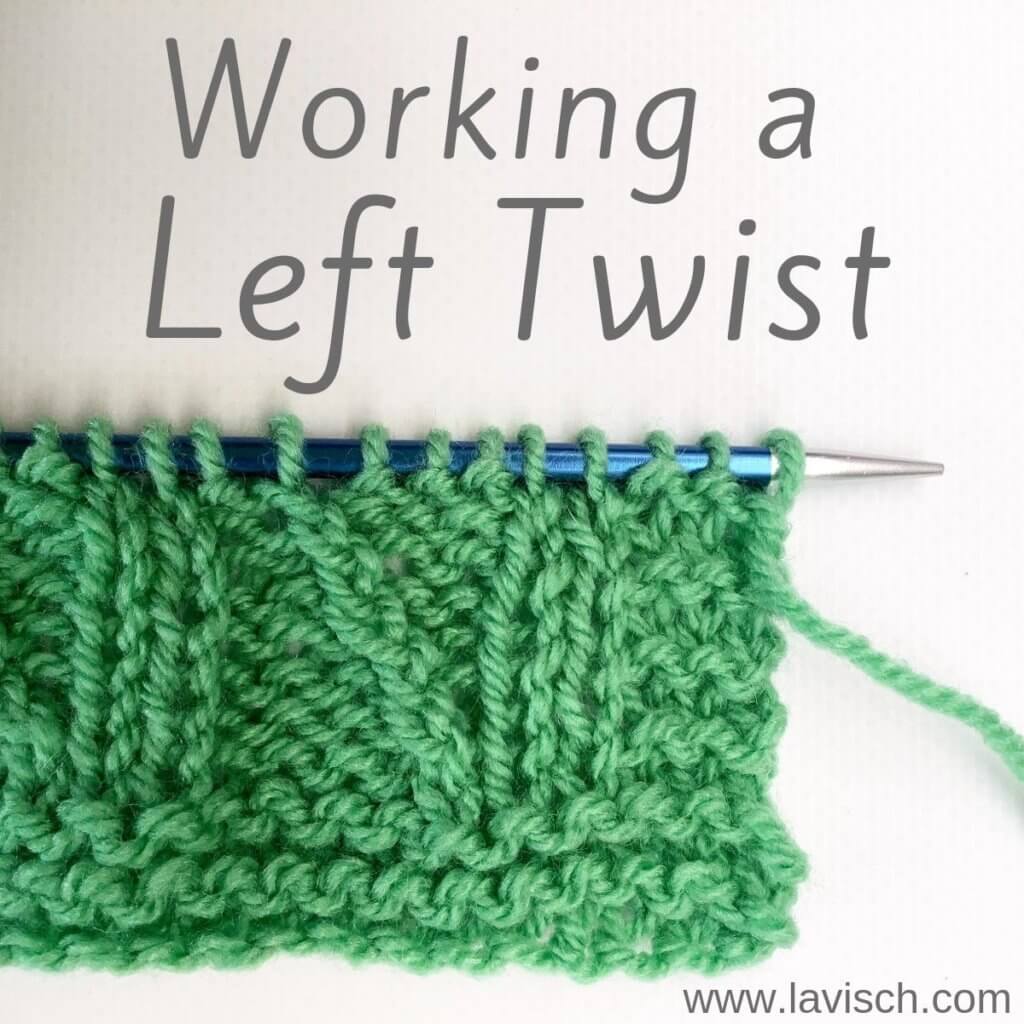
In one of the designs I’m working on, I’m using a lovely intricate stitch pattern from the Japanese Knitting Stitch Bible by Hitomi Shida. In this particular stitch pattern, a Left Twist stitch is used. So, in this post, I’ll go into the details on how to work this stitch.
The basic characteristic of a Left Twist is that it switches the order of 2 adjoining stitches, one “main stitch” and one “background stitch” to make it appear that the main stitch travels to the left. The background is usually reverse stockinette. The main stitch is usually worked twisted (working the stitch through the back loop) stockinette. This way it pops even more against the background.
The instruction from the Japanese Knitting Stitch Bible for this stitch consists of the following text:
With RN, go behind first st and p
second st without removing it from LN; ktbl first
st and slip both off LN.
Now, I don’t know if you’ve tried this, but following the above instruction didn’t give me anything resembling the picture of the worked left twist. It may be due to where I had my yarn or the fact that I knit weird, who knows? Anyway, I did some more research and found that this type of traveling stitch is also used quite a lot in Bavarian knitting. I also found that there are quite some ways it can be worked. Take for example this one from leethalknits.com, the one described in this Interweave article or the elaborate description of methods by Rox over on Ravelry.
Personally, I found just changing the order of the stitches before actually knitting them (as one would do for cabling without a cable needle) to be easiest. So that’s what I will show you in this tutorial.
Materials used
Yarn: Paintbox Yarns Simply DK, a good value, good quality 100% acrylic yarn, here in the color 125 Spearmint Green.
Needles: KnitPro Zing Fixed Circular Needles. In this tutorial, I used the 4 mm (US 6) size with a cable length of 80 cm (32 inches).
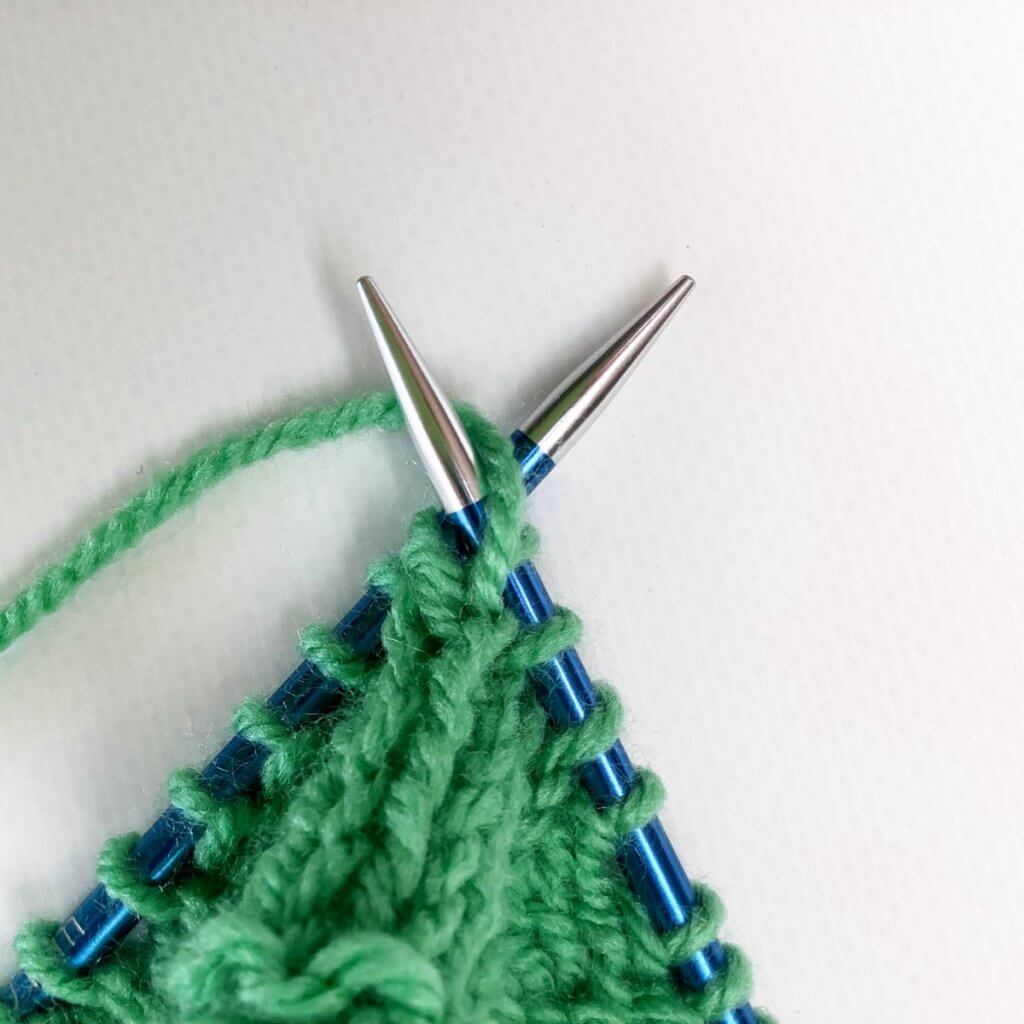
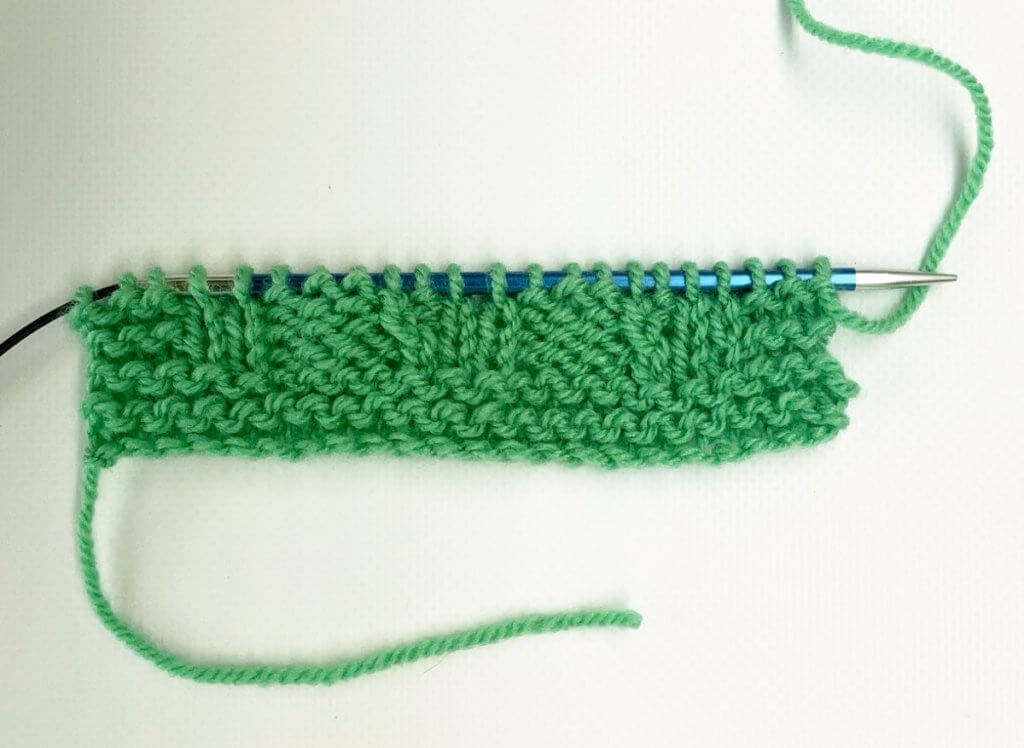
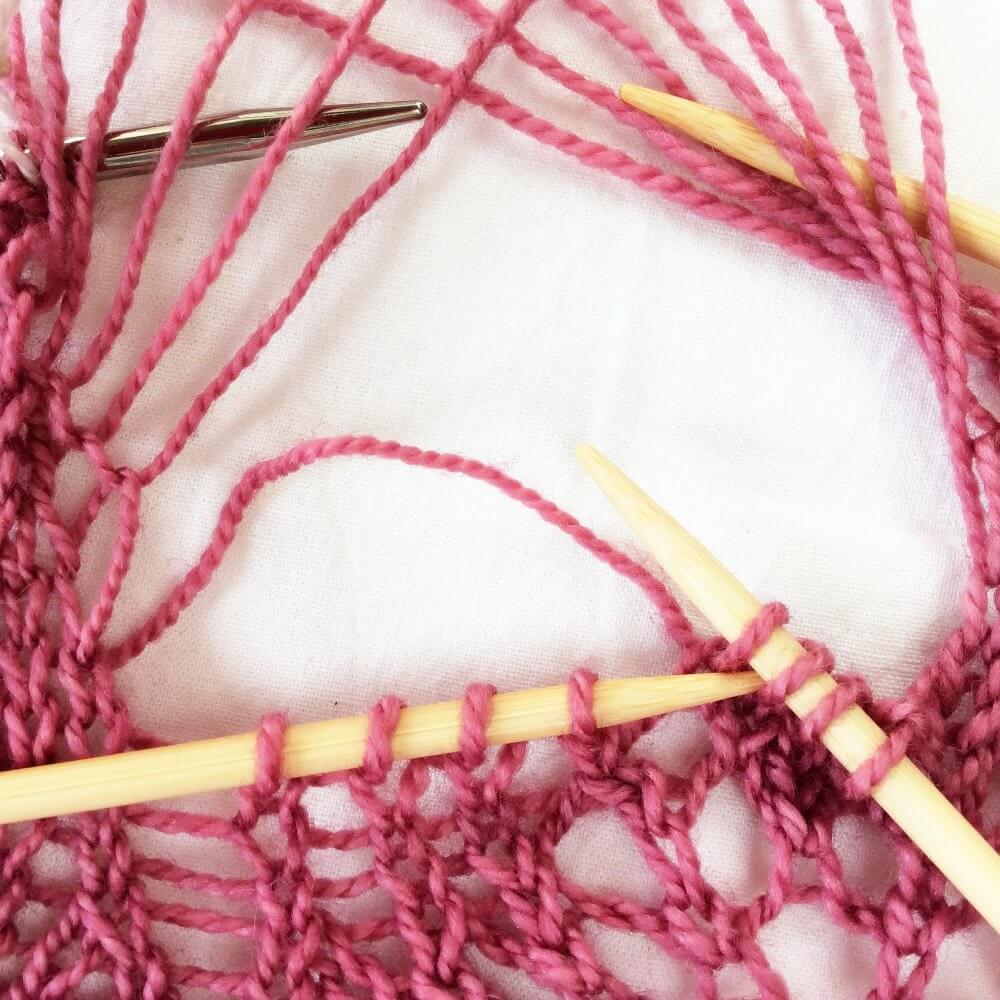
Some words about the swatch
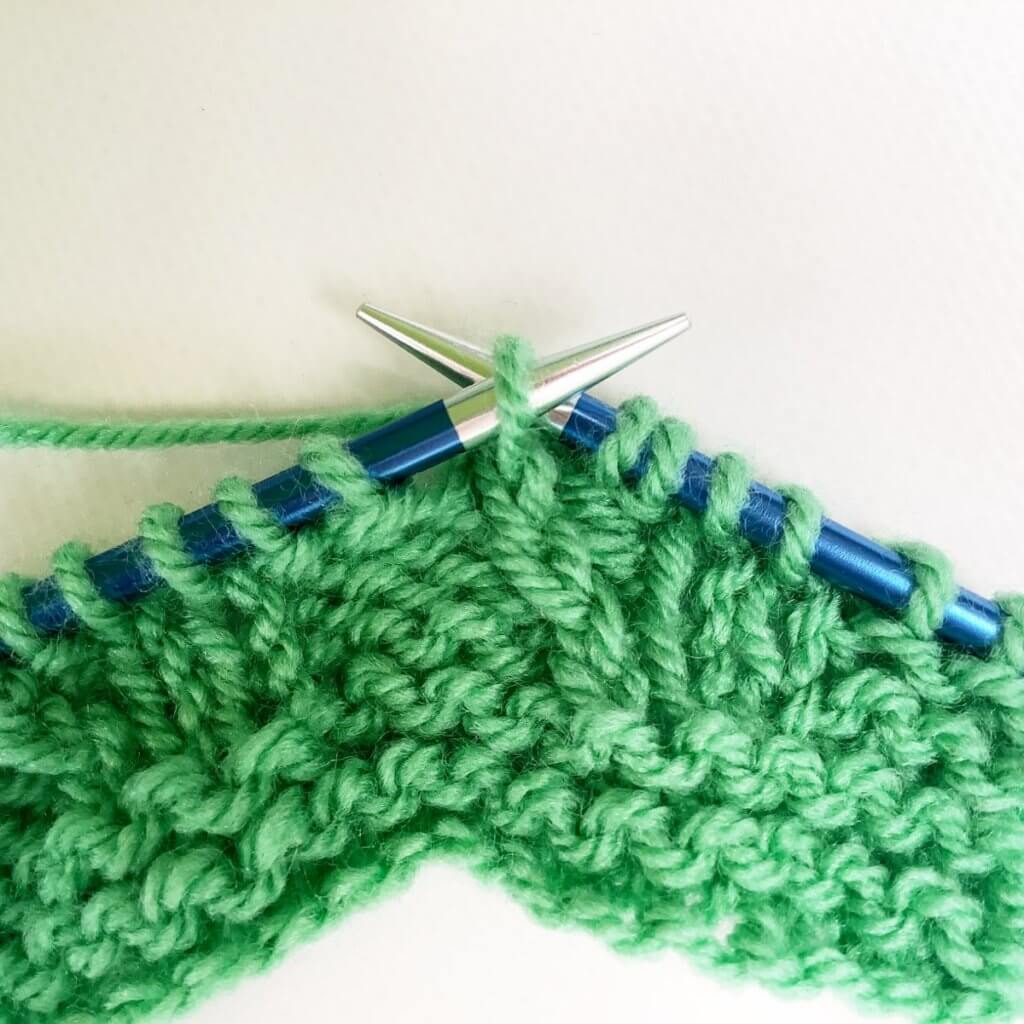
In this swatch, I’ve taken part of the stitch pattern in which I encountered the Left Twist stitch. It consists of a k3, p4 rib in which the left-most knit stitch travels across the purl stitches until it joins the next column of knit stitches. As you can see, I’ve already worked one RS row with a Left twist, as well as it’s accompanying WS row.
Working a Left Twist step by step
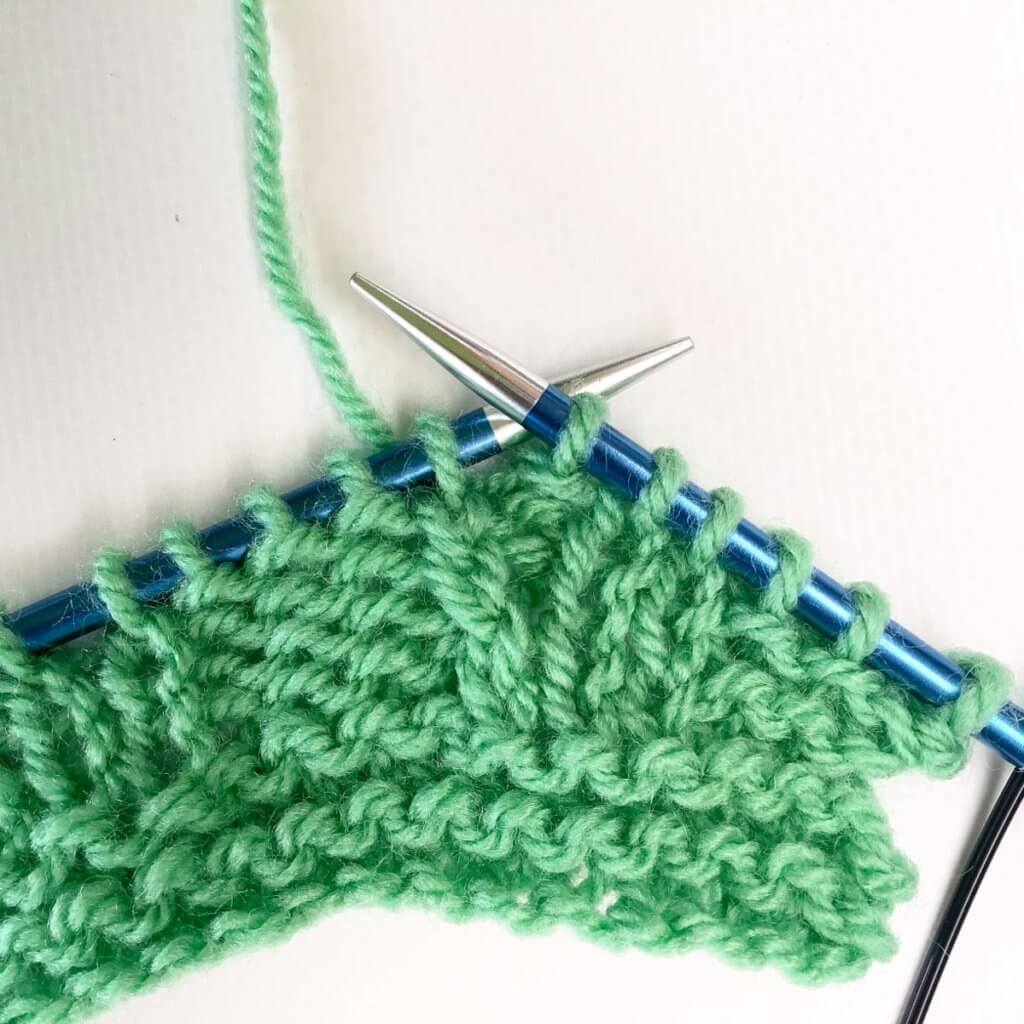
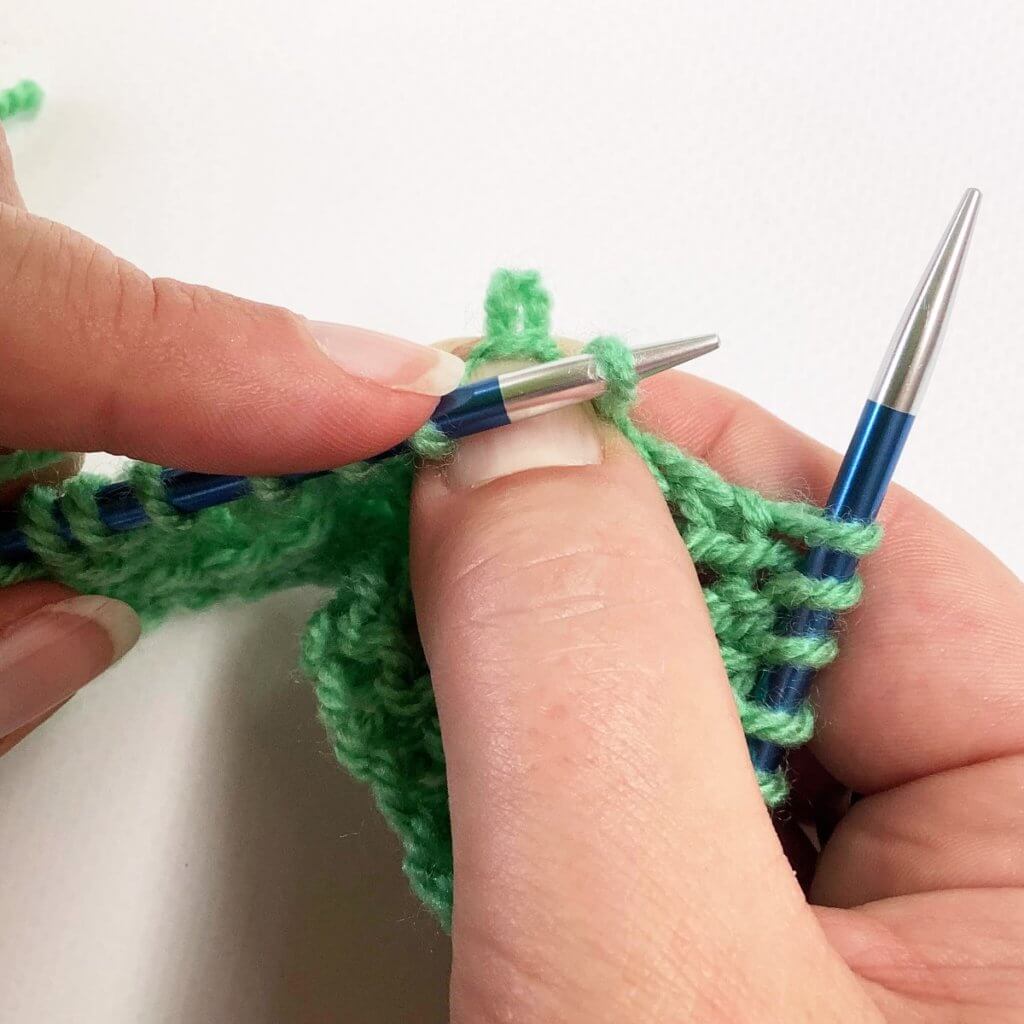
1. The first 2 stitches on the left-hand needle in the picture
below, are the ones we’re going to work the Left Twist over. In other
words: we’re going to switch the order of the knit and the purl
stitch, to make it appear that the knit stitch travels to the left.
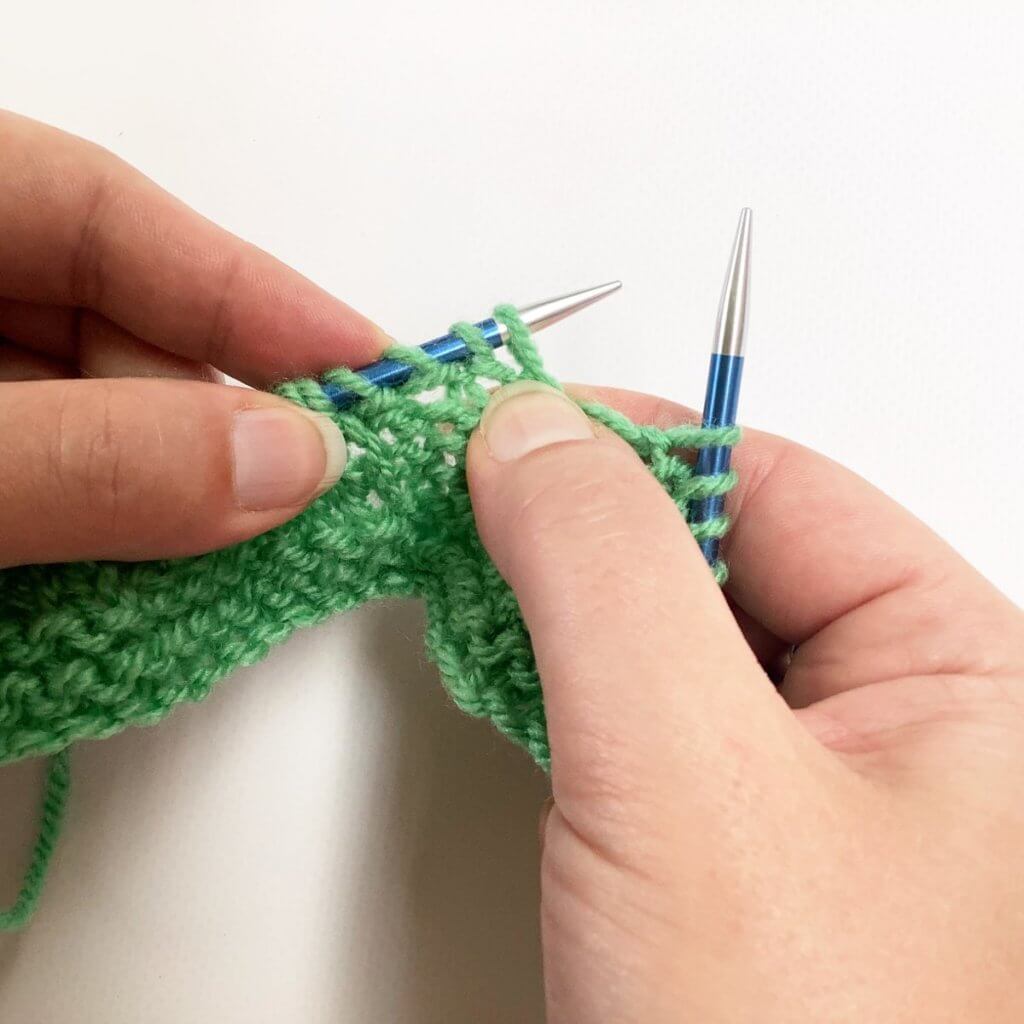
2. First I make sure to move the working yarn to the front of the work since the first stitch to work will be a purl stitch. Next, I grab the yarn directly below the 2 stitches to be switched and pinch down as pictured.
3. Next, I move these stitches off the left-hand needle. Keeping the fabric pinched, makes sure that the stitches won’t ladder down.
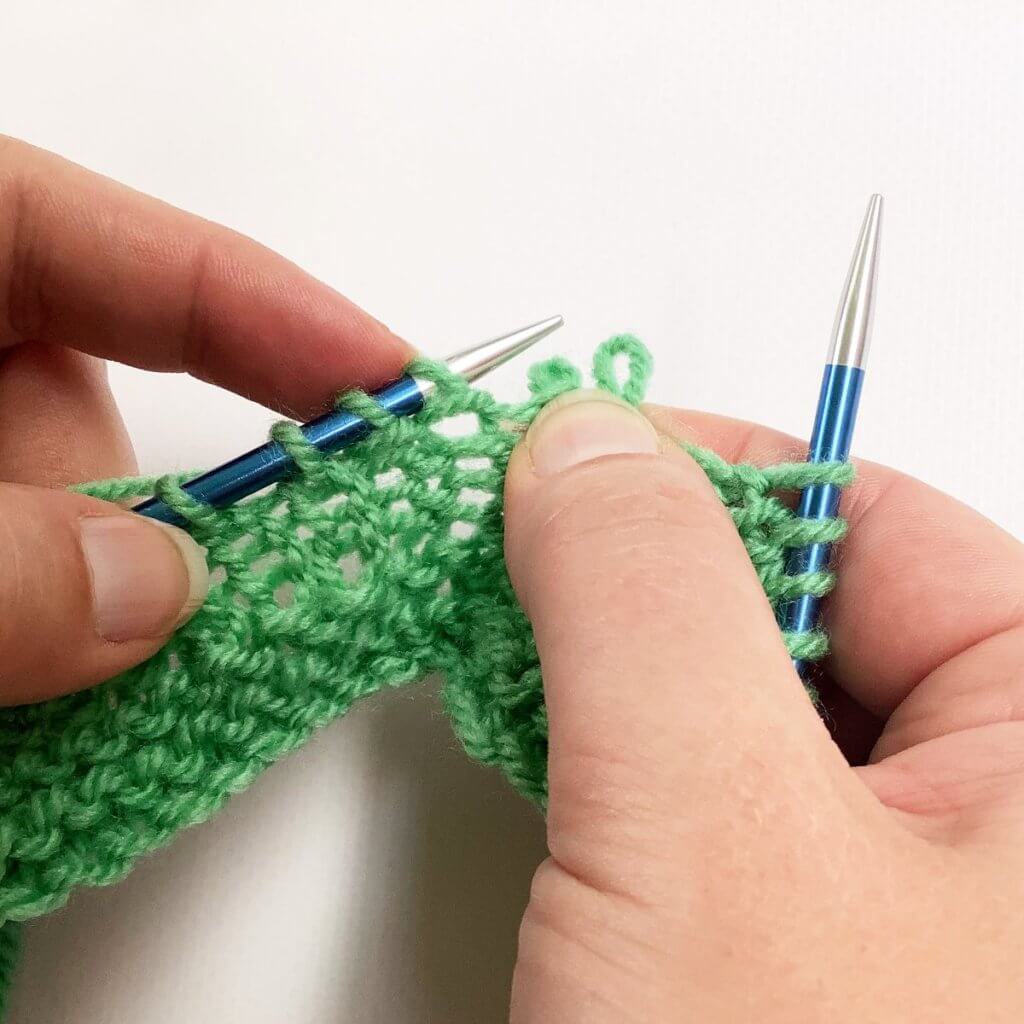
4. Then insert the left-hand needle knit wise into the loose stitch on the right to put it back on the needle. Make sure to keep pinching the fabric underneath the other stitch! Especially now we’re placing some stress on the yarn.
5. Now insert the left-hand needle knit wise into the remaining loose stitch and put it back on the needle. This can be somewhat fiddly.
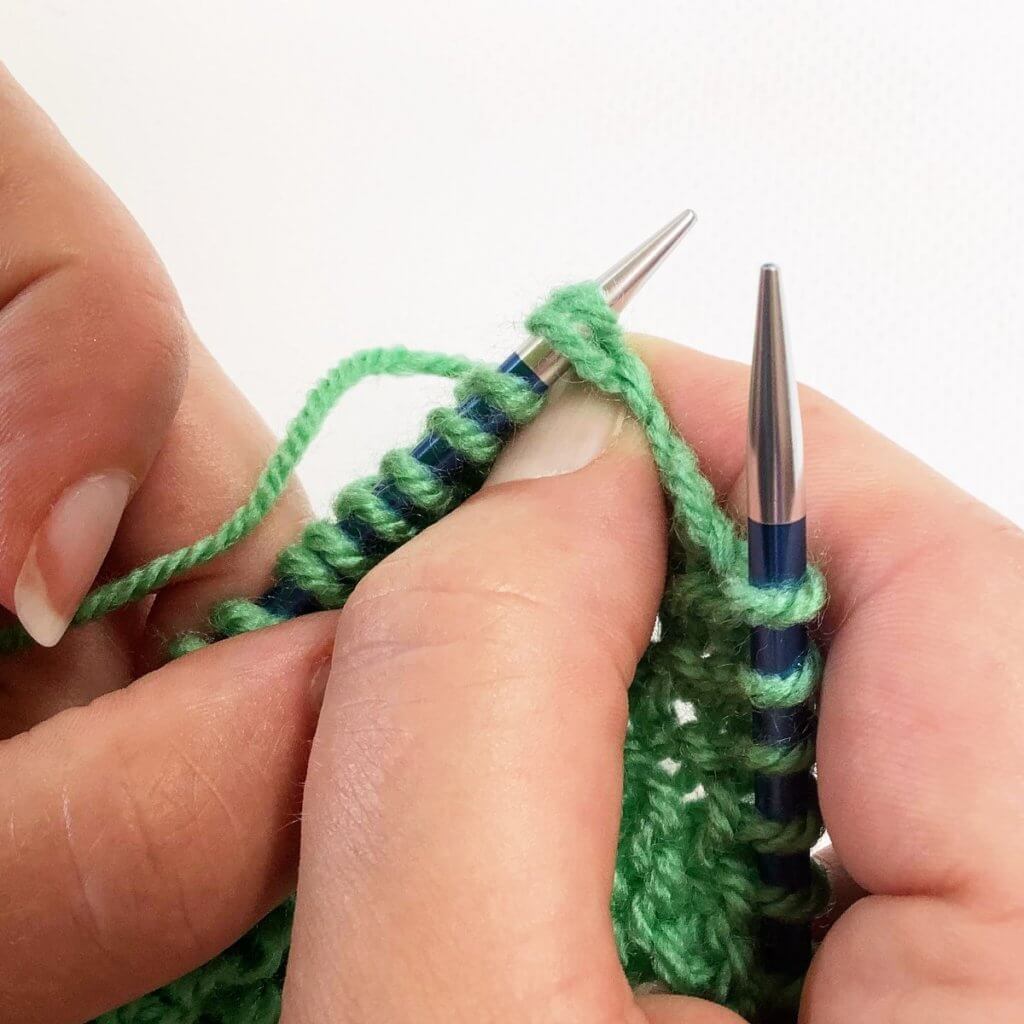
6. Now it’s time to insert your right-hand needle purl wise into the first stitch from the tip of the left-hand needle.
7. Next, wrap your yarn around the needle, pull it through and let the stitch slide of the needle to complete the purl stitch.
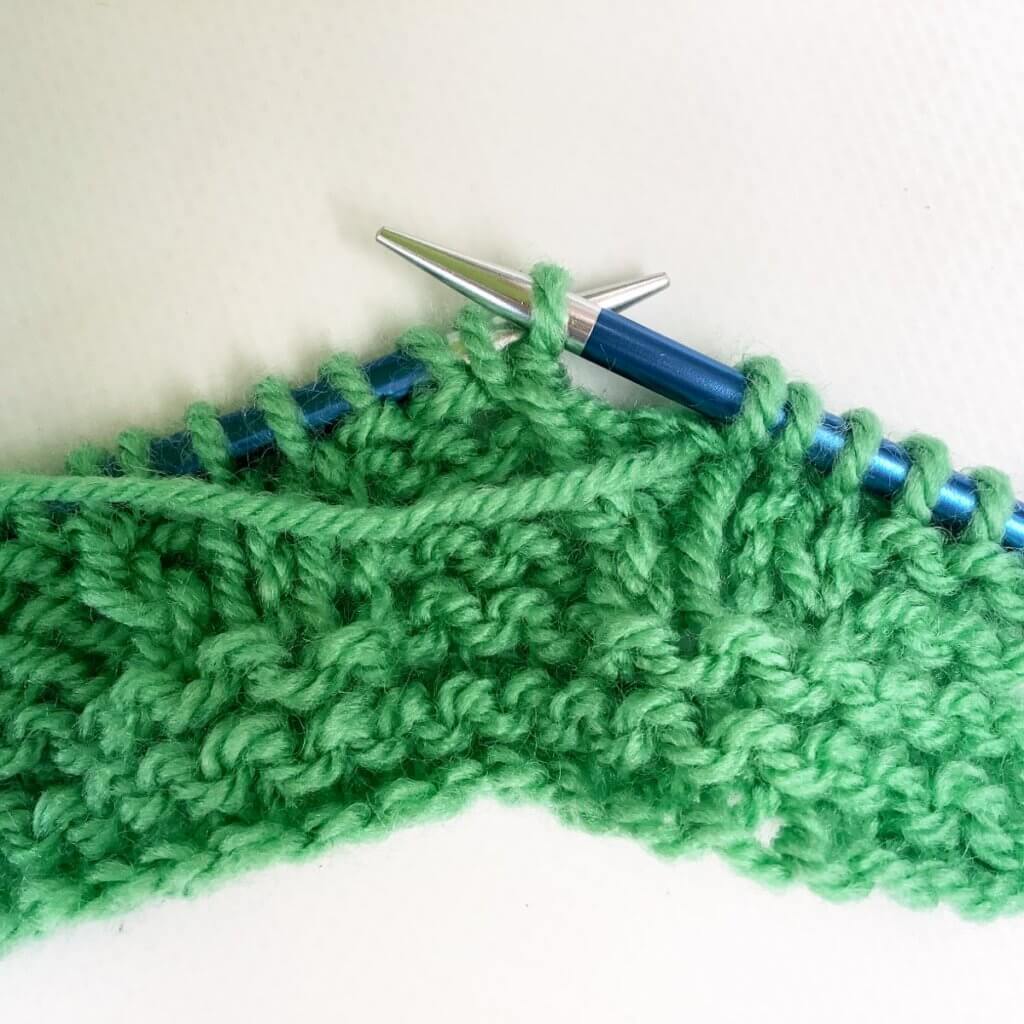
8. Next is to work the traveling stitch itself. To make it pop against the background and tighten it up a bit, this stitch is worked through the back loop. So, insert your right-hand needle knit wise into the first stitch from the tip of the left-hand needle.
9. Next, wrap your yarn around the needle, pull it through and let the stitch slide of the needle to complete the twisted knit stitch.
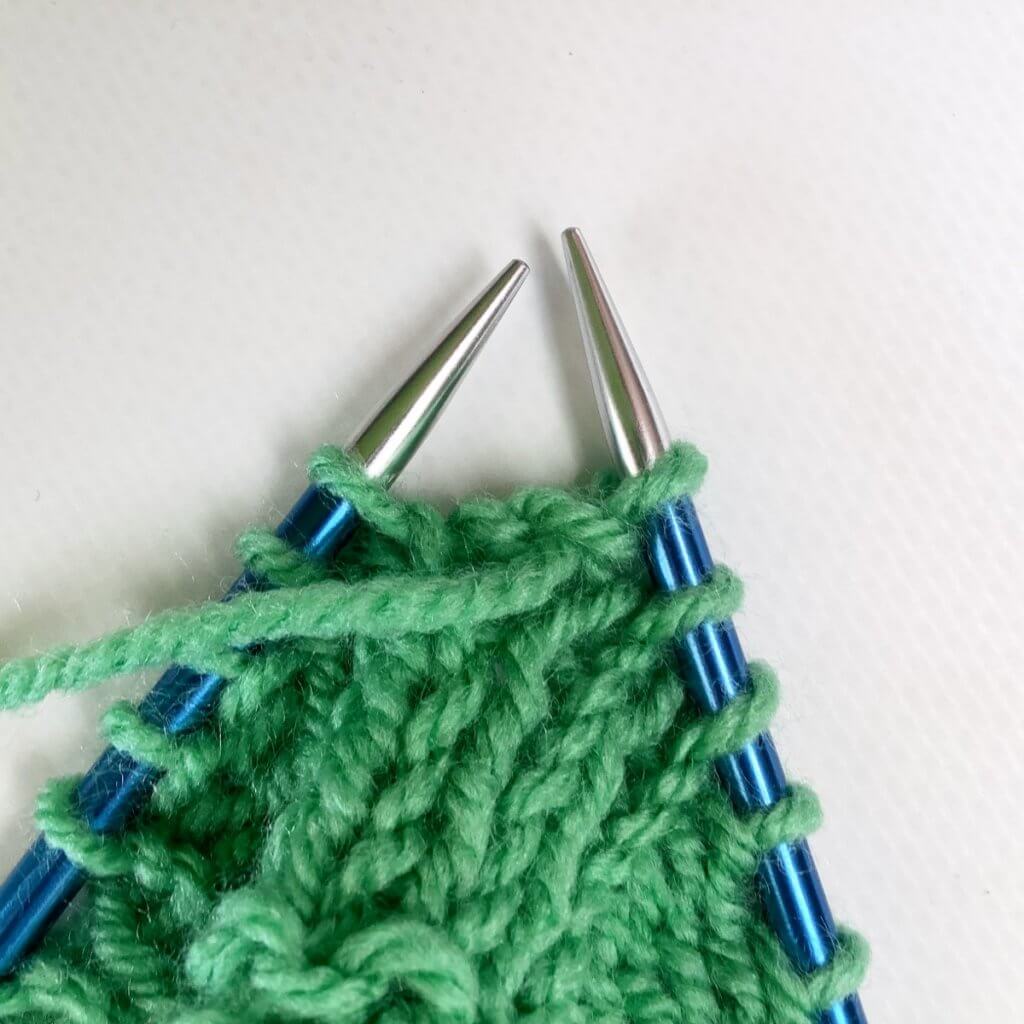
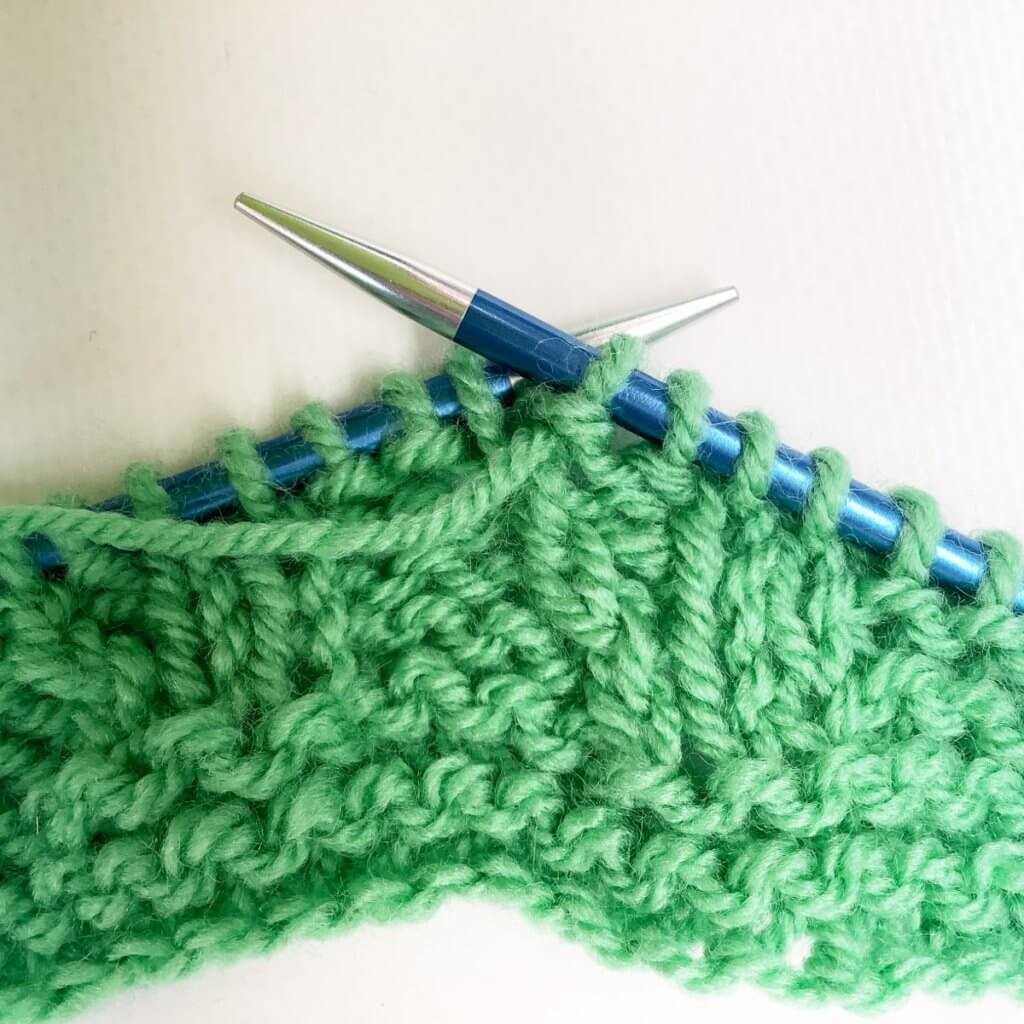
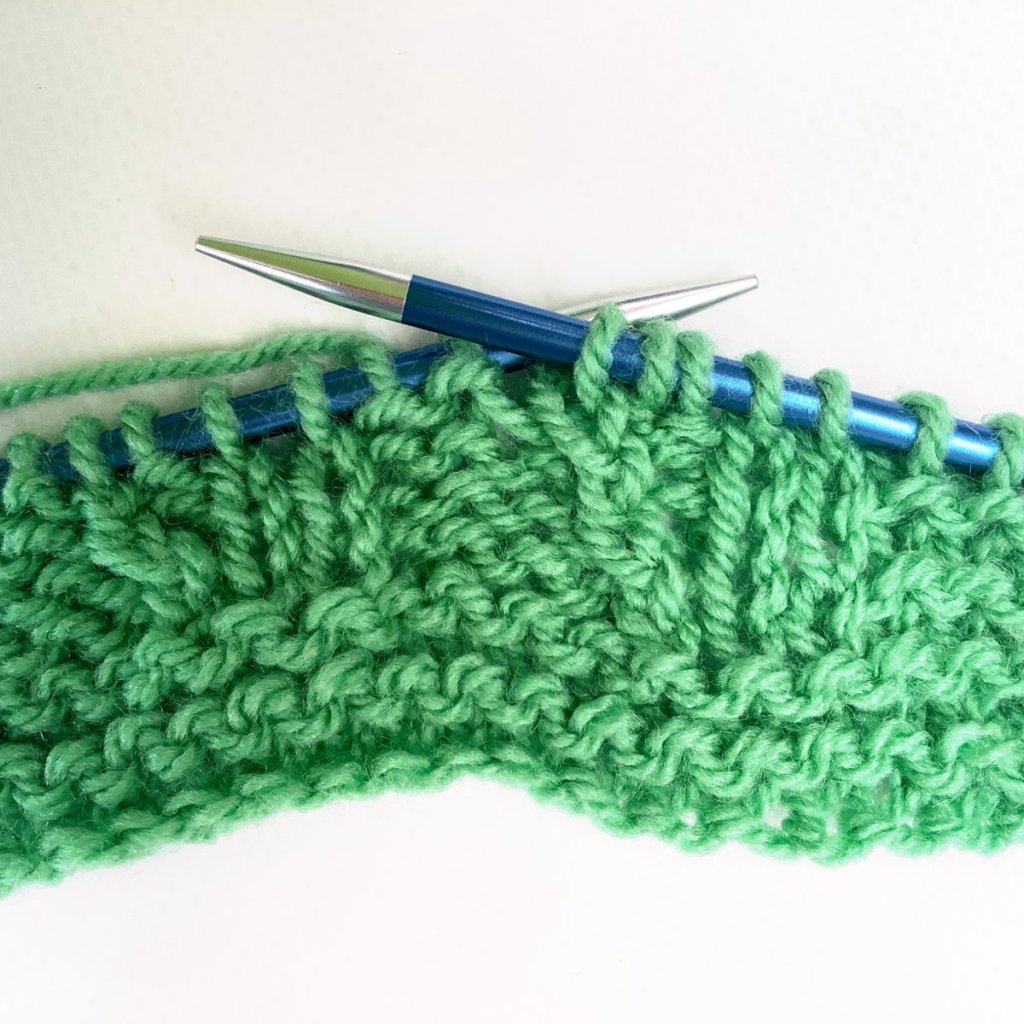
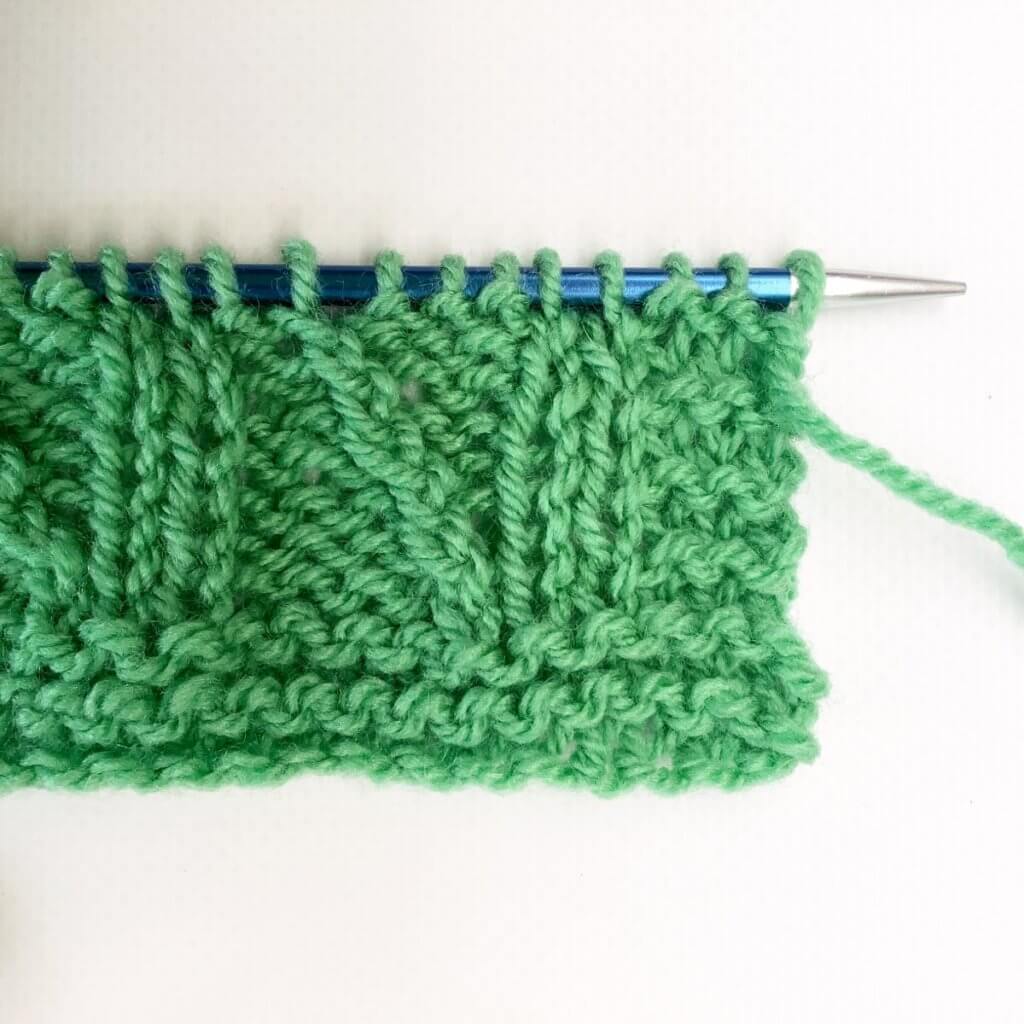
Then what?
On the following wrong side row, work the stitches as they present themselves. In other words: what looks like a knit stitch is knit, what looks like a purl stitch is purled, and the “traveling stitch” itself is purled through the back loop. Below is how it looks after a couple of more rows have been worked. Please note this piece has not been blocked!
Thanks to my Patreon supporters for bringing you this freebie! Creating quality patterns and tutorials is a lot of work and resource-intensive. However, I find it important to give you free content like this tutorial. Thanks to the generous support of my Patreon supporters, I can make it happen. Thank you, patrons! Click here to join, or click here to read more about La Visch Designs on Patreon.
The Dutch Knitting Festival Zwolle is the most popular knitting and crocheting event in the Netherlands. There will be more than 80 exhibitors, inspiring guests from the world of fiber crafts, over 30 classes and workshops, free yarn tastings, and demonstrations, and, of course, lots of opportunities to knit and crochet together. Perfect for inspiration-filled days with and among like-minded people. And parking is free!
At the upcoming edition in the IJsselhallen in Zwolle, on October 11 and 12, 2019, there will again be a surprising program. And I’ll be teaching a workshop on Friday the 11th on fixing mistakes in your knitting!
Fixing Knitting Mistakes with La Visch
You are knitting happily along when
suddenly you notice it: a mistake in your knitting, 5 cm down in your
project! Ripping it all out is a waste of time, that’s why you will
learn in this workshop how to correct mistakes while the project is
still on your needles. You will learn how to pick up fallen stitches
(in the middle and at the edge of your work!) and how to correct a
decrease or increase. You will also learn a good approach for
repairing mistakes in a lace or cable pattern. If you have a project
in time-out with such an error, do take it with you! In that case, a
cushion in a light color and a pack of pins is also handy to have.
This workshop is suitable for a wide
range of knitters; we all make mistakes when knitting. To get the
most out of this workshop, it is, however, advisable to have already
completed some knitting projects. These do not have to be very
complex projects, but experience with simple decreases such as k2tog
and ssk/skp, increases such as the yarn over and m1 as well as with
simple lace knitting is useful.
For more information on this workshop, visit the workshop page (in Dutch) on the Dutch Knitting Festival website.
Early bird tickets for admission and this class are available through the workshop page from July 24th, 19.00 (GMT+1).
Will I see you at the Dutch Knitting Festival Zwolle? Do let me know if you plan on visiting. In case of questions or remarks regarding the workshop you’re, of course, also welcome to contact me. I’m very much looking forward to seeing there!