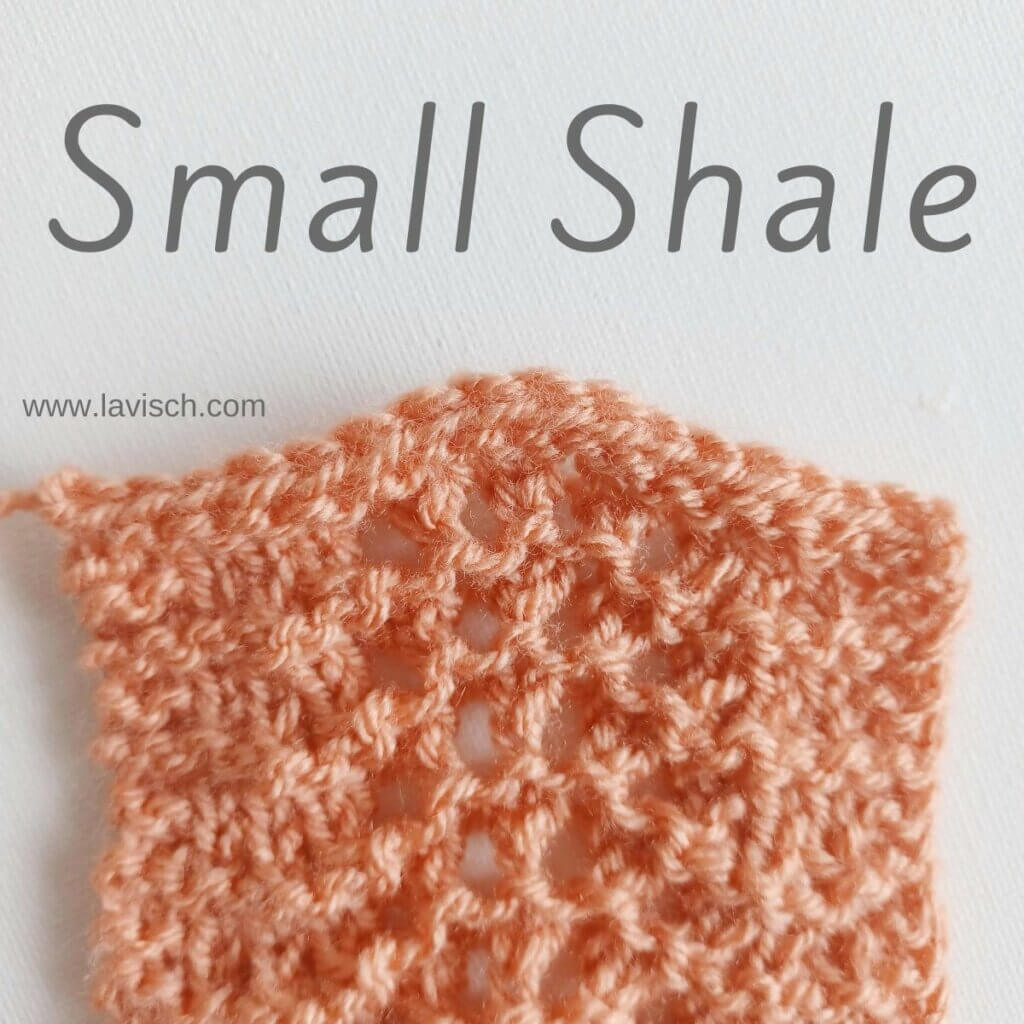
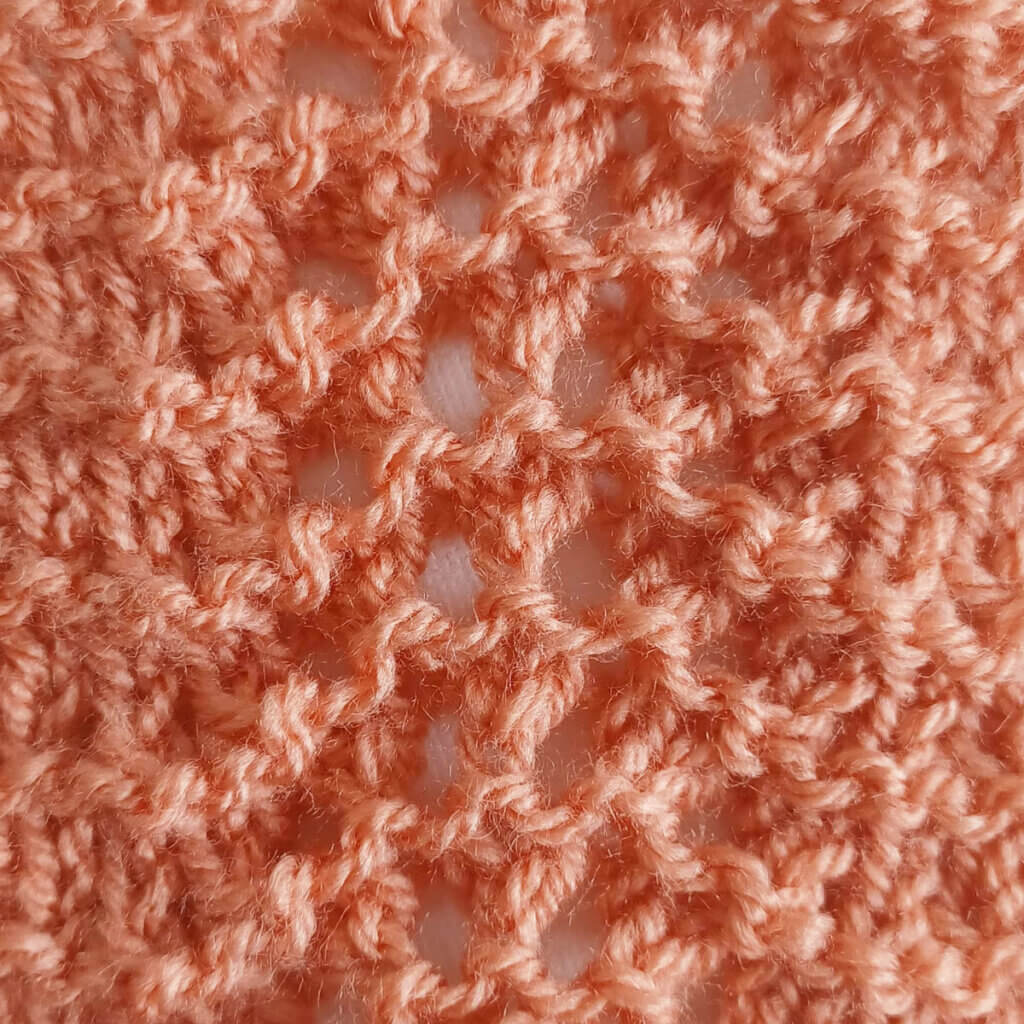
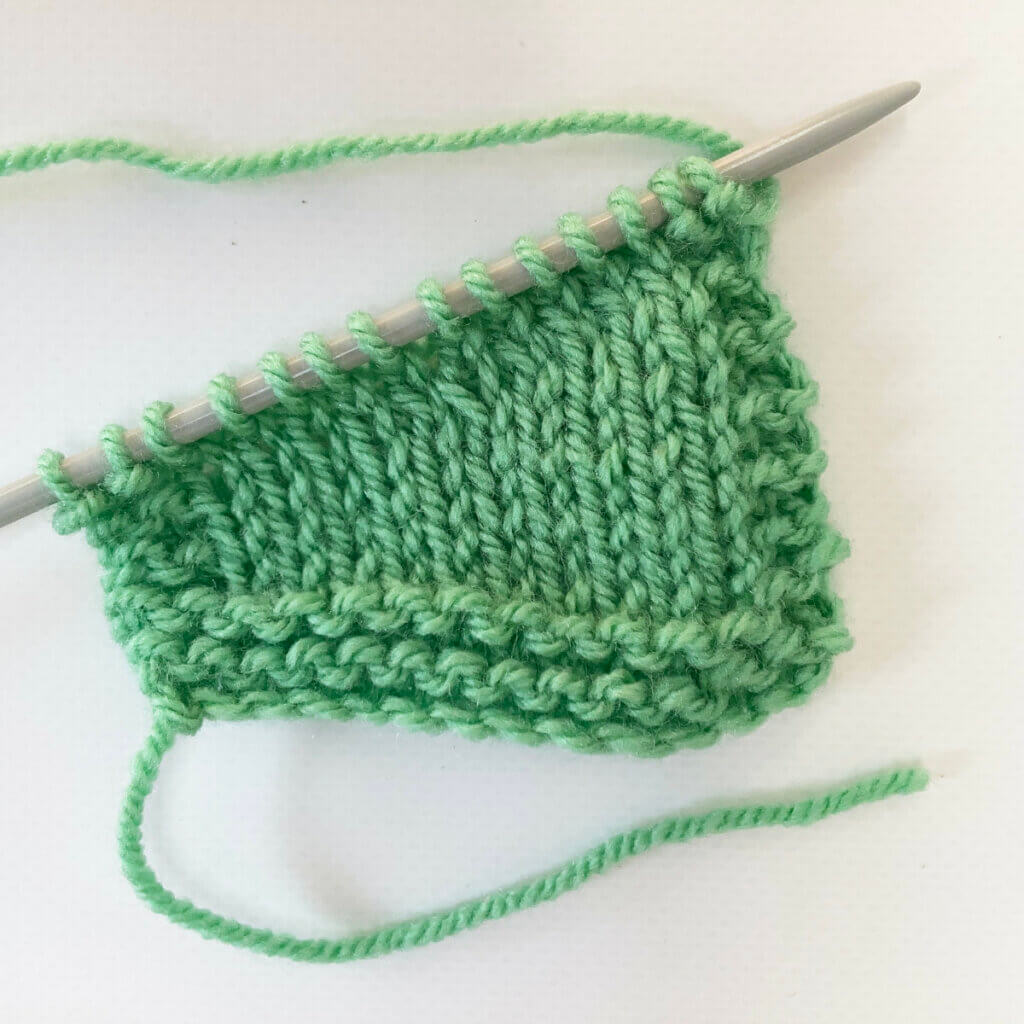
Small Shale is the smallest variation of the Old Shale stitch pattern, which is a traditional Shetland stitch pattern. Sets of decreases are alternated with sets of yarn over increases, creating a lovely wavy edge of both the bottom and top of the fabric. Because this patterning also contains some garter stitch, the fabric tends to lay flat. For this reason, Small Shale is very suitable for things like hems and edgings. This stitch pattern is worked in a multiple of 11 + 2 stitches. Please note that in the above picture, I’ve added 2 edge stitches in garter stitch on both sides of the swatch.
Materials used
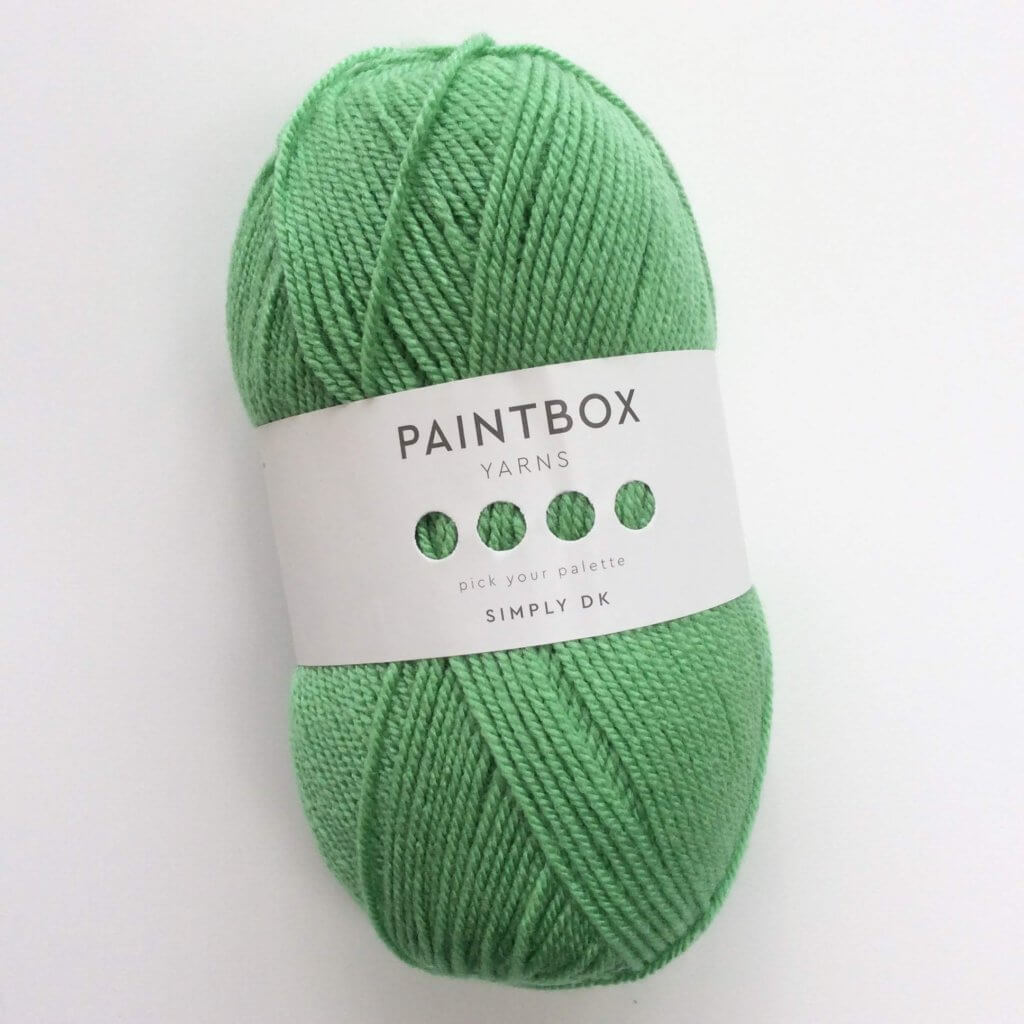
Yarn: Paintbox Yarns Simply DK, a good value, good quality 100% acrylic yarn, here in the color Vintage Pink.
Knitting needles: This is a pair of straights that I picked up at the second-hand store when I started knitting, brand unknown.
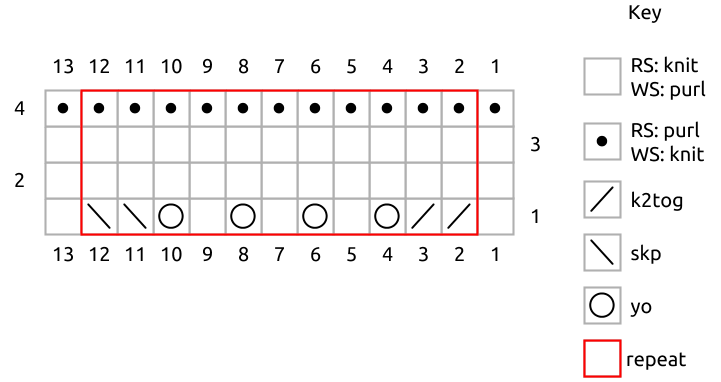
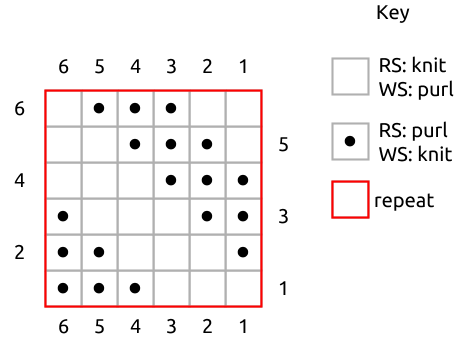
Row 1 (right side): K1, *k2tog twice, (yo, k1) 3 times, yo, skp twice; rep from * to 1 st before end, k1.
Row 2: (wrong side): Purl.
Row 3: Knit.
Row 4: Knit.
Repeat rows 1-4 for pattern.
Thanks to my Patreon supporters for bringing you this freebie! Creating quality patterns and tutorials is a lot of work and resource-intensive. However, I find it important to give you free content like this tutorial. Thanks to the generous support of my Patreon supporters, I can make it happen. Thank you, patrons! Click here to join, or click here to read more about La Visch Designs on Patreon.
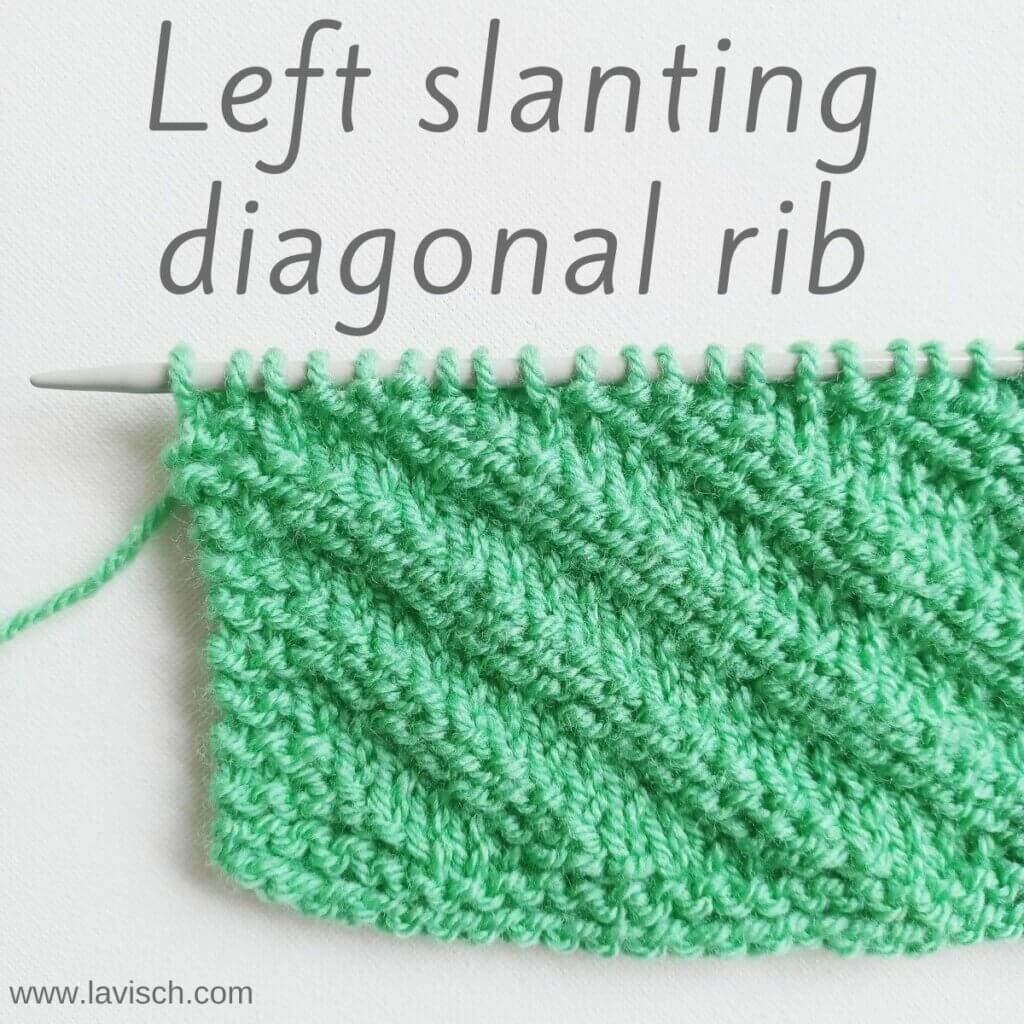
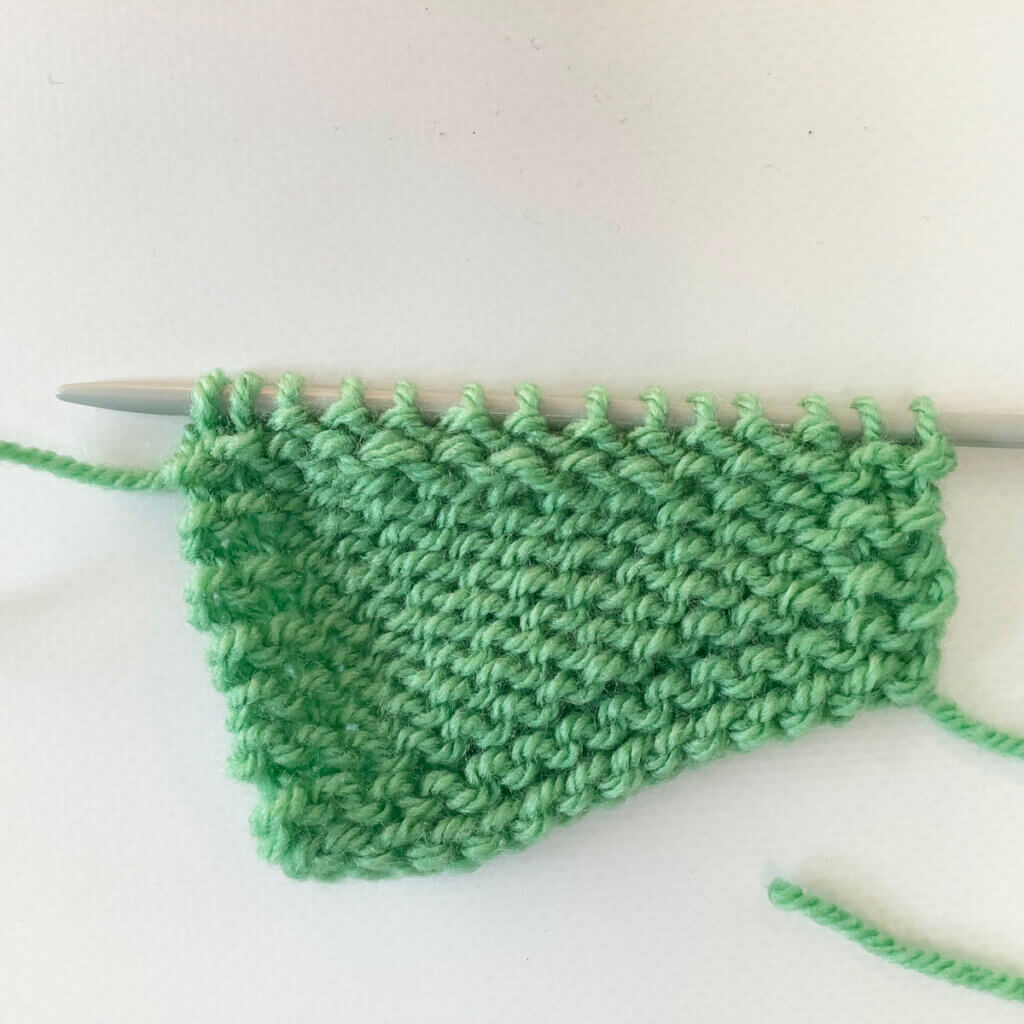
This post is about working the left slanting diagonal rib pattern. It works well both as all-over patterning, as well as an alternative for regular rib as finishing for hems and sleeves. This stitch pattern is worked on both right side and wrong side rows, and is a multiple of 6 stitches.
Materials used
Yarn: Paintbox Yarns Simply DK, a good value, good quality 100% acrylic yarn, here in the color 125 Spearmint Green.
Knitting needles: This is a pair of straights that I picked up at the second-hand store when I started knitting, brand unknown.
Row 1 (right side): *K3, p3; rep from * to end. Row 2: (wrong side): *K2, p3, k1 rep from * to end. Row 3: *P2, k3, p1; rep from * to end. Row 4: *P3, k3; rep from * to end. Row 5: *K1, p3, k2; rep from * to end. Row 6: *P1, k3, p2; rep from * to end.
Repeat rows 1-6 for pattern.
Thanks to my Patreon supporters for bringing you this freebie! Creating quality patterns and tutorials is a lot of work and resource-intensive. However, I find it important to give you free content like this tutorial. Thanks to the generous support of my Patreon supporters, I can make it happen. Thank you, patrons! Click here to join, or click here to read more about La Visch Designs on Patreon.
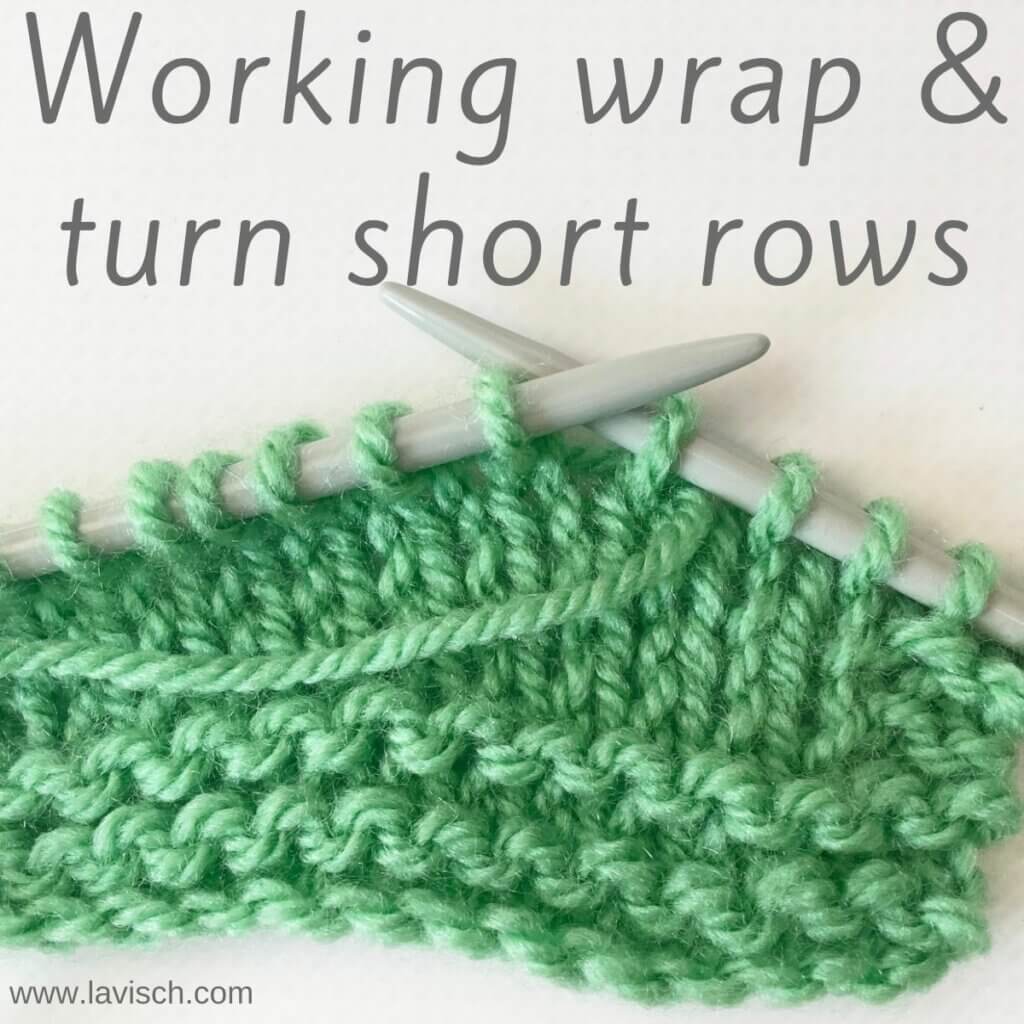
What exactly are short rows? They’re partial rows of knitting in your project, that can be used to shape the fabric. Think for example of creating extra room for the bust, or to raise the back neck in sweaters. In this tutorial, I’ll tell you all about the wrap & turn method of working short rows. Good to know, is that “wrap & turn” is often abbreviated as “w&t”. If you encounter it in a knitting instruction, it is telling you to wrap a stitch with your working yarn, and then turn your work. By wrapping this stitch, any holes in the fabric by switching the knitting direction in the middle of your row or round are closed.
Grab your materials and let’s get started!
Materials used
Yarn: Paintbox Yarns Simply DK, a good value, good quality 100% acrylic yarn, here in the color 125 Spearmint Green.
Knitting needles: This is a pair of straights that I picked up at the second-hand store when I started knitting. Brand unknown.
Working wrap & turn short rows step by step
To start, work as instructed by your pattern until the point where it says “wrap & turn”.
With the yarn in back, slip the first stitch on the left-hand needle purlwise.
Bring the yarn to the front of the work…
… and slip the stitch back onto the left needle again.
Now turn your work to the wrong side.
Do you see that the stitch we slipped is now wrapped with the working yarn?
Now we’re going to repeat steps 1 to 5, but working them on the purl side instead of on the knit side.
Again, work as instructed by your pattern until the point where it says “wrap & turn”. With the yarn in front, slip the first stitch on the left-hand needle purlwise.
Bring the yarn between the needles to the back of the work…
… and slip the stitch back onto the left needle again.
Now turn your work to the right side again. Do you see that the stitch we slipped is now wrapped with the working yarn?
Before you continue working in stockinette again, we, of course, have to move the working yarn to the back again. Do so in between the knitting needle tips.
In the below picture, I’ve marked the wrapped stitches with stitch markers. It is possible to identify them without marking, but this is just easier.
In this case I didn’t make my swatch big enough, otherwise I could have continued working more sets of short rows, starting the “w&t” 3 sts before the last wrapped (marked) stitch. In other words: Working steps 1 to 8 of this tutorial more times as needed.
At some point, you’ll want to resume working over the entire row or round of the work. This is also the row where you want to pick up the strand that you wrapped around the slipped stitch, and knit it together with the stitch that it wraps.
Especially in stockinette fabric, this wrap is very visible. Also, not knitting the wrap with its stitch will make a visible hole in the fabric. In garter stitch or lace, this may not be that noticeable, though. So, first, work to the first wrapped stitch, and insert the needle from bottom to top into the wrap…
…. Then into the stitch itself as if to knit.
Wrap the yarn around the needle, and pull it through both the stitch and the wrap. Pulling it through the wrap may be a tad fiddly.
To finish the stitch, let it slide off the needle.
Here, I finished the row, turned the work and purled right to the remaining wrapped stitch.
Then, with the yarn in front, insert the needle into the **back** of the wrap, from back to front, and place it on the needle.
If you work the wrap any other way, it will be visible on the right side of the fabric.
Next, insert the needle as if to purl into both the wrap and the stitch itself.
Wrap the yarn around the needle, and pull it through both the stitch and the wrap. To finish the stitch, let it slide off the needle.
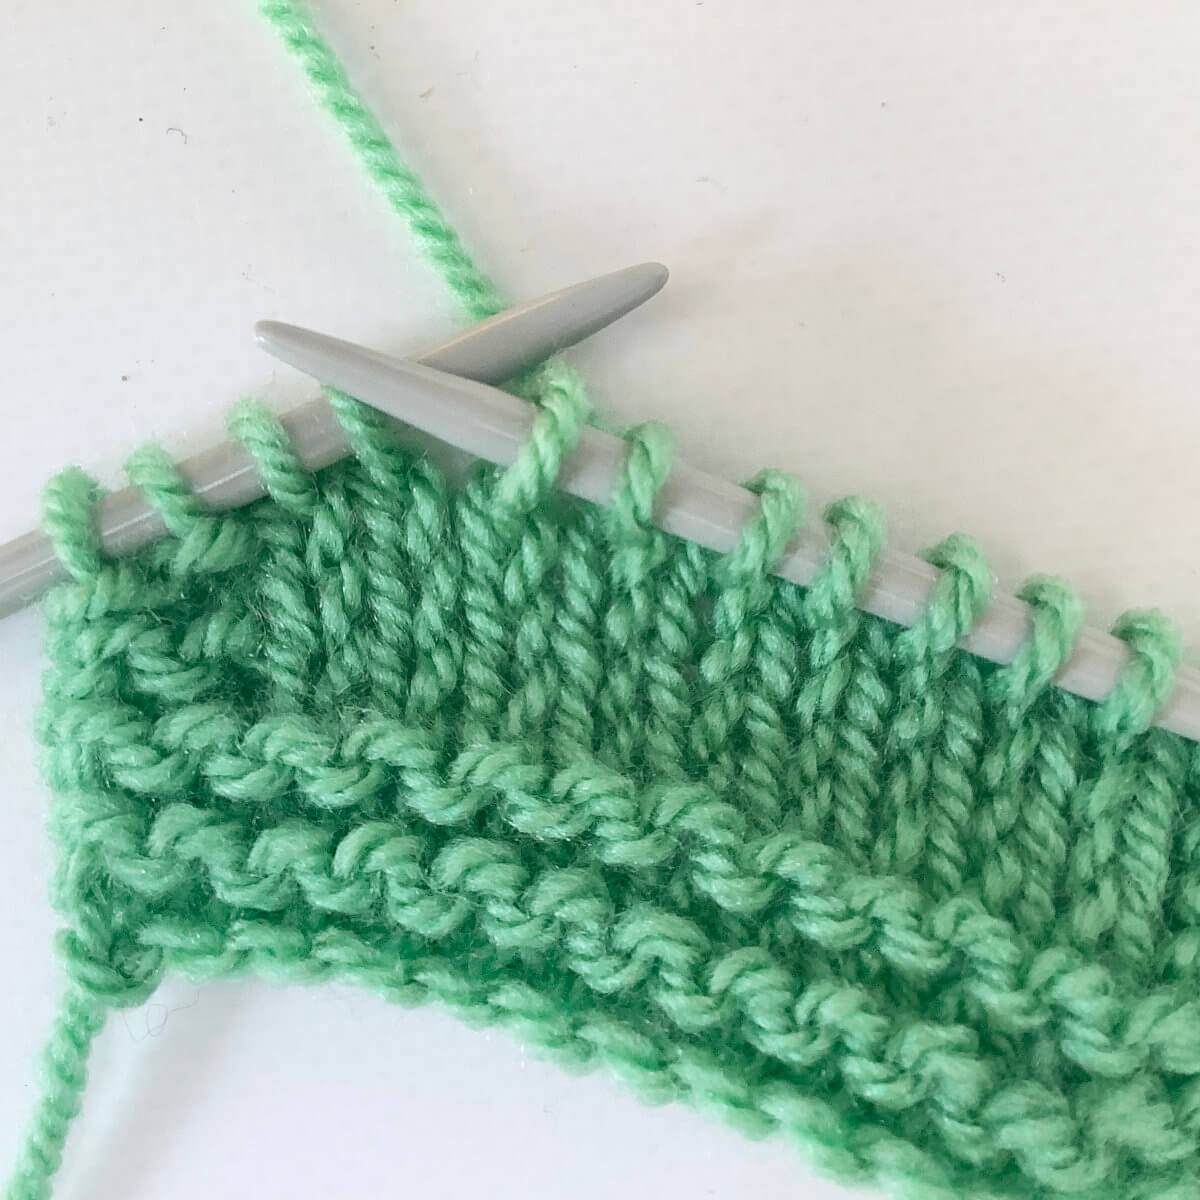
The result
Below, you can see the result of the wrap & turn short rows I worked for this tutorial. The shaping is not very dramatic, because I ended up only having room in my swatch for 1 set of short rows.
Thanks to my Patreon supporters for bringing you this freebie! Creating quality patterns and tutorials is a lot of work and resource-intensive. However, I find it important to give you free content like this tutorial. Thanks to the generous support of my Patreon supporters, I can make it happen. Thank you, patrons! Click here to join, or click here to read more about La Visch Designs on Patreon.
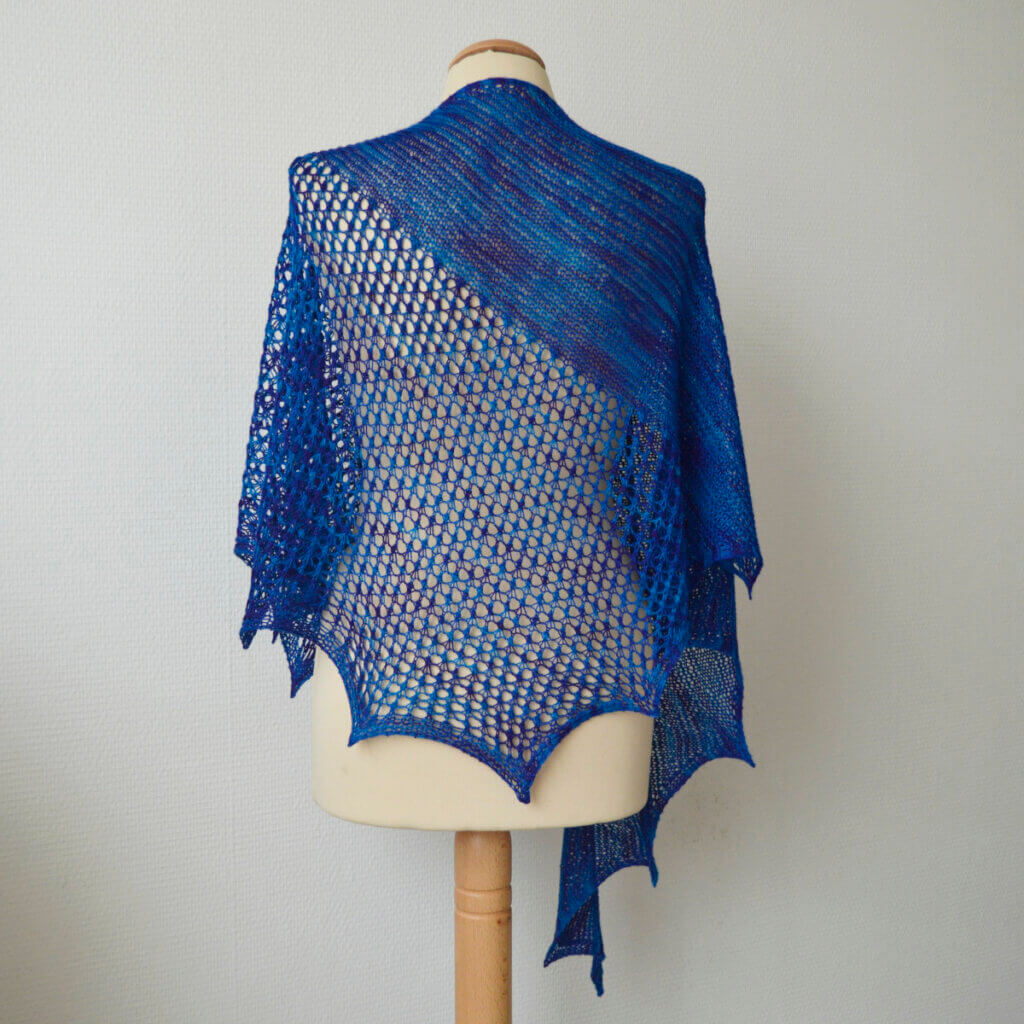
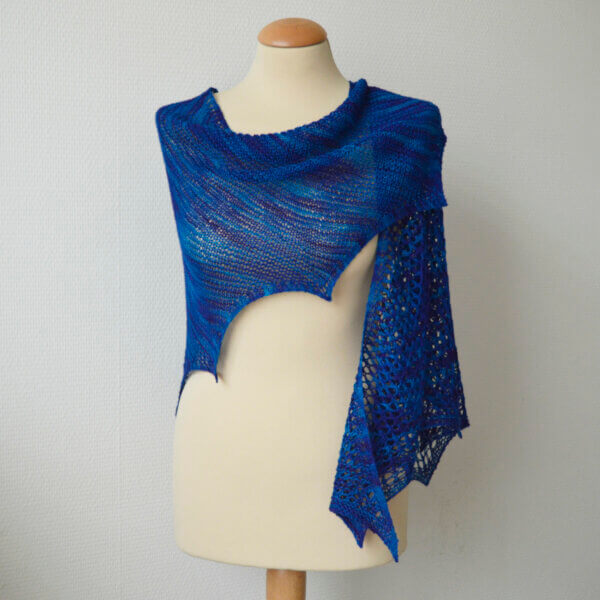
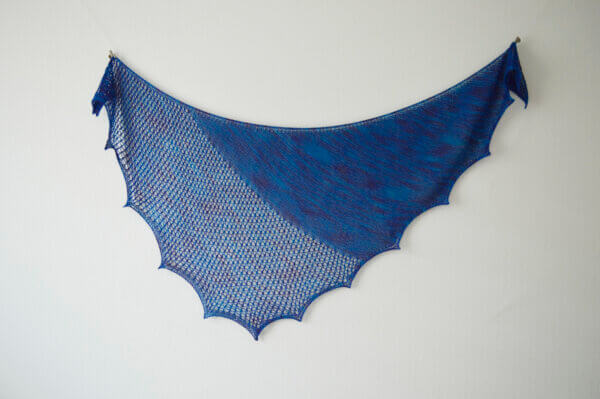
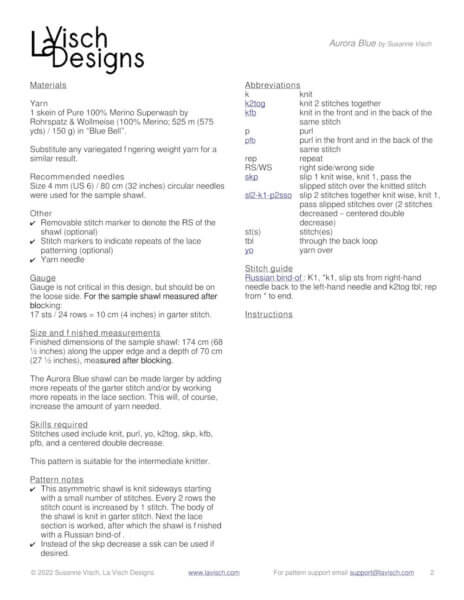
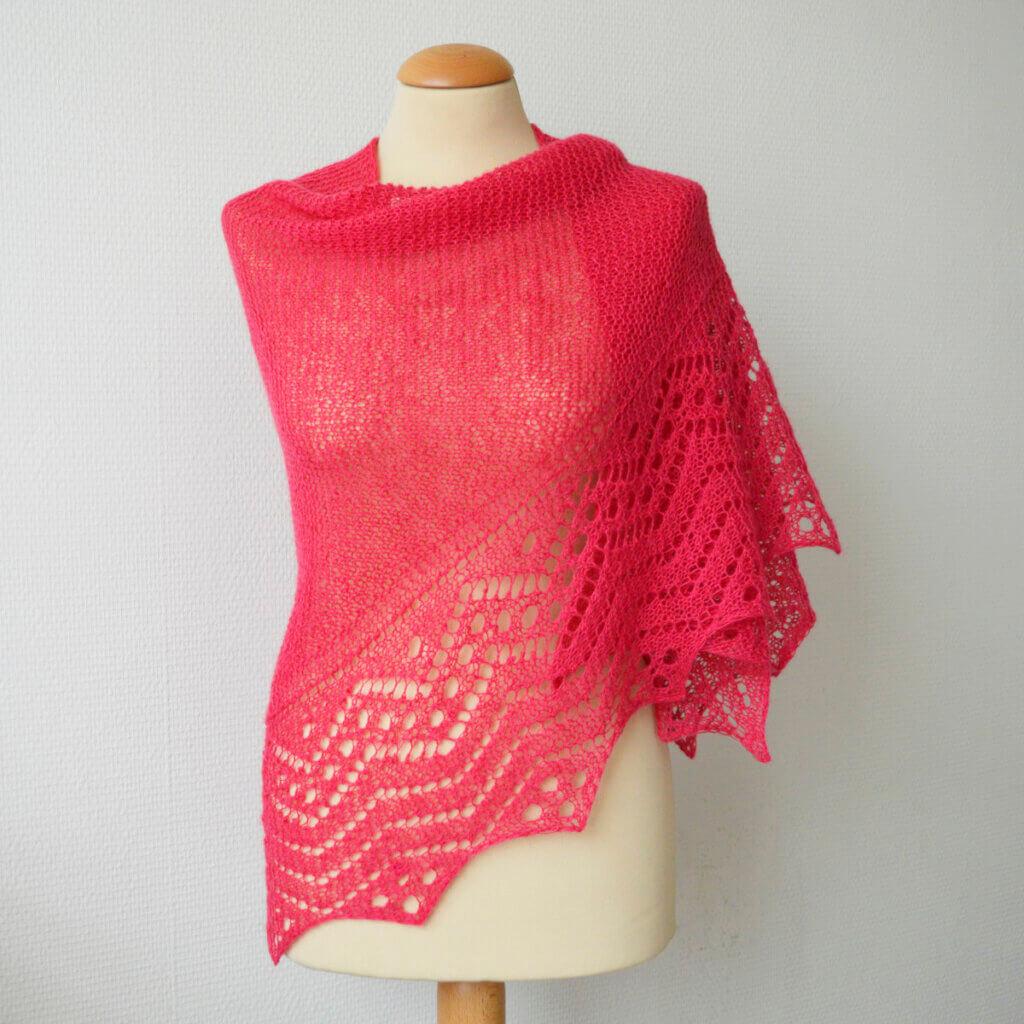
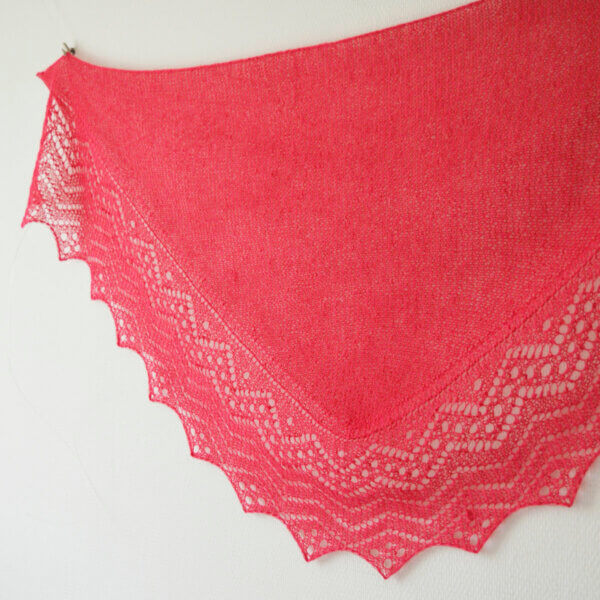
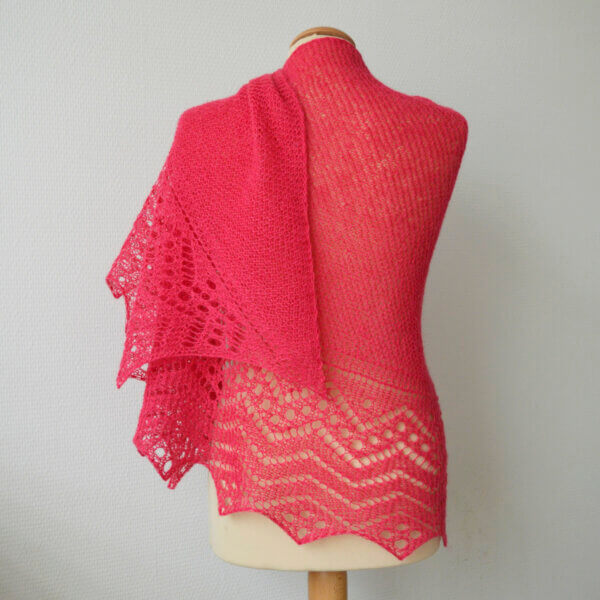
Aurora Blue captures all the gorgeous variations of vibrant blue found in the semi-double flowers of this type of delphinium. This design is knit sideways on the bias, making a shallow and asymmetrical triangle, perfect for wearing as an elegant scarf. The combination of garter stitch in a variegated hand-dyed yarn and simple lace makes it a perfect choice to get the best of both worlds.
The pattern contains both fully written out as well as charted instructions for the lace section.
Pay what you want: (minimum €6.95)
€
Difficulty level
Stitches used in this pattern include knit, purl, yo, kfb, skp, k2tog, and a centered double decrease. This pattern is therefor suitable for the intermediate knitter.
Sizes and finished measurements
Finished dimensions of the sample shawl: 174 cm (68 ½ inches) along the upper edge and a depth of 70 cm (27 ½ inches), measured after blocking.
Make the Aurora Blue shawl larger by adding more repeats of the garter stitch and/or by working more repeats in the lace section. As a result, this will, of course, increase the amount of yarn needed.
Pattern details
Gauge: Approx. 17 sts / 24 rows = 10 cm (4 inches) over garter stitch, measured after blocking. Gauge is, however, not critical in this design.
Pattern languages included: English.
Digital PDF has 3 pages (letter size)
Materials
Yarn: 1 skein of Pure 100% Merino Superwash by Rohrspatz & Wollmeise (100% Merino; 525 m (575 yds) / 150 g) in “Blue Bell”. Substitute any variegated fingering weight yarn for a similar result.
Size 4 mm (US 6) / 80 cm (32 inches) circular needles were used in the sample shawl.
Removable stitch marker to denote the RS of the shawl (optional)
Stitch markers to indicate repeats of the lace patterning (optional)
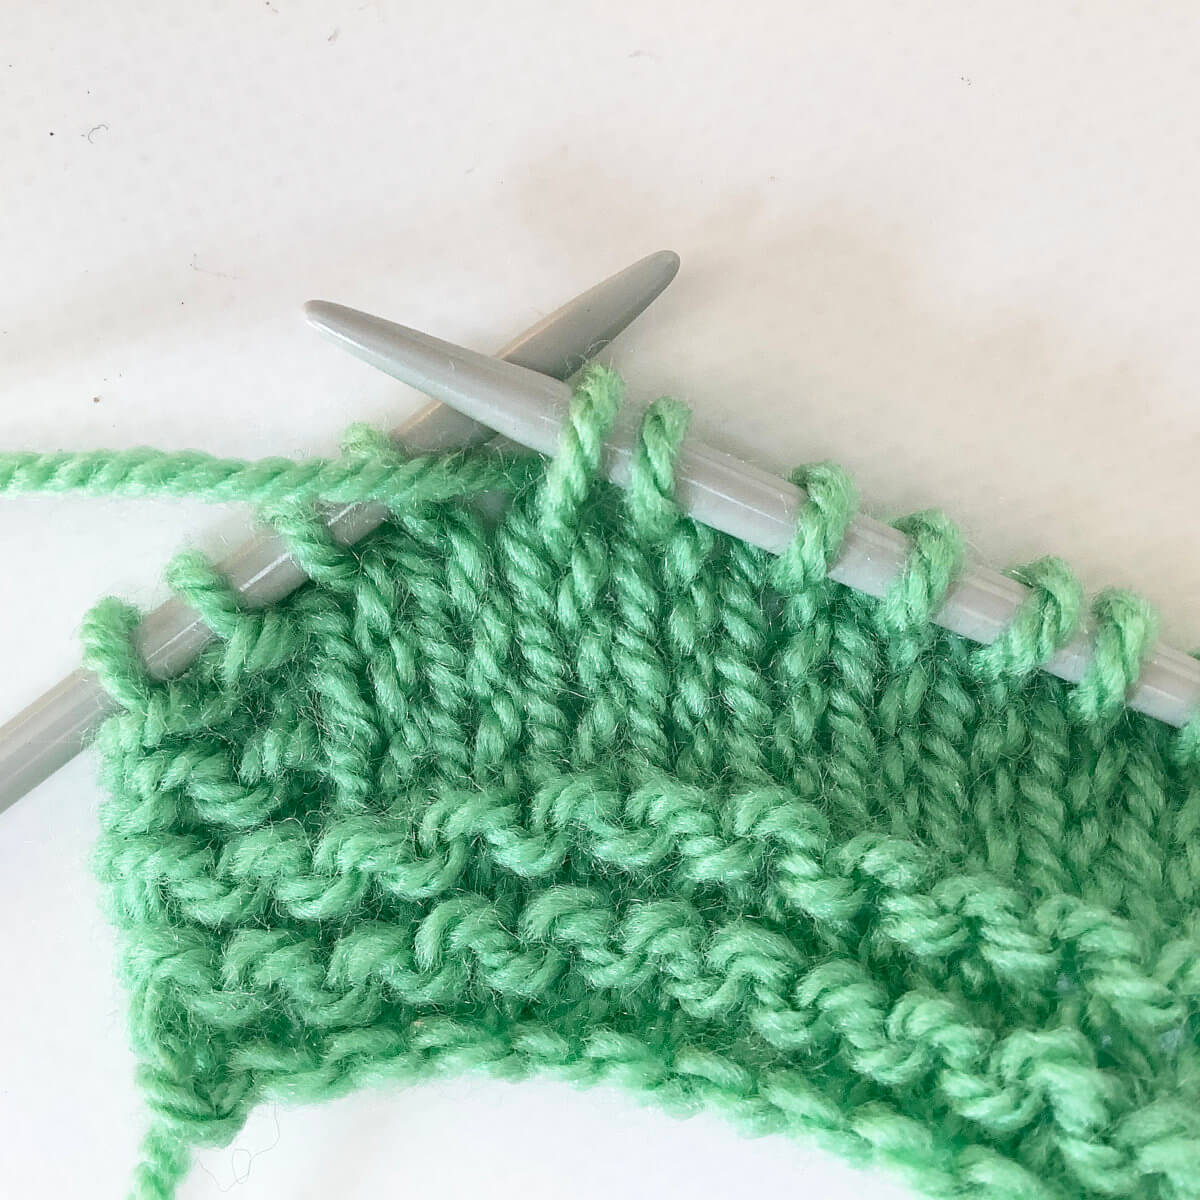
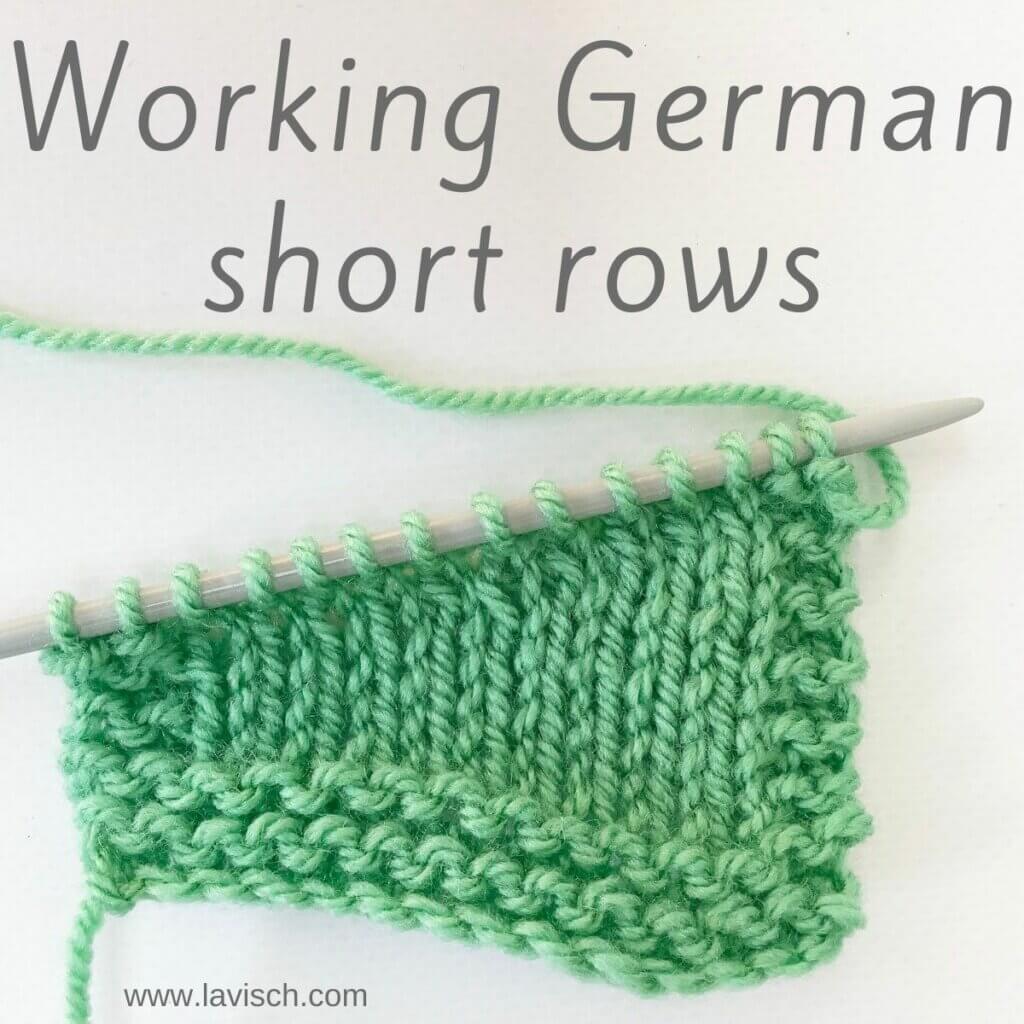
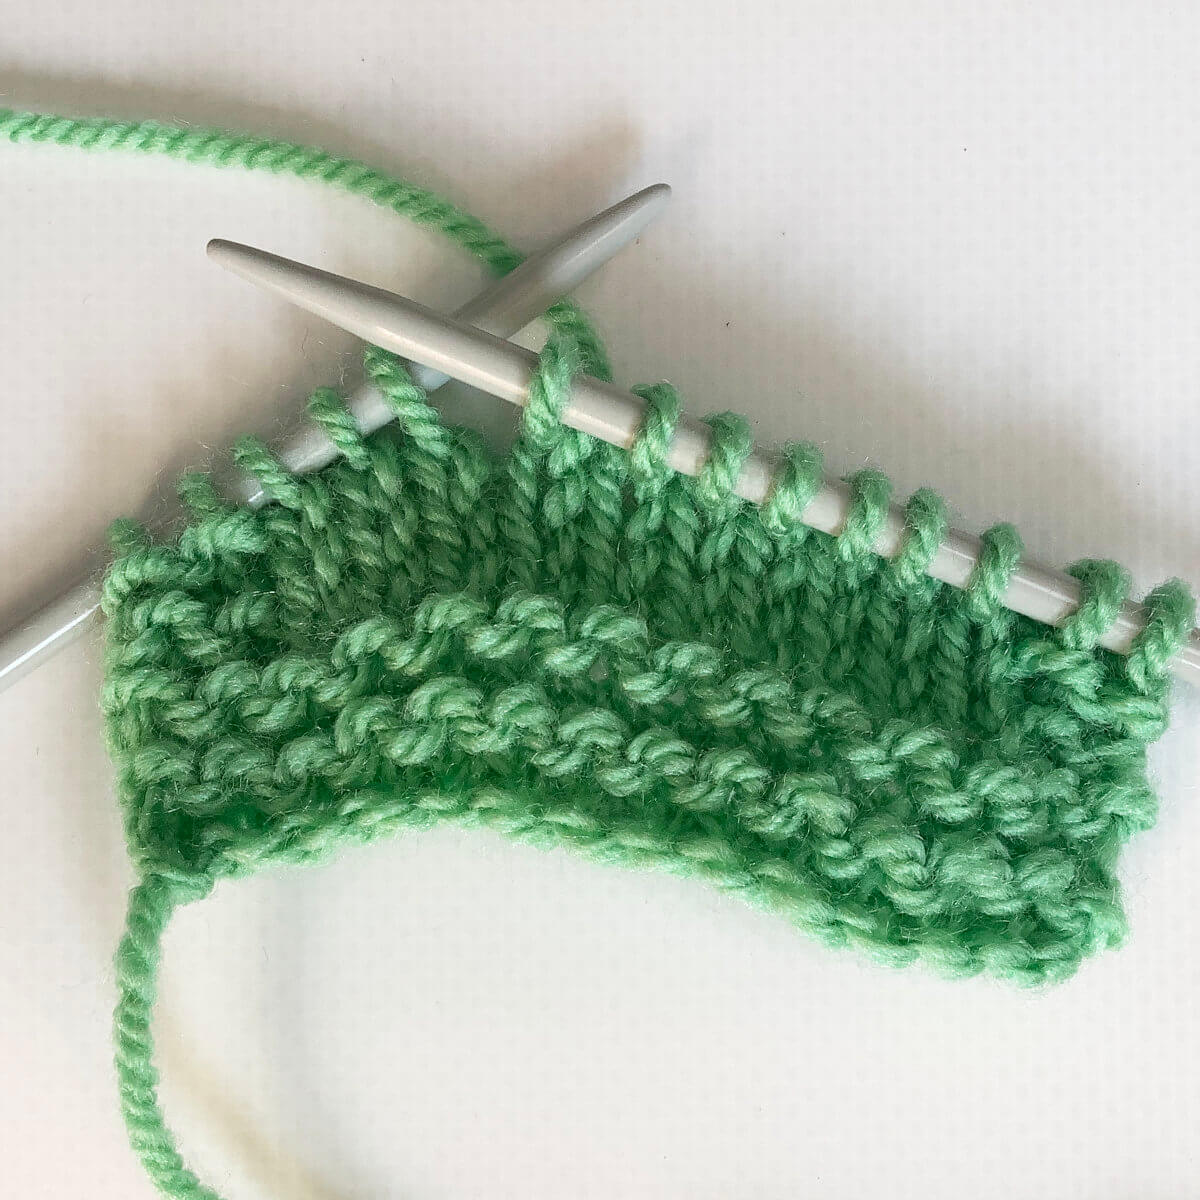
Short rows are a very handy way to create shaping in knitted fabric. Use it, for example, to raise the back of the neck in sweaters. You can also think of horizontal bust shaping, to prevent a sweater from riding up. I really like German short rows, because they’re pretty invisible in the resulting fabric, and they’re easy to work too. I don’t know how this technique has gotten its name, though. As I understand it, Germans know the technique as the German equivalent of “double stitch” short rows. But who knows how those things evolve?
Grab your materials and let’s get started!
Materials used
Yarn: Paintbox Yarns Simply DK, a good value, good quality 100% acrylic yarn, here in the color 125 Spearmint Green.
Knitting needles: This is a pair of straights that I picked up at the second-hand store when I started knitting. Brand unknown.
Working German short rows step by step
Please note that while I show the German short rows here from the right side of the fabric, the mechanics are really the same when working them from the wrong side.
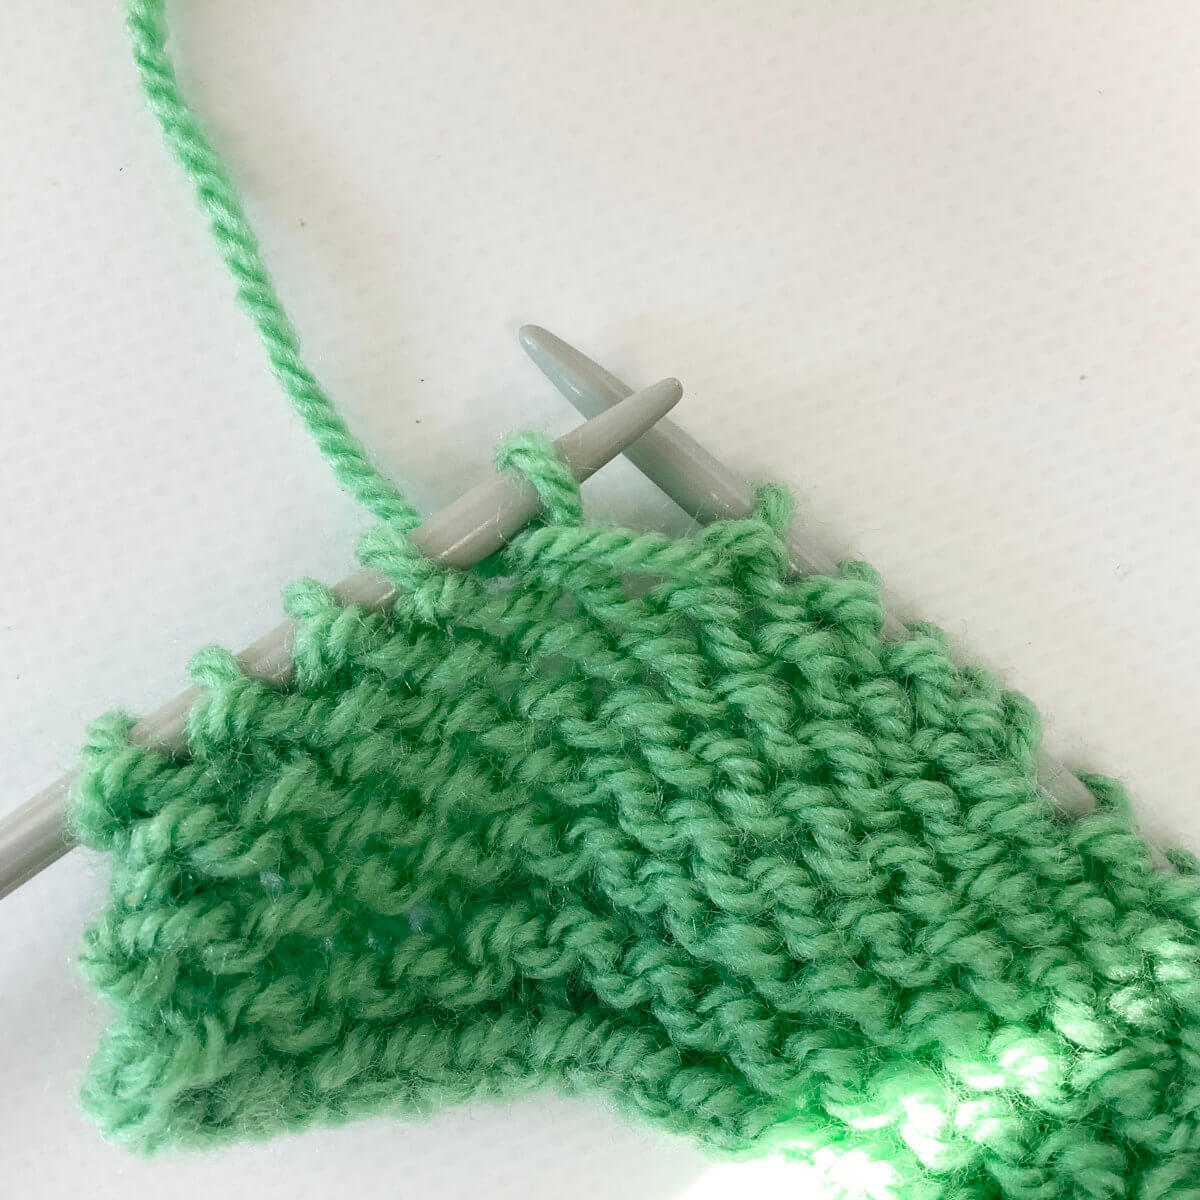
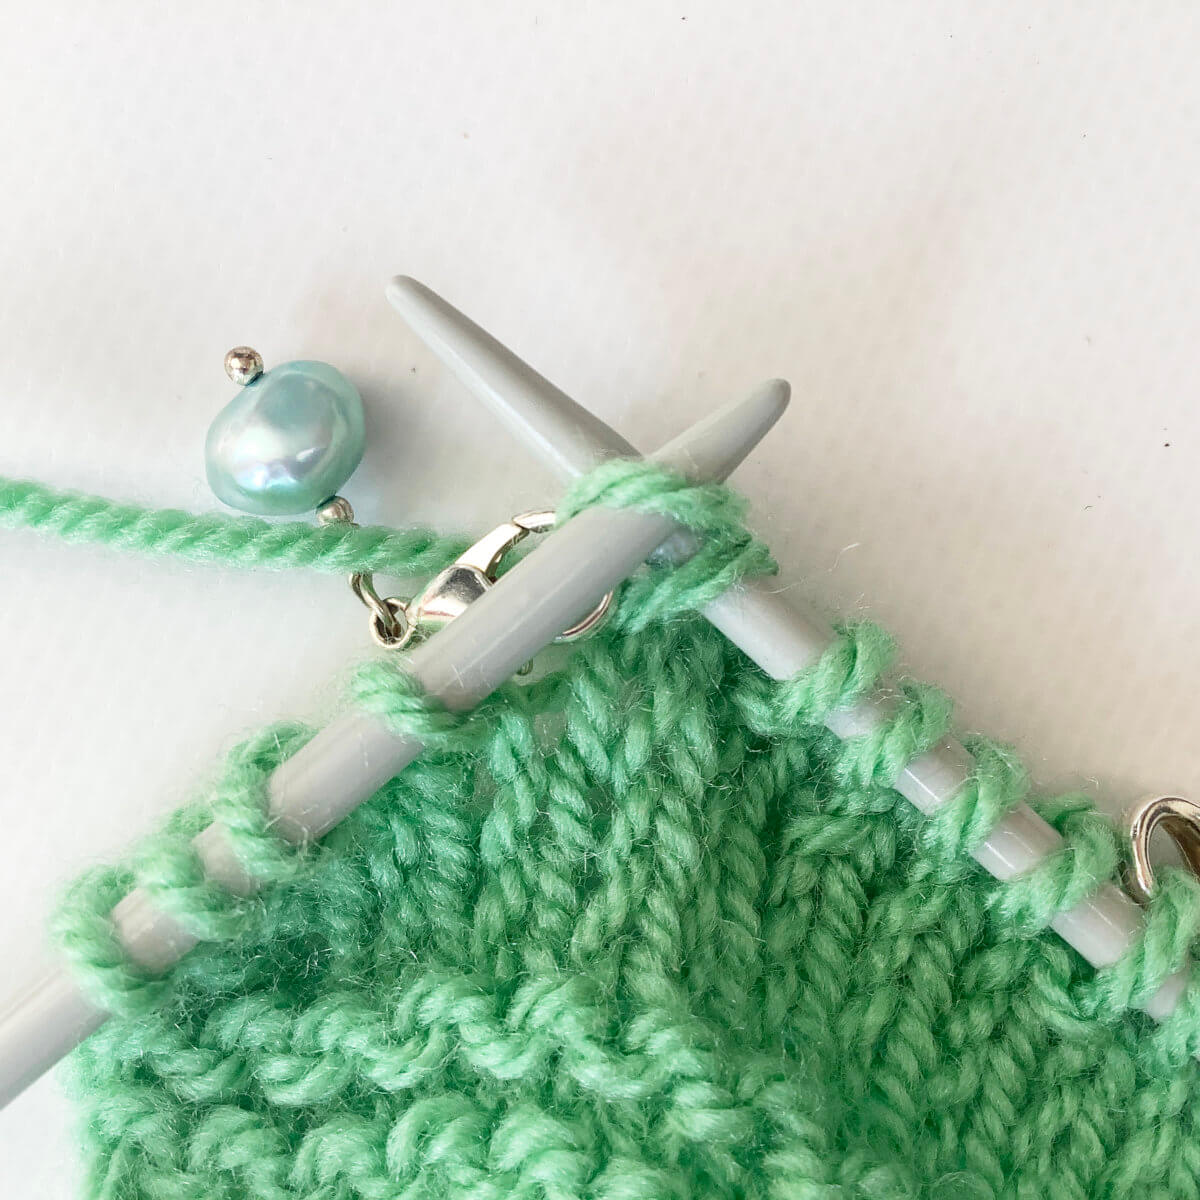
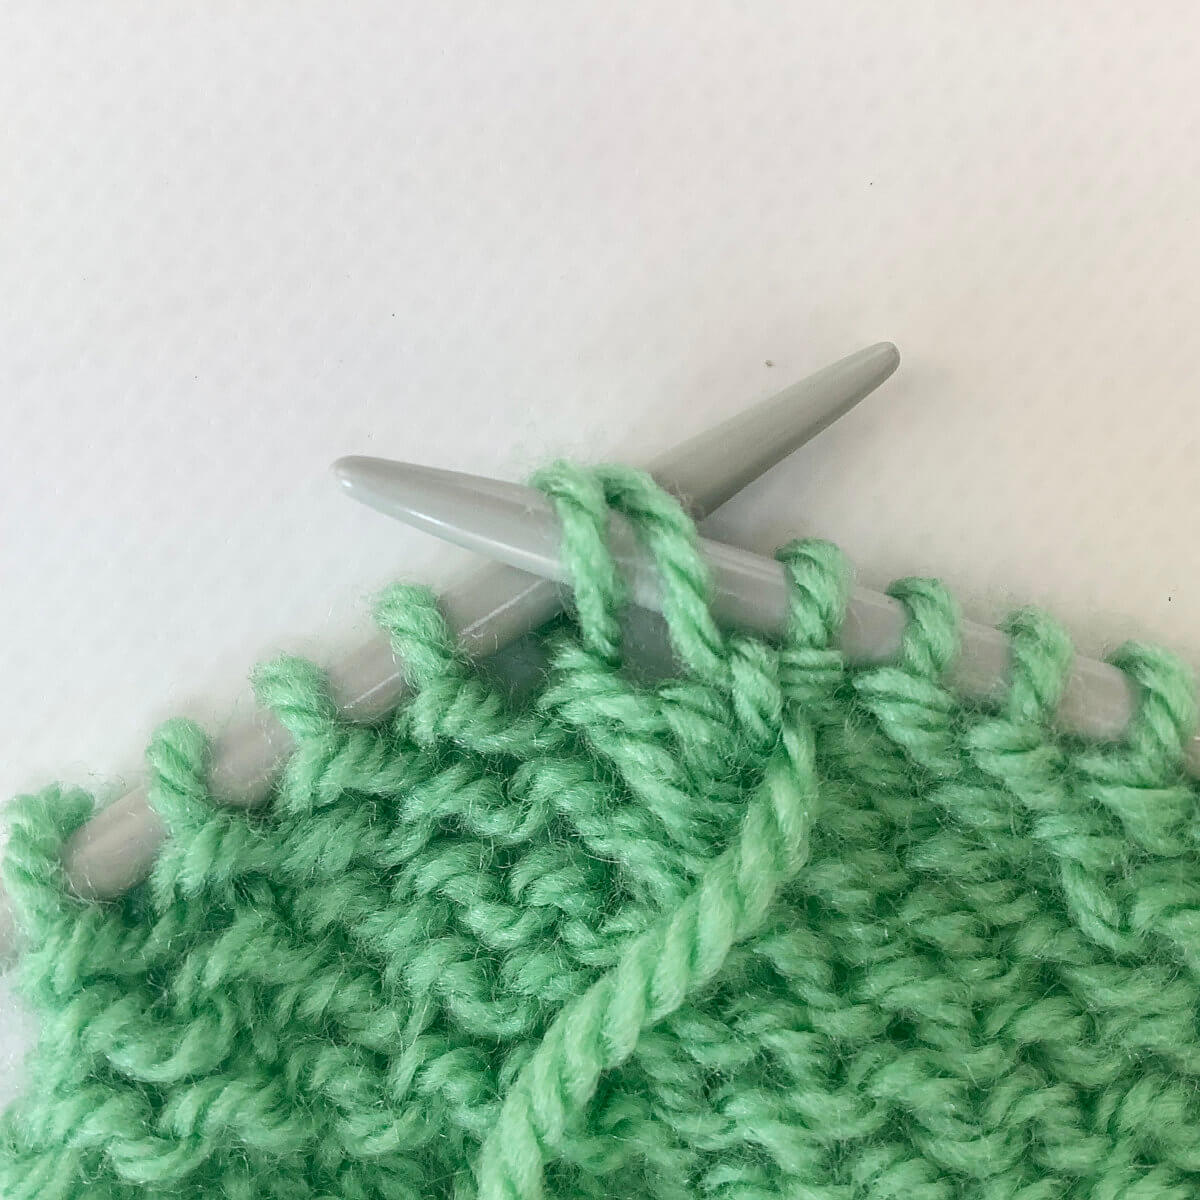
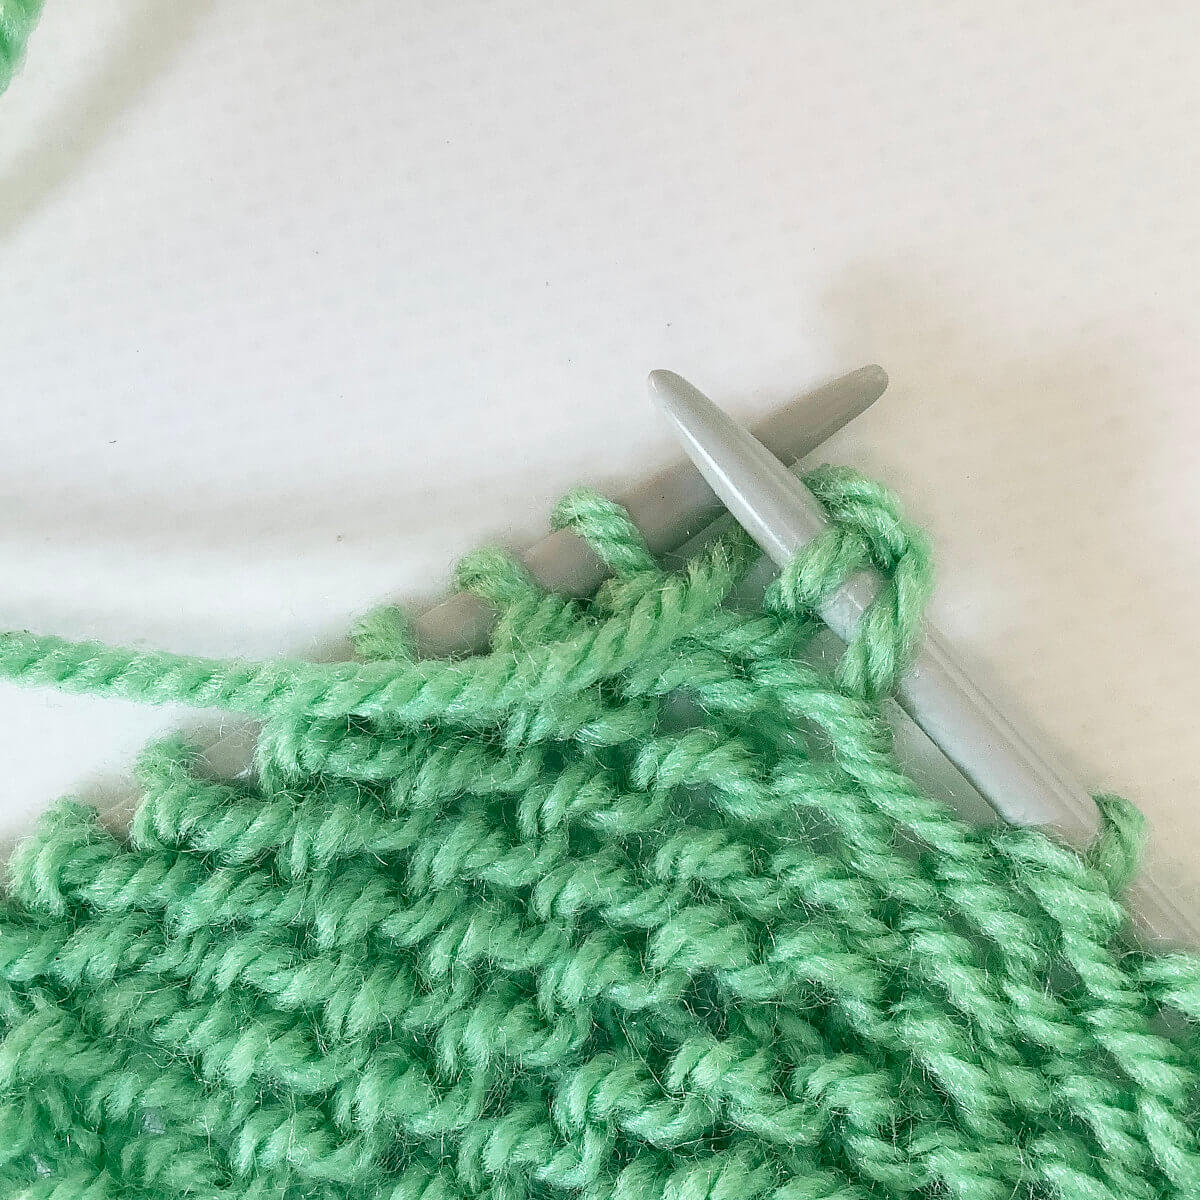
Work as instructed by your pattern until the point where it says “turn and make double stitch”.
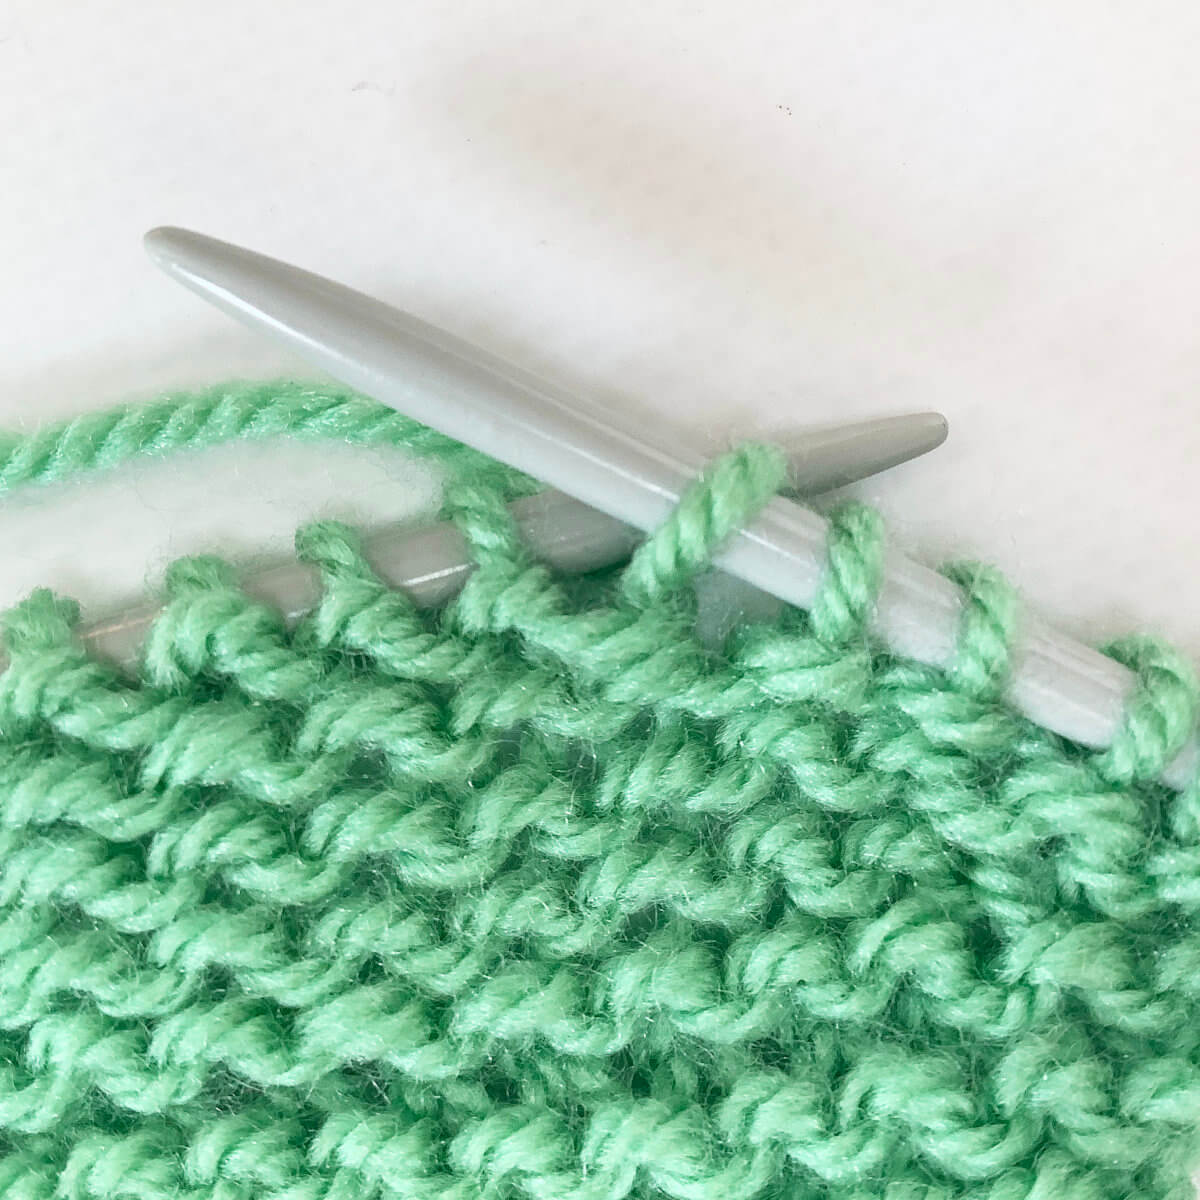
Next, turn your work, making sure you have the yarn at the front of your work, ….
… and slip the first stitch on the left-hand needle purlwise.
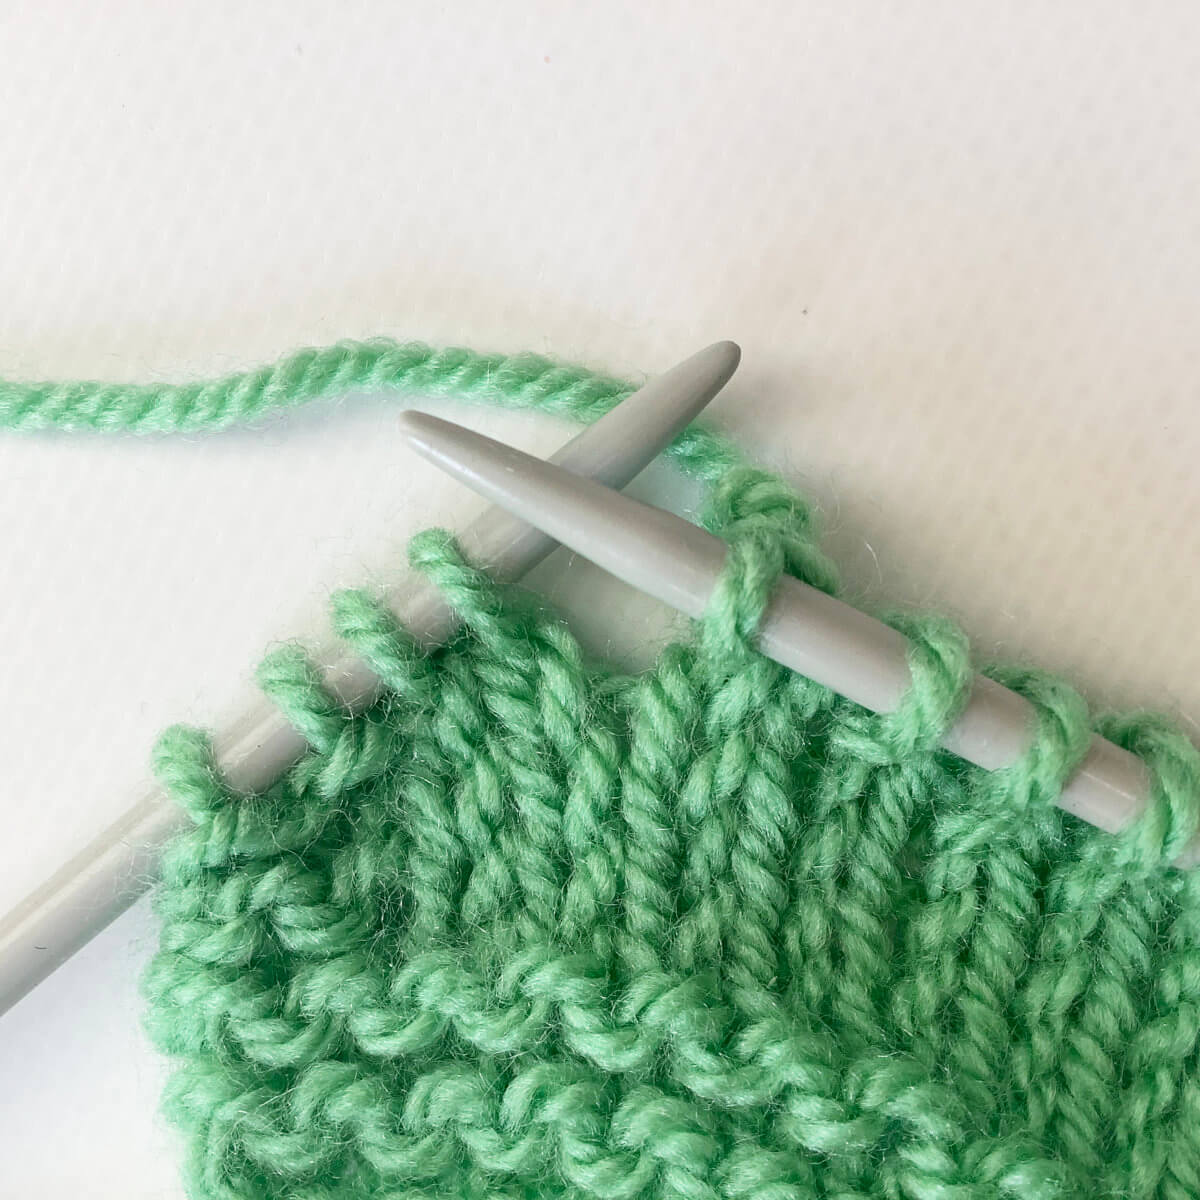
To make the double stitch, or ds, we now bring the yarn attached to the stitch we slipped over the needle to the back of your work and pull. This lifts it up and over the needle, pulling the base of the stitch with it.
This base consists of 2 strands of yarn, making it look like there are 2 stitches, hence the name “double stitch”.
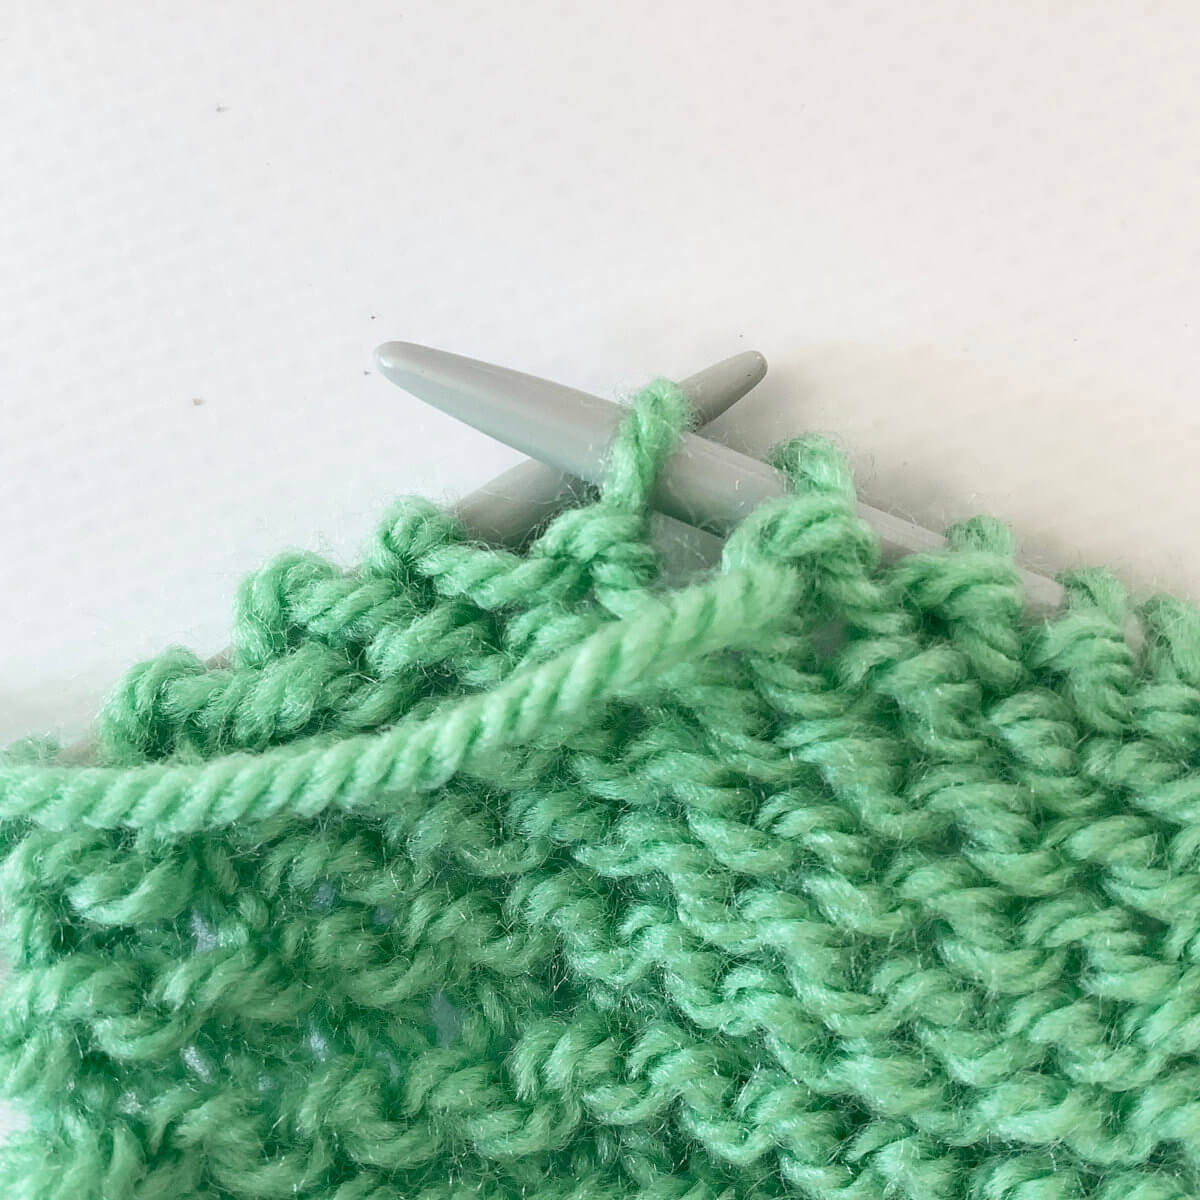
Next, if the next stitch is to be purled, bring the yarn back to the front of the work between the needle and purl. If the next stitch is to be knit, keep the yarn at the back of the work.
In this step it’s important to keep the tension on the yarn, to make sure the double stitch does not slide back into its previous position, before you secure it with the new stitch worked.
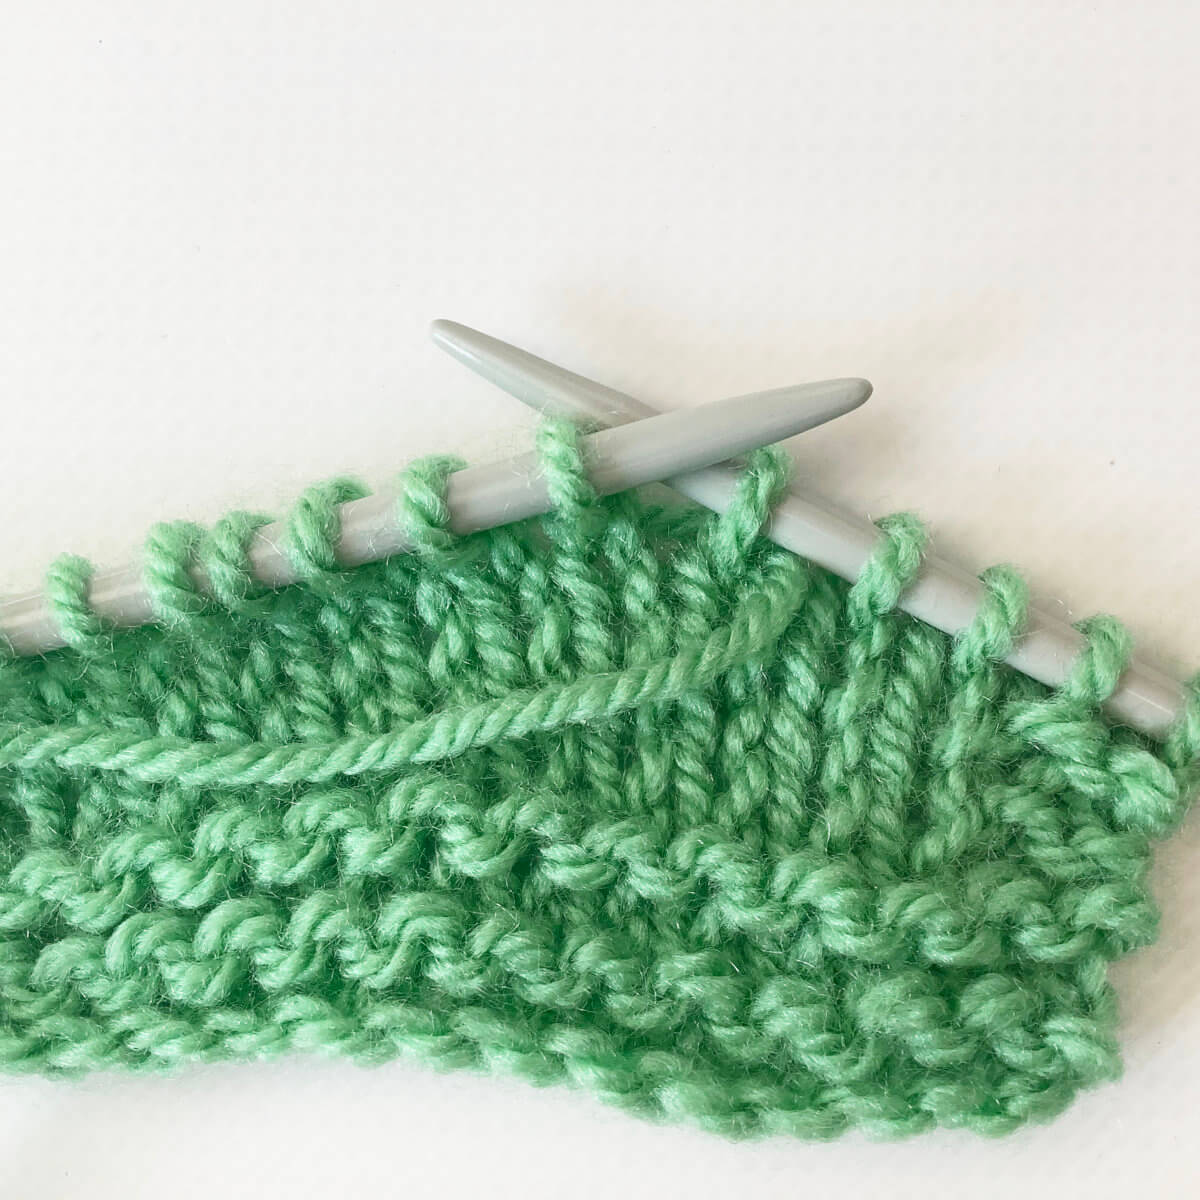
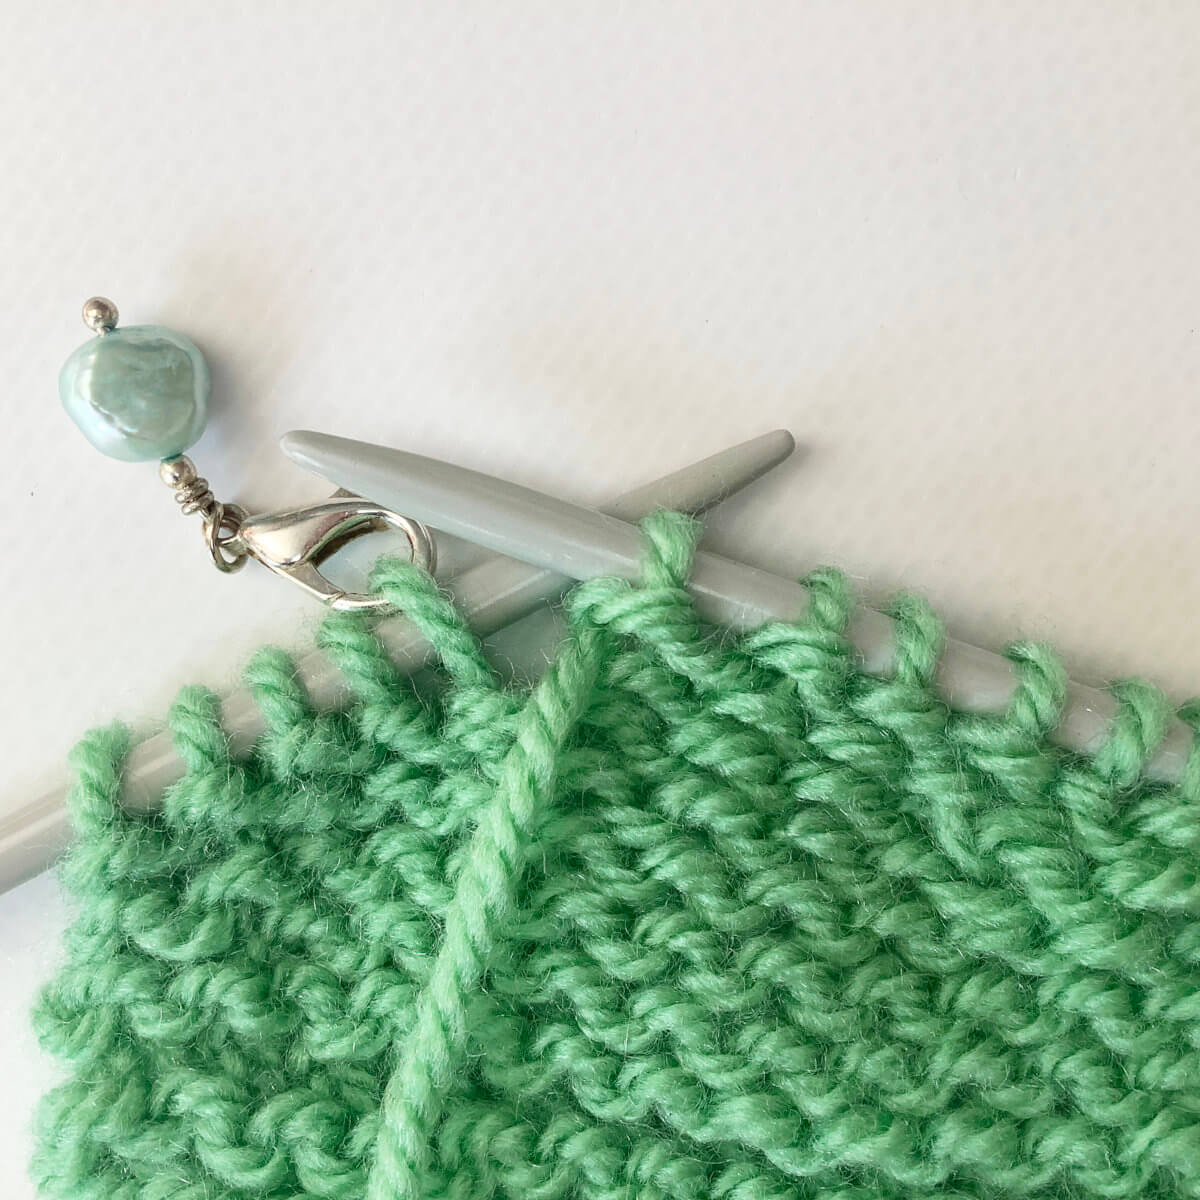
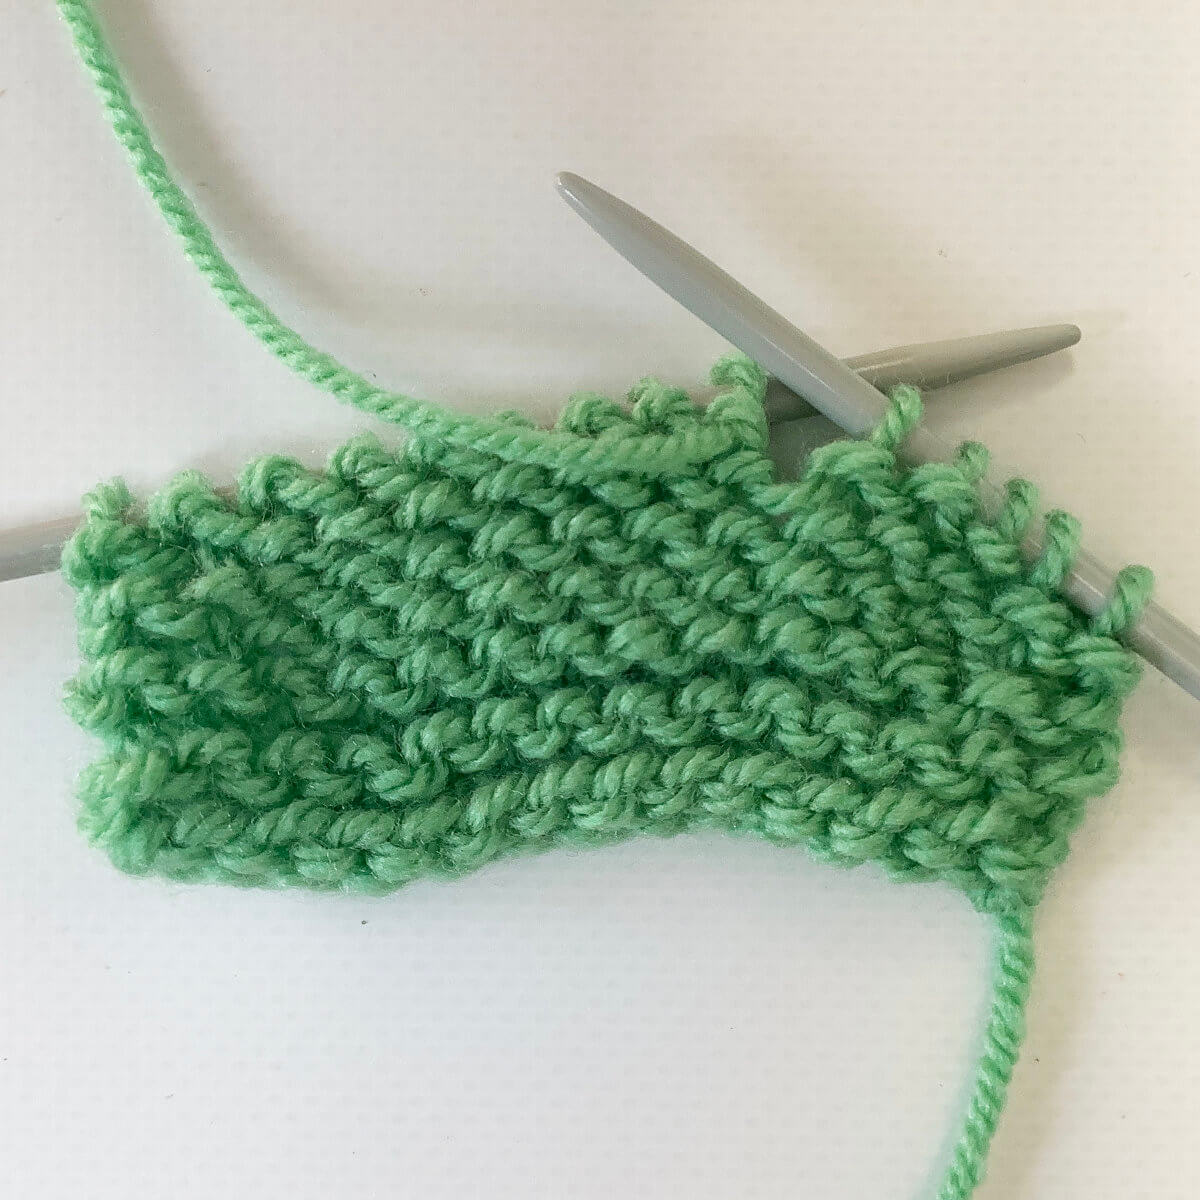
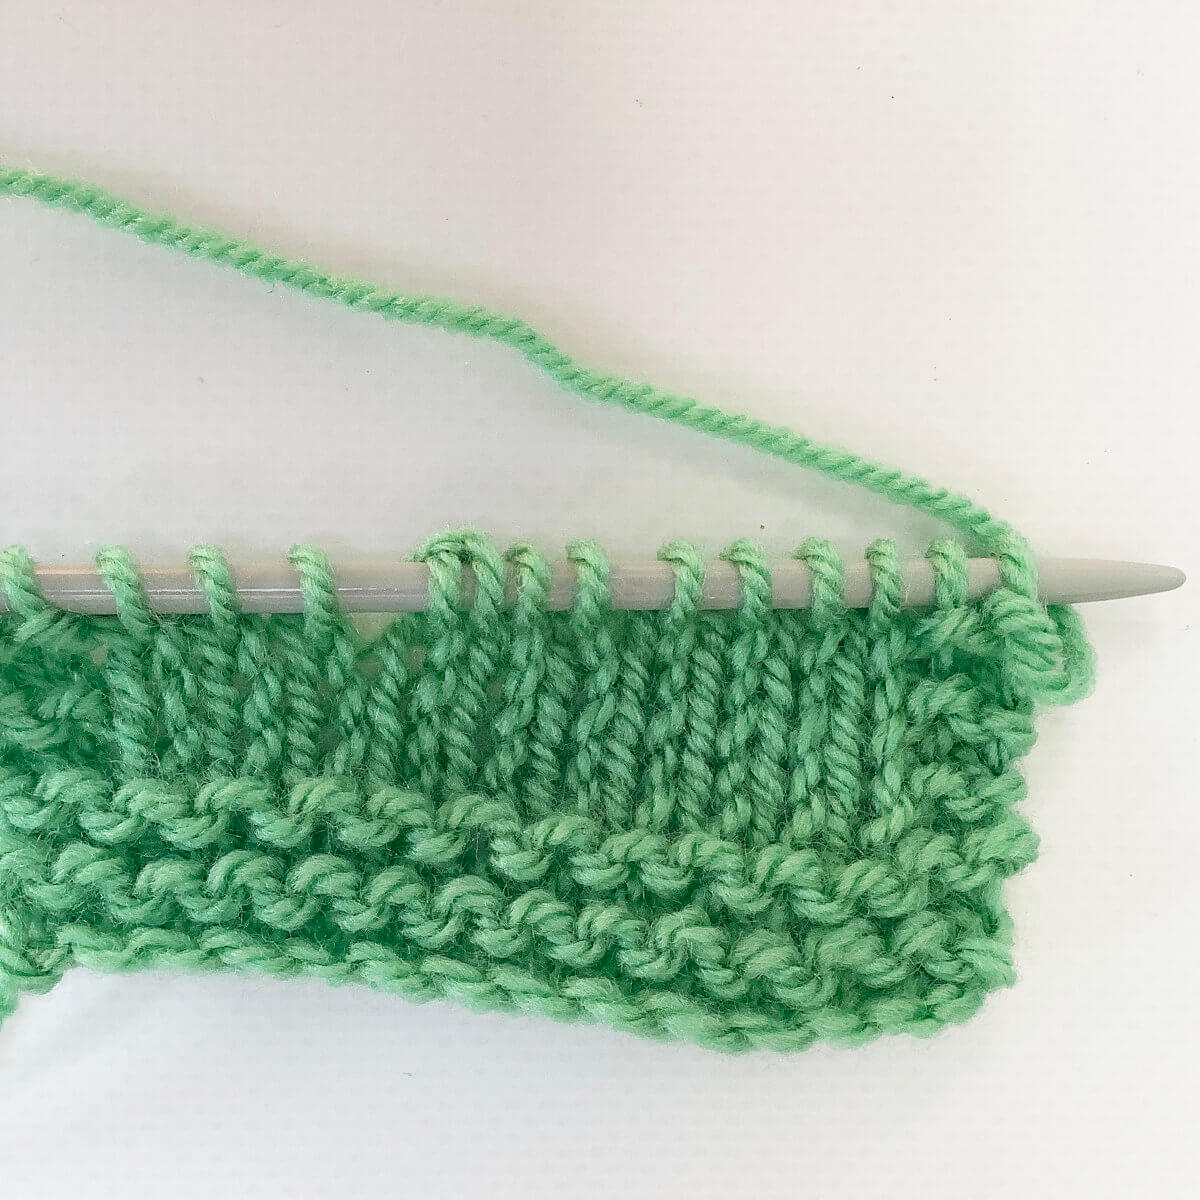
Then continue to work the pattern, making double stitches as instructed.
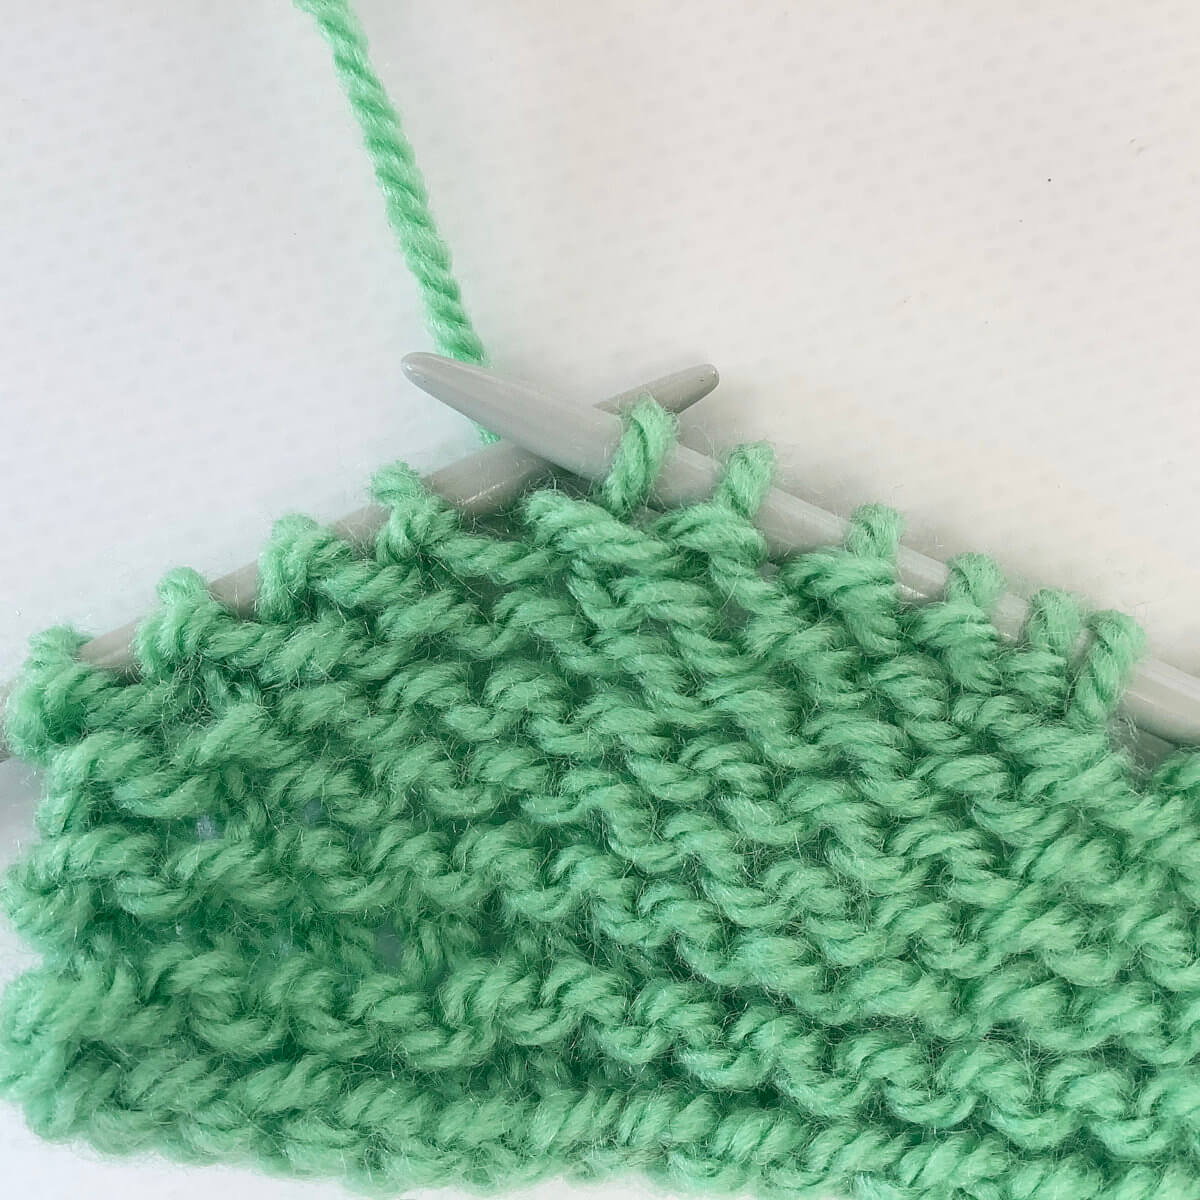
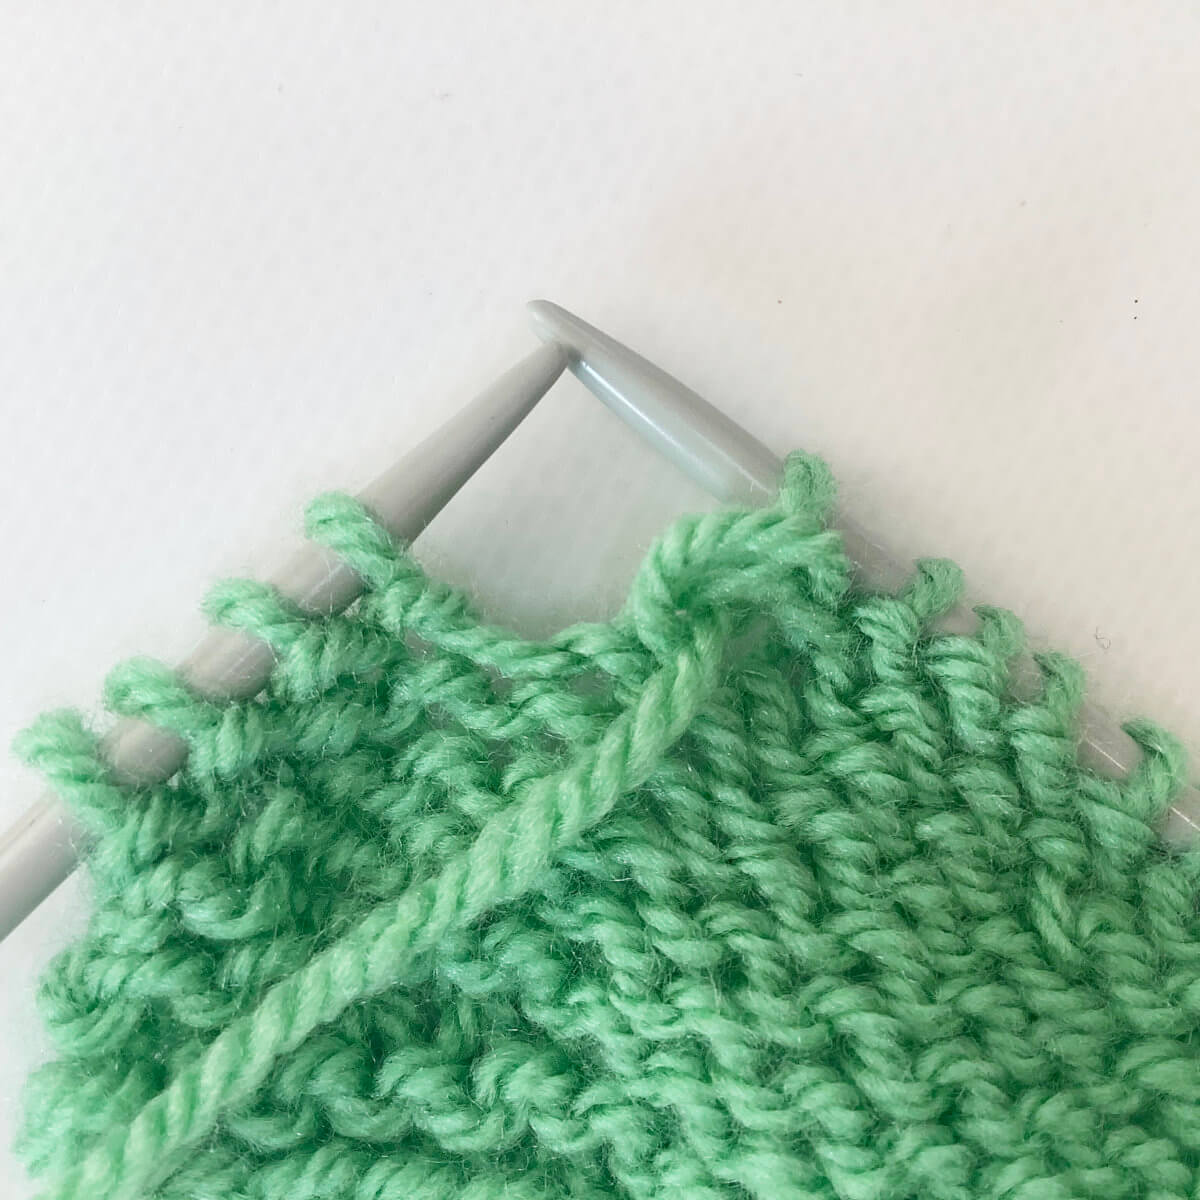
In this example, I purled back to the end of the row, working the last 2 sts as knit stitches to keep the edges in garter stitches. Do you see the ds, just before the turning gap?
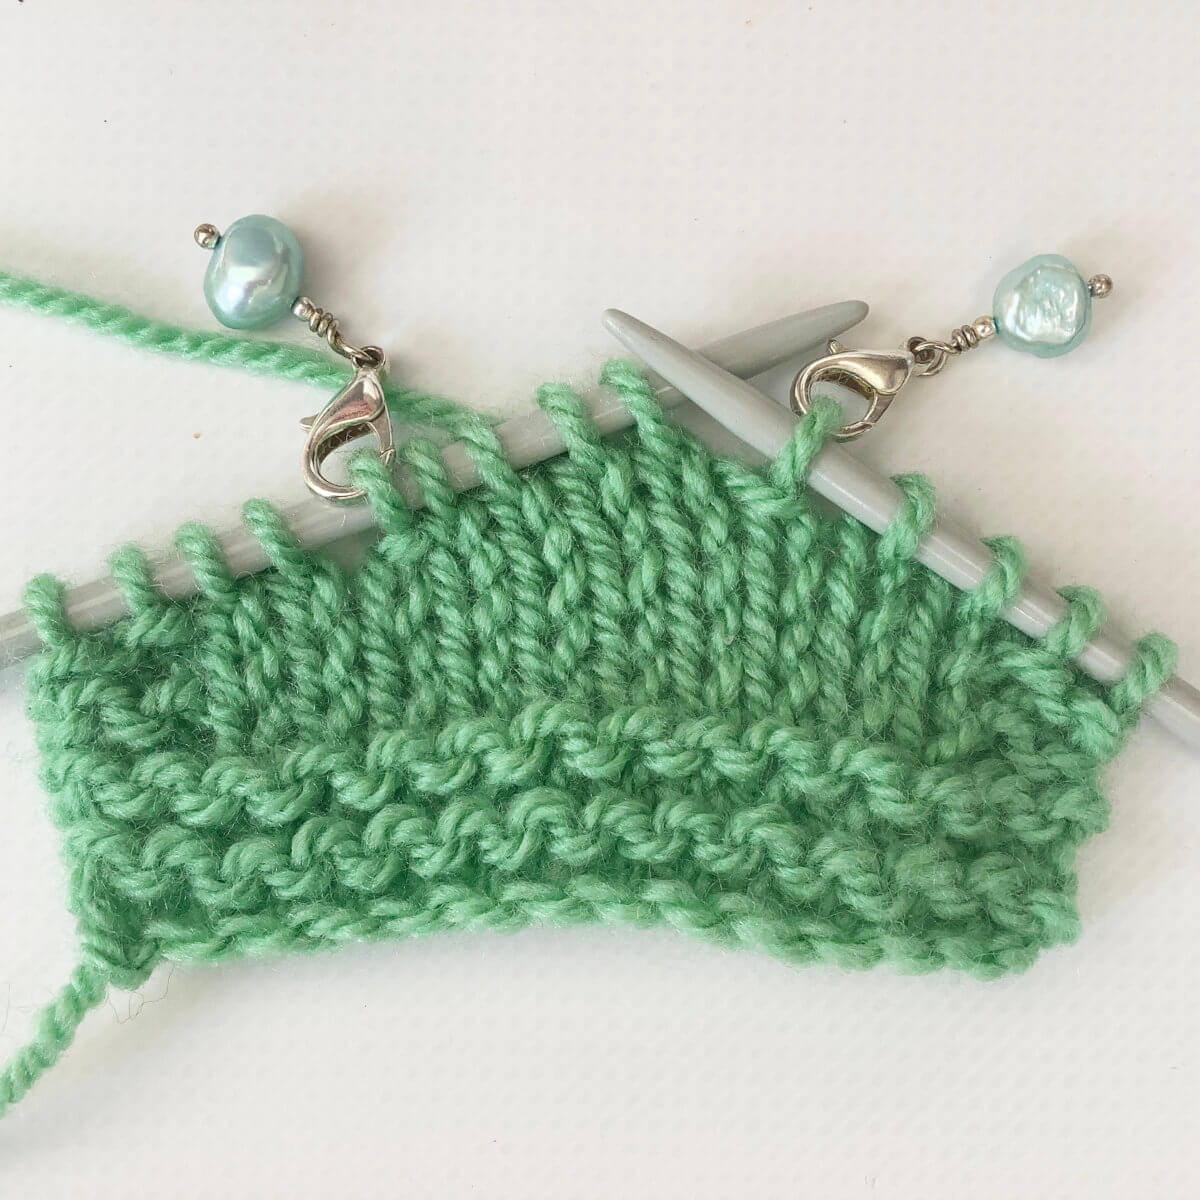
Then I worked 2 more sets of short rows, with each set turning to the WS at 2 sts before the last “turning gap”.
Please note: the ds is counted as a single stitch here! In other words: I worked steps 1 to 6 of this tutorial twice more. This is then the result:
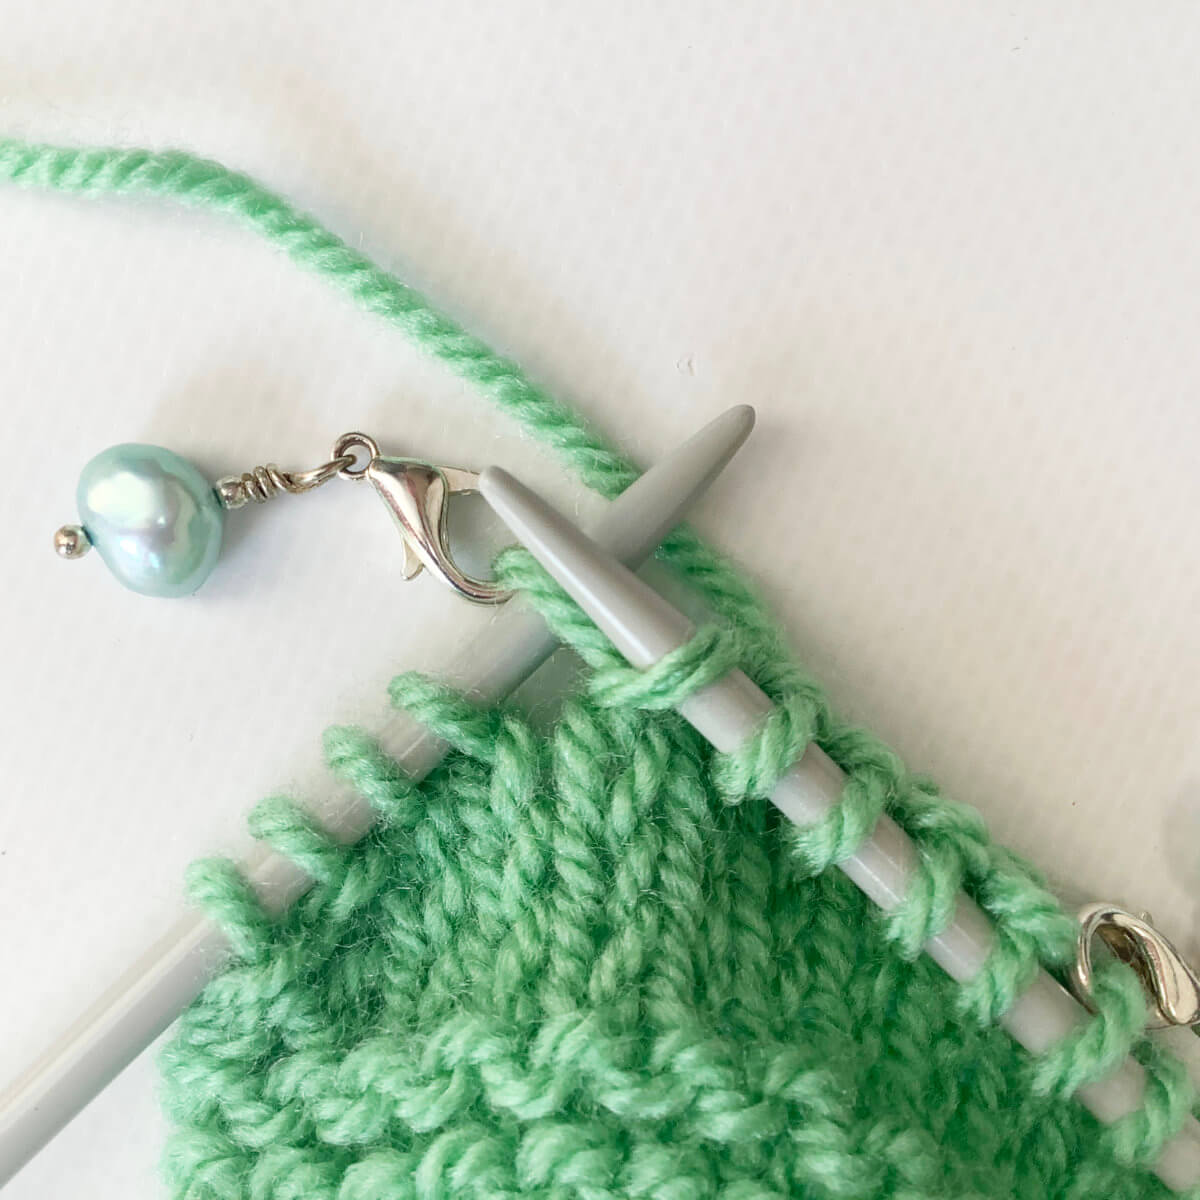
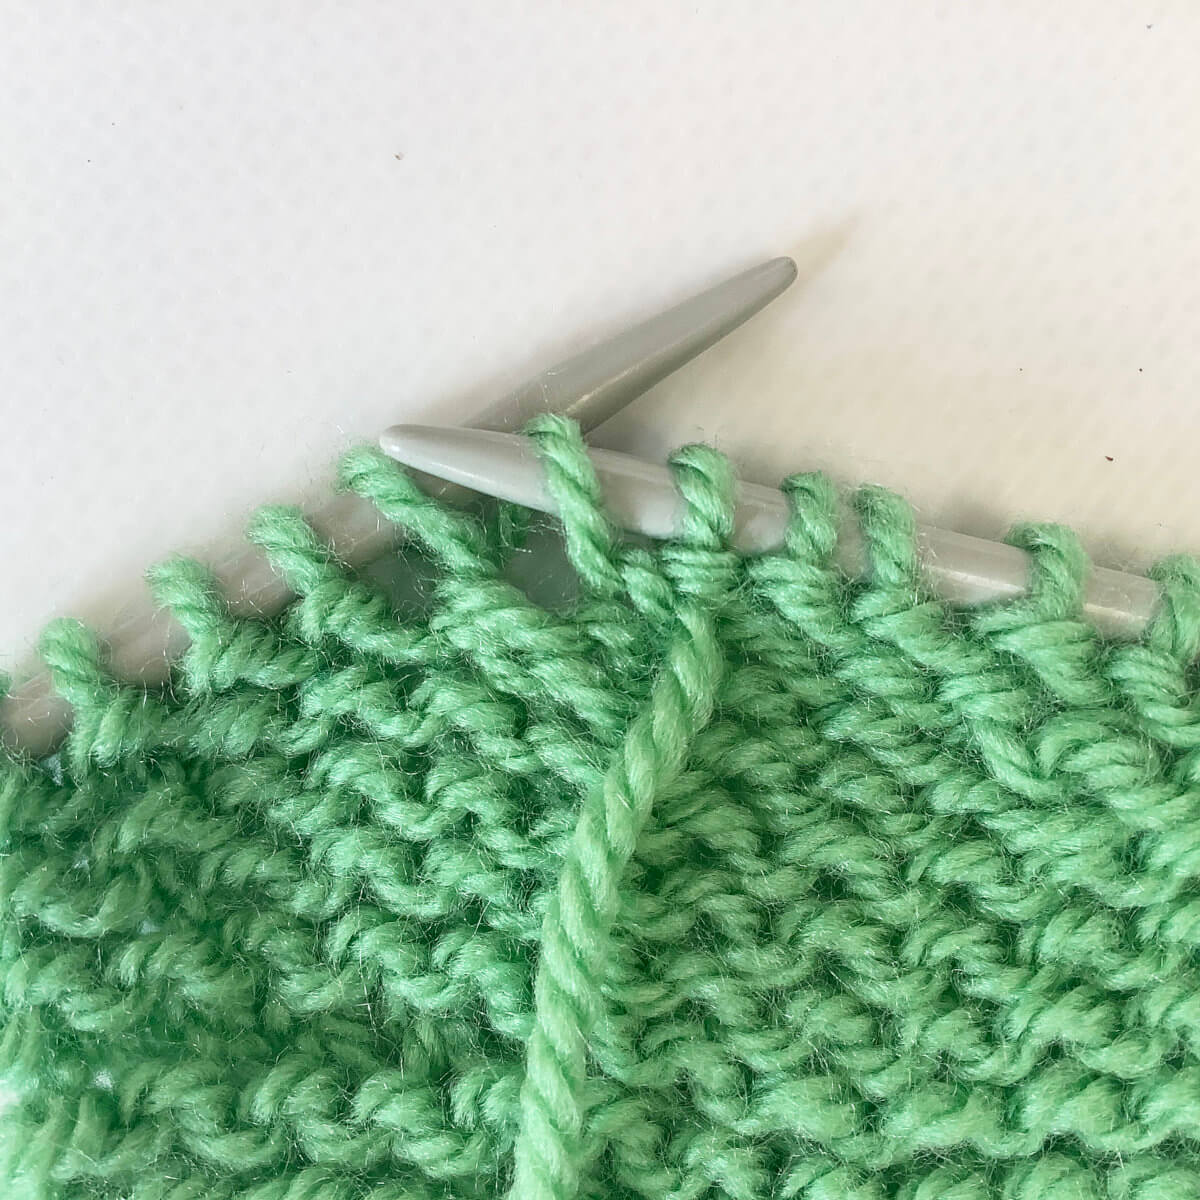
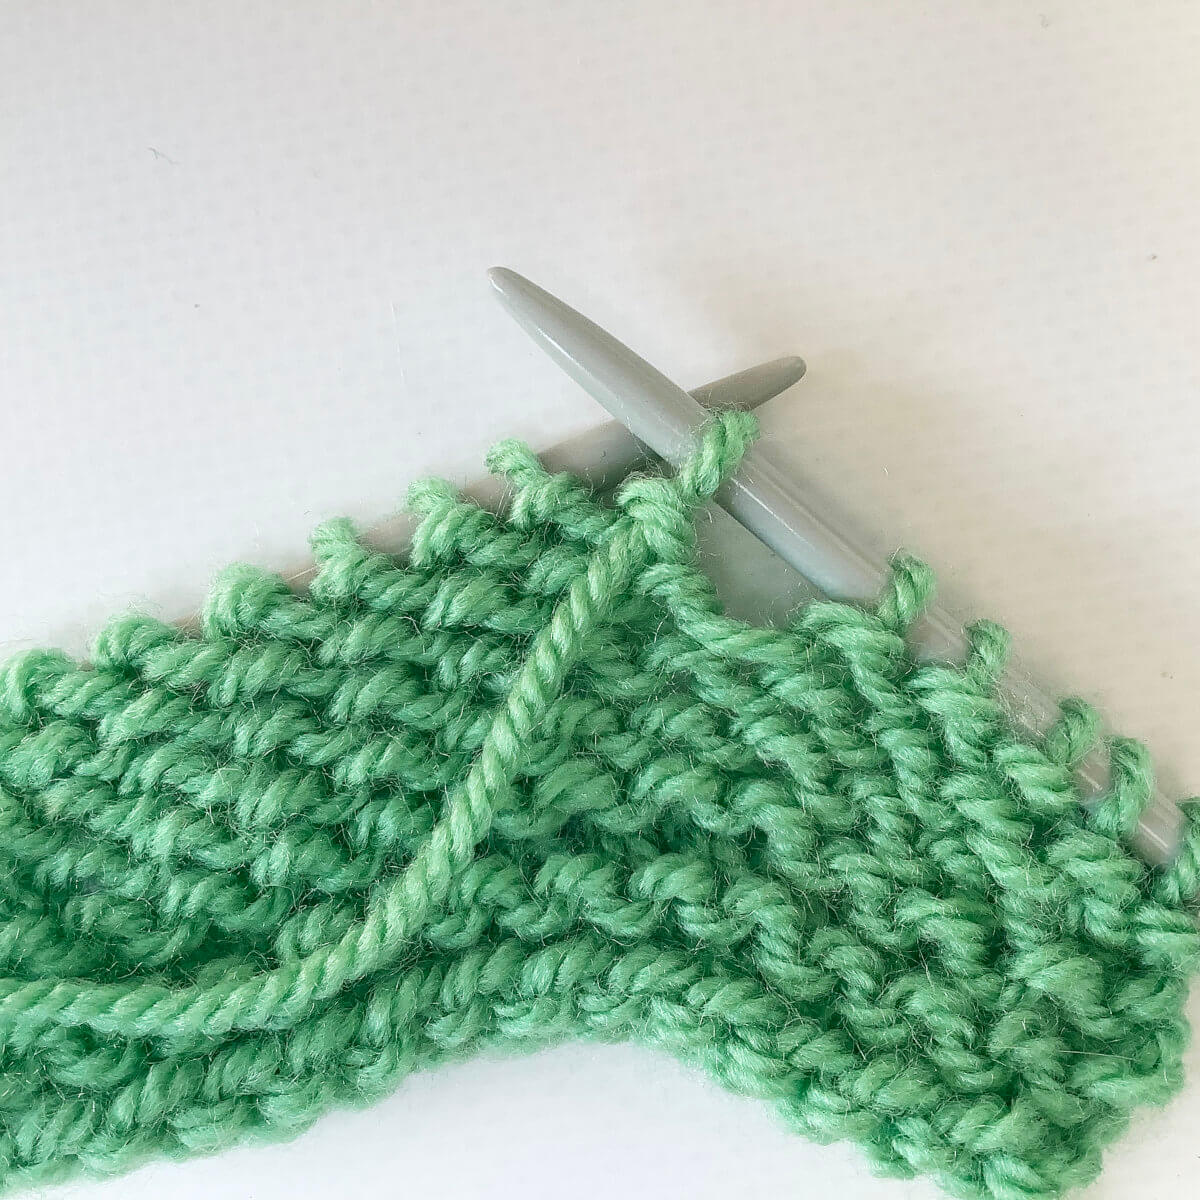
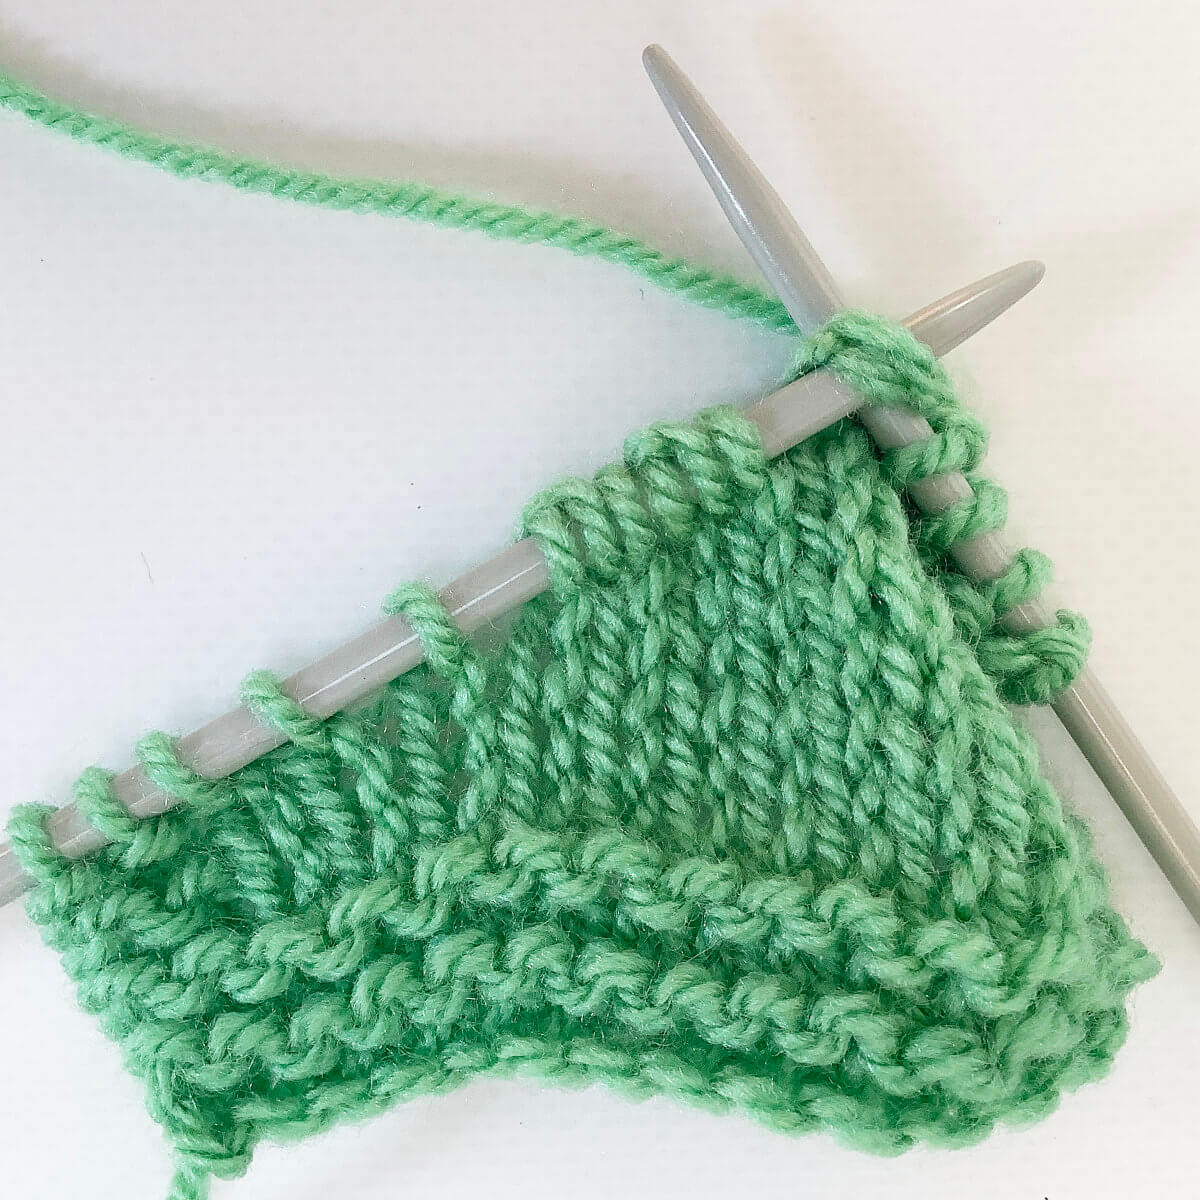
At a certain point, you won’t be working short rows anymore and will resume working over the entire row or round of the work. To close the “turning gaps” you will be working over the double stitches.
Whenever you encounter a double stitch, just knit or purl over both strands as if it were a single stitch.
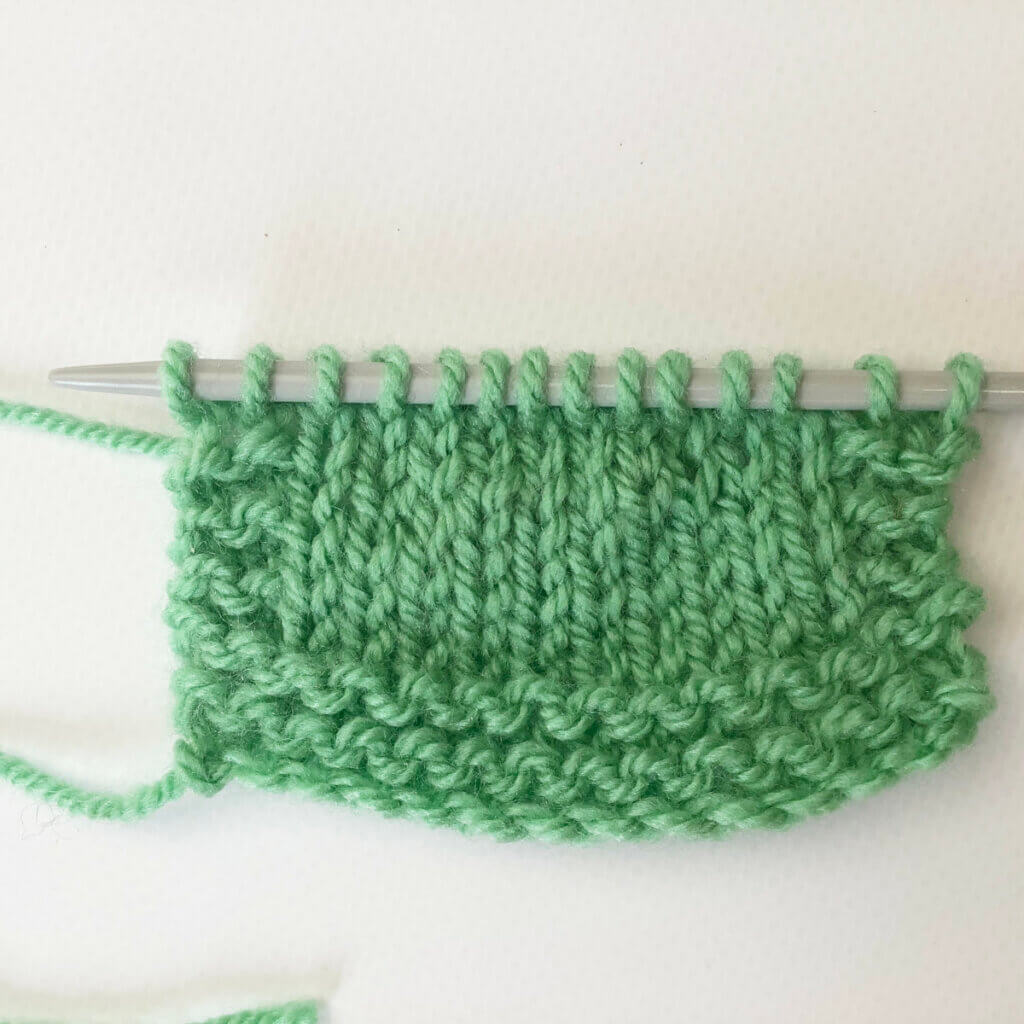
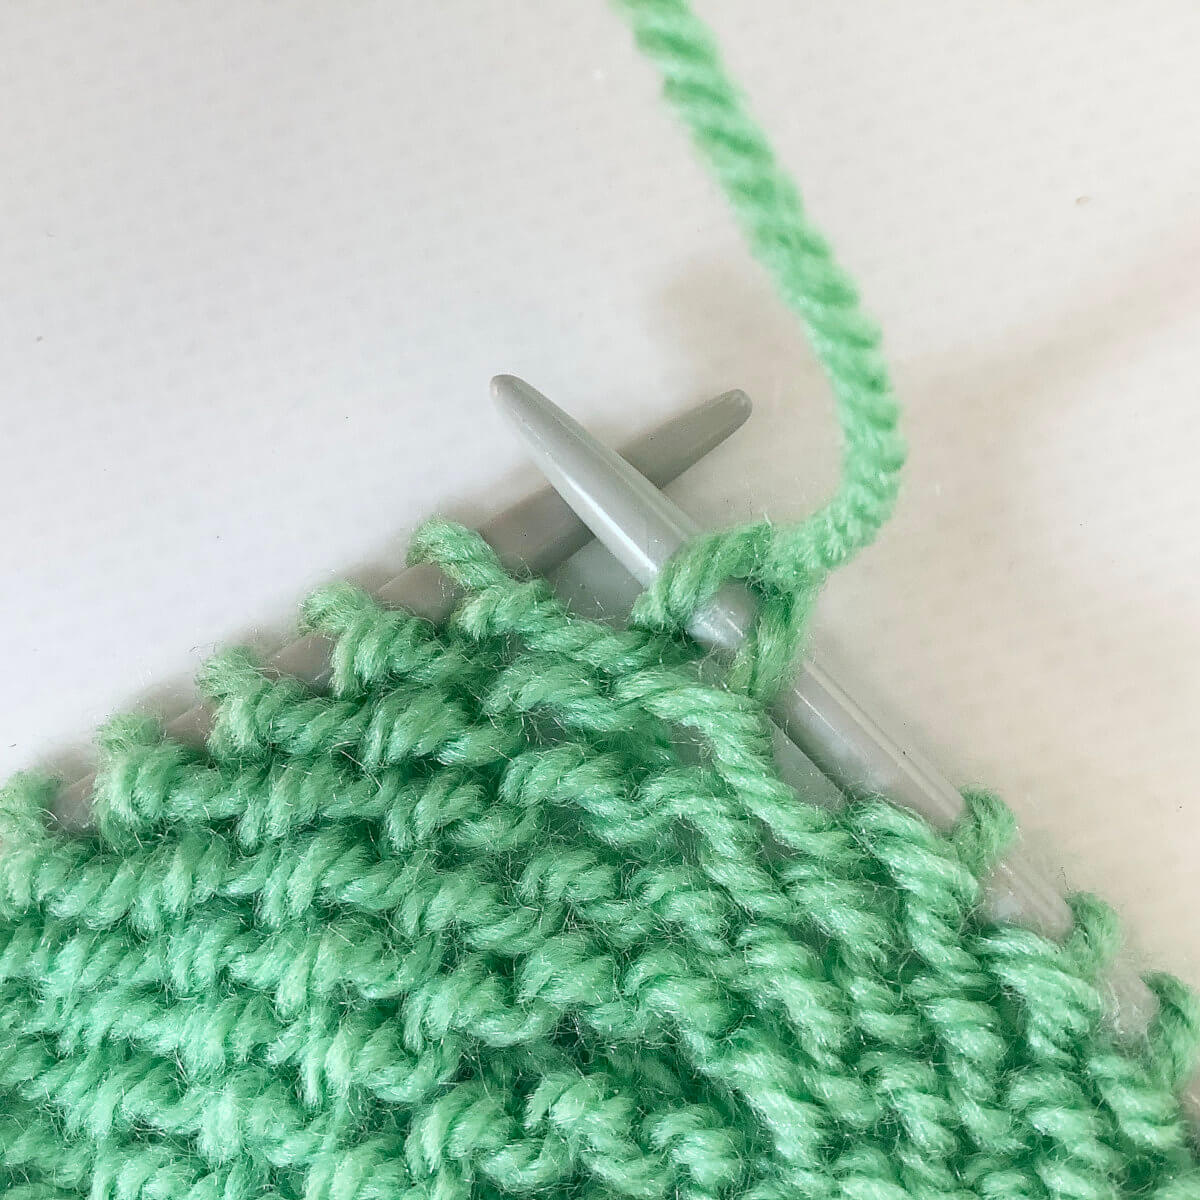
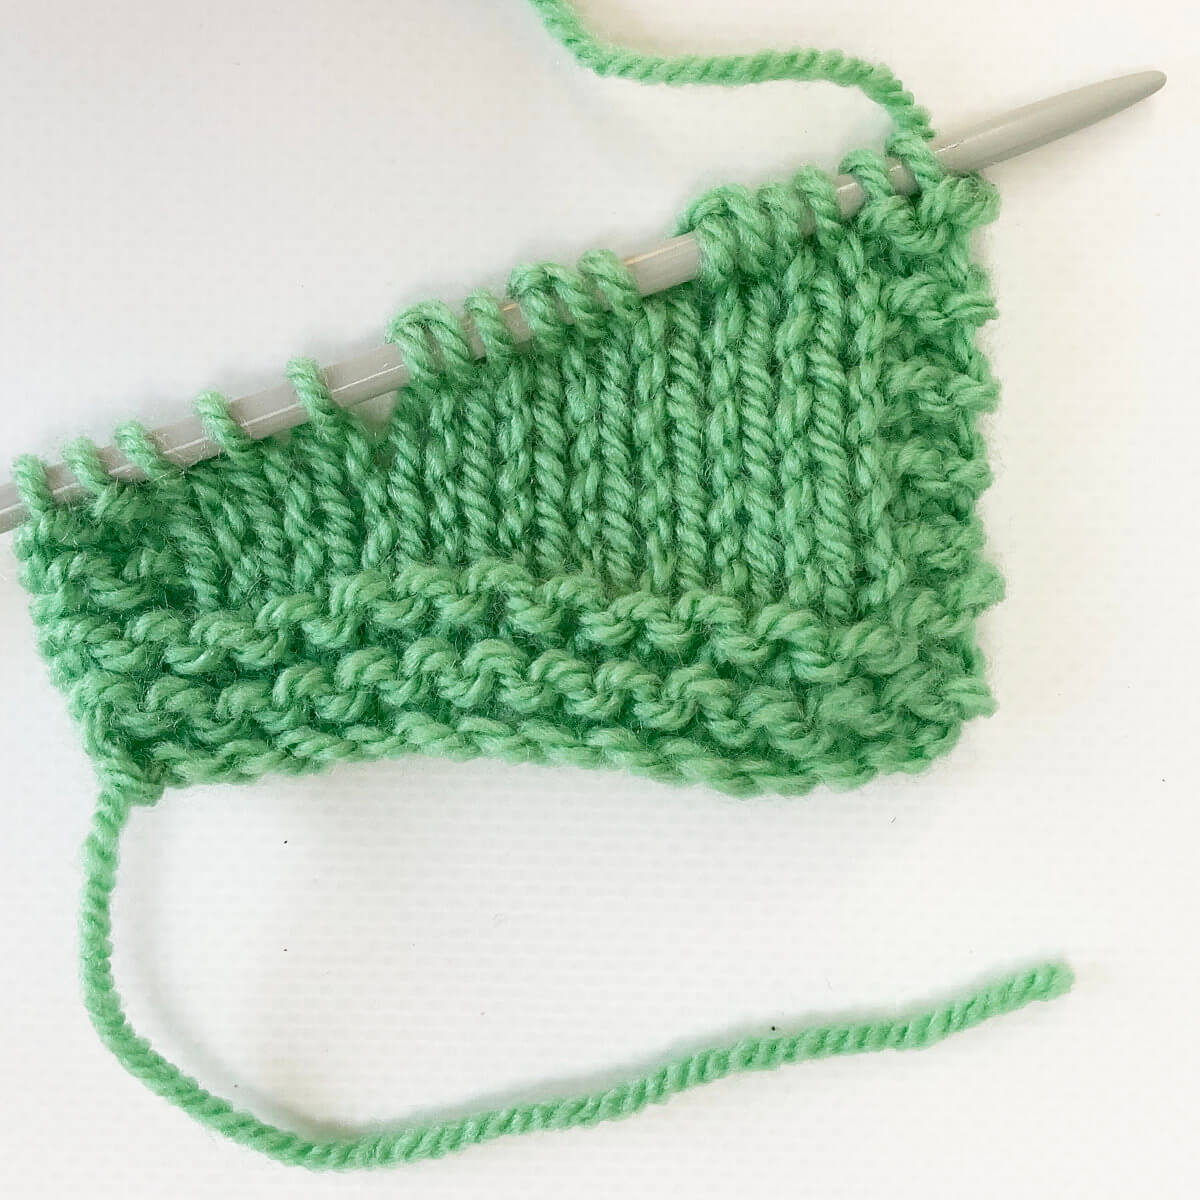
The result
When viewed from the right side:
And, of course, when viewed from the wrong side of the fabric:
Substituting German for wrap & turn short rows
When you have knitting instructions that contain classic wrap & turn short rows, you can’t just substitute them with German short rows. If you do that, the stitch counts will be off. As a result, the placement of the shaping will be slightly different from what’s intended in the pattern. The main difference between both methods is that with wrap & turn, the wrapped stitch is slipped but not worked. This means it technically isn’t part of the short row itself. With German short rows, however, the stitch in the row below the double stitch is the last stitch worked on the previous short row. This means it’s included in the short-row stitch count.
When substituting German short rows for wrap & turn ones on rows that are getting shorter: Work to the number of stitches as mentioned in the w&t instructions before the last turned stitch, then work 1 more stitch and turn your work. At that point, you’re ready to make a ds as described in step 2.
When substituting German short rows for wrap & turn ones on rows that are getting longer: Work 1 fewer stitch before the previous double stitch than called for in the directions for the w&t short rows, and turn your work. Again, you’re now ready to make a ds as described in step 2.
Thanks to my Patreon supporters for bringing you this freebie! Creating quality patterns and tutorials is a lot of work and resource-intensive. However, I find it important to give you free content like this tutorial. Thanks to the generous support of my Patreon supporters, I can make it happen. Thank you, patrons! Click here to join, or click here to read more about La Visch Designs on Patreon.
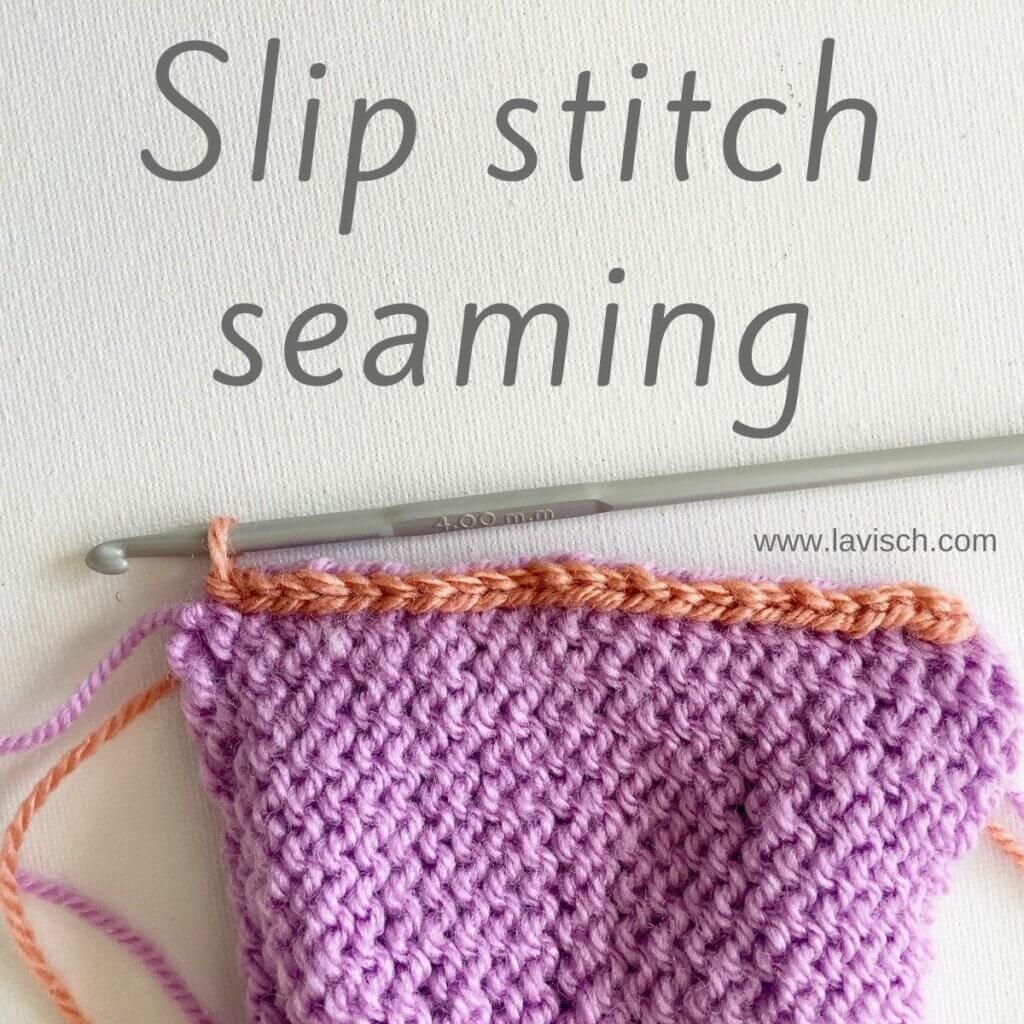
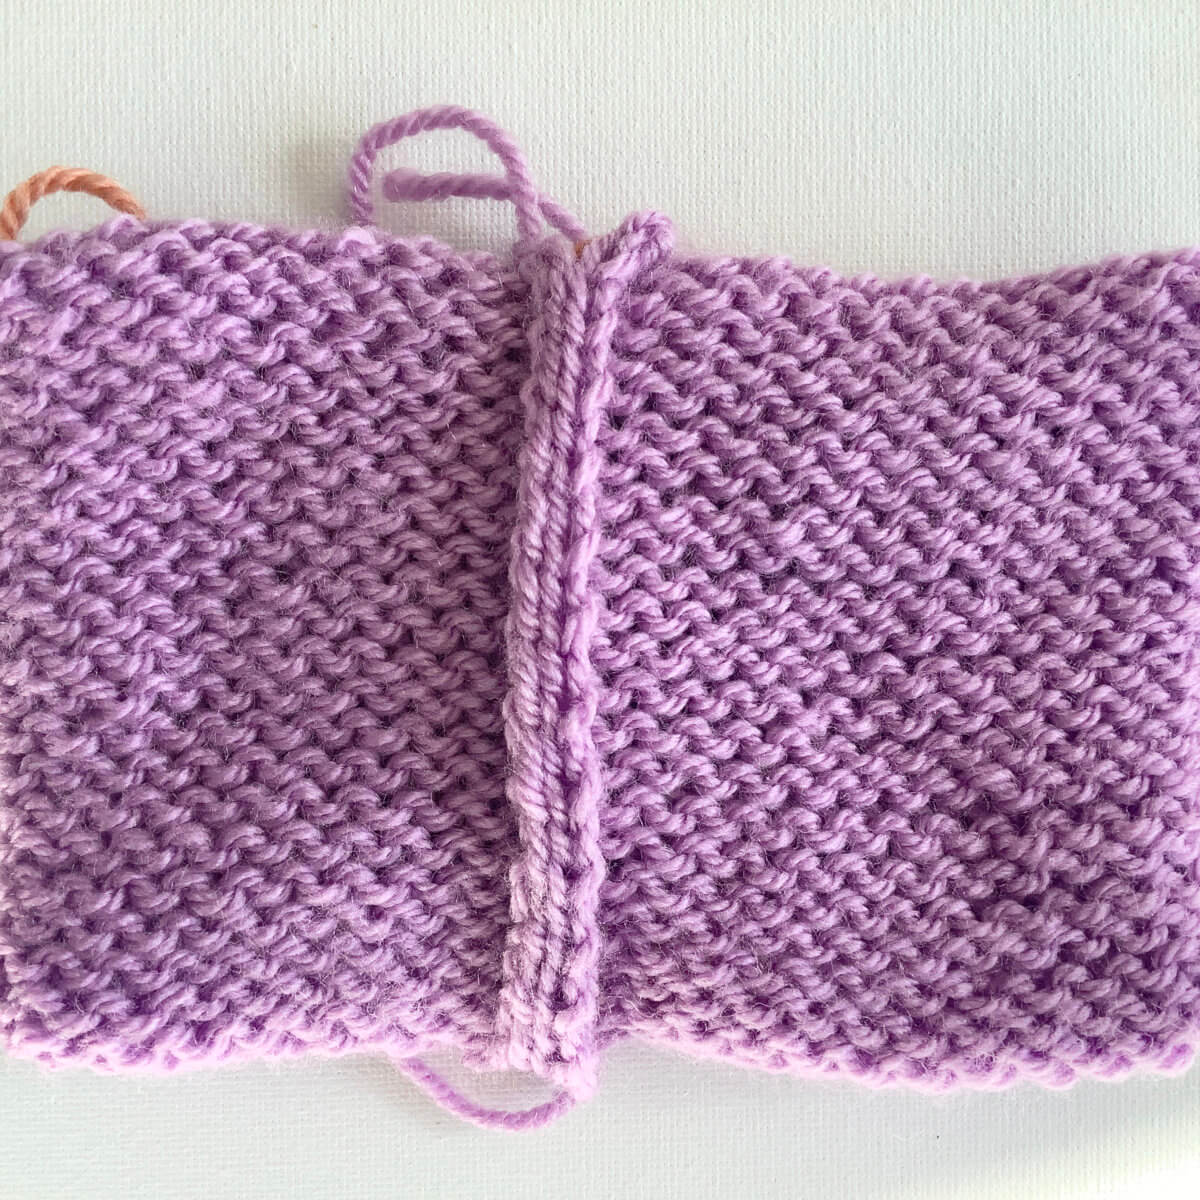
As I wrote in my tutorial on the mattress stitch, there are many ways to join two pieces of knitted fabric together. And they all have their own advantages and disadvantages! In this post, I’ll be talking about seaming with slip stitch, using a crochet hook. This technique is particularly suited for joining pieces together, that are not an exact match in rows or stitch patterns. Think for example of easing a set-in sleeve into its sleeve cap. Personally, I also prefer it over other seaming methods, because of how easy it is to undo. That flexibility can be a lifesaver when working on long seams like those on flat-knit sleeves.
Materials used
Yarn: Paintbox Yarns Simply DK, a good value, good quality 100% acrylic yarn, here in the color 142 Tea Rose. I also used a bit of 155 Vintage Pink.
Crochet hook : A crochet hook similar or smaller to the size of the knitting needles used in the project. The hook pictured is by Pony.
Slip stitch crochet seaming step by step
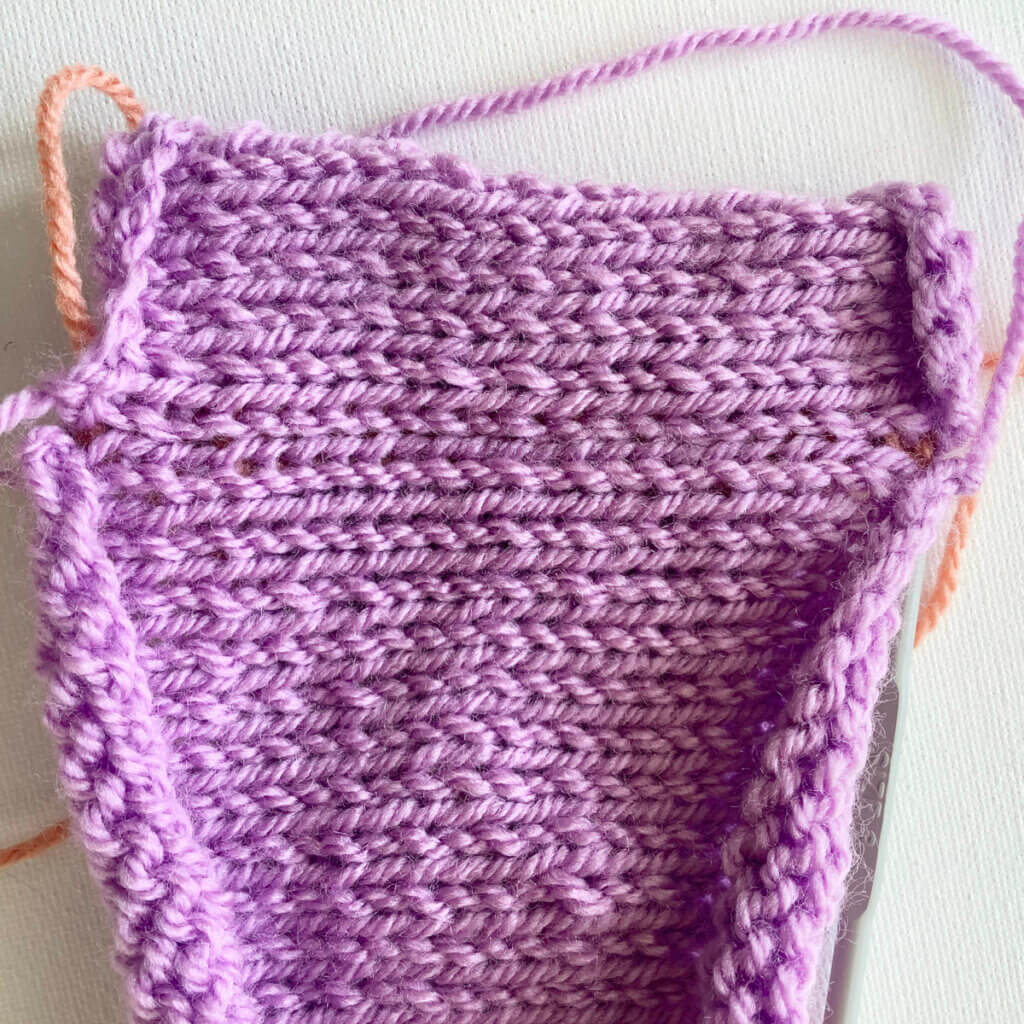
In this tutorial, I’m using the purple swatch to show you how to seam it close using slip stitch crochet, with the orange yarn. This particular seaming technique can be done with both the right side or the wrong side of the fabric facing. It yields a very decorative seam, that could be used as a design feature when visible on the outside of the piece, especially in a contrasting yarn. In this example, however, I’m working it with the wrong side facing, to have the seam on the inside of the piece.
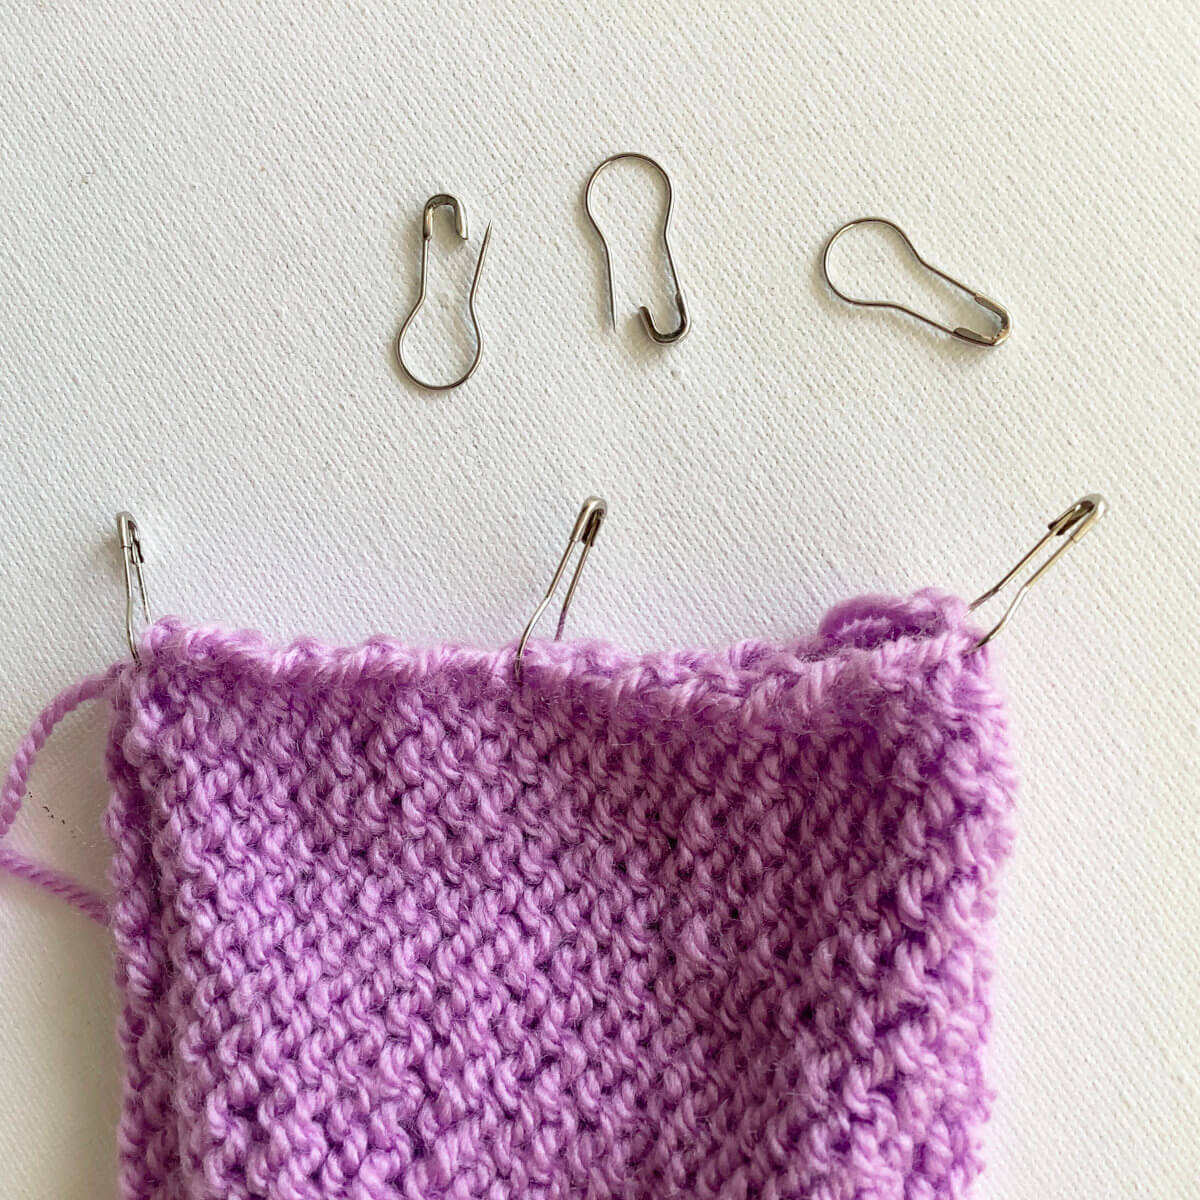
First, line up the edges of the pieces to be seamed together.
I like to use these bulb-pins to hold the edges together, but regular safety pins or stitch markers could also be used.
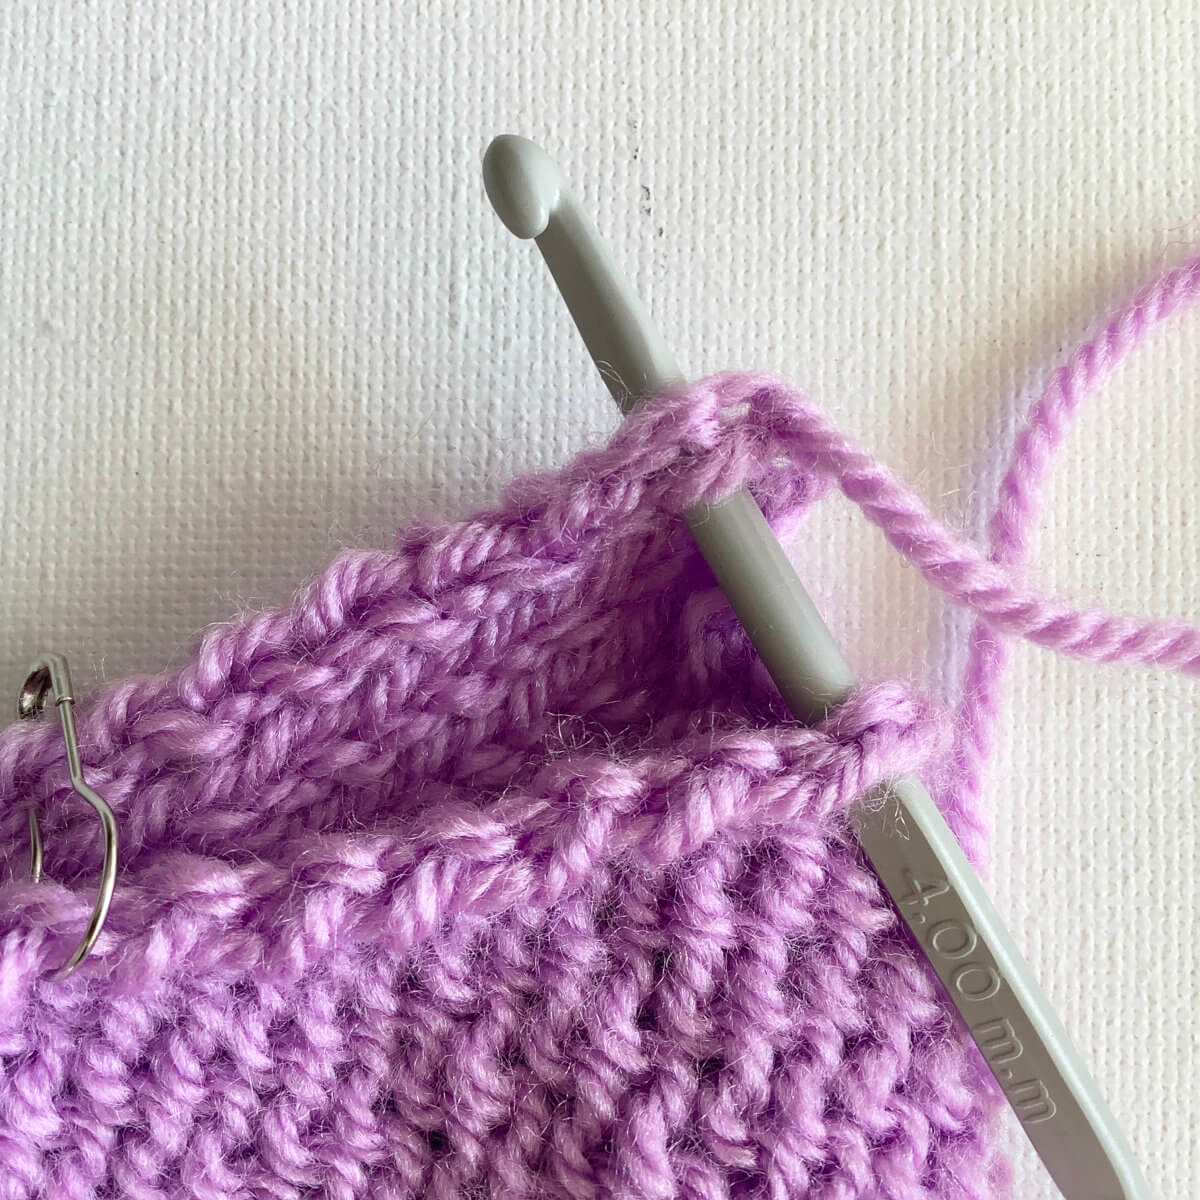
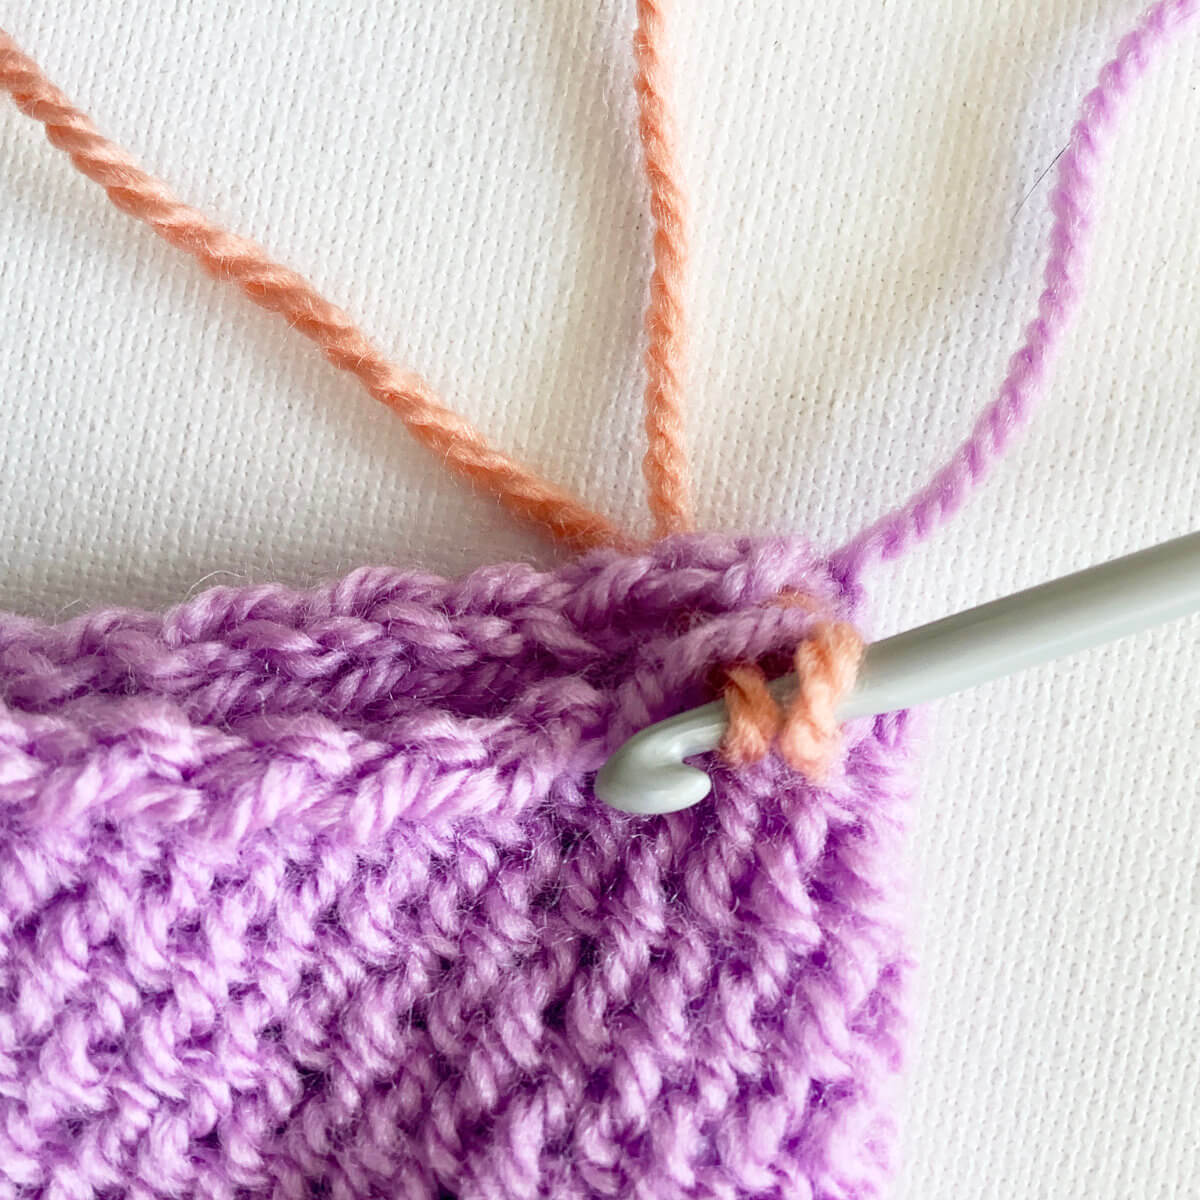
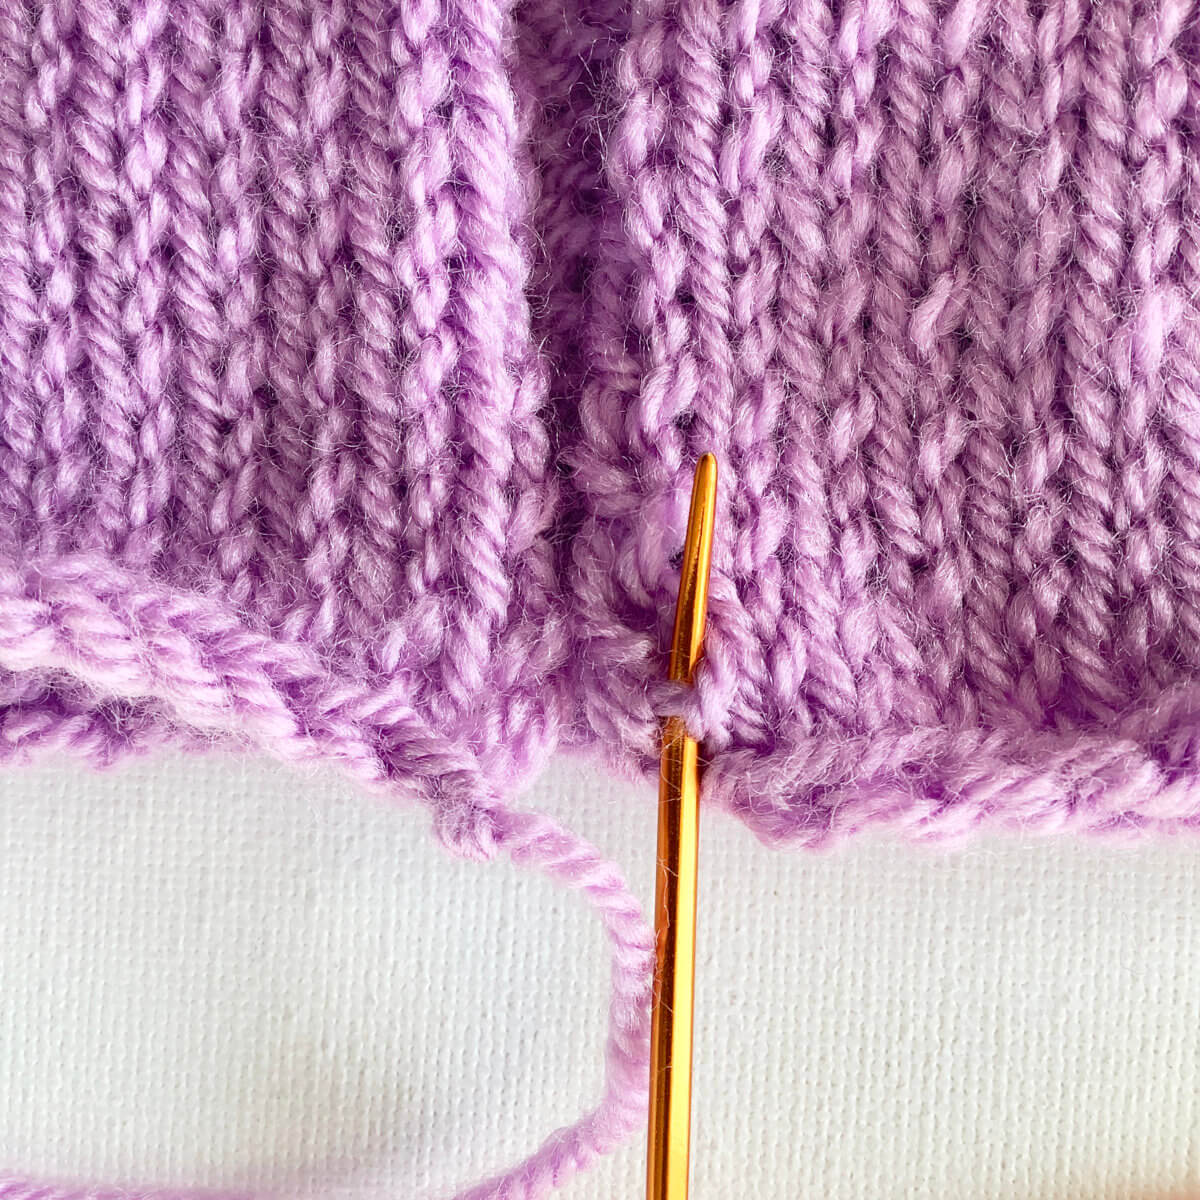
To start, insert the crochet hook from front to back through both pieces, on the utmost right of the work. Take care to go under only one edge stitch for each piece.
Next, grab a loop of your seaming yarn …
…. and pull it through both edge stitches.
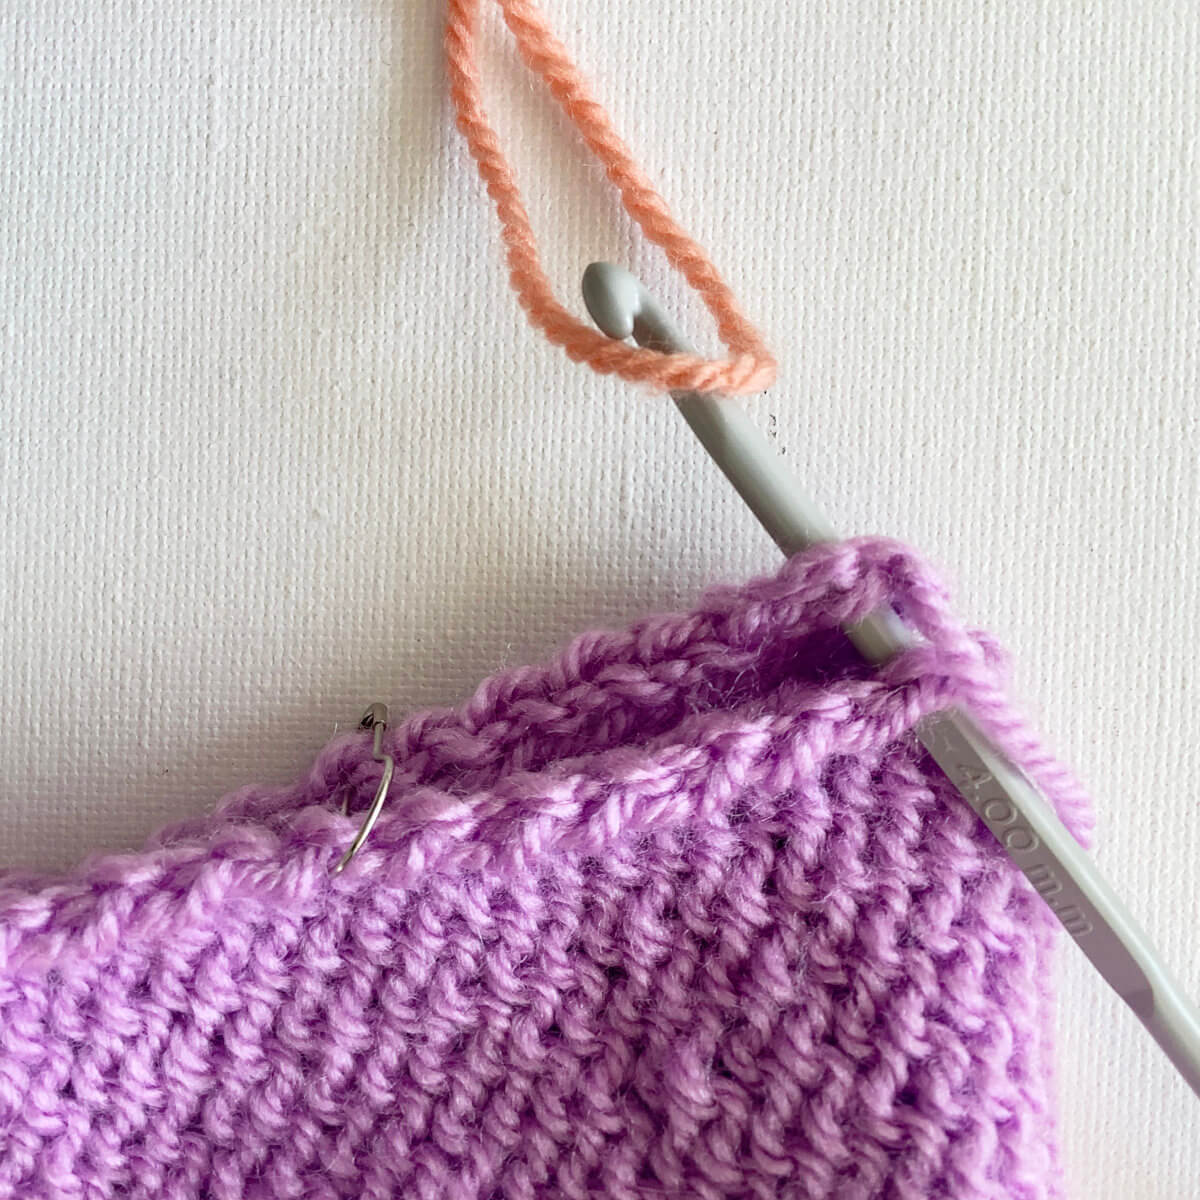
Next, insert the hook from front to back through both pieces, one stitch to the left. Again, take care to go under only one edge stitch for each piece.
Again, grab a loop from your seaming yarn, and pull it through both of the edge stitches. You now have through 2 loops of yarn on your crochet hook.
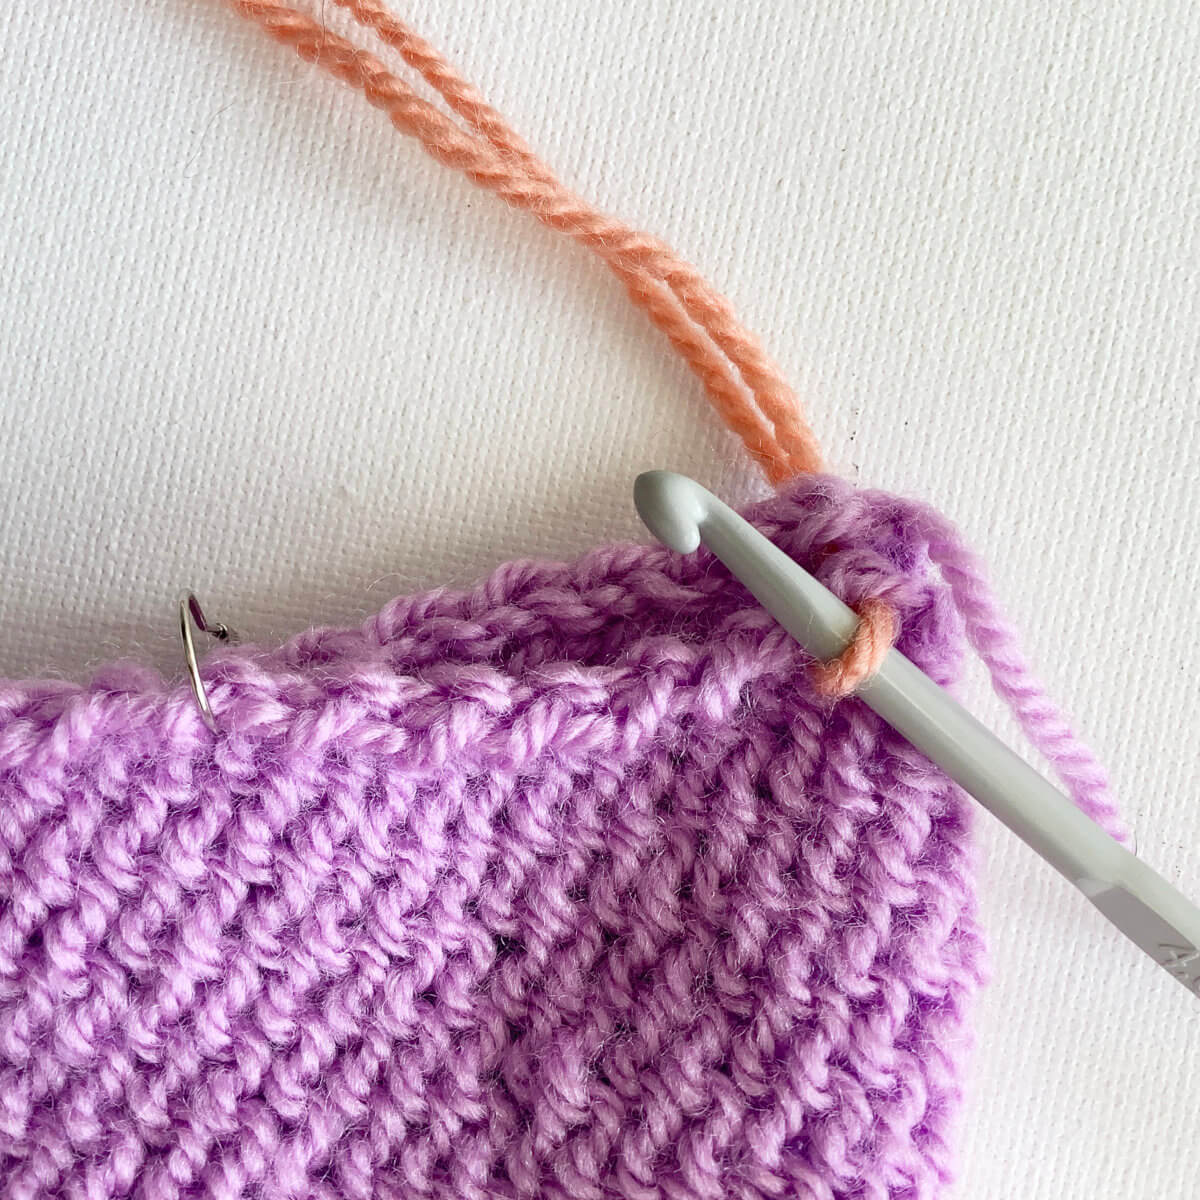
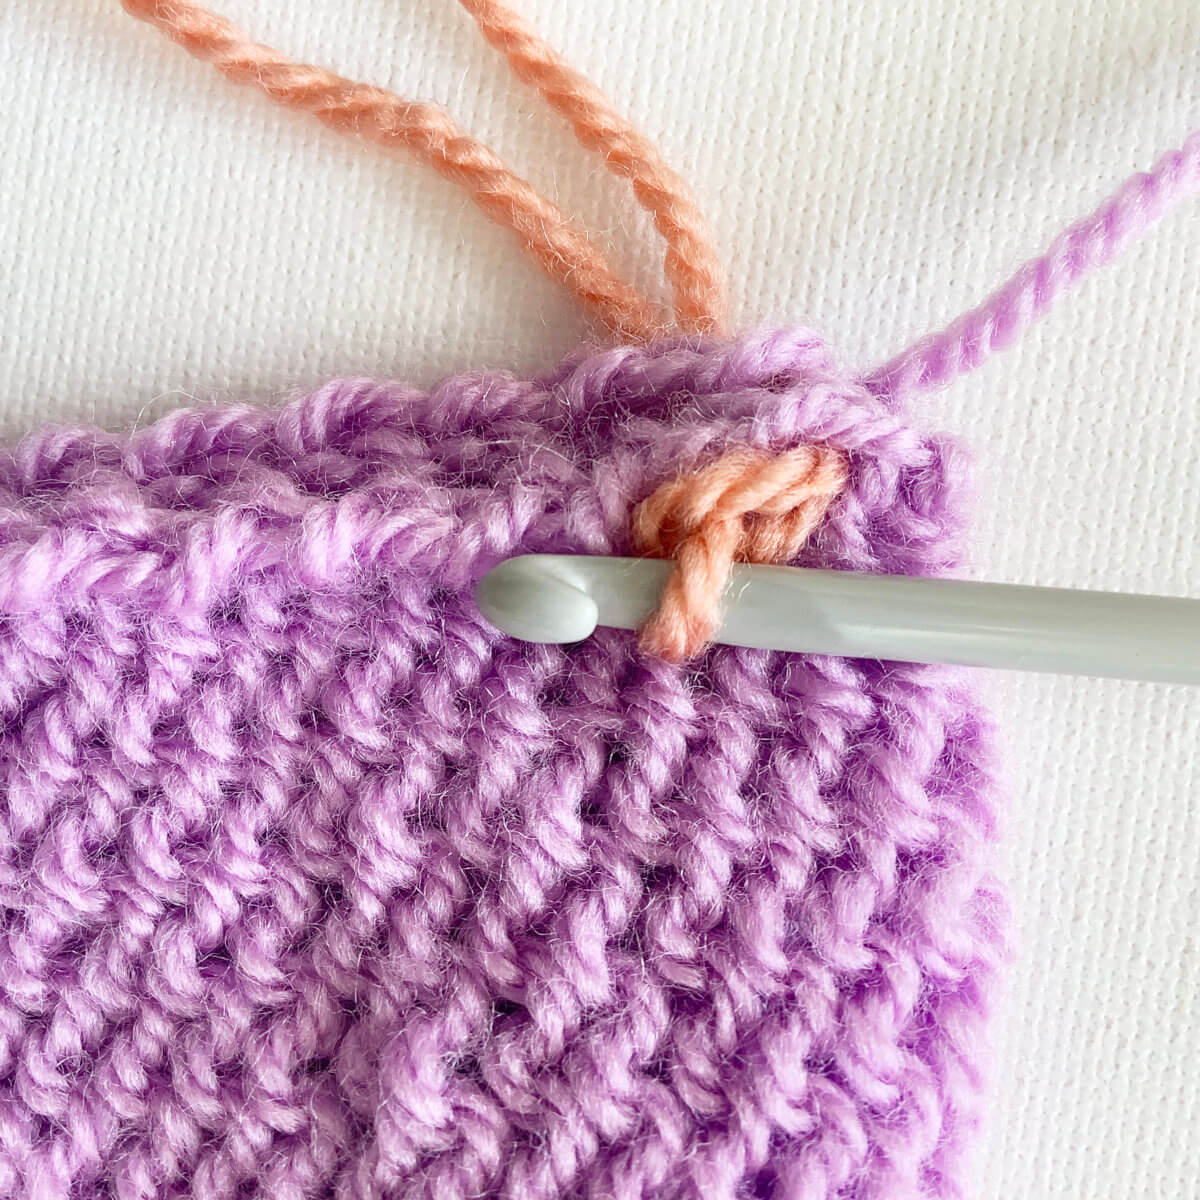
Next, pull the loop closest to the tip of the hook through the second loop.
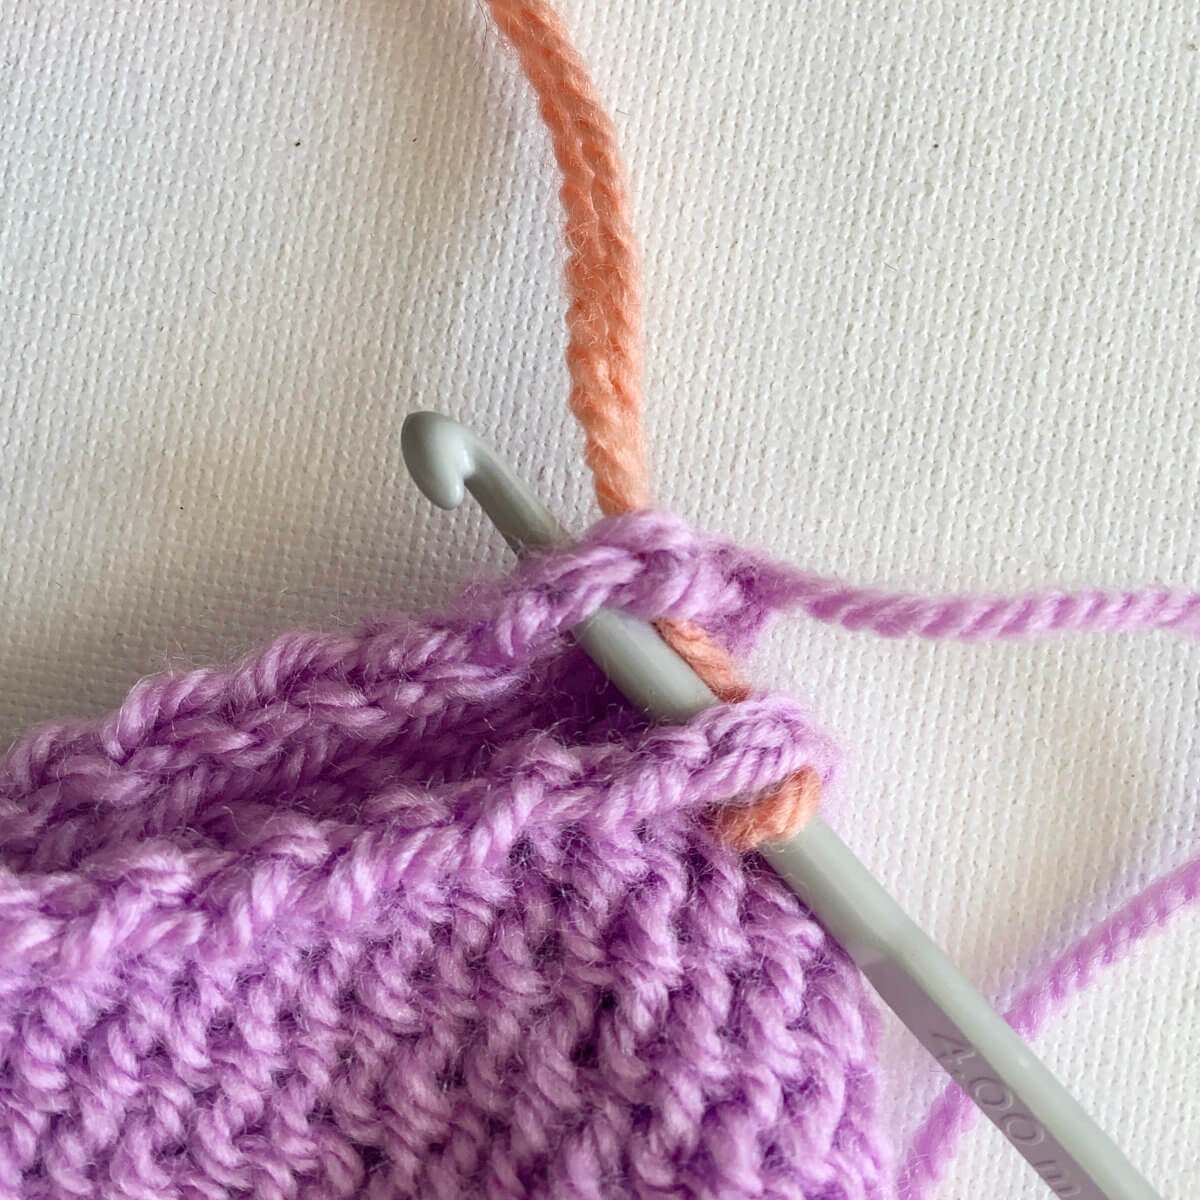
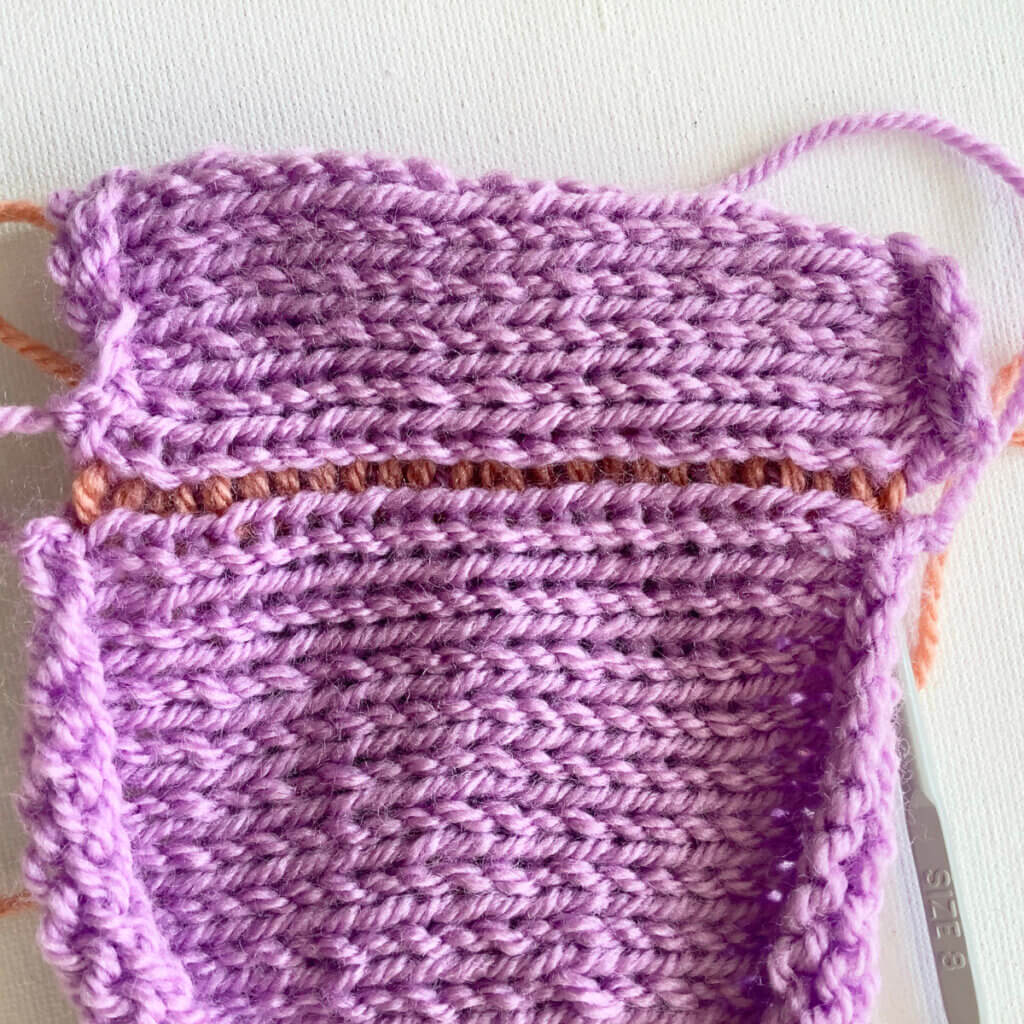
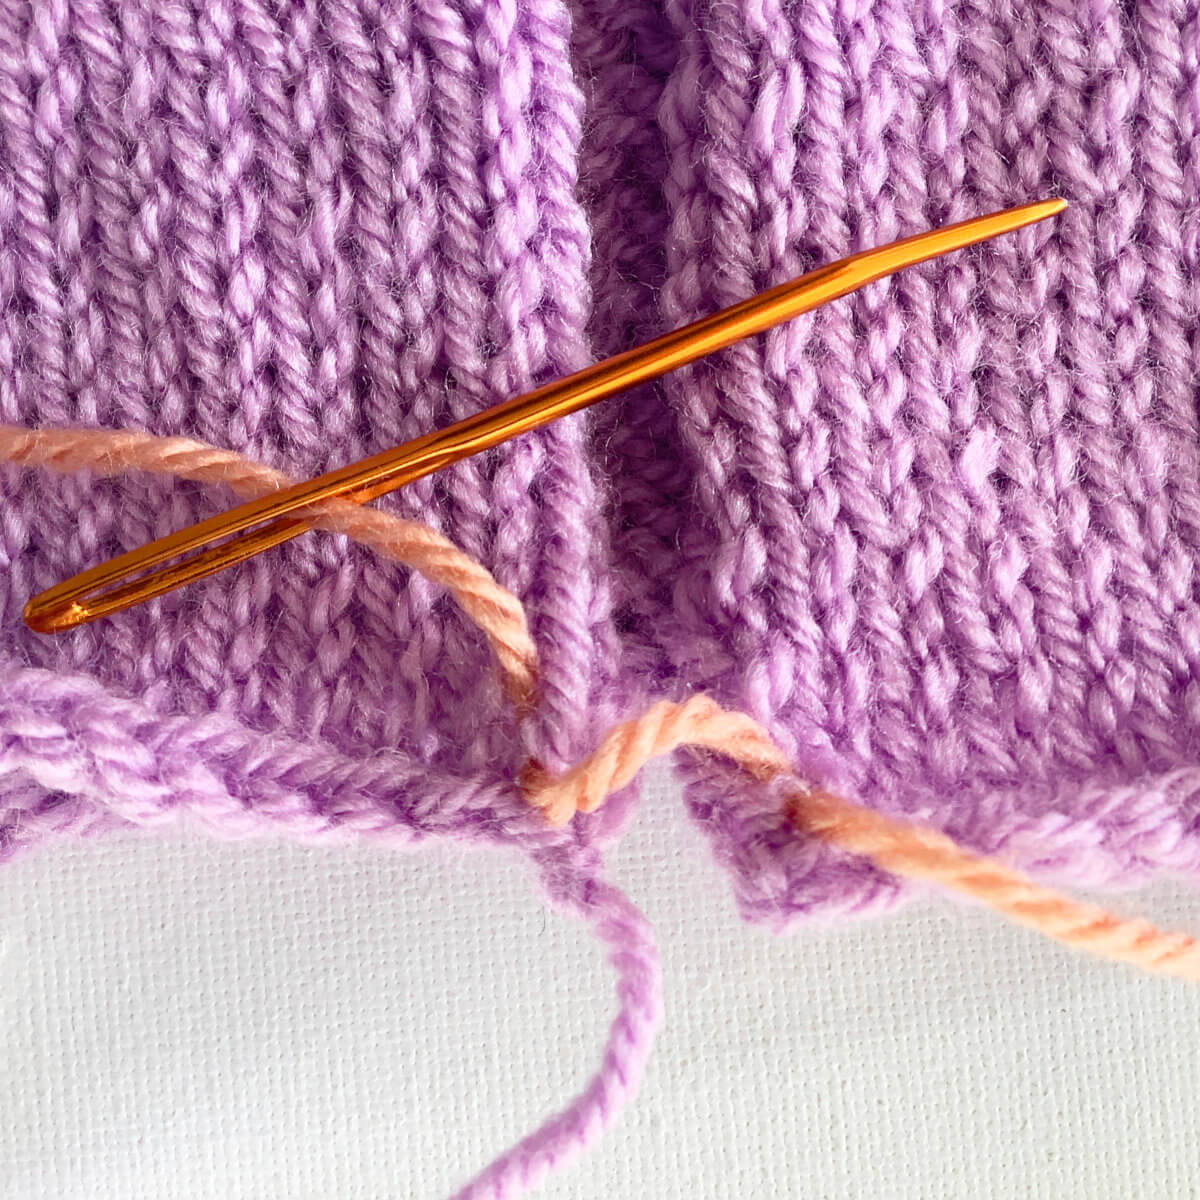
Repeat steps 5 to 7, each time moving one edge stitch to the right, until the entire edge has been worked.
To complete it, just break the yarn and pull the end through the last remaining loop before weaving in the ends.
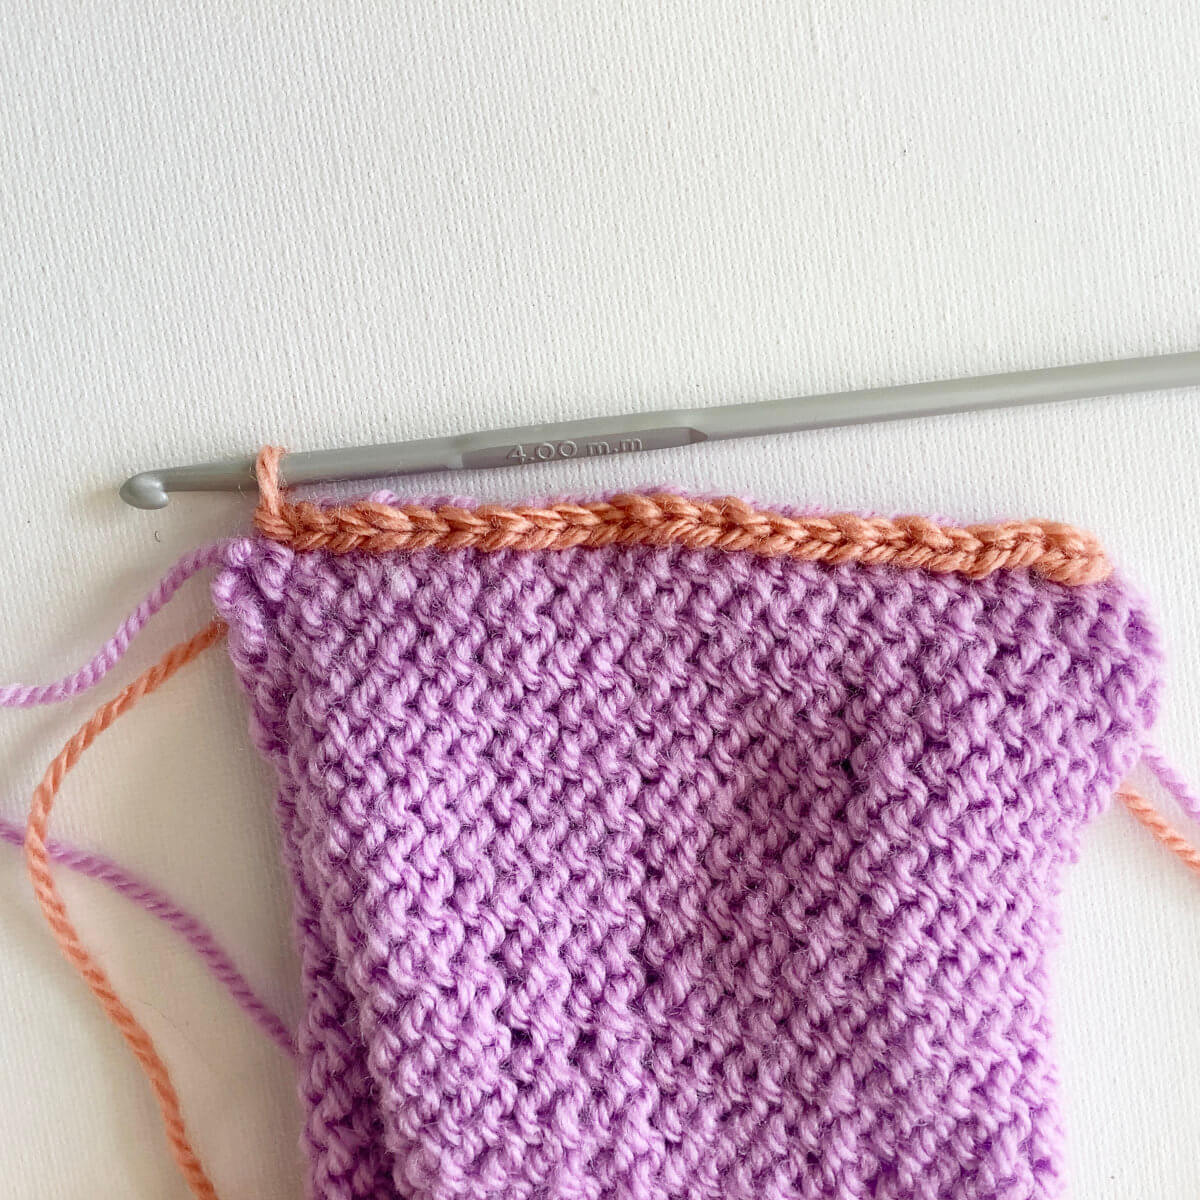
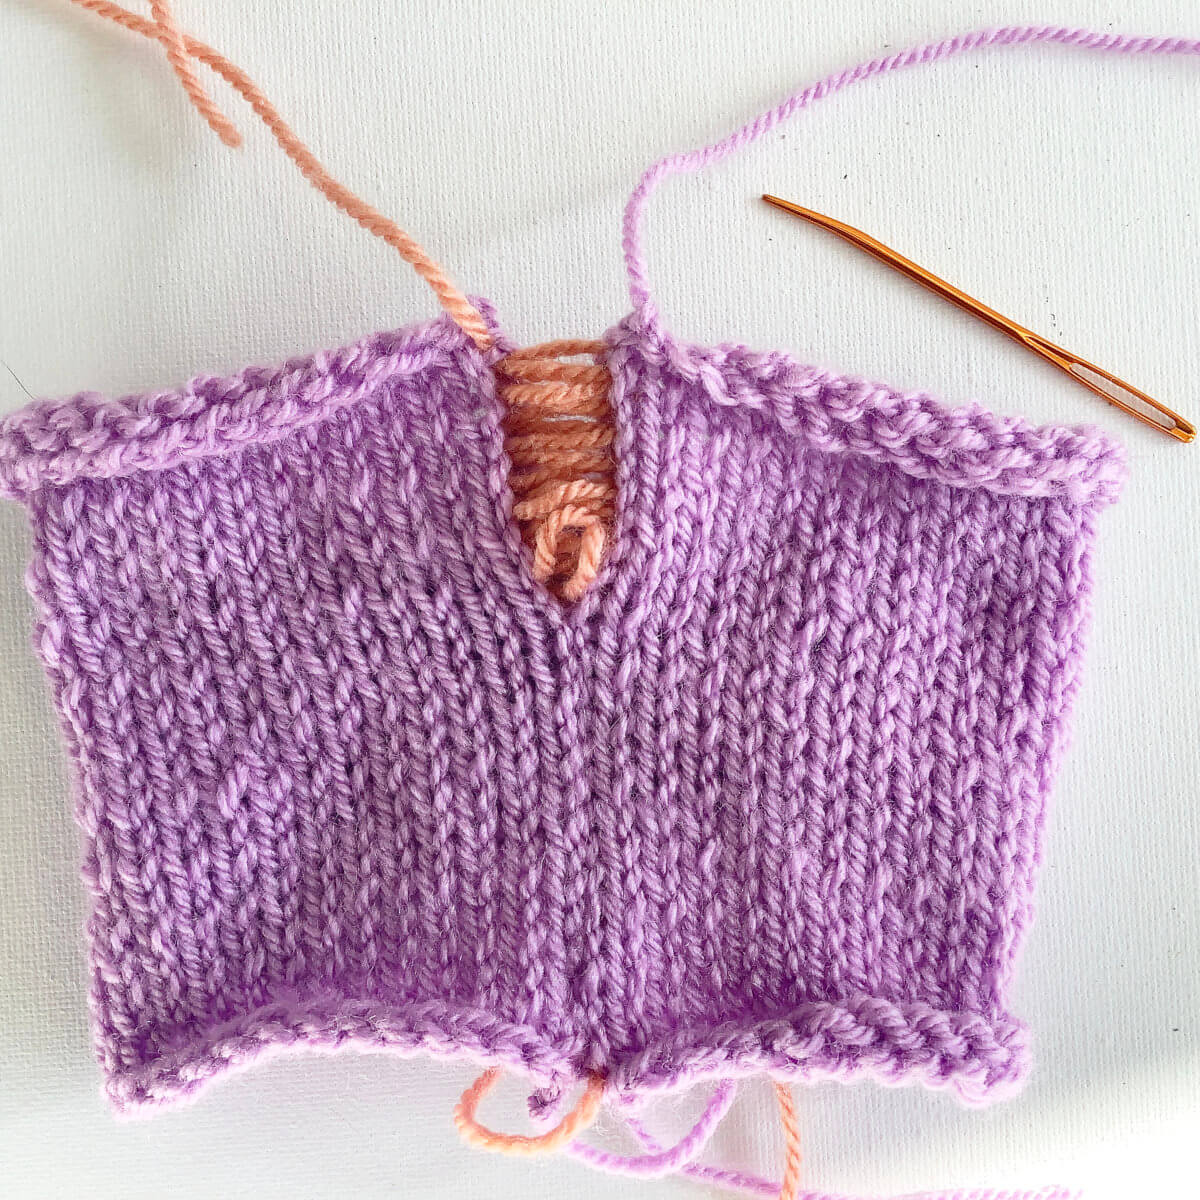
Below, you can see how the seam looks when I flip the piece over.
Please note, this is still on the wrong side of the fabric!
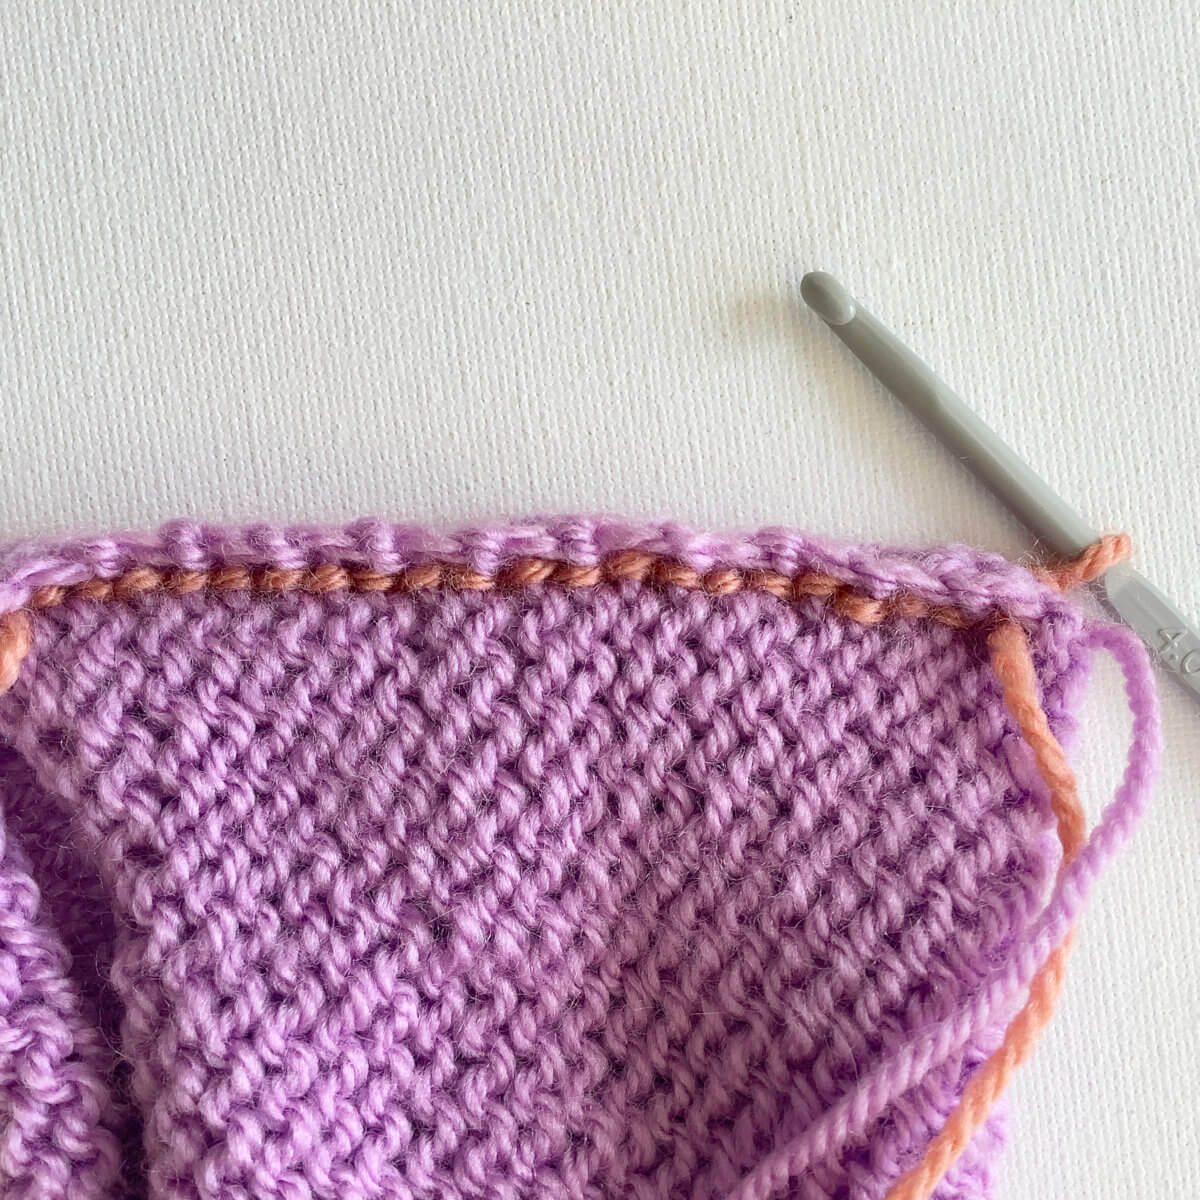
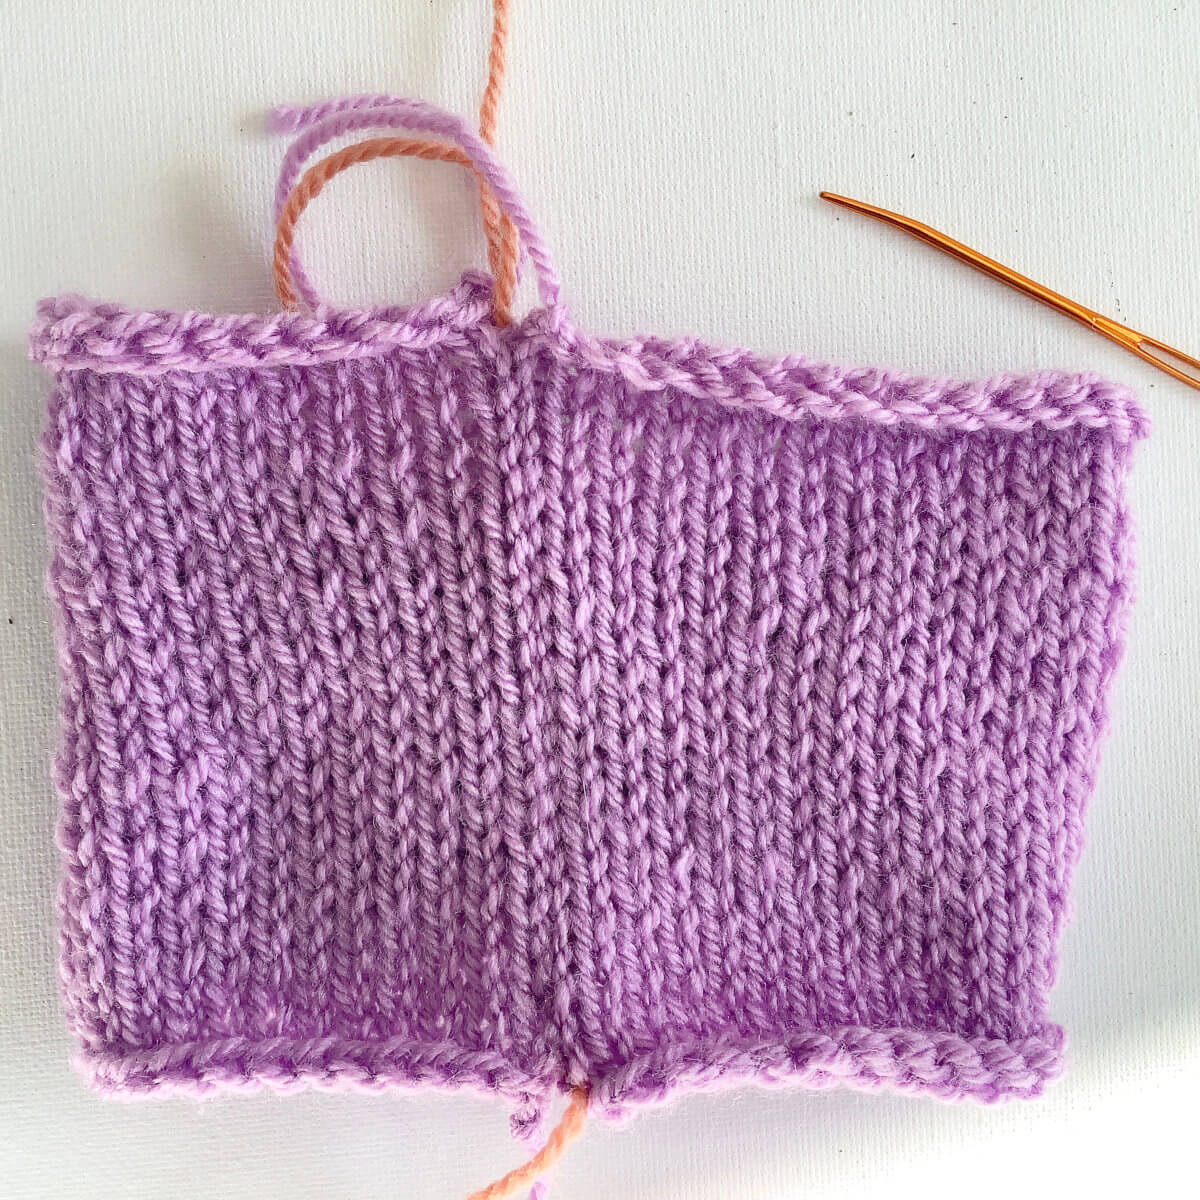
The result when viewed from the RS
For completeness’s sake, you can see below how this seam looks on the other side of the fabric, the right side, in this case:
When I put the seam under a bit of tension, you can see below that the yarn used peeps through for a bit. You can see it is a design feature, using a contrasting yarn. Or, of course, just use the same yarn as for the rest of the project.
And that’s how to work a slip stitch crochet seam. Really not that hard, right?!
Thanks to my Patreon supporters for bringing you this freebie! Creating quality patterns and tutorials is a lot of work and resource-intensive. However, I find it important to give you free content like this tutorial. Thanks to the generous support of my Patreon supporters, I can make it happen. Thank you, patrons! Click here to join, or click here to read more about La Visch Designs on Patreon.
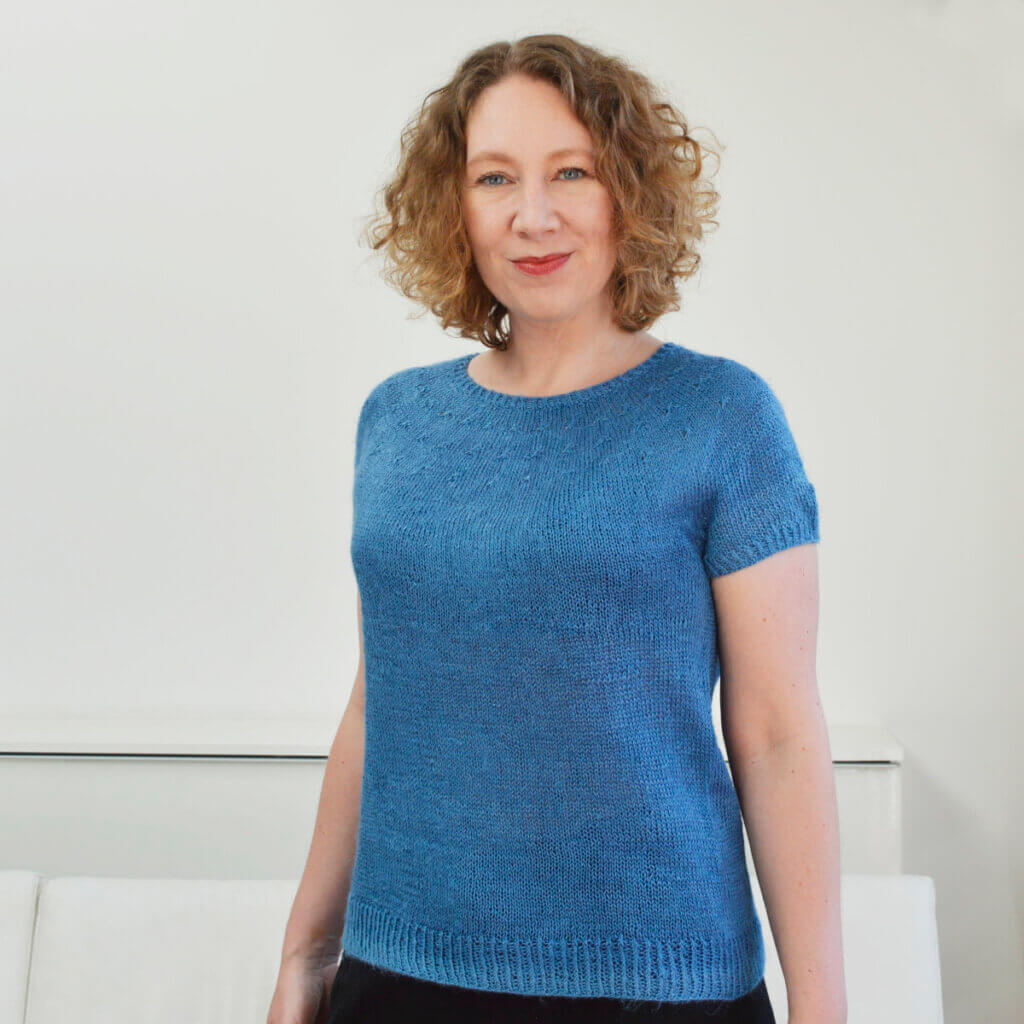
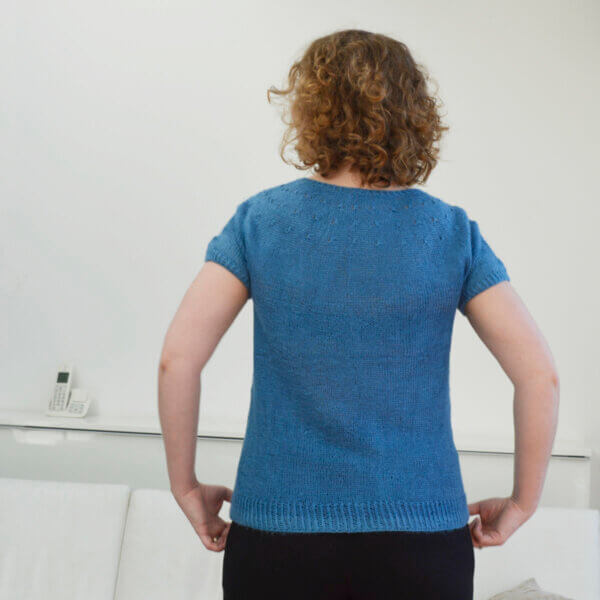
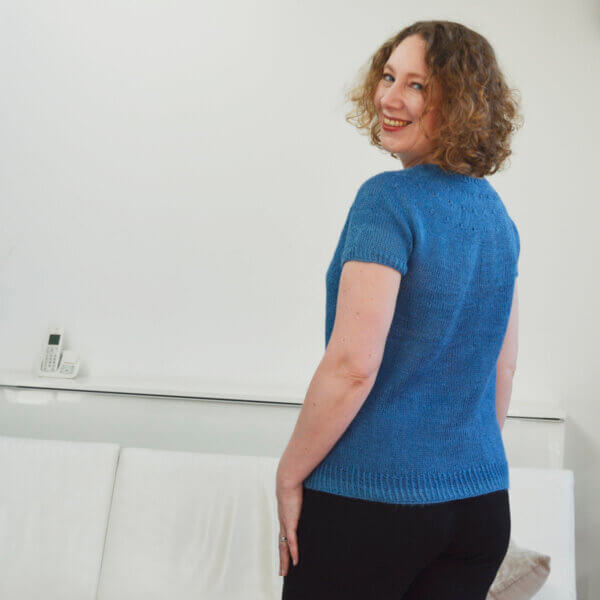
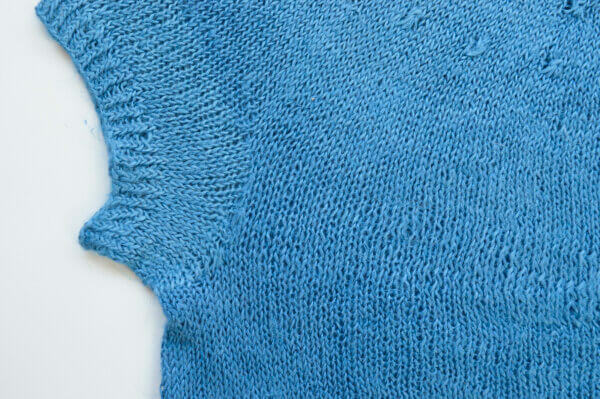
The gorgeous linen yarn in the tee pictured, I bought when visiting Sally in Shoreham-by-Sea some years ago. What better to use it for than a simple top-down tee with a circular yoke construction? The top is completely seamless, with subtle star stitch patterning in the yoke, and neat twisted rib edgings. Worked in a 100% linen yarn, this top is a dream to wear in warm weather. Moreover, it also works great as a layering piece!
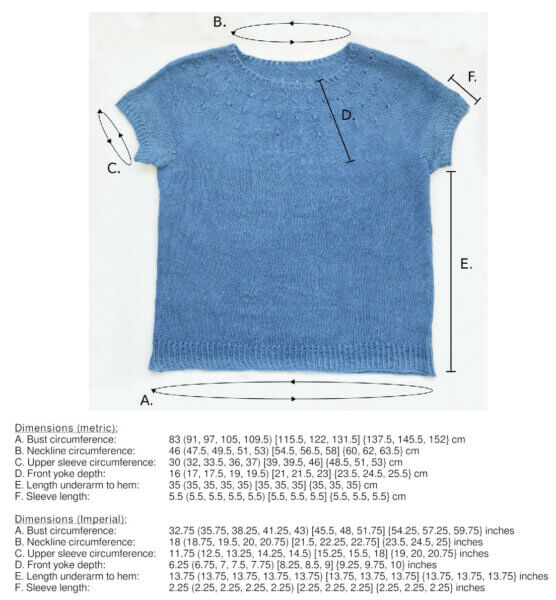
Instructions for 11 sizes are included, with finished bust measurements ranging from 81 to 152 cm (32 to 59.75 inches).
Pay what you want: (minimum €8.50)
€
Difficulty level
Stitches used include knit, purl, knit tbl, k2tog, skp, yo, k3tog, m1l and m1r. This pattern is therefor suitable for the intermediate knitter.
Sizes and finished measurements
The Shoreham-by-Sea tee pattern is available in 11 sizes: Size 0 (1, 2, 3, 4) [5, 6, 7] {8, 9, 10} with a finished bust measurement of 83 (91, 97, 105, 109.5) [115.5, 122, 131.5] {137.5, 145.5, 152} cm or 32.75 (35.75, 38.25, 41.25, 43) [45.5, 48, 51.75] {54.25, 57.25, 59.75} inches. For more measurements, please see the schematic in the picture gallery.
The tee is intended to be worn with approx. 5 -10 cm (2-4 inches) of positive ease at the full bust. The sample in size 2 shown is worn with 6 cm (2.25 inches) of positive ease.
Pattern details
Gauge: 22.7 sts / 30 rounds = 10 cm (4 inches) over stockinette stitch on larger needles, measured after blocking.
Pattern languages included: English.
Digital PDF has 6 pages (letter size)
Yarn
Yarn used in the sample Shoreham-by-Sea tee: 4 (5, 5, 6, 6) [6, 7, 7] {8, 8, 9} balls of Rowan Pure Linen (100% linen (flax); 130 m (142 yds) / 50 g) in 399 Patagonian.
Alternatively, use: 512 (572, 608, 676, 710) [770, 809, 910] {967, 1035, 1100} m (559 (625, 665, 738, 775) [841, 883, 994] {1056, 1130, 1201} yds) / 197 (220, 234, 260, 273) [296, 311, 350] {372, 398, 423} g of yarn with good drape of approx. sport weight that knits up to the pattern gauge, in solid colors for a similar result. Cotton and cotton blends will work well.
Materials
Knitting needles:
Size 2.5 mm (US 1.5) / 60 cm (24 inches) and 80 cm (32 inches) circular needles, or a size 0.5 mm (or the US equivalent) smaller than the size needed to get gauge
A size 3 mm (US 2.5) / 60 cm (24 inches) and 80 cm (32 inches) circular needles, or the size needed to get gauge
Size 3 mm (US 2.5) and 2.5 mm (US 1.5) needles in your preferred style for small circumference knitting in the round
For larger-busted persons, bust shaping may be beneficial for optimal fit of a garment. In this two-part series on bust shaping, I’ll go into the nitty-gritty details on both vertical and horizontal (short row) bust shaping to help you achieve the perfect fit in your knitted garments for your body. In this part, I’ll focus on horizontal bust darts. The previous tutorial about vertical bust shaping can be found here.
What are darts?
In short, darts are a way to add in (or remove) fabric in a specific area, to accommodate the curves of the body underneath. In this tutorial, I focus on bust darts. However, you can also use darts to create more room for a tummy or buttocks, while highlighting the waist.
When talking specifically about horizontal darts, we mean the kind of darts that are worked horizontally. In other words: adding in rows of knitting to add additional length to the fabric in the place where it’s needed. In this case, at the bust. These short rows can be done working top-down or bottom-up, the approach is exactly the same. That said, my personal preference is to work garments top-down. So, that’s what I’ll use for illustrating the concept in this tutorial.
But first, we have to measure!
Measuring
We need to measure. Not only to determine whether you actually need to add horizontal bust darts, but also for how many rows. Sometimes, a sweater may ride up because a lack of width at the bust stretches the fabric in that direction. This causes it to shrink in the other direction. In that particular case, vertical bust darts would be the first modification to look into, because it’s usually easier to implement in an all-over stitch pattern, than short rows. Before we do any measuring, though, make sure you wear a well-fitting bra, because this will influence the resulting measurements.
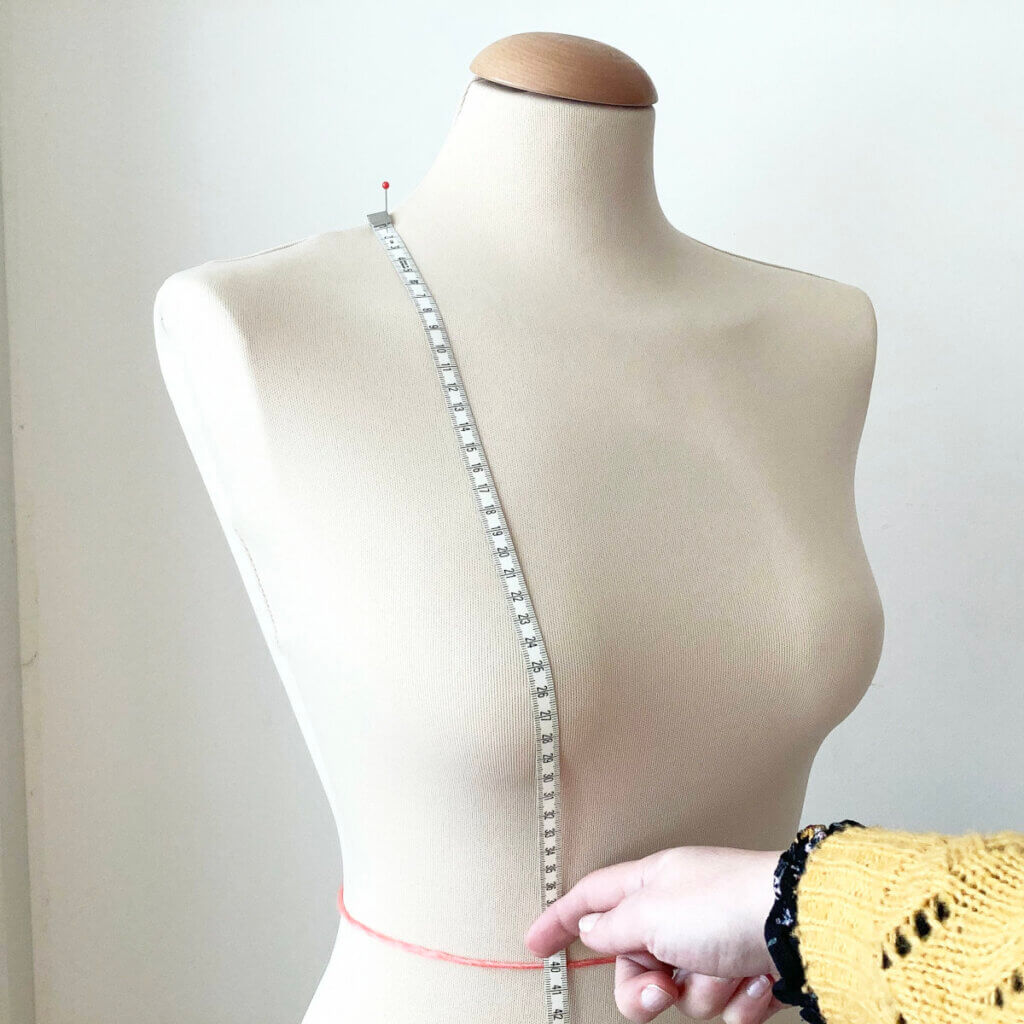
To find the relevant vertical measurements, tie a piece of string around your waist, and measure from the “shoulder seam” to this string. First over the full bust as pictured below. Also note where both the upper bust and the full bust fall, when measured from the shoulder seam.
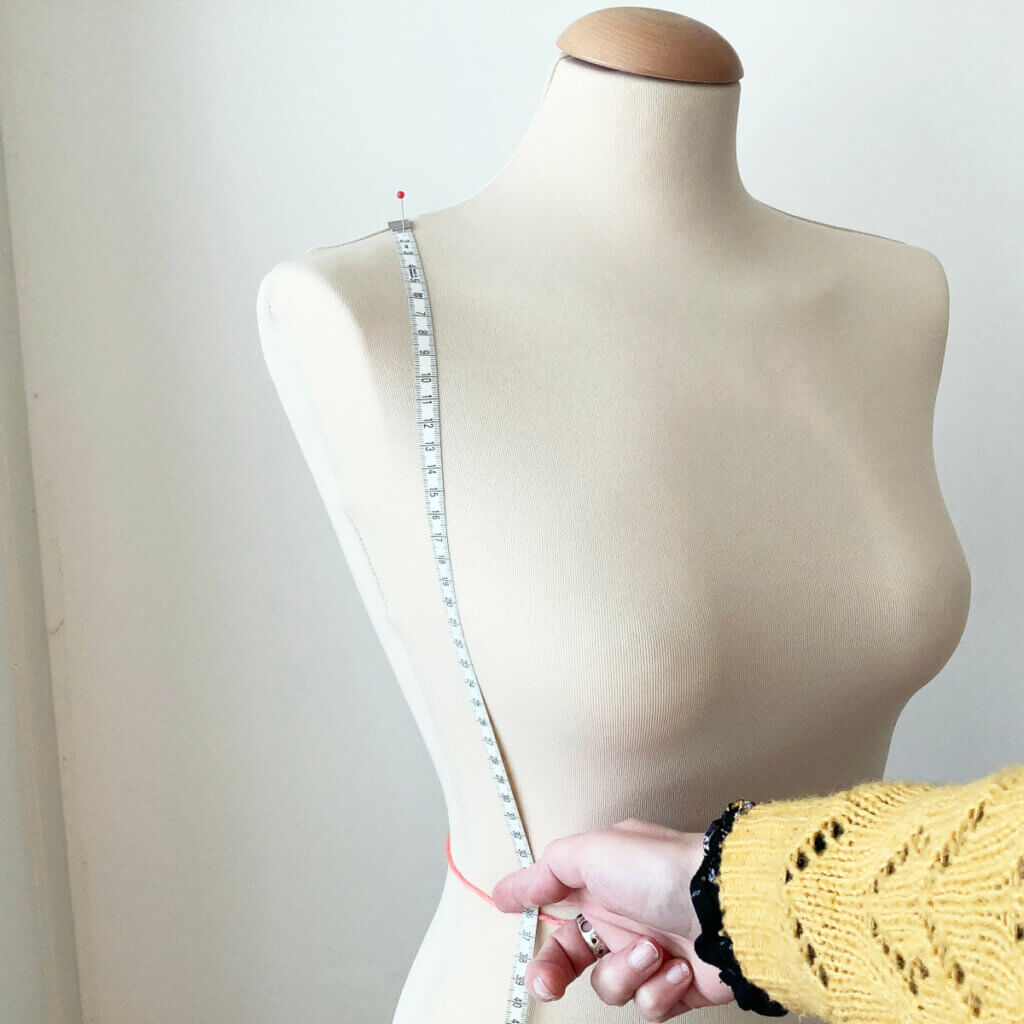
Next, measure again from the shoulder seam to the piece of string around the waist, but now at the side of the full bust. Alternatively, you can also measure from the shoulder seam to the waist at the back.
Now, on my mannequin there is not much difference between both measurements, only 4 centimeters or 1.57 inches. As a rule of thumb: if there is more than 5 cm (2 inches) of difference, horizontal bust darts would be beneficial. If the difference is less, the inherent stretchiness of knitted fabric is probably enough. Unless you’re making a garment with a lot of negative ease, of course.
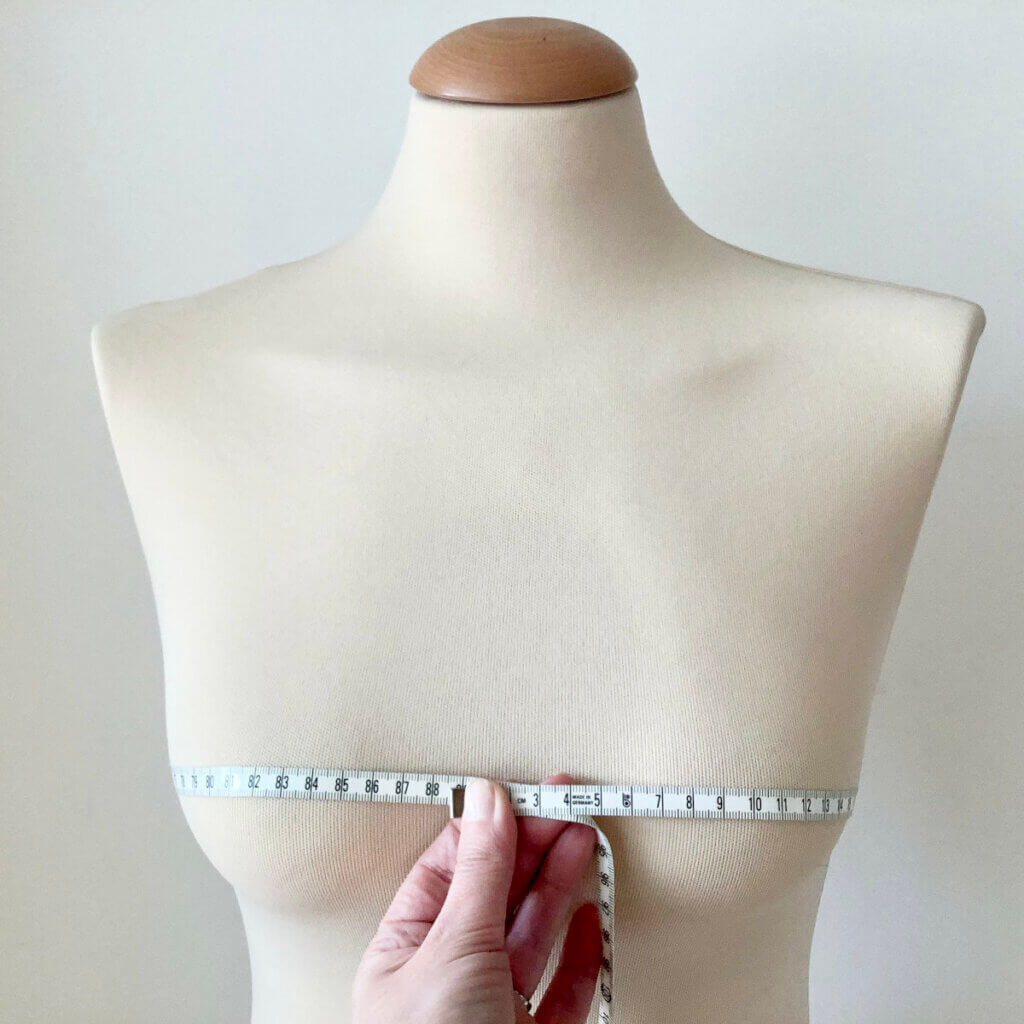
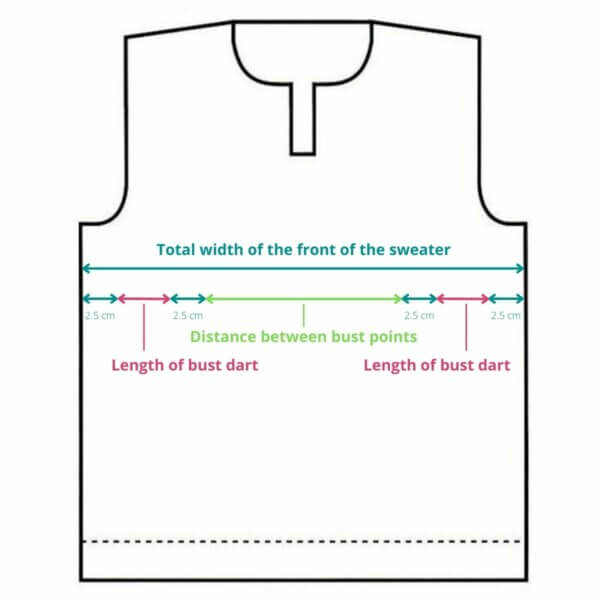
The first relevant horizontal measurement we have to take, is the distance between the full bust points (“nipples”). To find this measurement, wrap the tape measure around the fullest part of your bust, keeping it level with the floor. In the picture below, the full bust points would be approx. at numbers 10 and 82 on the tape measure. Of course, here, I’m holding the tape measure all wrong to actually read the distance between those points.
The second horizontal measurement we have to take, is the distance between the side seam, and the full bust point. This will help you determine how many stitches to work plain before turning the work.
Horizontal bust dart placement
As with all knitting, there are 2 dimensions to consider for optimal placement: the vertical and the horizontal one. For the vertical dimension – when to start the dart (in a top-down garment) – we really have to take a good look at your personal measurements as well as your gauge. You want to have the shortest pair of short rows at or just below the bust apex. But everyone’s full bust hits at a different vertical point, as is the case for the sweater’s sleeve separation. So I really can’t give you pointers in the sense of starting x cm or inches below sleeve separation. Fortunately, we have measured this!
For the horizontal placement of the bust dart, we also have some rules of thumb:
The shortest pair of short rows should be at least 5 cm (2 inches) wider than the distance between the full bust points.
The longest pair of short rows should be at least 2.5 cm or 1 inch from the side seam.
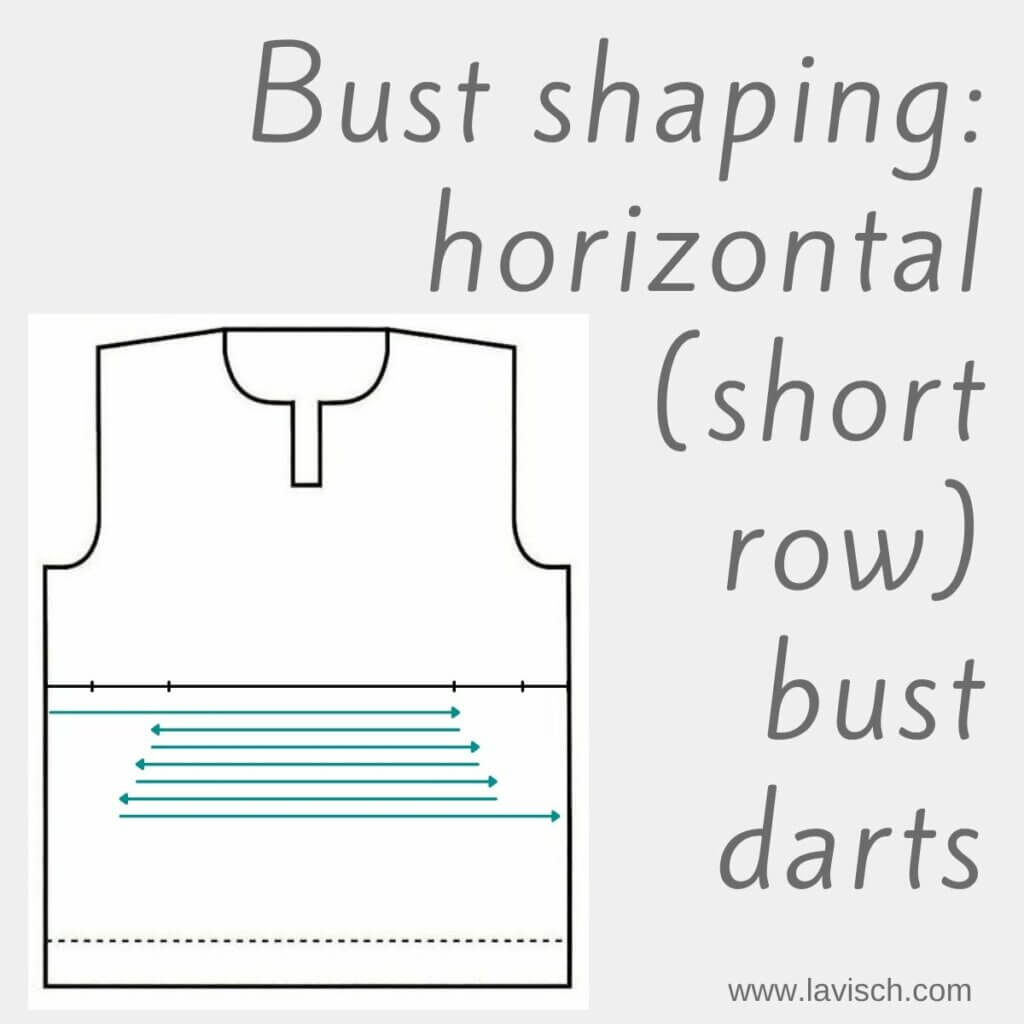
In the below schematic, I’ve pictured the various horizontal measurements:
Horizontal bust dart worksheet
To plan out the bust darts, we will need to do a few calculations. These are based on the measurements we’ve taken and the gauge of our knitting.
A: Vertical measurement from shoulder seam to waist over the full bust: _____ i.e. size 45 cm or 12 inches.
B: Vertical measurement from shoulder seam to waist at the side of the bust or at the back: ____ (i.e. 37.5 cm or 9 inches)
C: Difference between A and B: ____ (i.e. 7.5 cm or 3 inches)
D: Calculate C (divided by 2.5 for measurements in cm) times the number of rows/rounds per 2.5 cm or per inch in your gauge: _____. This is the total number of short rows to add. Round up to the nearest even number if needed.
E: Divide D by 2 to get the number of turns at each side of the garment: ____
F: The vertical distance from shoulder seam to full bust: ____ (i.e. 27.5 cm or 11 inches)
G: The horizontal distance between the side seam and the nearest bust point: ____ (i.e. 15 cm or 6 inches)
H: Calculate G minus the desired horizontal distance for the short row turns, from both the side seam and the bust point (= 2.5 + 2.5 cm / 1 + 1 inches): ____ (i.e. 10 cm or 4 inches)
I: Multiply H with your stitch gauge to find your dart width: _____ This is the number of stitches to used to determine the distance (in stitches) between short row lengths.
J: Divide I by E to get the number of stitches between turns: _____
K: The horizontal distance between the bust points: ____ (i.e. 17.5 cm or 7 inches)
An example:
Say A is 45 cm, and my B is 37.5 cm. This means the difference (C) is 45 – 37.5 = 7.5 cm. With a row gauge of 24 rows / 10 cm (4 inches) or 6 rows per 2.5 cm (1 inch) I arrive at 18 short rows to add (D). This also means I will turn 9 times on each side of the bust (E). If the vertical distance from shoulder seam to full bust (F) is 27.5 cm (11 inches), this means I want to start my short rows a couple of rows or rounds later.
My G is 15 cm, and I want to keep the turns 2.5 cm (1 inch) from both the side seam and the nearest bust point. This means I have 15 – 5 = 10 cm (4 inches) to work and space the short row turns in, on each side of the bust (H). With a stitch gauge of 20 sts / 10 cm (4 inches) my (I) would be 20 sts. We already calculated that we had 9 turns to work on each side. In other words: my J = 20 divided by 9 = 2.2, meaning that we work a turn every 2 sts: every short row is 2 stitches longer (or shorter) than the previous one.
Also, working top down, we start with the shortest pair of short rows with a turning point at 2.5 cm (1 inch) or 5 sts on the outside of the full bust point. In this example, we also have 17.5 cm or 35 stitches between the full bust points. The longest pair of short rows will have its turning point at 2.5 cm or 5 stitches from the side seam.
Knitting your bust dart
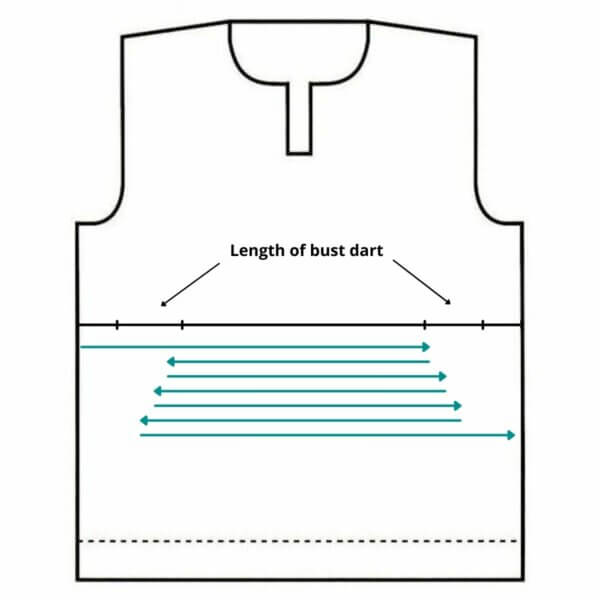
To start, work a right-side row across the front of the garment to 2.5 cm (1 inch) on the outside of the bust point. Then use the short row technique if your preference, and turn the work. Next, work a wrong-side row across the front to the point 2.5 cm (1 inch) outside the other bust point. Again, turn, using your short row technique of preference.
Continue to work longer and longer rows across the front of the sweater. Each one longer than the previous one by the number of stitches calculated at J, until you have worked all the necessary short rows. You should have enough stitches in the last two short rows to go across to 2.5 cm (1 inch) of the side seam. Turn and work one final right side row across the middle and one side.
In the below image, I made a visual of this:
And with this, your short row bust dart is done, and you can continue with the rest of your garment!
Thanks to my Patreon supporters for bringing you this freebie! Creating quality patterns and tutorials is a lot of work and resource-intensive. However, I find it important to give you free content like this tutorial. Thanks to the generous support of my Patreon supporters, I can make it happen. Thank you, patrons! Click here to join, or click here to read more about La Visch Designs on Patreon.
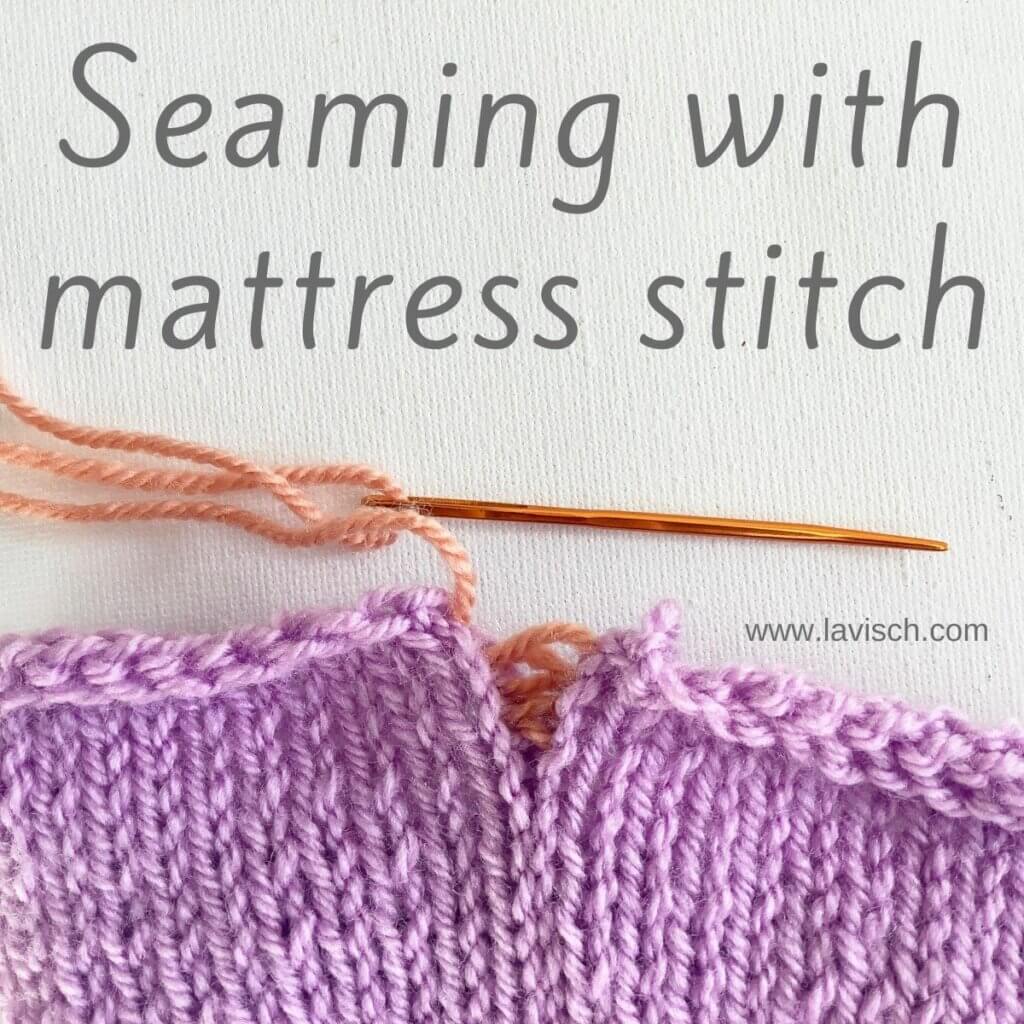
There are many ways to join two pieces of knitted fabric together, all with their own advantages and disadvantages. In this post, I’ll be talking about working the mattress stitch. This technique is particularly suited for joining pieces in stockinette stitch on the vertical edge of the work. It will also work splendidly with other stitch patterns, as long as there is a column of knit stitches right at the edge that you want to join with another piece. Examples of where I used mattress stitch, include closing up sleeves that were worked flat, and connecting the front and back pieces of sweaters.
Personally, I find mattress stitch more time-consuming than, for example, working a crochet join. However, it has a very important benefit: it’s virtually invisible on the right side of the fabric, although it does create a ridge on the wrong side of the work. Also, it’s very satisfying to see the fabric closing up when pulling the thread!
Materials used
Yarn: Paintbox Yarns Simply DK, a good value, good quality 100% acrylic yarn, here in the color 142 Tea Rose.
Darning needle: Hiya Hiya Darn It Yarn Needle, or any other tapestry needle, threaded with yarn.
Working mattress stitch step by step
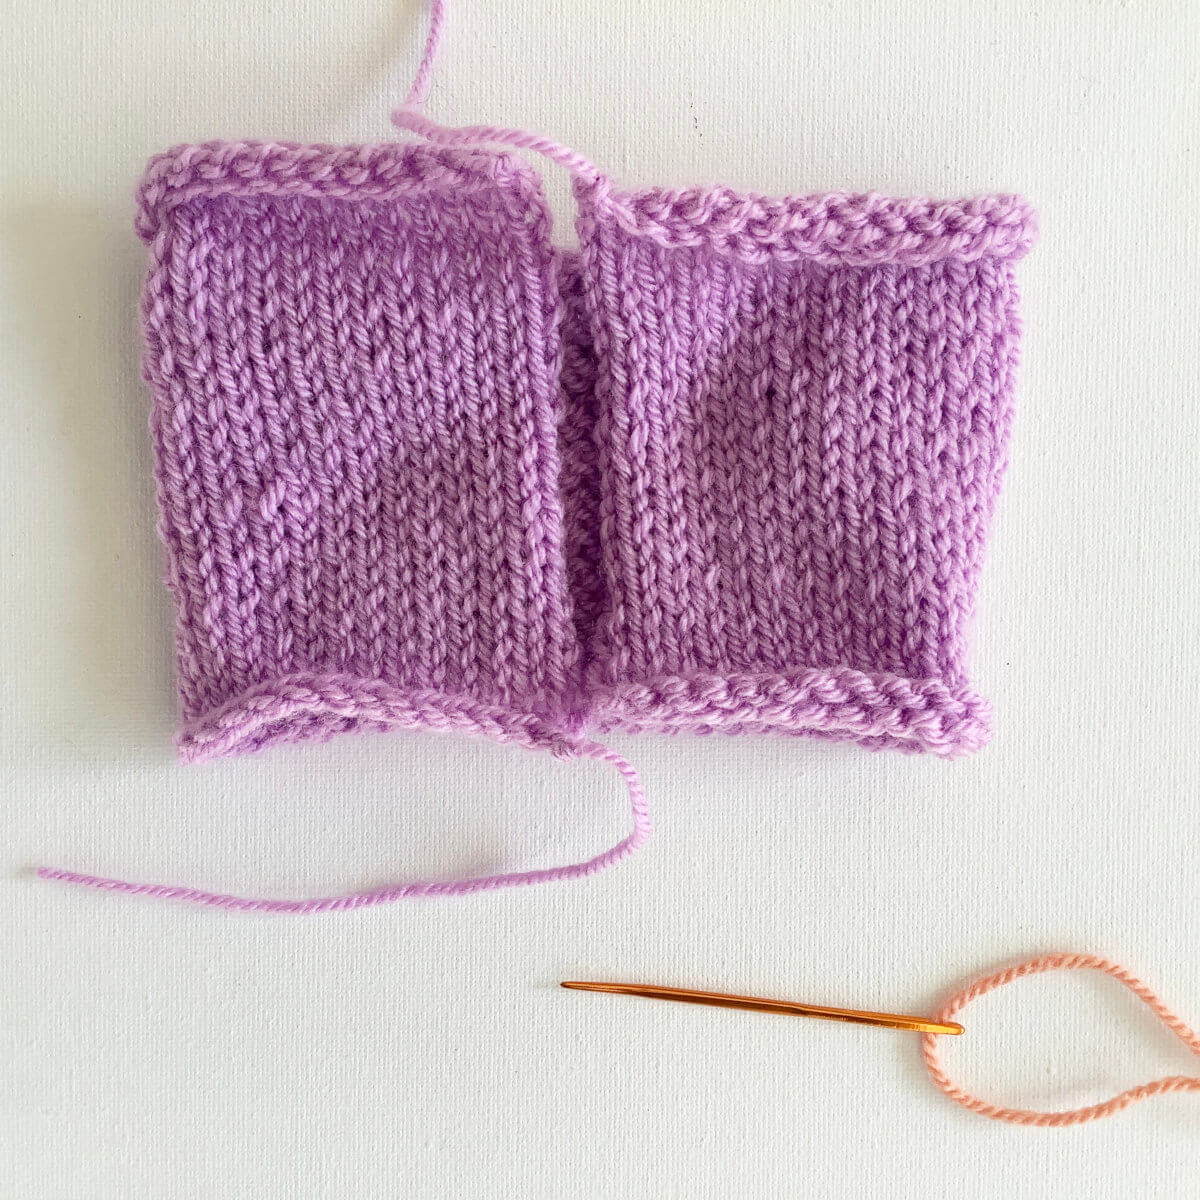
Before we can start, we have to measure out a length of the working yarn. For this, a length of approx. twice the length of the edge that you want to bind-off is advised. If long enough, you could also use the yarn tail left over from casting on or binding off. This will give less ends to weave in later on.
When you have measured out the length of yarn, break it, and thread it onto the darning needle.
First, make sure you have your work in front of you, with the right side facing.
In the picture below, you can see that I did not block my swatch before making the pictures for this tutorial. When using this technique on a project, though, blocking could make it easier to see the stitches you want to seam into.
To start, insert the darning needle directly to the right of the first column of stitches, from bottom to top, underneath the thread that runs between the two columns of stitches.
You can also start with the left piece of fabric. In that case, insert the needle underneath the thread to the left of the column of knit stitches at the edge of the piece. Don’t forget to leave a long enough yarn tail to weave in later on, if you’re not using a yarn tail for seaming.
Next, insert the darning needle directly to the left of the first column of stitches on the other piece of fabric. Again, from bottom to top, underneath the thread that runs between the two columns of stitches.
Pull the yarn through.
Repeat steps 2 and 3 until you’ve reached the end of the edges to join.
Make sure to pull the yarn to close up the seam every few cm or inches. Take care not to make it too tight, though, or the seam will be less invisible than it could be.
Below, you can see the result of seaming with mattress stitch on the right side of the fabric. Pretty good, right?!
And for completeness’s sake, here also the view from the wrong side of the fabric.
Thanks to my Patreon supporters for bringing you this freebie! Creating quality patterns and tutorials is a lot of work and resource-intensive. However, I find it important to give you free content like this tutorial. Thanks to the generous support of my Patreon supporters, I can make it happen. Thank you, patrons! Click here to join, or click here to read more about La Visch Designs on Patreon.
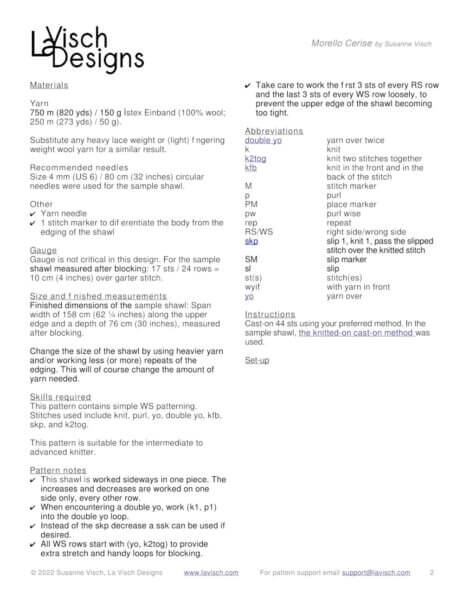
Morello Cerise is a triangle shawl, knit sideways. This design features lace patterning in the tradition of the Shetland Isles. The triangle edging is worked at the same time as the body of the shawlette. Worked at a loose gauge, Morello Cerise is a lovely and airy layering piece.
The pattern contains both fully written out as well as charted instructions for the lace.
Pay what you want: (minimum €6.95)
€
Difficulty level
This pattern contains simple WS patterning. Stitches used include knit, purl, yo, double yo, kfb, skp, and k2tog.
This
pattern is suitable for the intermediate to advanced knitter.
Sizes and finished measurements
Finished dimensions of the sample shawl: Span width of 158 cm (62 ¼ inches) along the upper edge and a depth of 76 cm (30 inches), measured after blocking.
Change the size of the shawl by using heavier yarn and/or working less (or more) repeats of the edging. This will of course change the amount of yarn needed.
Pattern details
Gauge: Approx. 17 sts / 26 rows = 10 cm (4 inches) over garter stitch, after blocking. Gauge is, however, not critical in this design.
Pattern languages included: English.
Digital PDF has 4 pages (letter size)
Materials
Yarn: 750 m (820 yds) / 150 g Ístex Einband (100% wool; 250 m (273 yds) / 50 g). Substitute any heavy lace weight or (light) fingering weight wool yarn for a similar result.
Size 4 mm (US 6) / 80 cm (32 inches) circular needles were used in the sample shawl.
Yarn needle.
1 stitch marker to differentiate the body from the edging of the shawl.