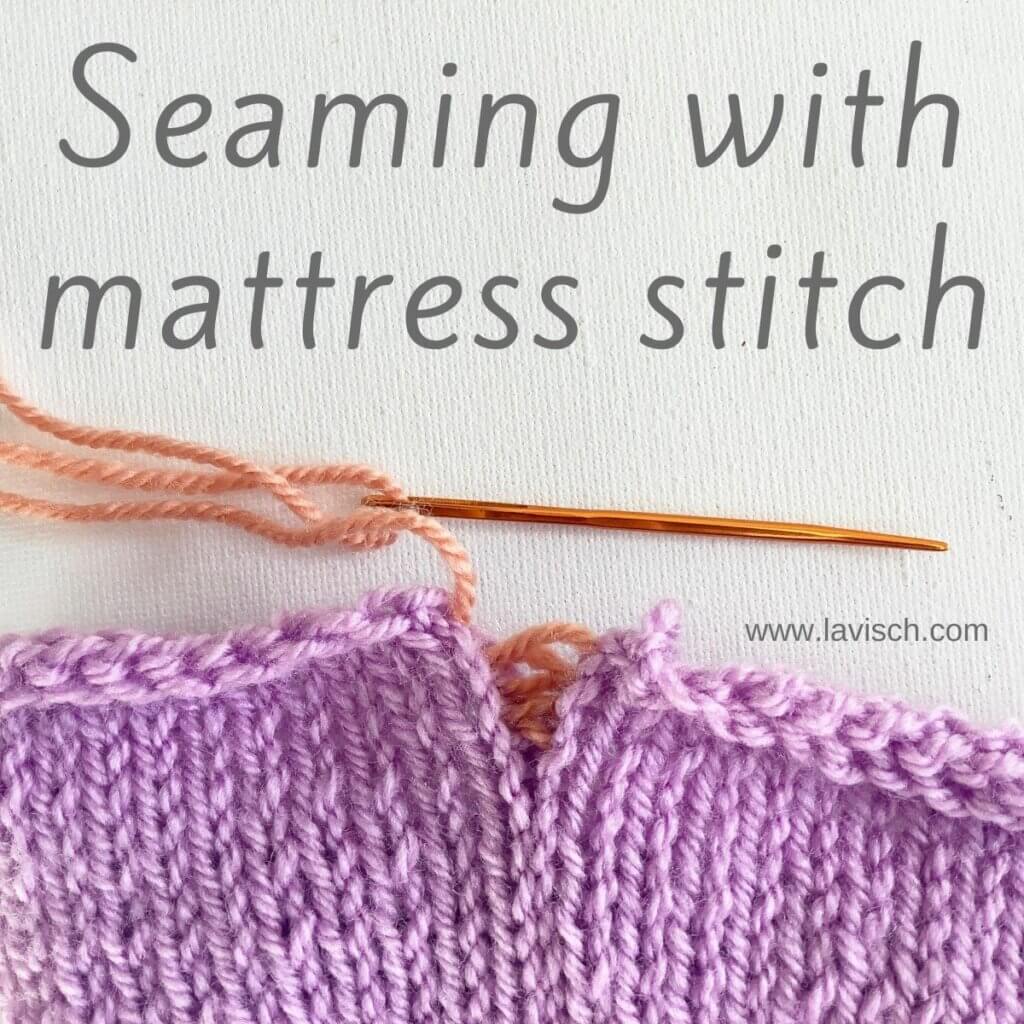
There are many ways to join two pieces of knitted fabric together, all with their own advantages and disadvantages. In this post, I’ll be talking about working the mattress stitch. This technique is particularly suited for joining pieces in stockinette stitch on the vertical edge of the work. It will also work splendidly with other stitch patterns, as long as there is a column of knit stitches right at the edge that you want to join with another piece. Examples of where I used mattress stitch, include closing up sleeves that were worked flat, and connecting the front and back pieces of sweaters.
Personally, I find mattress stitch more time-consuming than, for example, working a crochet join. However, it has a very important benefit: it’s virtually invisible on the right side of the fabric, although it does create a ridge on the wrong side of the work. Also, it’s very satisfying to see the fabric closing up when pulling the thread!
Materials used
Yarn: Paintbox Yarns Simply DK, a good value, good quality 100% acrylic yarn, here in the color 142 Tea Rose.
Darning needle: Hiya Hiya Darn It Yarn Needle, or any other tapestry needle, threaded with yarn.
Working mattress stitch step by step
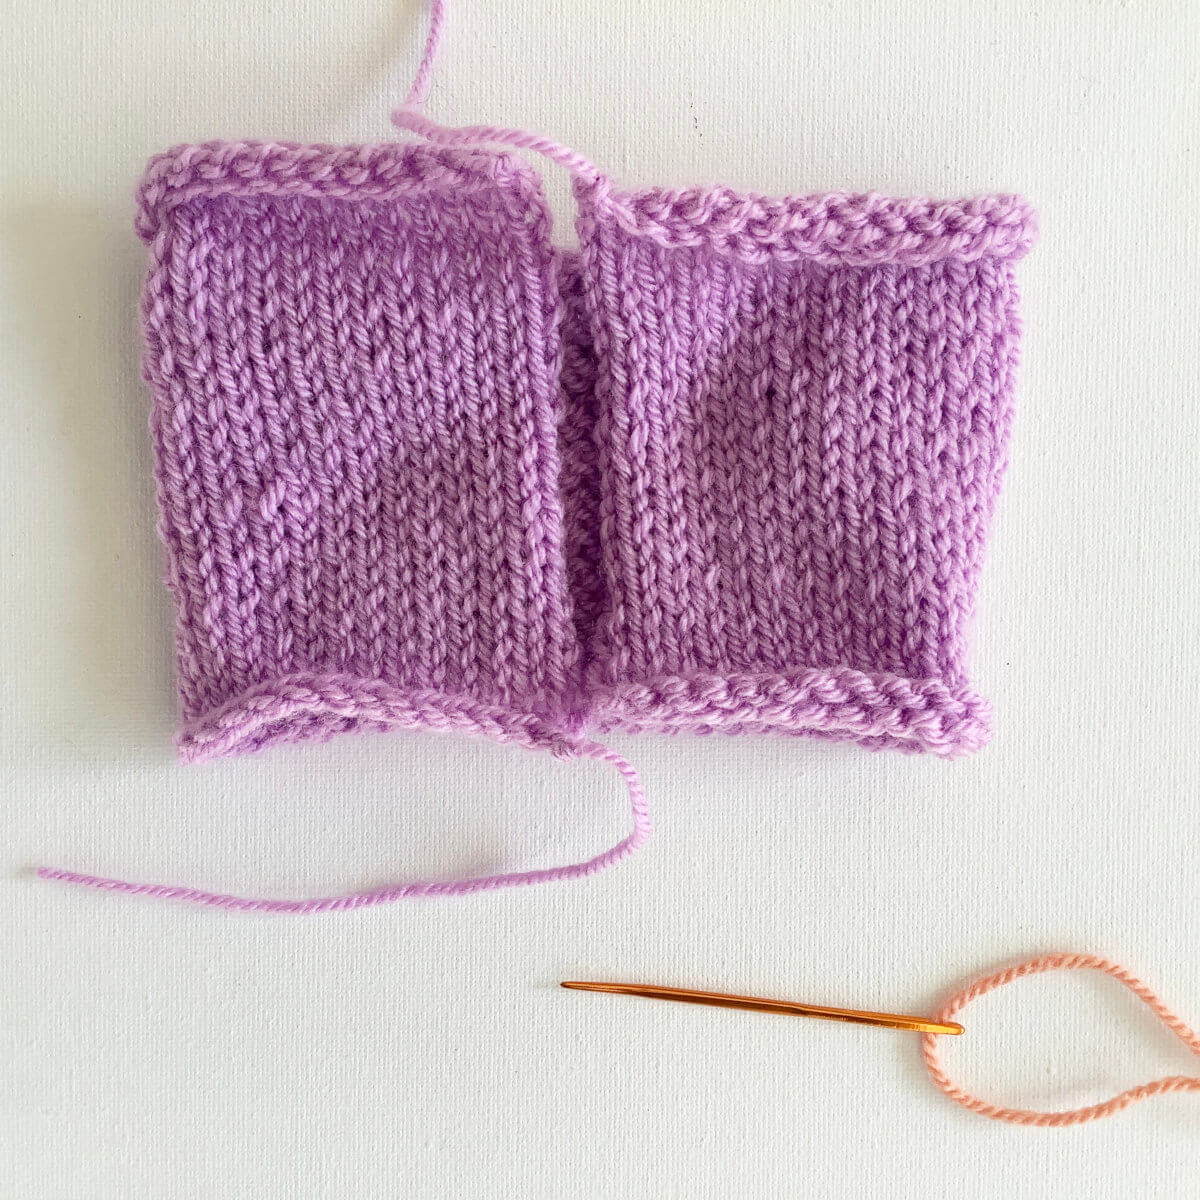
Before we can start, we have to measure out a length of the working yarn. For this, a length of approx. twice the length of the edge that you want to bind-off is advised. If long enough, you could also use the yarn tail left over from casting on or binding off. This will give less ends to weave in later on.
When you have measured out the length of yarn, break it, and thread it onto the darning needle.
First, make sure you have your work in front of you, with the right side facing.
In the picture below, you can see that I did not block my swatch before making the pictures for this tutorial. When using this technique on a project, though, blocking could make it easier to see the stitches you want to seam into.
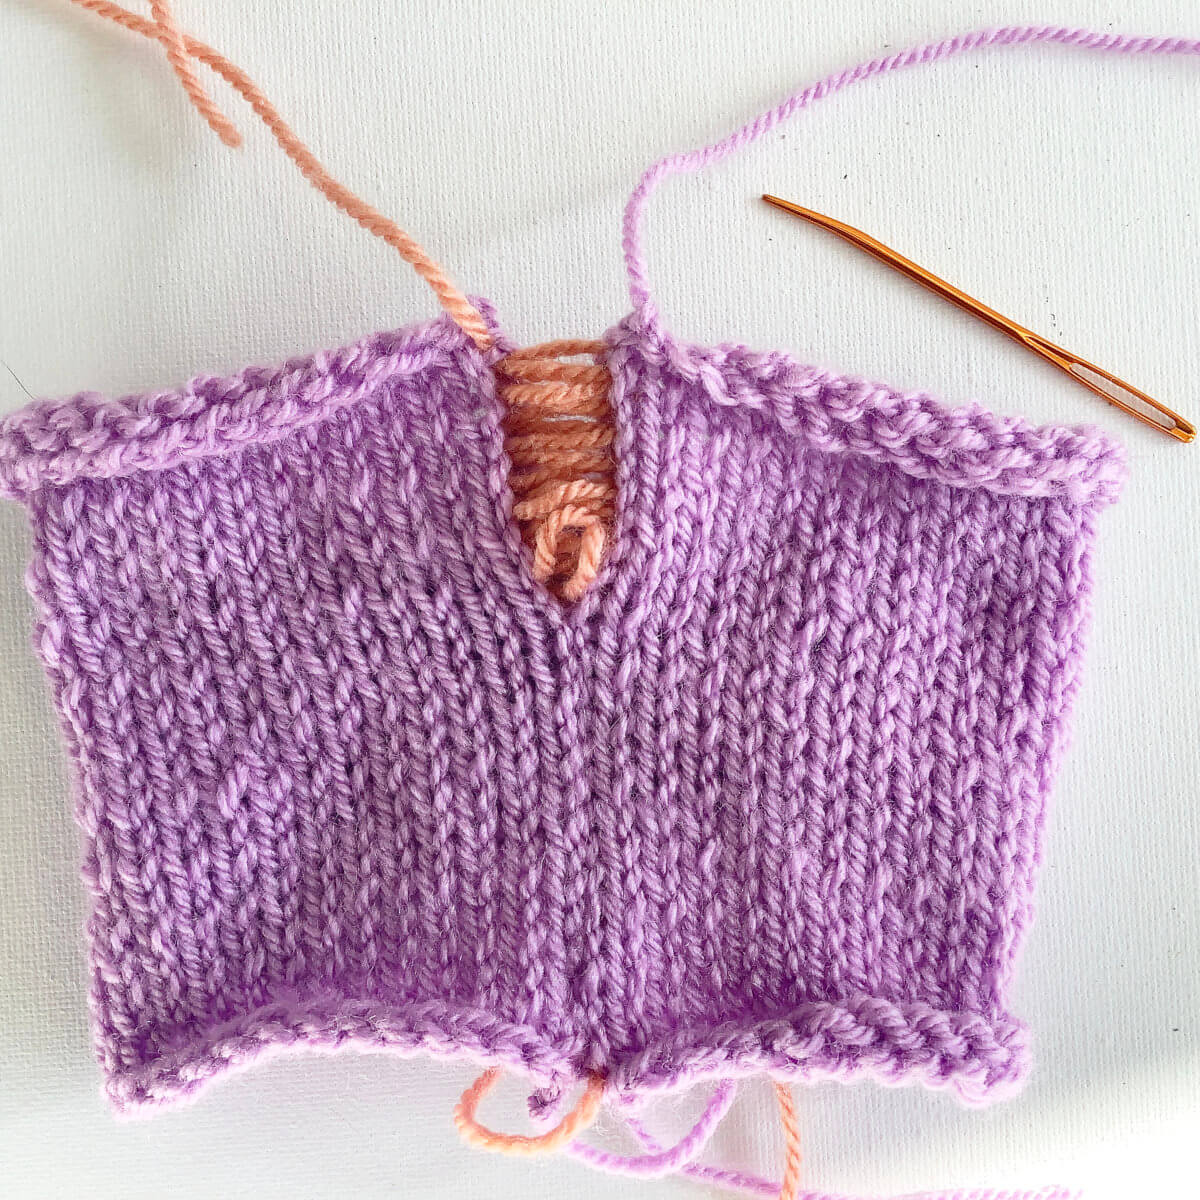
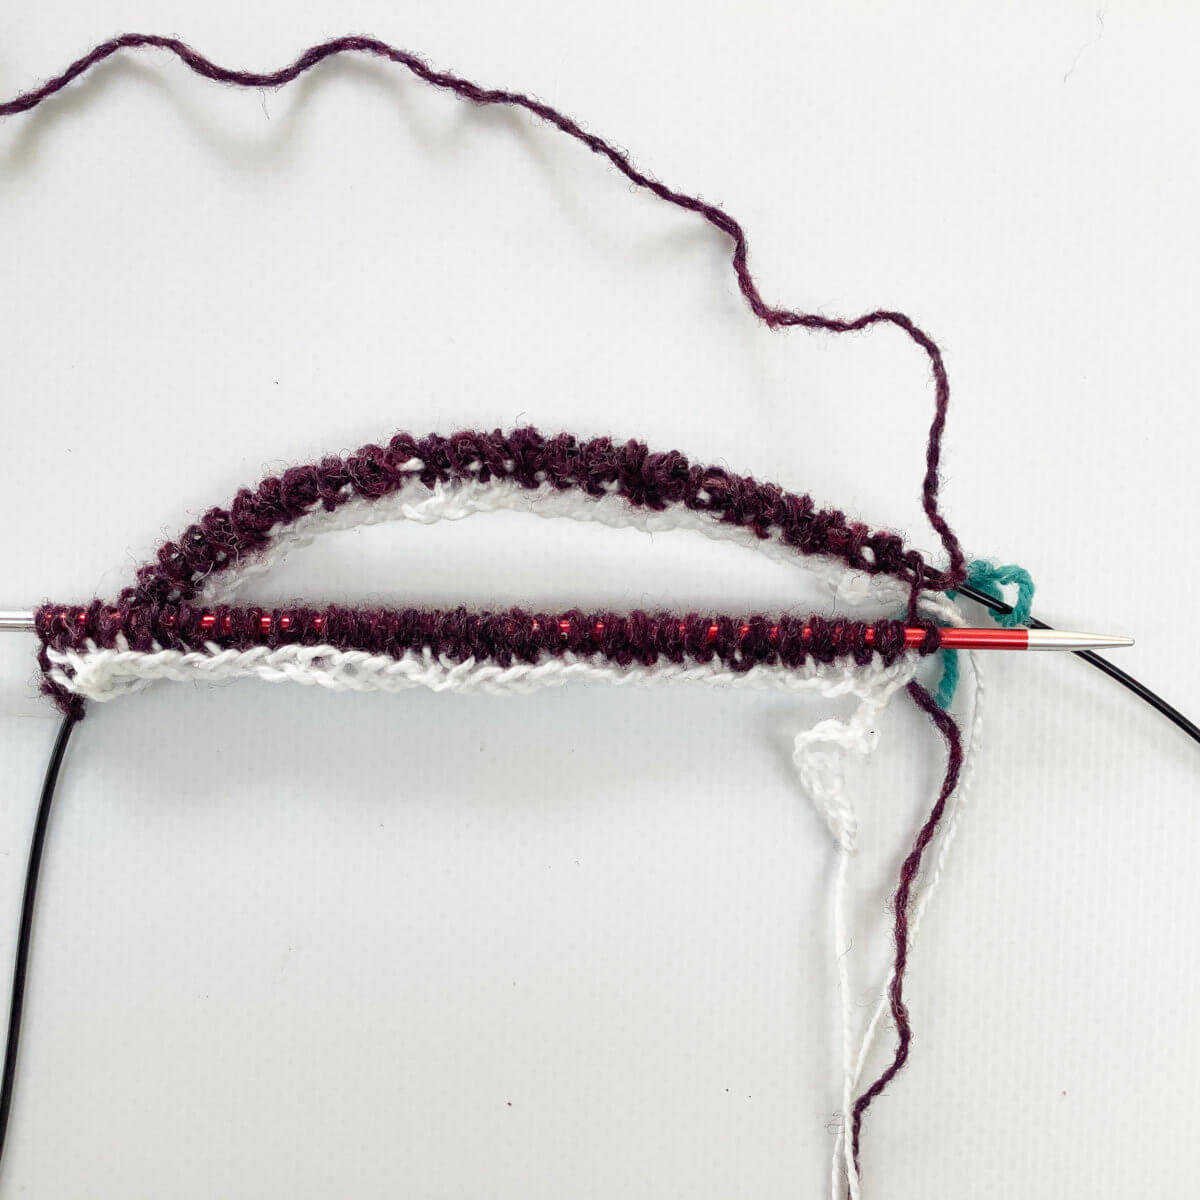
To start, insert the darning needle directly to the right of the first column of stitches, from bottom to top, underneath the thread that runs between the two columns of stitches.
You can also start with the left piece of fabric. In that case, insert the needle underneath the thread to the left of the column of knit stitches at the edge of the piece. Don’t forget to leave a long enough yarn tail to weave in later on, if you’re not using a yarn tail for seaming.
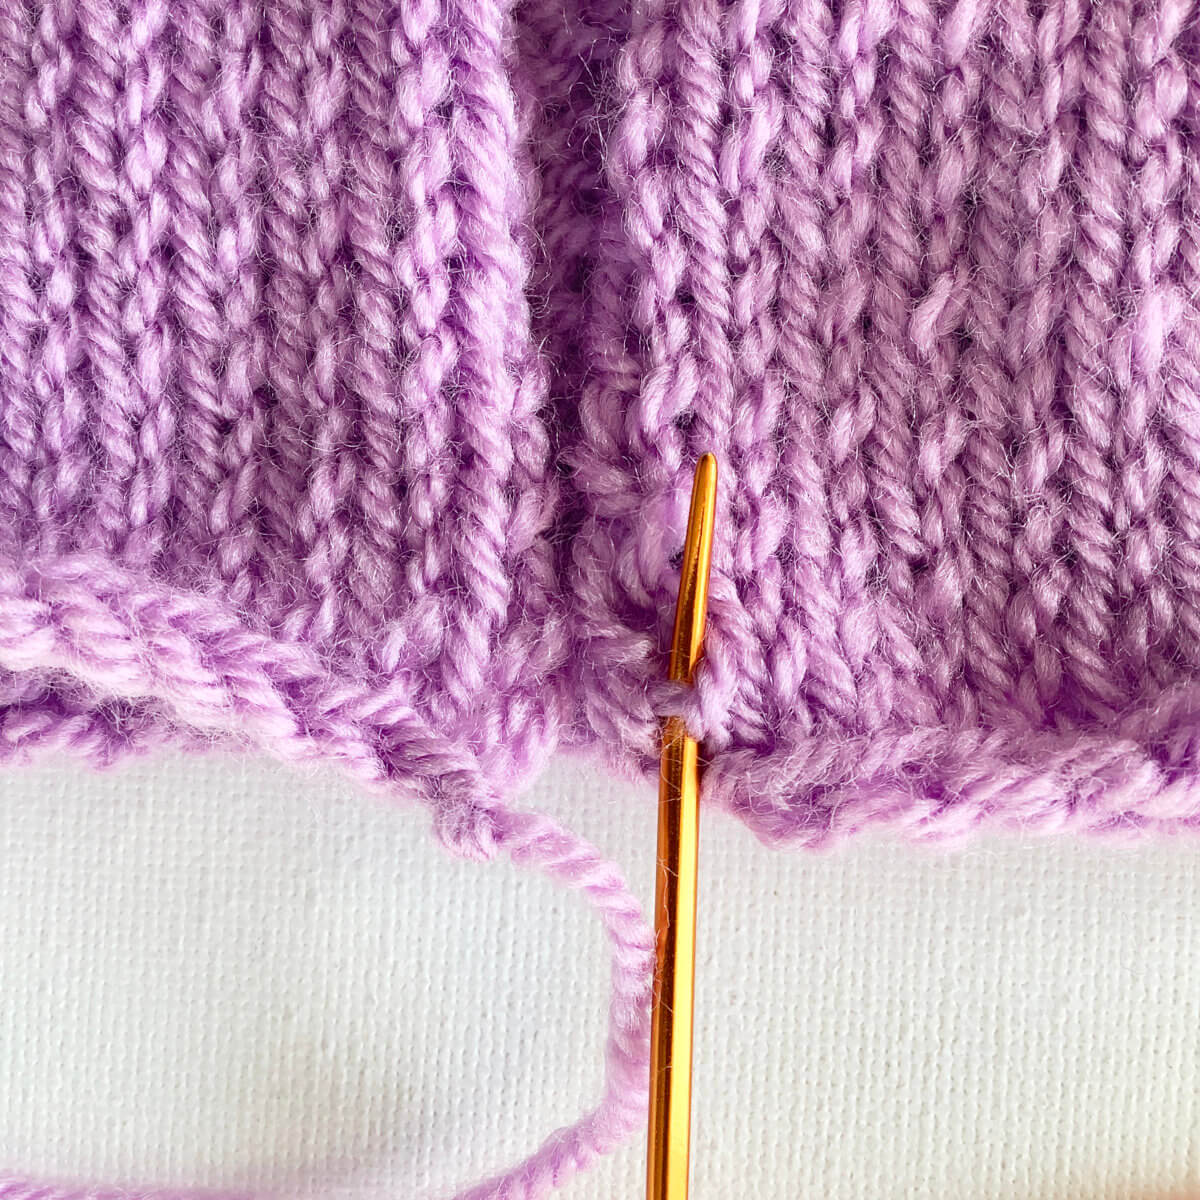
Next, insert the darning needle directly to the left of the first column of stitches on the other piece of fabric. Again, from bottom to top, underneath the thread that runs between the two columns of stitches.
Pull the yarn through.
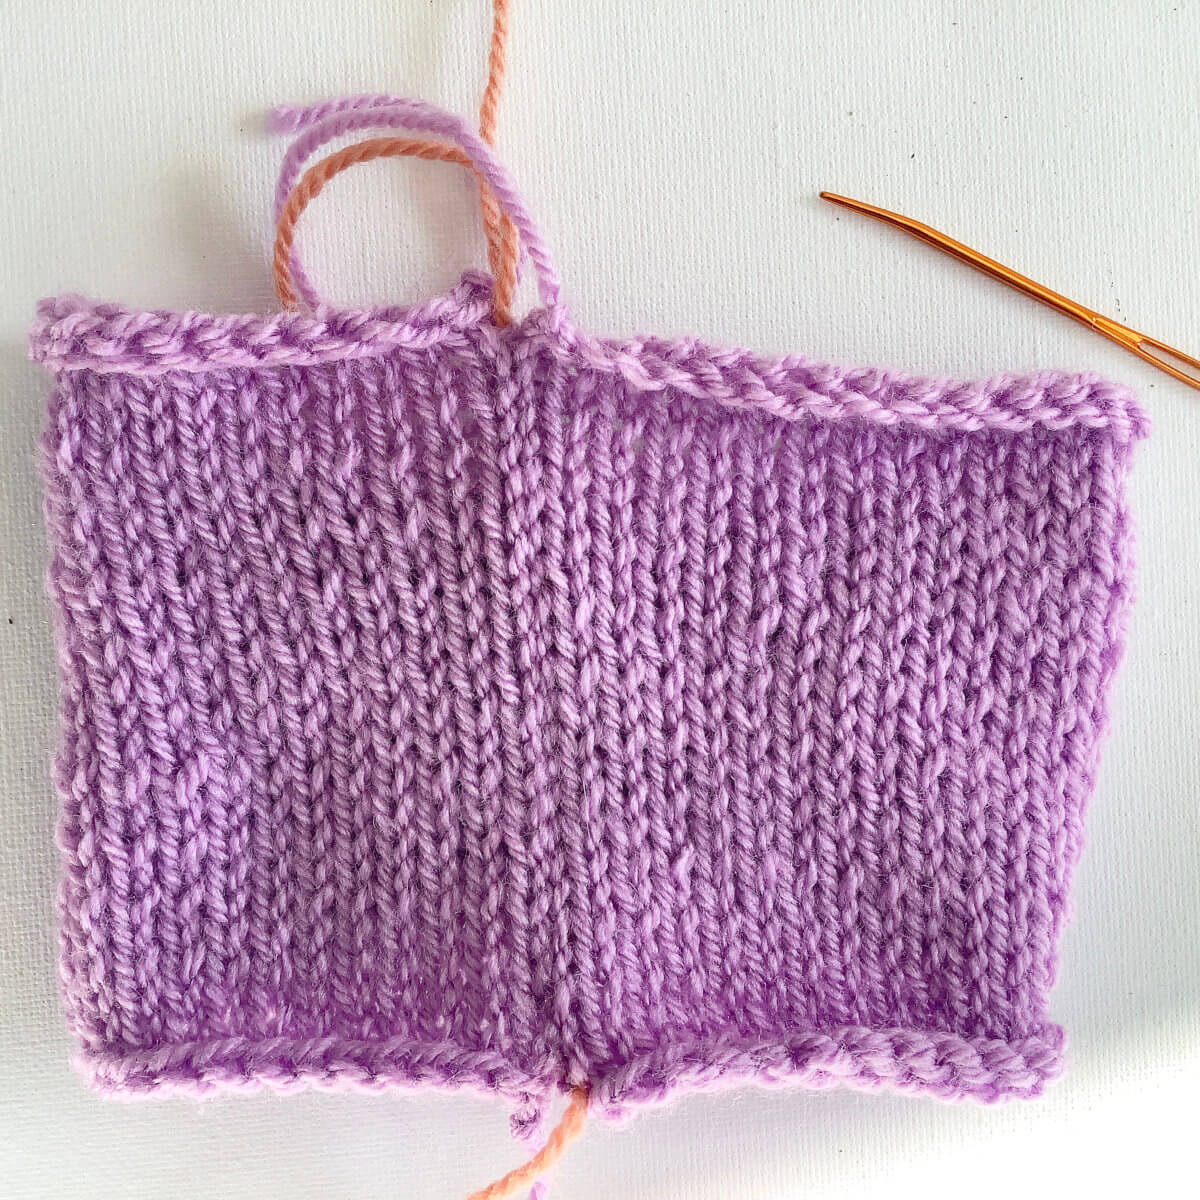
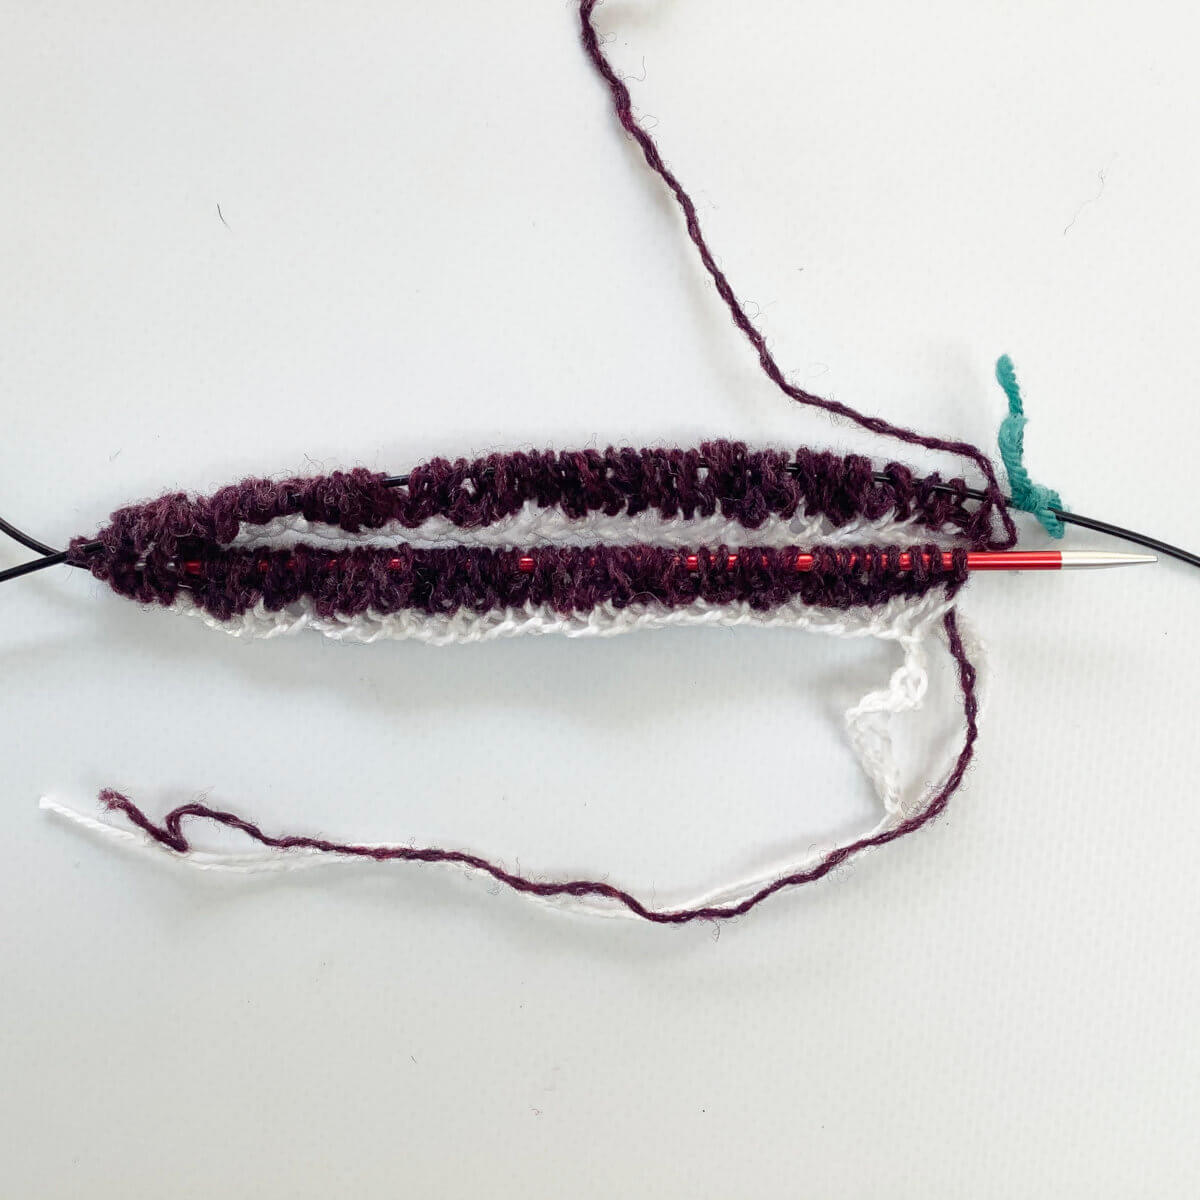
Repeat steps 2 and 3 until you’ve reached the end of the edges to join.
Make sure to pull the yarn to close up the seam every few cm or inches. Take care not to make it too tight, though, or the seam will be less invisible than it could be.
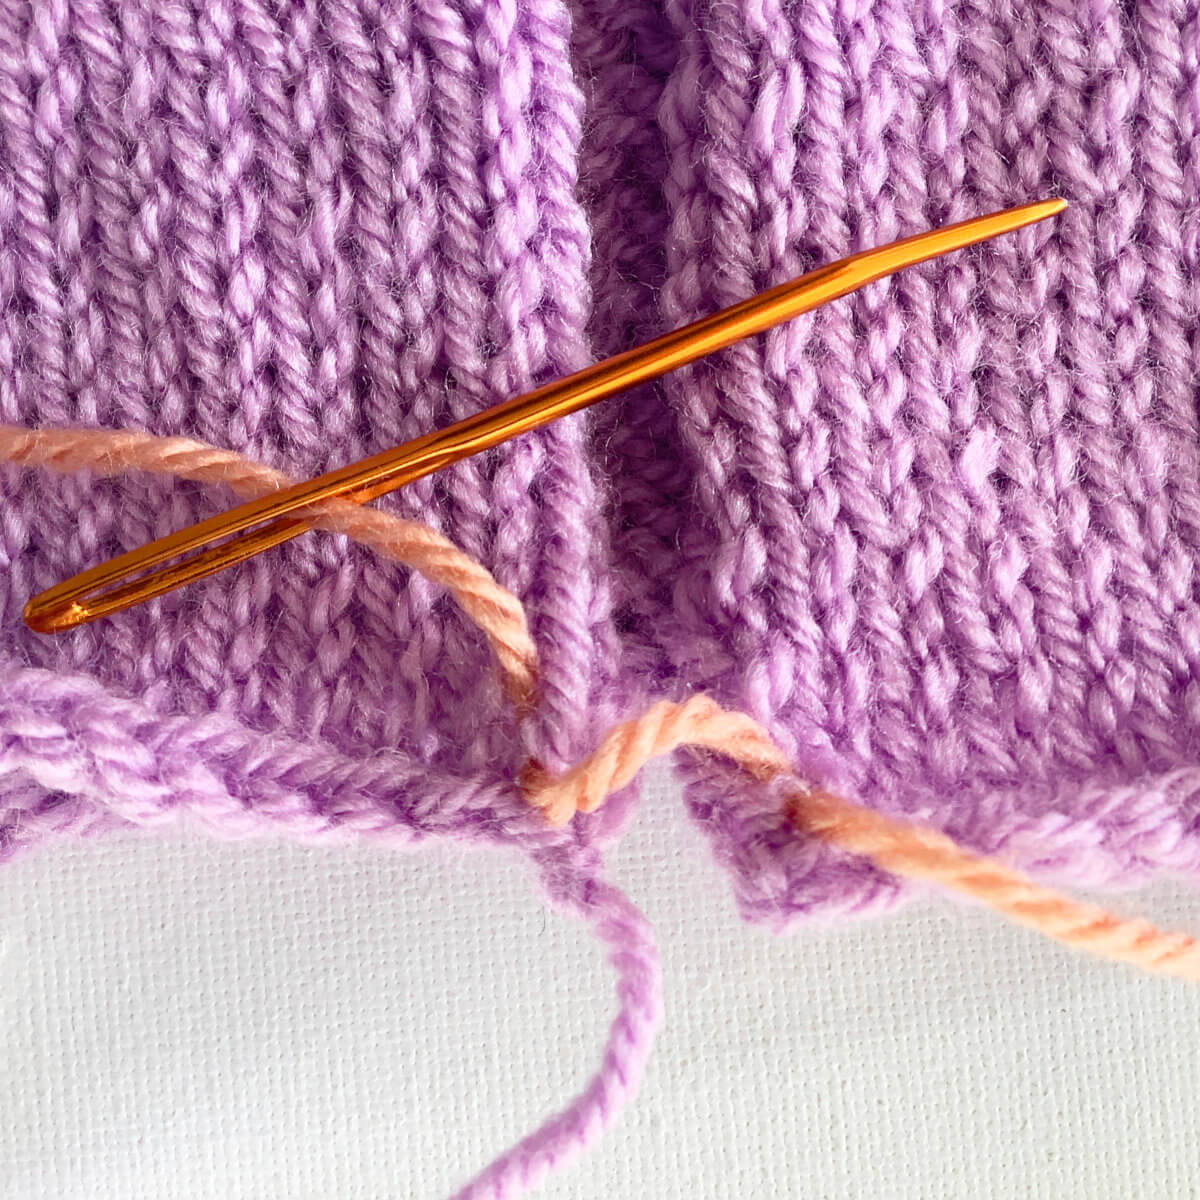
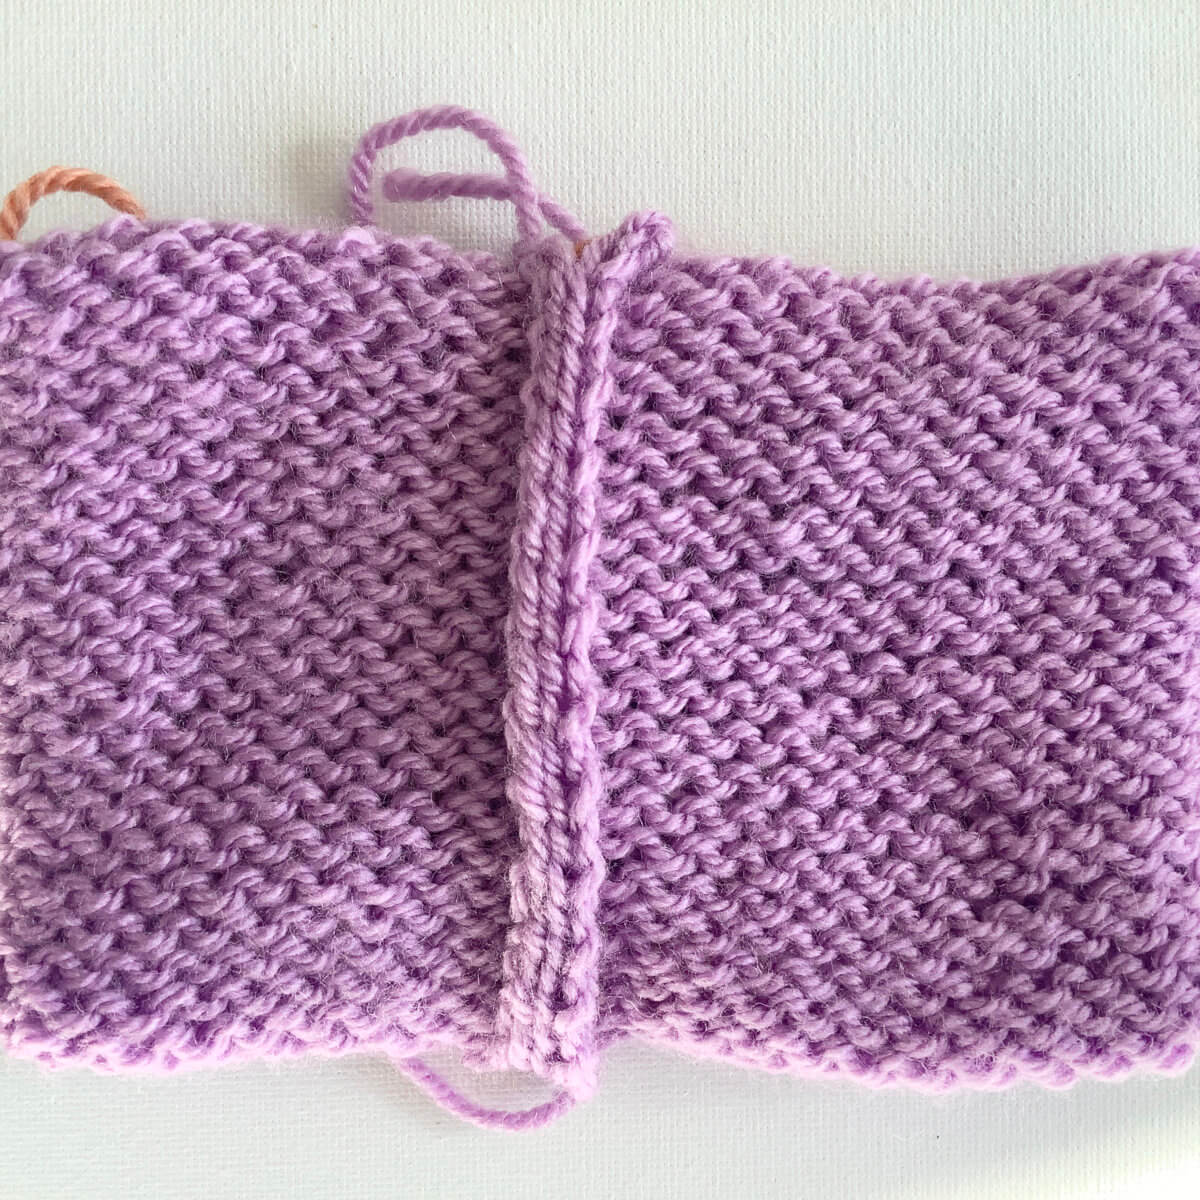
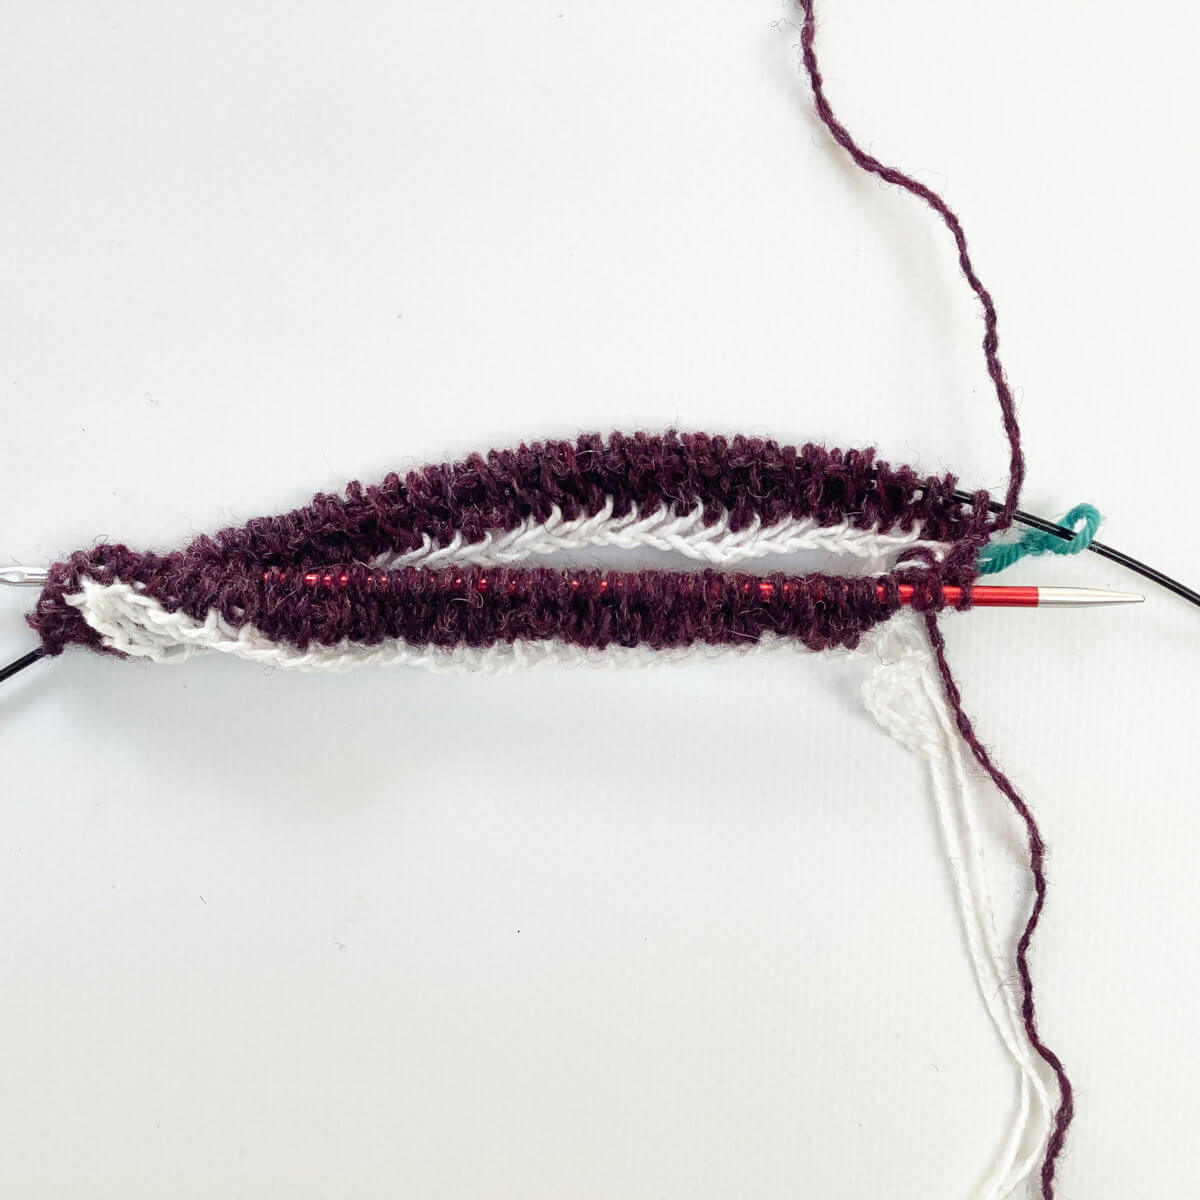
Below, you can see the result of seaming with mattress stitch on the right side of the fabric. Pretty good, right?!
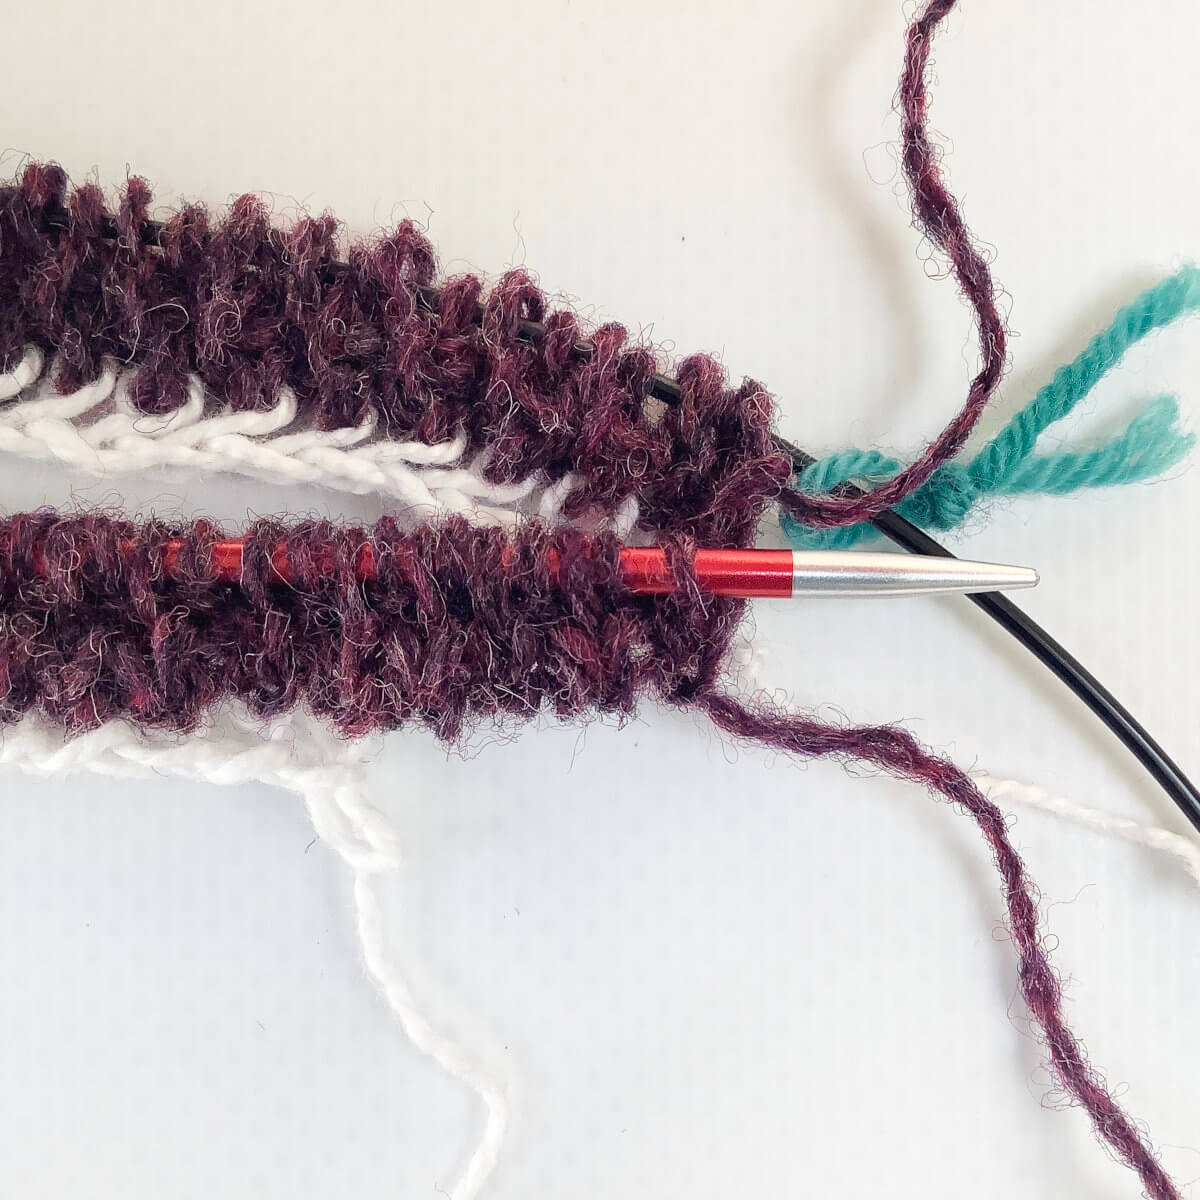
And for completeness’s sake, here also the view from the wrong side of the fabric.
Thanks to my Patreon supporters for bringing you this freebie! Creating quality patterns and tutorials is a lot of work and resource-intensive. However, I find it important to give you free content like this tutorial. Thanks to the generous support of my Patreon supporters, I can make it happen. Thank you, patrons! Click here to join, or click here to read more about La Visch Designs on Patreon.
Lately I’ve been branching out from accessories like shawls to garments. In tees and sweaters for myself, I usually don’t work any shaping in the body. The stretch of knitted fabric is often enough to accommodate my bust. However, for people with a C+ bust, some shaping could be beneficial for optimal fit. As a larger-busted person, you may have experienced that the fabric is very much stretched across the bust. Or perhaps, that with a size selected based on the bust measurement, the garment fits great in the chest area, but is just too big in all other places. None of these options are good if you want something that fits all of you.
In this two-part series on bust shaping, I’ll go into the nitty-gritty details on both vertical and horizontal (short row) bust shaping to help you achieve the perfect fit in your knitted garments for your body. In this part, I’ll focus on vertical bust darts.
What are darts?
In short, darts are a way to add in (or remove) fabric in a specific area, to accommodate the curves of the body underneath. In this tutorial, I focus on bust darts. However, darts could also be used to create more room for a tummy or buttocks, while highlighting the waist.
If we’re talking specifically about vertical darts, we mean the kind of darts that are worked vertically. In other words: adding in or removing stitches to add to or subtract width from the fabric. These can be done working top-down or bottom-up, the approach is exactly the same. That said, my personal preference is to work garments top-down. So, that’s what I’ll use for illustrating the concept in this tutorial.
But first, we have to measure!
Measuring
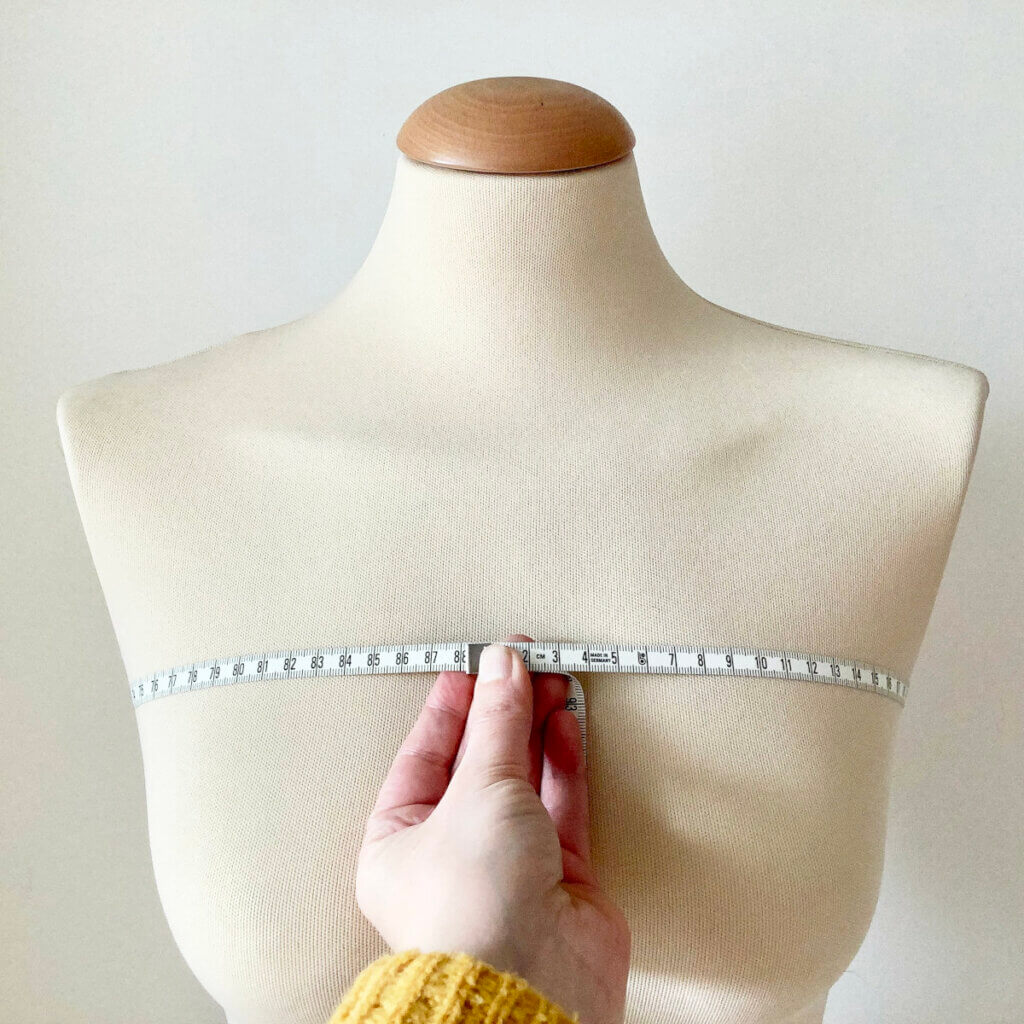
A good rule of thumb is to pick your garment size, based on the upper bust measurement. This way, the garment will be based on your actual torso size, giving a better fit in the shoulders etc. Before we do any measuring, though, make sure you wear a well-fitting bra, because this will influence the resulting measurements.
To find your upper bust measurement: Wrap the tape measure around your chest at the narrowest part above the bust. This is usually just below your arms. Take care to keep the tape measure over your back level with the floor. The picture below shows this on my mannequin.
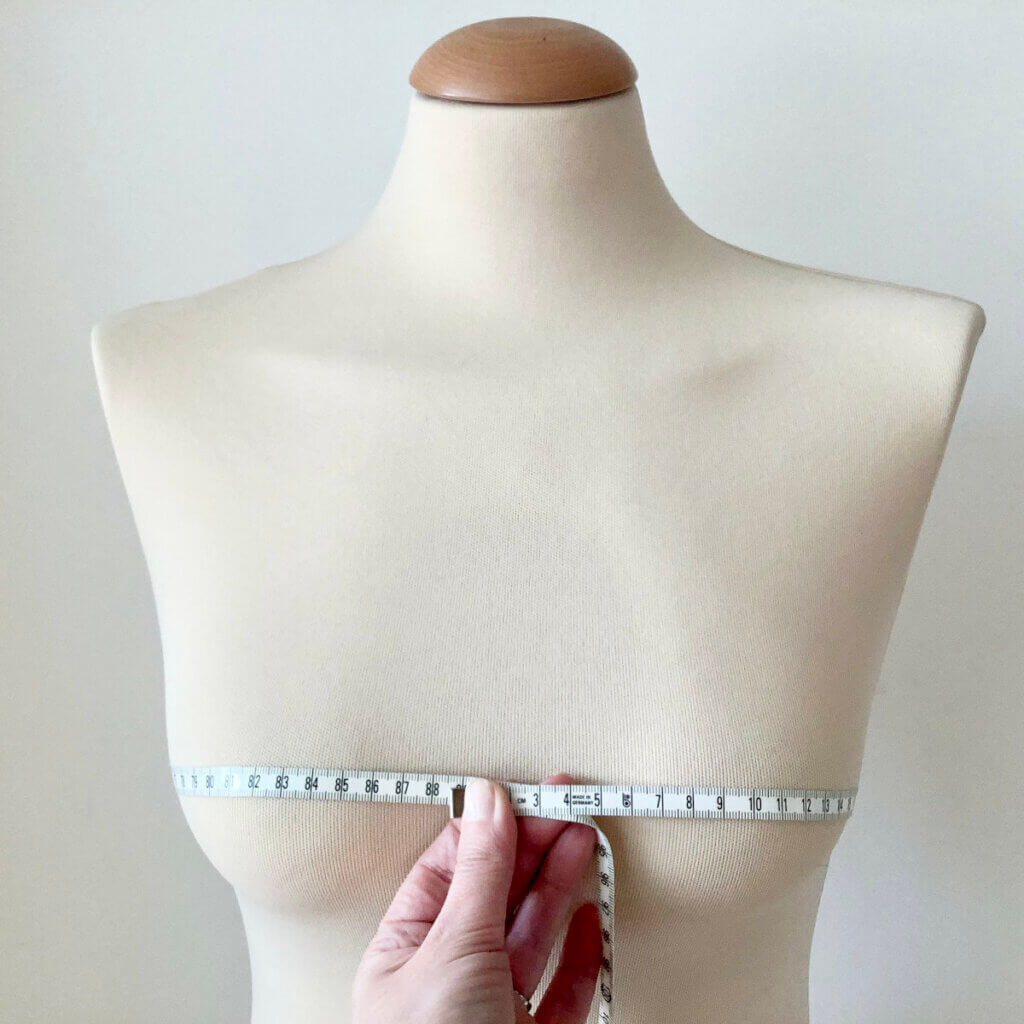
Now, to know how much fabric to add to create sufficient room for the bust, we also need to know the full bust measurement. To find this measurement, wrap the tape measure around the fullest part of your bust, again keeping it level with the floor. This might be tricky to do on your own, so ask for help with this if possible. I’ve made a picture of this on my mannequin again:
Now, on my mannequin there is not much difference between the upper bust and the full bust measurement, only about half a centimeter. But, for people with a C+ bust, the difference can be 2.5-7.5 cm (1-3 inches), or more.
Now we know both the upper bust and full bust measurements, and thus how much to increase the width with. However, we don’t know yet where to reduce the width to after that (following a top-down construction). For this, we need a final measurement taken at the small part of your torso, directly below the bust. Please note, that if your bust sits quite a bit below the under bust, while wearing a well-fitting bra, it would be better to take the waist measurement, or the measurement of a spot between the under bust and waist.
With these 3 measurements, we can almost start doing our calculations. First, though, we have to take a moment to think about ease.
Measurements and ease
Knitted garments always are designed with a certain amount of ease. For a close-fitting, curve-hugging one, there may be negative ease. This means that the fabric has a somewhat smaller measurement than the body or body part it’s meant to fit around. Negative ease is often used for items like hats and socks, because it makes for a better fit when fitting tightly. Positive ease, on the other hand, means the opposite: the fabric has a larger measurement than the body or body part it’s meant for. On my garments, I like approx. 5 cm (2 inches) of positive ease, to make the fabric skim over my curves. When using even more positive ease, like for example about 20 cm (8 inches), the fit will be something like those popular boxy sweaters.
When doing your bust dart calculations, you want to make sure to stay in line with the over-all amount of ease in the garment. A full-bust width, that ends up with negative ease, will look odd if the rest of the sweater has a lot of positive ease. Similarly, a close-fitting body of the sweater will look strange if the upper to full-bust part is so loose that’s a tad baggy.
Vertical bust dart placement
As with all knitting, there are 2 dimensions to consider for optimal placement: the vertical and the horizontal one. The latter is the easiest to determine, because it for a large part depends on preference. The rule of thumb for the horizontal placement of the bust dart, is that it should fall somewhere between the side seam and the full bust points (“nipples”). Usually about 1/4 to 1/3 of the way in on the front, measured from the side seam, gives a good result. When you need multiple darts on each side, make sure to place them somewhere between the side seam and the full bust points.
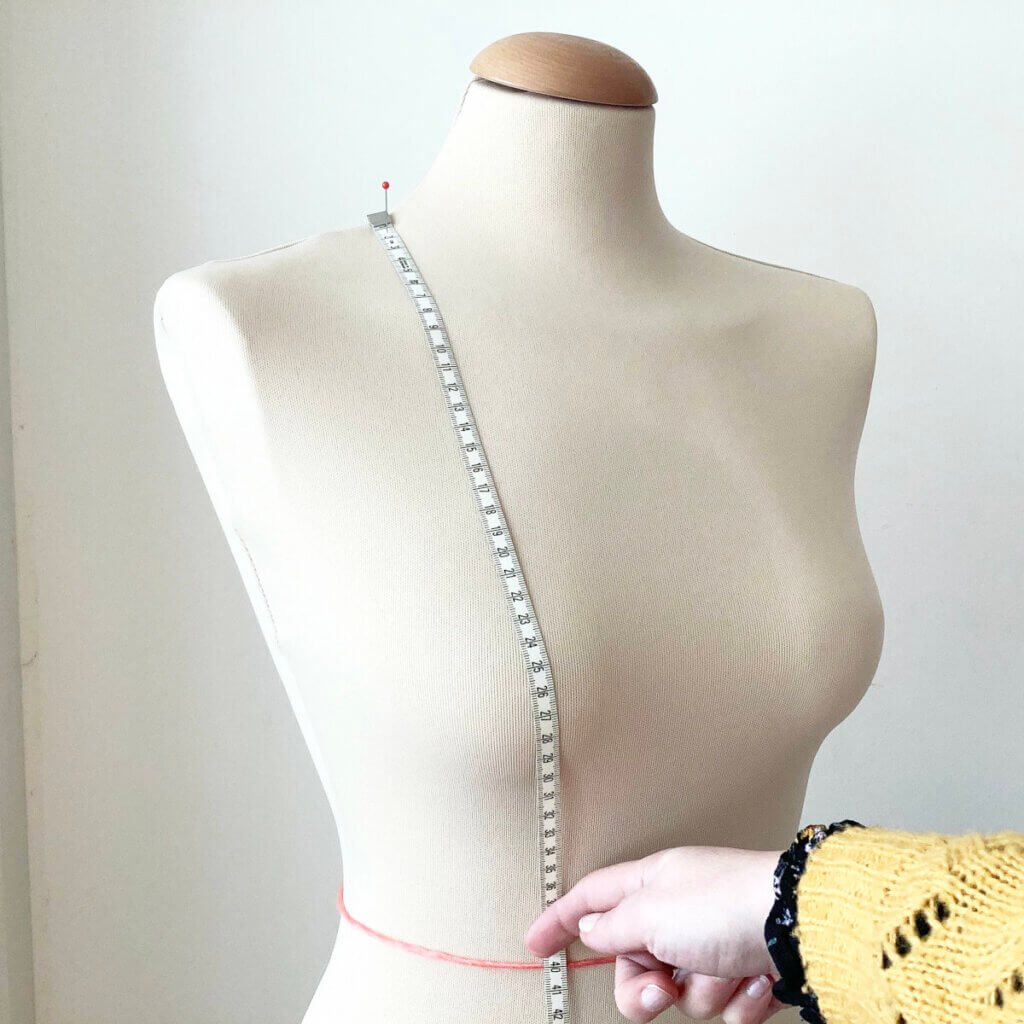
For the vertical dimension – when to start the dart – we really have to take a good look at your personal measurements as well as your gauge. You want to have the correct number of stitches for your full bust measurement + ease, just before you arrive at the bust apex. But everyone’s full bust hits at a different vertical point, as is the case for the sweater’s sleeve separation. So I really can’t give you pointers in the sense of starting x cm or inches below sleeve separation. What does give a good indication, is to measure from the shoulder seam to the upper bust, and onwards to your full bust. These measurements form a good guideline for when you need to have reached the full bust width, as well as the vertical distance between upper bust and full bust.
Vertical bust dart worksheet
To plan out the bust darts, we will need to do a few calculations, based on the measurements we’ve taken and the gauge of our knitting. First for increasing the stitches to the full bust measurement, and then to decrease again to the chosen below-bust measurement (under bust, waist or some measurement of choice in between, depending on your personal build).
Increasing to the full bust measurement
A: Upper bust measurement: _____ This will guide your choice of the size of garment to make, according to pattern measurements, i.e. size 95 cm or 38 inches. Don’t forget to take the recommended ease into account!
B: Your actual bust measurement at fullest point: ____ (i.e. 100 cm or 40 inches)
C: Difference between A and B: ____ (i.e. 5 cm or 2 inches)
D: C times the number of stitches per 2.5 cm or per inch in your gauge: _____. This is the total number of stitches to add in width. Round up to the nearest even number if needed.
E: Divide D by 2 to get the number of stitches to add to each side of the garment: ____
F: The vertical distance from shoulder seam to full bust: ____ (i.e. 27.5 cm or 11 inches)
G: The vertical distance from shoulder seam to upper bust: ____ (i.e. 22.5 cm or 9 inches)
H: Difference between F and G: ____ (i.e. 5 cm or 2 inches)
I: H times the number of rounds per 2.5 cm or per inch in your gauge: _____
An example:
Say A is 90 cm, so I choose to make the 95 cm pattern size. The actual bust measurement at fullest point is 97.5 cm, taking some positive ease into account, my B is 100 cm. This means the difference (C) is 100 – 95 = 5 cm. With a gauge of 20 sts / 10 cm (4 inches) or 5 sts per 2.5 cm (1 inch) I arrive at 10 sts to add in width. This means I will add 5 sts to each side.
If the vertical distance from shoulder seam to full bust (F) is 30 cm (12 inches), and the G measurement is 22.5 cm (9 inches), then the difference is 7.5 cm or 3 inches. With a vertical gauge of 24 rounds / 10 cm (4 inches) or 6 rounds per 2.5 cm (1 inch) this means I have approx. 18 rounds to work the dart increases in (I). Depending on how many extra stitches you need, you can choose to do them every other round or every round. If there are more increases to work than there are rounds to put them in, you can also work a second set of darts on each side.
With working increases every other round, I need 10 rounds, and I want to be at full width a tad before the bust apex. So, say 2 rounds before that. In other words: I want to start my dart 12 rounds before the apex. This equals 5 cm (2 inches). When subtracting this from F, you get the measurement from the shoulder seams where the dart should be started. In this case, that’s 25 cm or 10 inches from the shoulder seam line.
When I reach the point I should start my darts, I place stitch markers to indicate where I want to place the dart line. After that, the increase round instruction will be something like this: K to dart marker, m1, SM, k across bust to next dart M, SM, m1, k to end of round.
When you’ve reached the desired width, it’s time to work even for about 2.5-7,5 cm (1-3 inches) before reducing the number of stitches again. The larger the bust, the longer you’d want to work even before reducing the number of stitches. If you also want to use horizontal (short row) bust darts to add length to the front of the garment and avoid having it ride up, this is the spot to add them! Otherwise, continue with the next section.
Decreasing to the below bust measurement
J: Under bust measurement : _____
K: Difference between J and B: ____ (i.e. 5 cm or 2 inches)
L: K times the number of stitches per 2.5 cm or per inch in your gauge: _____. This is the total number of stitches to reduce in width. Round up to the nearest even number if needed.
M: Divide L by 2 to get the number of stitches to add to each side of the garment: ____
My under bust measurement is the same as my upper bust measurement. Taking ease into account, my J is 5 cm (2 inches). With a gauge of 20 sts / 10 cm (4 inches) or 5 sts per 2.5 cm (1 inch) I arrive at 10 sts to reduce in width. This means 5 sts are to be decreased on each side, with 2 decreases in each round. The decrease round instruction will be something like this: K to 2 sts before dart marker, k2tog, SM, k across bust to next dart M, SM, skp, k to end of round.
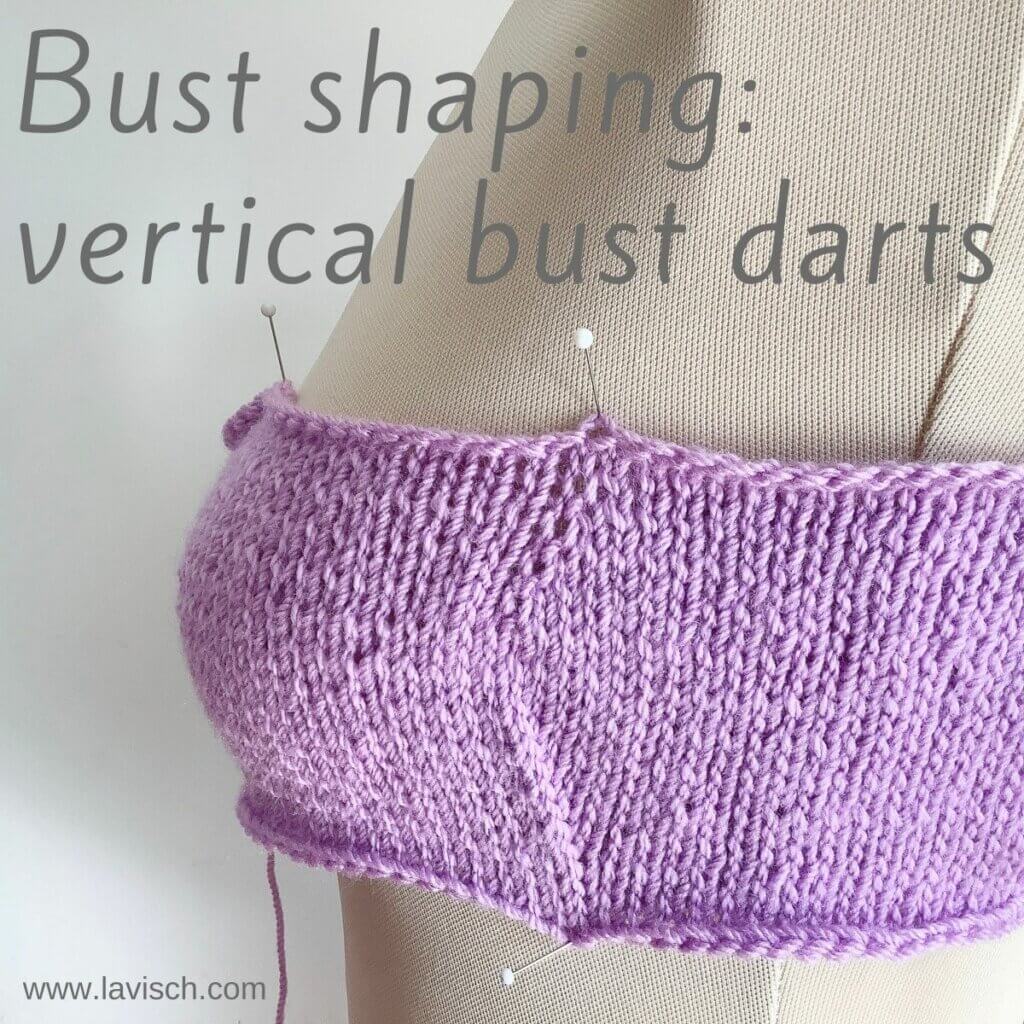
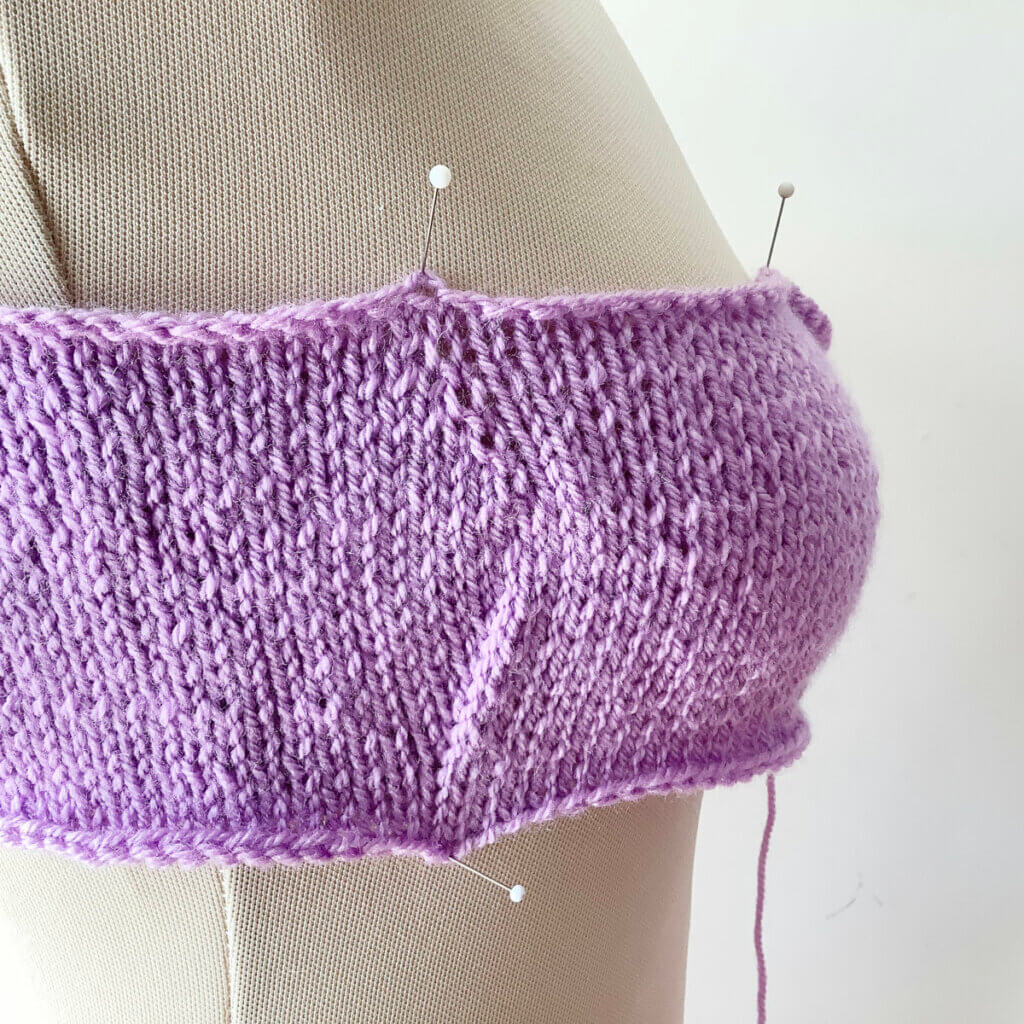
In the below image, you can see an example of a vertical bust dart worked as described above. Of course, it’s not the only way one can customize a garment to their curves. I do trust this method will be useful for you. You can also add length to a garment using horizontal (short-row) bust darts to prevent the front of the garment from riding up. Read about it in the second part of the series!
Thanks to my Patreon supporters for bringing you this freebie! Creating quality patterns and tutorials is a lot of work and resource-intensive. However, I find it important to give you free content like this tutorial. Thanks to the generous support of my Patreon supporters, I can make it happen. Thank you, patrons! Click here to join, or click here to read more about La Visch Designs on Patreon.
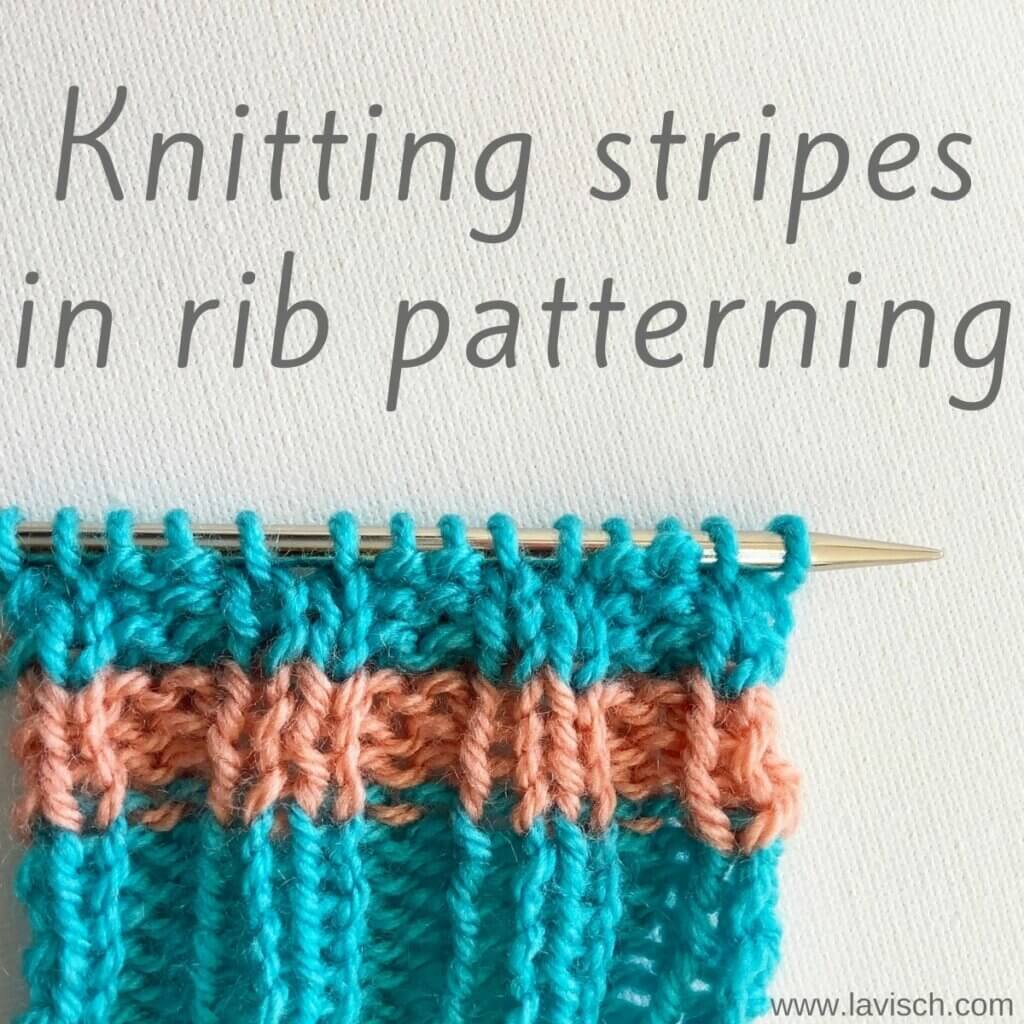
Adding stripes is an easy way to make a project more interesting, without having to work complex patterning. But what if you’re changing colors when already working in some sort of knit-purl patterning, like the 2×2 rib pictured above? When changing the colors, you will see purl bumps in the old color showing through. Personally, I don’t like how it looks, it makes the color change look less sharp than it could. Fortunately, there is an easy solution!
Materials used
Yarn: Paintbox Yarns Simply DK, a good value, good quality 100% acrylic yarn, here in the colors Marine Blue, and Vintage Pink.
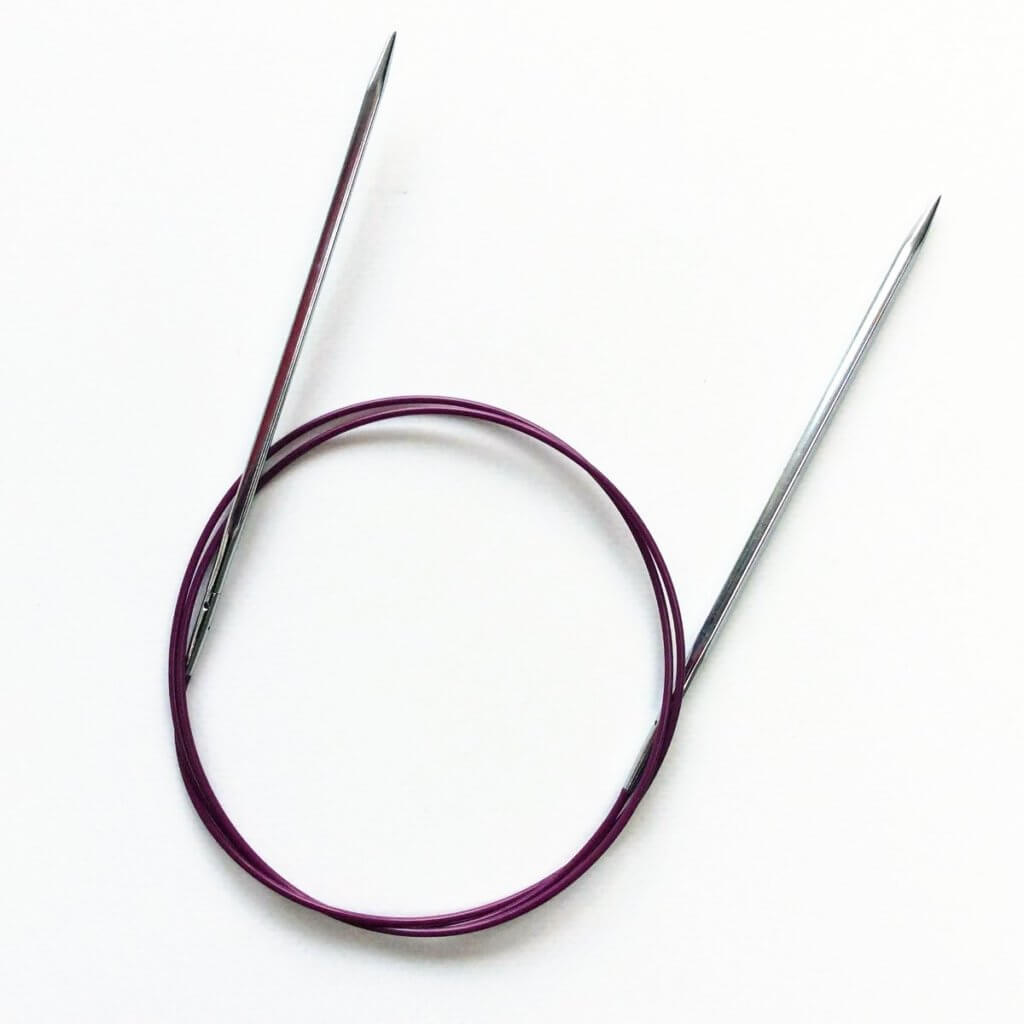
Needles: A random circular needle in the 4 mm (US 6) size, with a cable length of 80 cm (32 inches).
Preventing purl bumps when knitting stripes in rib patterning
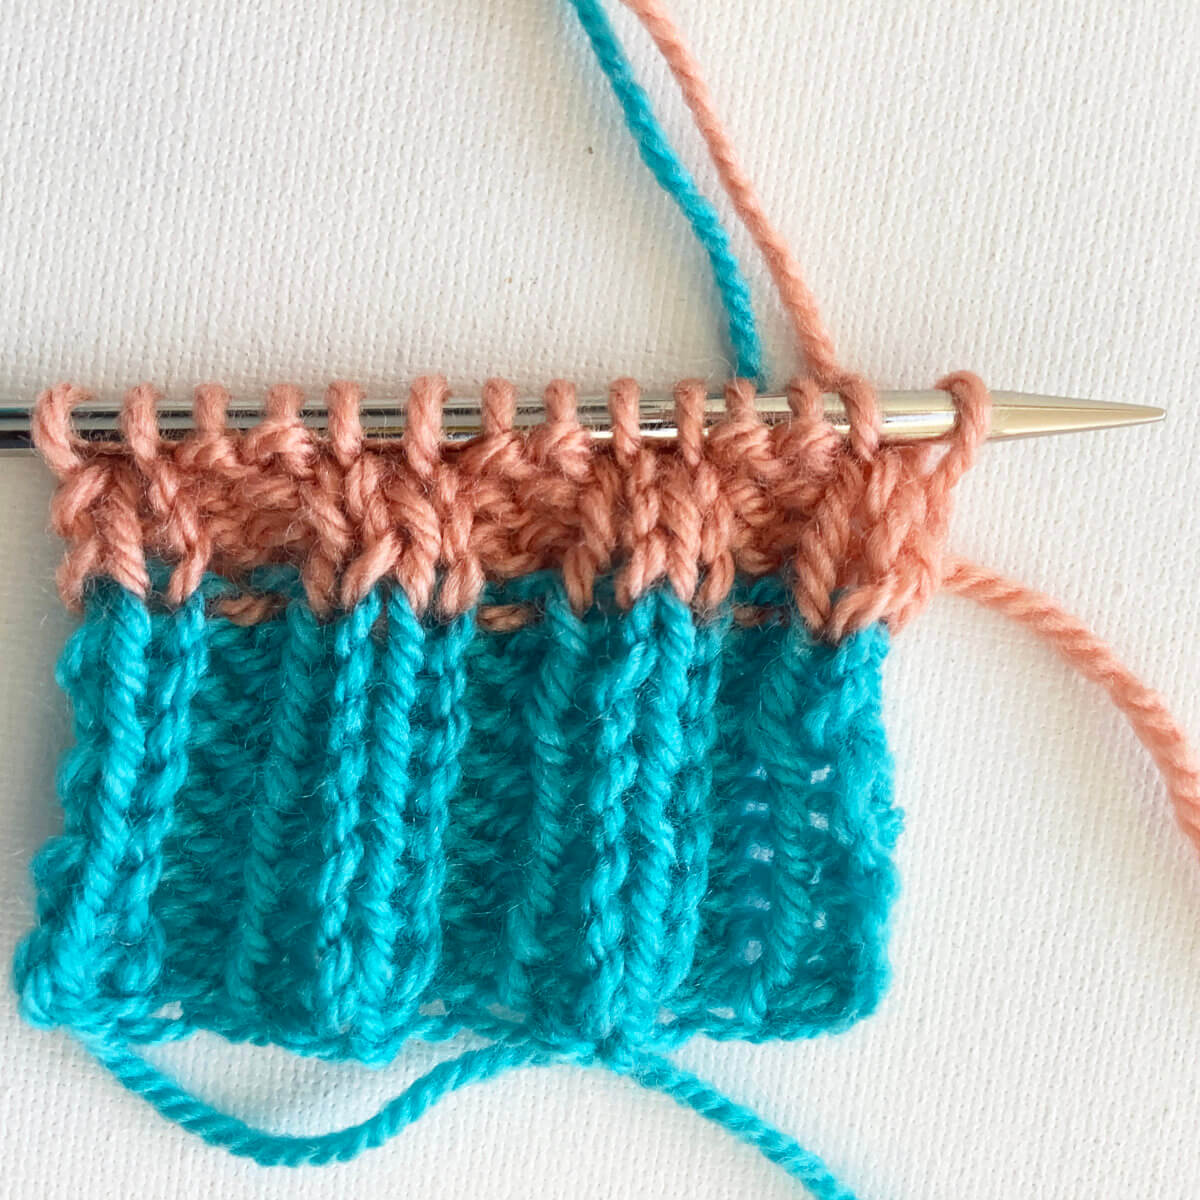
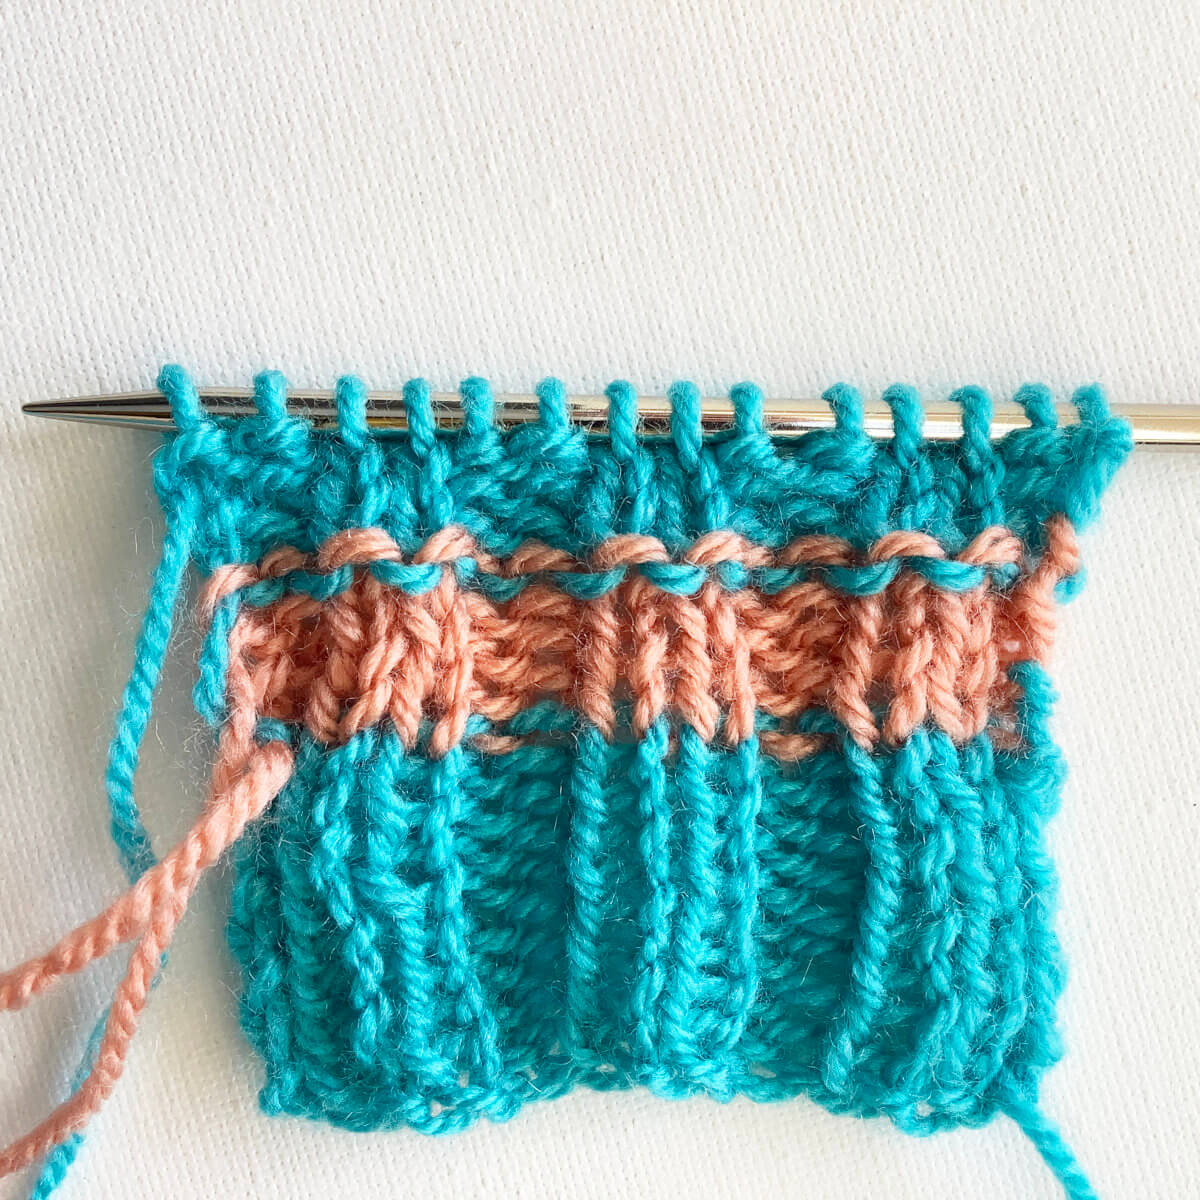
In the picture below, you can clearly see the purl bumps of the Marine Blue yarn peeking through, above the Vintage Pink.
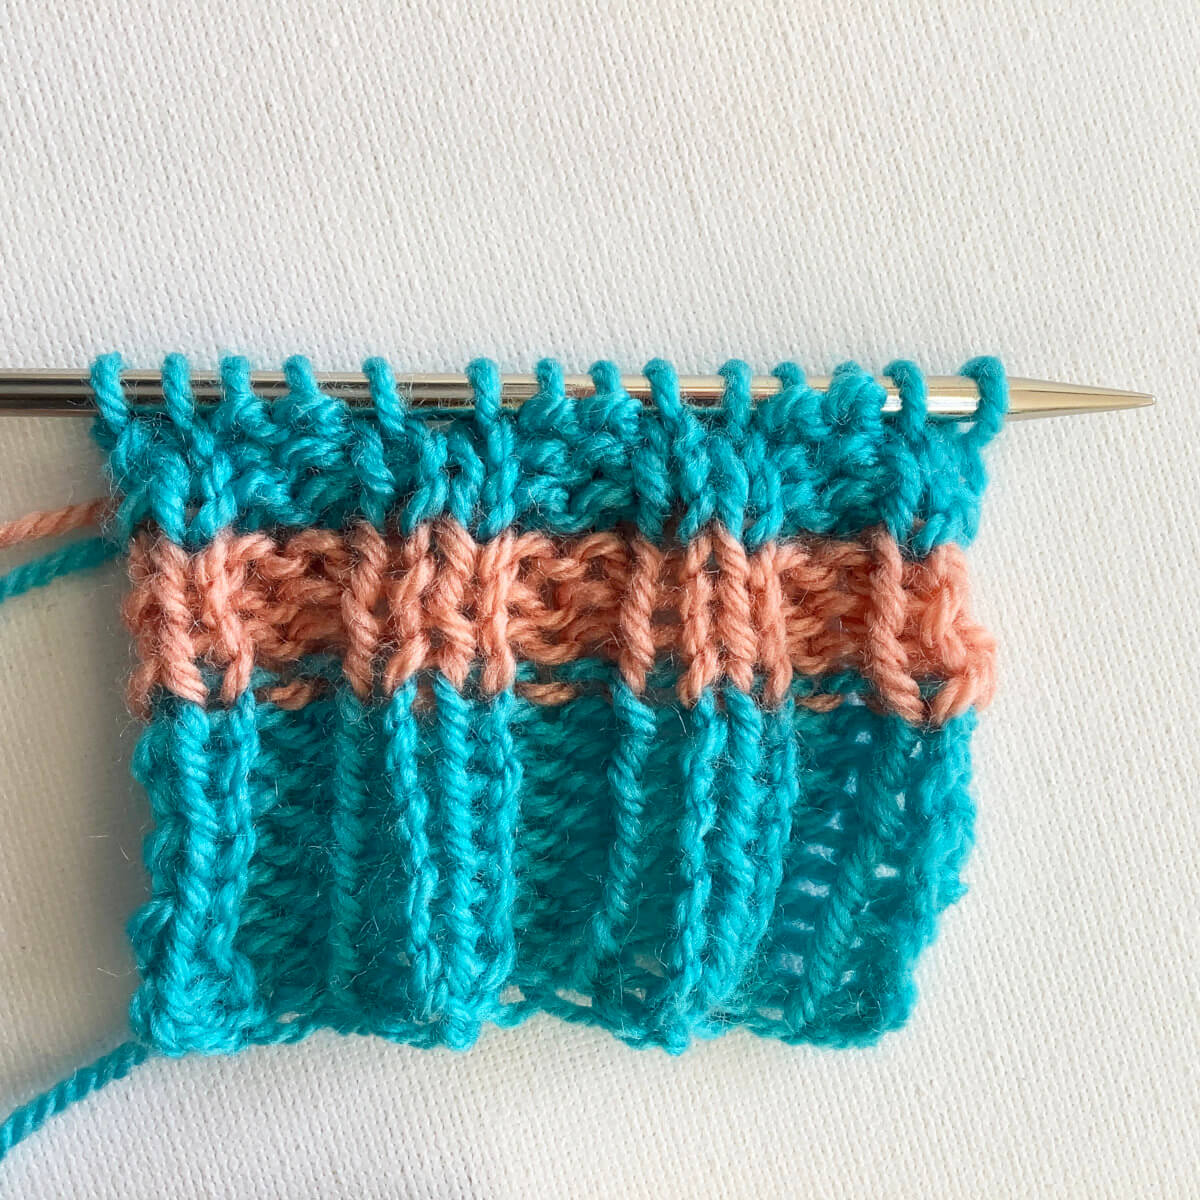
To remove those pesky purl bumps, simply knit the entire first row or round in the new color!
For all rows or rounds following the color change, just resume the patterning as before. Do you see the difference in the picture below?
To be complete, I’ll also show you the wrong side of this piece:
Thanks to my Patreon supporters for bringing you this freebie! Creating quality patterns and tutorials is a lot of work and resource-intensive. However, I find it important to give you free content like this tutorial. Thanks to the generous support of my Patreon supporters, I can make it happen. Thank you, patrons! Click here to join, or click here to read more about La Visch Designs on Patreon.
The tubular bind-off creates a rounded edge of your knitting project, as well as being very stretchy. This makes it a very good bind-off for edges that are prone to wear and tear. And, of course, where the stretch is useful. Think, for example, of bottom-up socks. That said, this bind-off is very time-consuming to work, very much worth it in my opinion, though!
Of course, there are many ways to work a tubular bind-off. This particular version is for working in k1, p1 rib patterning. It can be used both in the round and for knits worked flat, and is a perfect match for the tubular cast on I did a tutorial about recently.
Materials used
Yarn: Paintbox Yarns Simply DK, a good value, good quality 100% acrylic yarn, here in the color 142 Tea Rose.
Darning needle: Hiya Hiya Darn It Yarn Needle, or any other tapestry needle, threaded with yarn.
Working a tubular bind-off for 1×1 rib step by step
Before we can start, we have to measure out a length of the working yarn, before breaking it. For this, a length of approx. 3 to 4 times the length of the edge that you want to bind-off is advised. However, if you want to bind-off a long edge like the body of a sweater, this means that the length of yarn can get very unyielding and prone to tangling. So when using a feltable yarn, I highly recommend only measuring out about twice the length needed. When the yarn tail runs out, a new length can be added by first using the braided join, followed by felting the join between your hands. This would have saved me quite aggravation on a recent sweater project!
When you have measured out the length of yarn, break it, and thread it onto the darning needle.
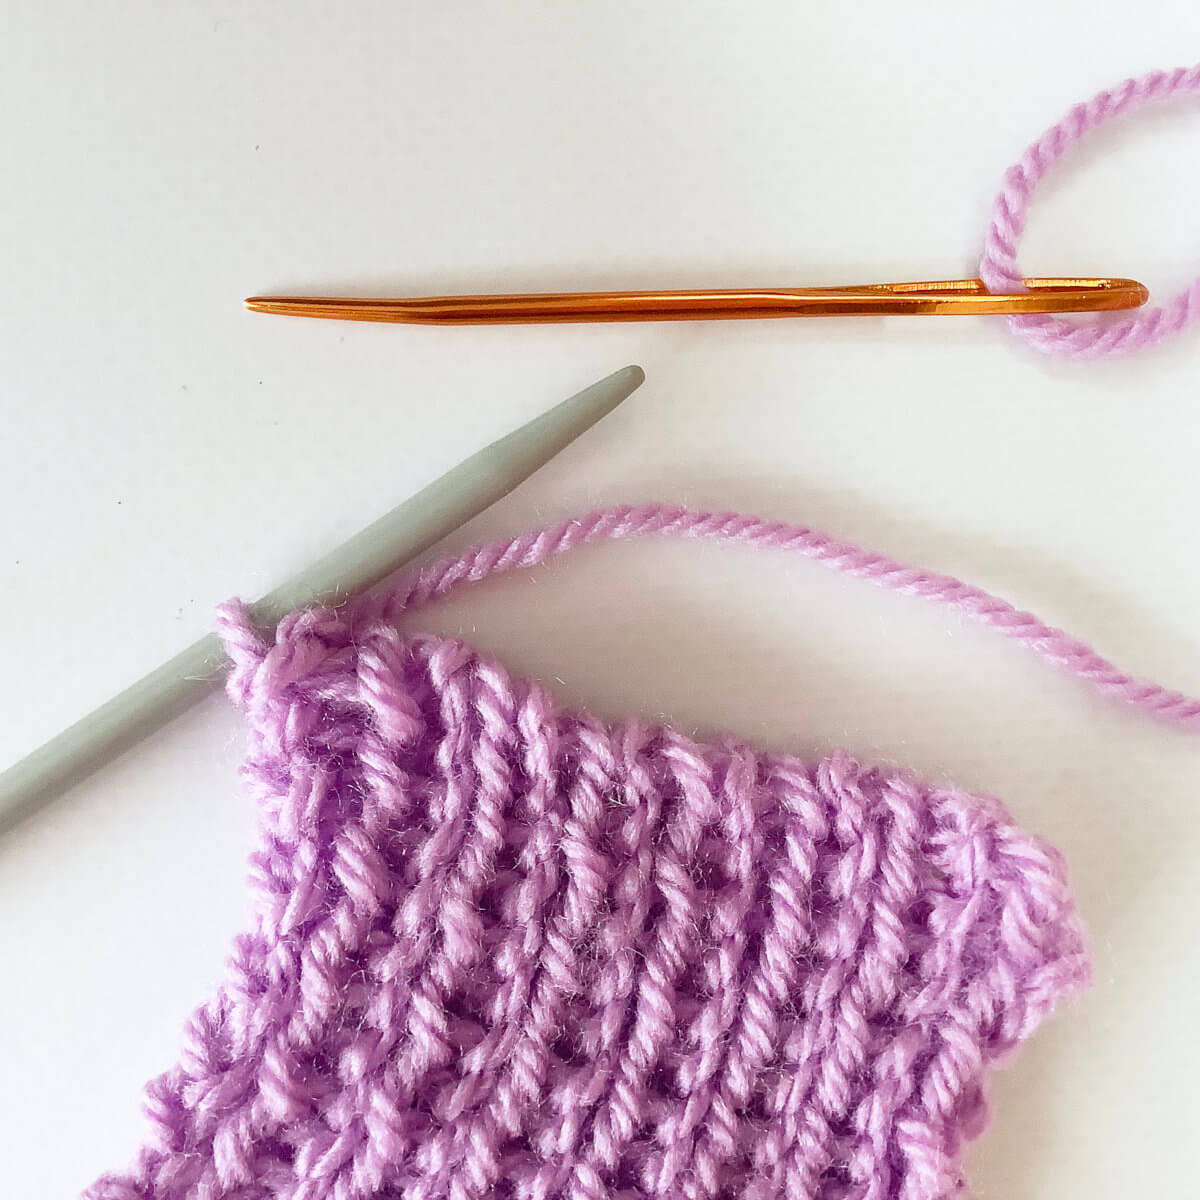
First, make sure you have your work in front of you on the left-hand needle, ready to work.
We’ll be working on binding the stitches off from right to left.
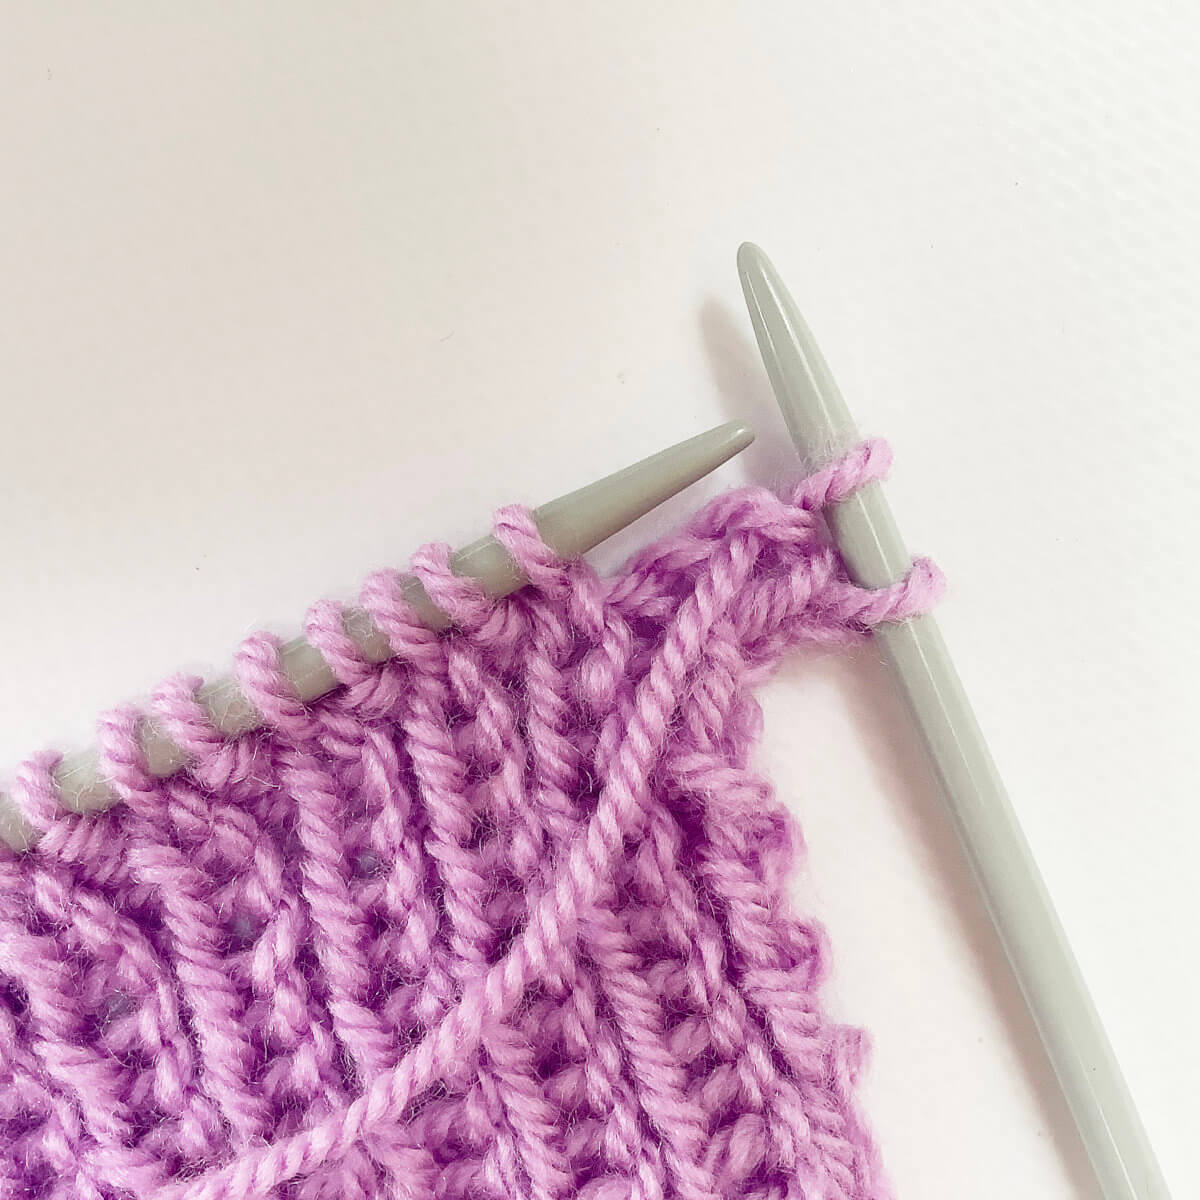
To start, insert the darning needle purl-wise into the first stitch on the needle, and pull the yarn through.
This first stitch is a knit stitch.
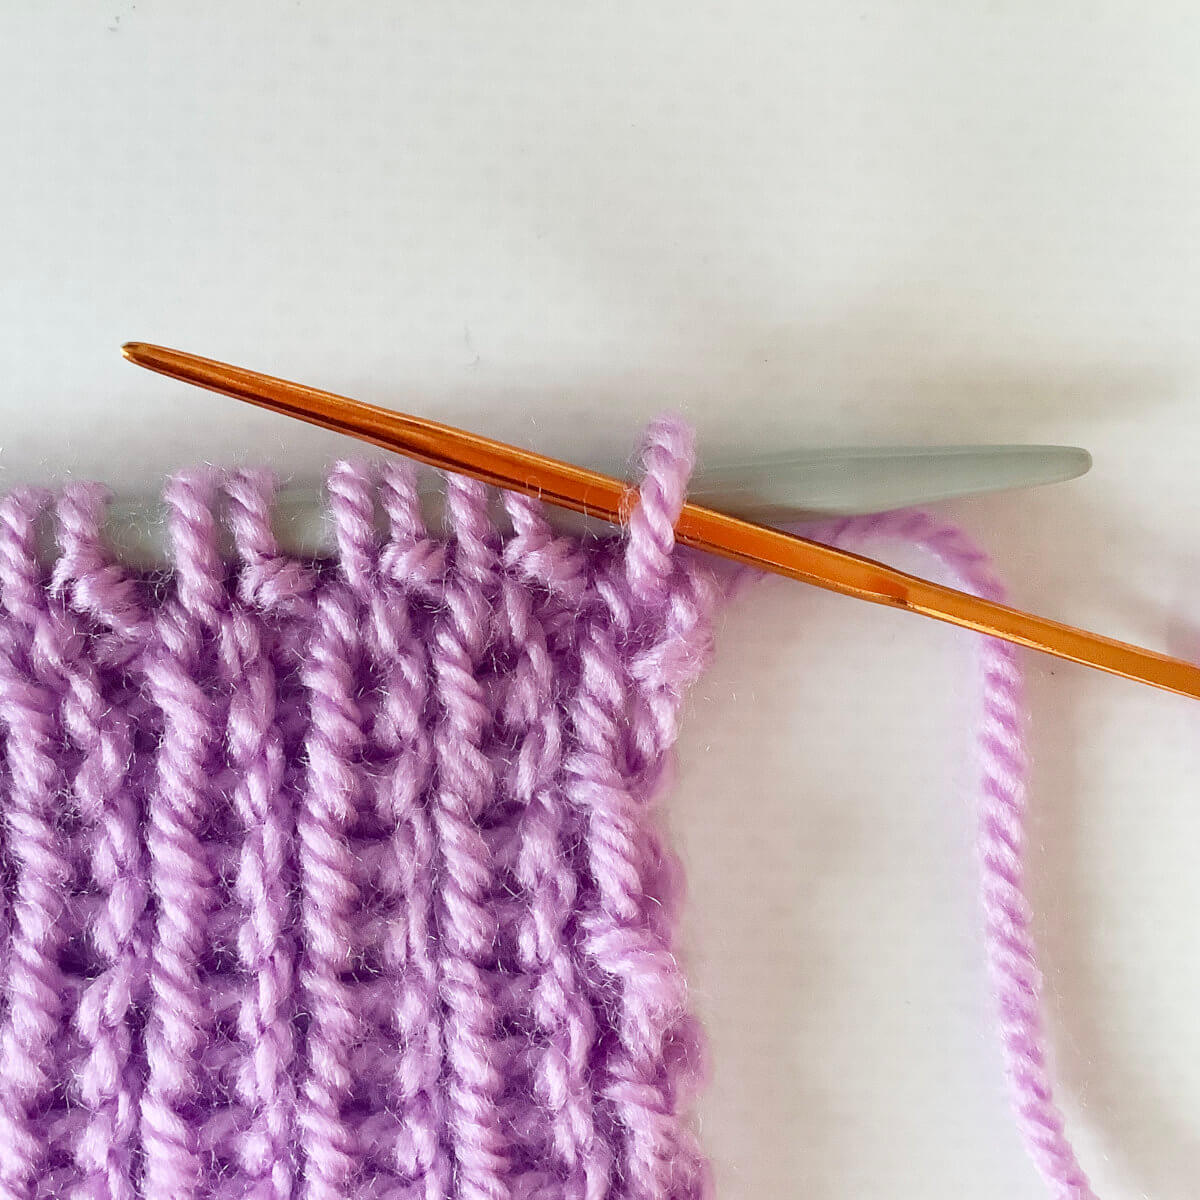
Next, hold the darning needle behind the work, insert it between the first 2 stitches on the needle from back to front, then twist it around to insert it knit-wise into the second stitch (purl stitch) on the needle.
Pull the yarn through.
Now move the darning needle back to the front of the work, insert it knit-wise in the first stitch on the needle (a knit stitch) and slip this stitch off the knitting needle.
Don’t pull the yarn through yet!
Still with the darning needle at the front of the work, insert it purl-wise into the second stitch on the needle (a knit stitch), skipping the first (purl) stitch.
Now pull the yarn through.
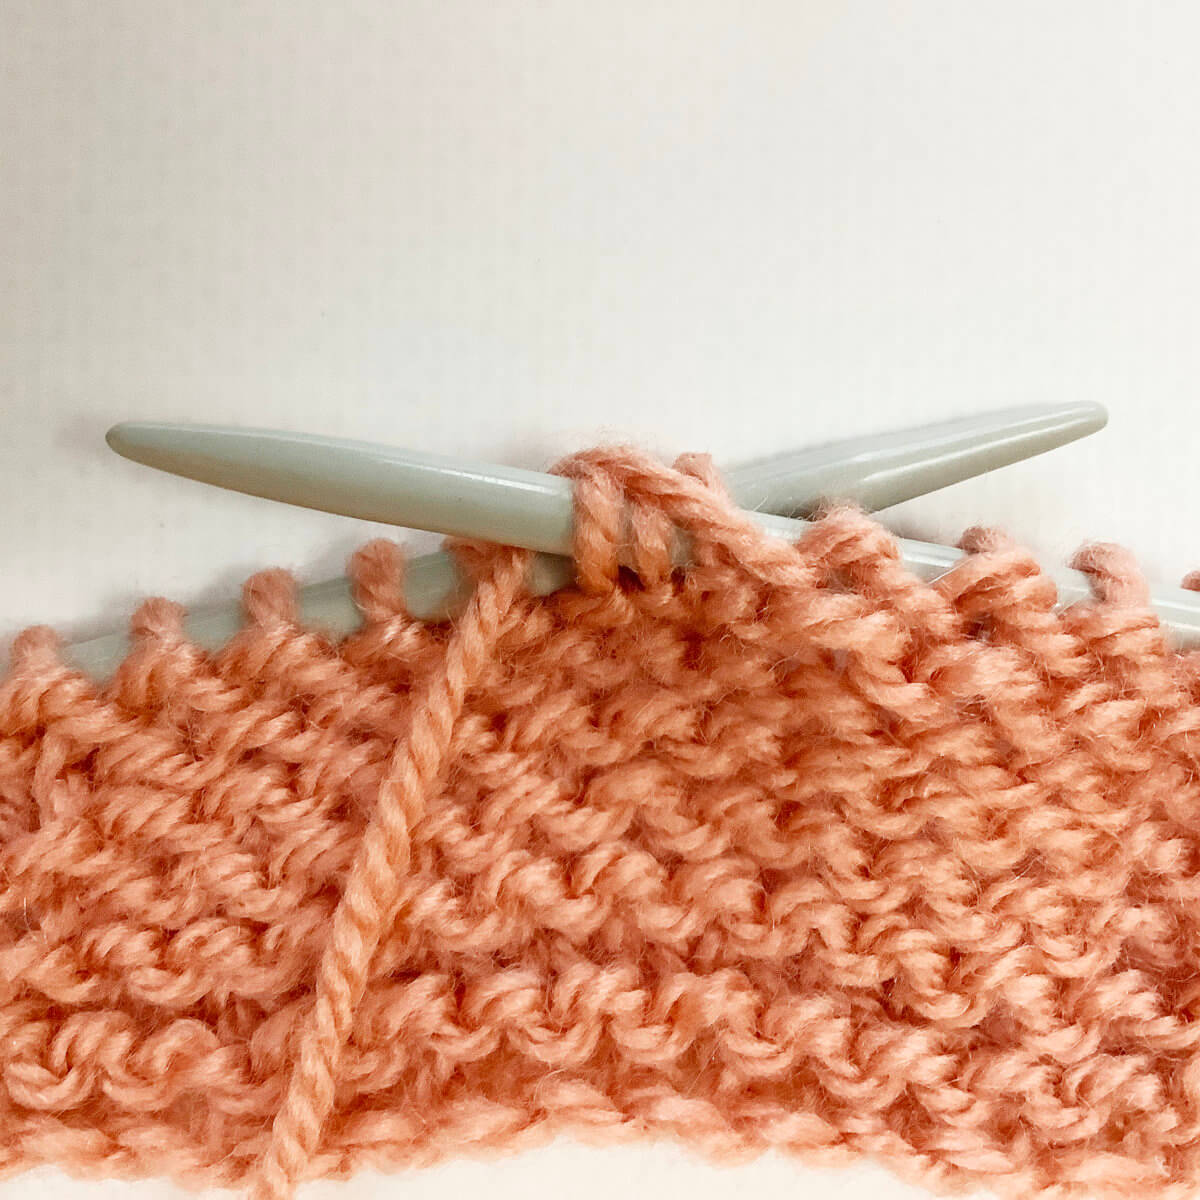
Next, insert the darning needle purl-wise into the first stitch (the purl stitch that was skipped in the previous step), and slip it off the knitting needle.
Pull the yarn through.
Next, hold the darning needle behind the work, insert it between the first 2 stitches on the needle from back to front, then twist it around to insert it knit-wise into the second stitch (purl stitch) on the needle. This is similar to step 3.
Pull the yarn through.
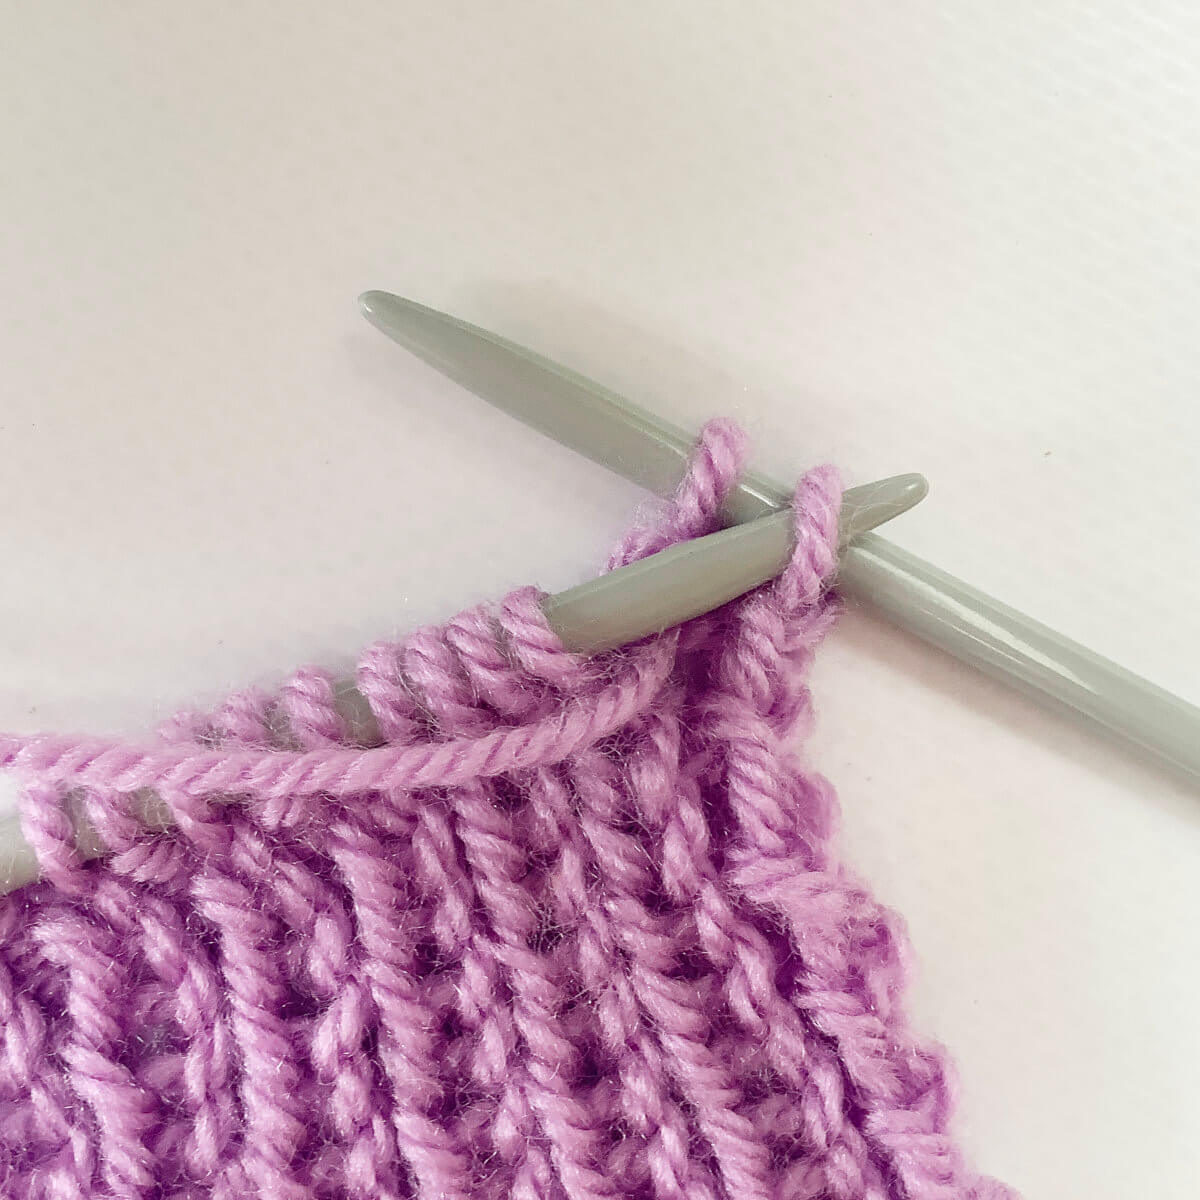
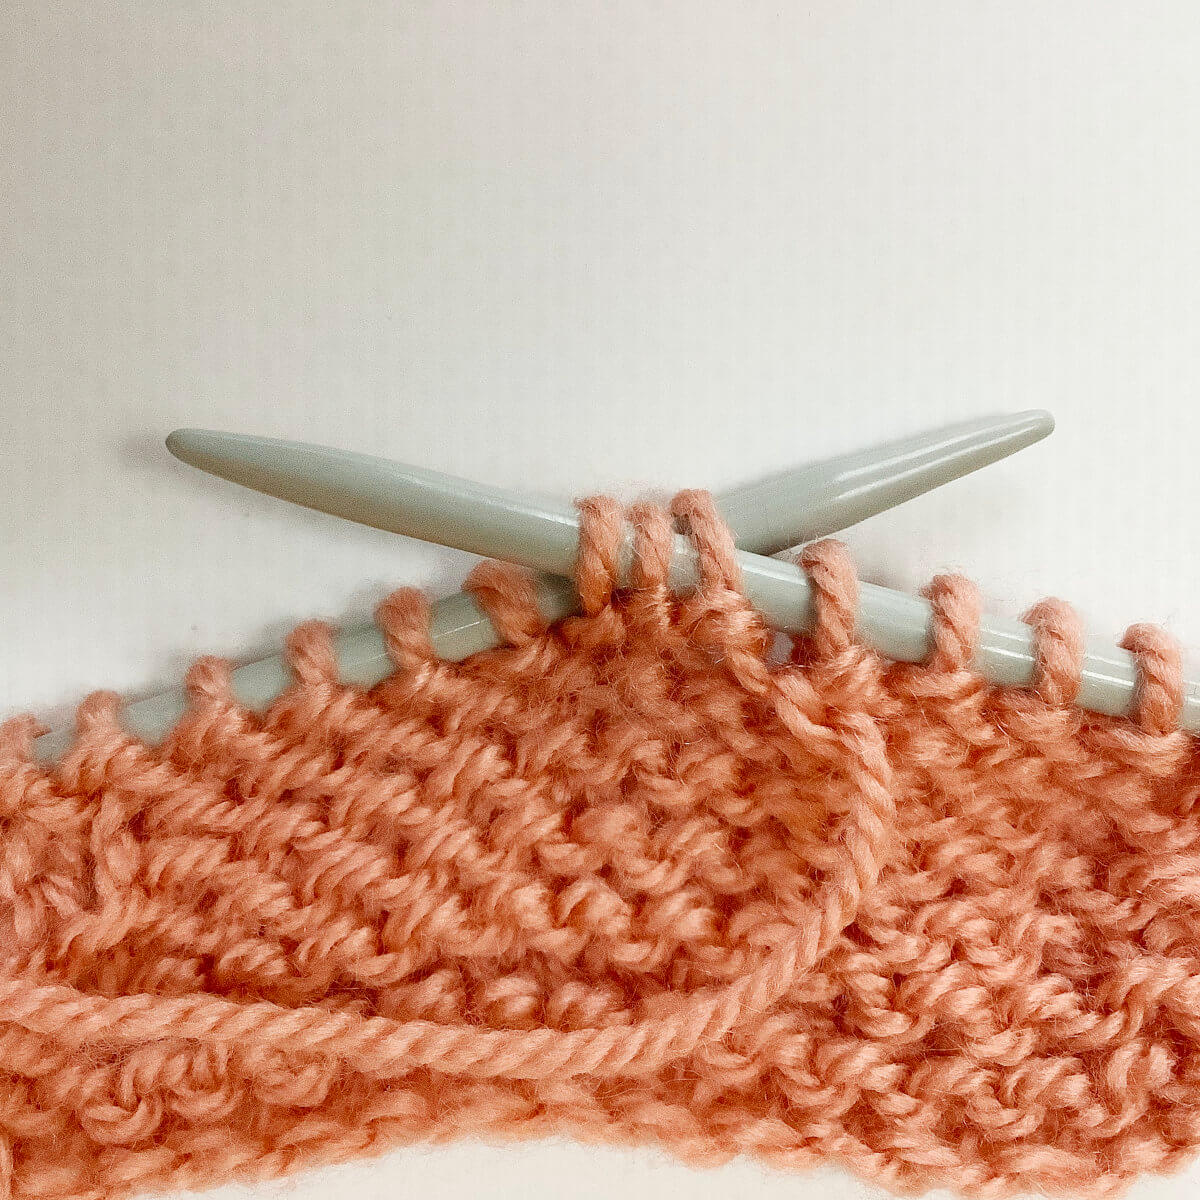
Repeat steps 4 to 7 until 3 stitches remain on the knitting needle.
In this tutorial I used a swatch with an odd number of stitches. If you have a piece with an even number of stitches, repeat steps 4 to 7 until 2 stitches remain.
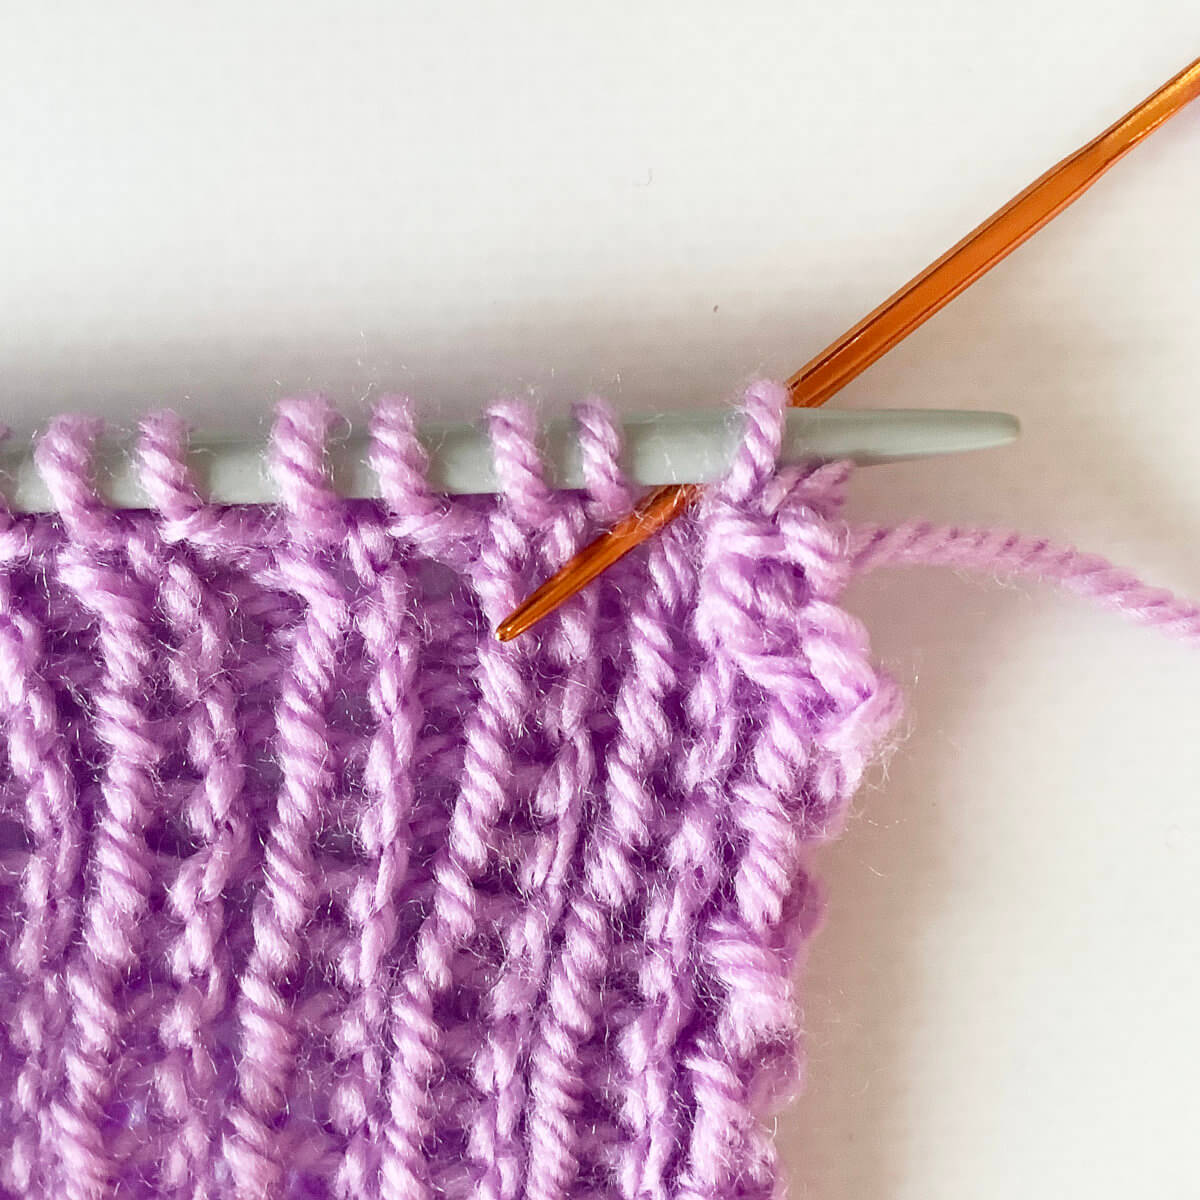
To finish the bind-off work steps 4 to 6 once again (in case of an even number of stitches work only step 4 once more), so only 1 stitch remains, then insert the darning needle purl-wise into the last stitch and pull the yarn through.
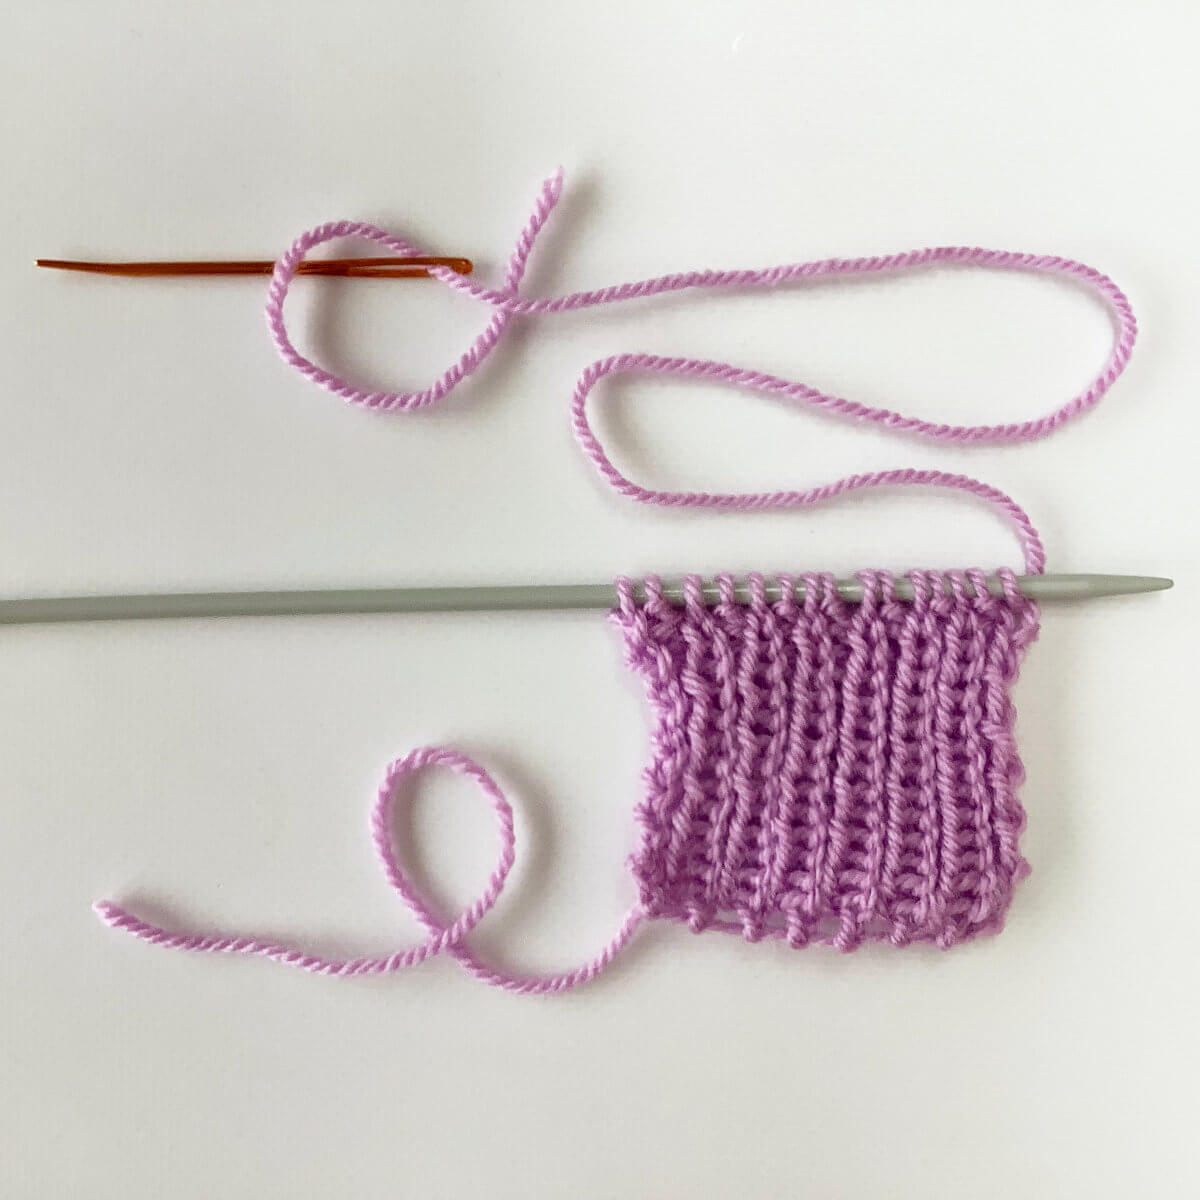
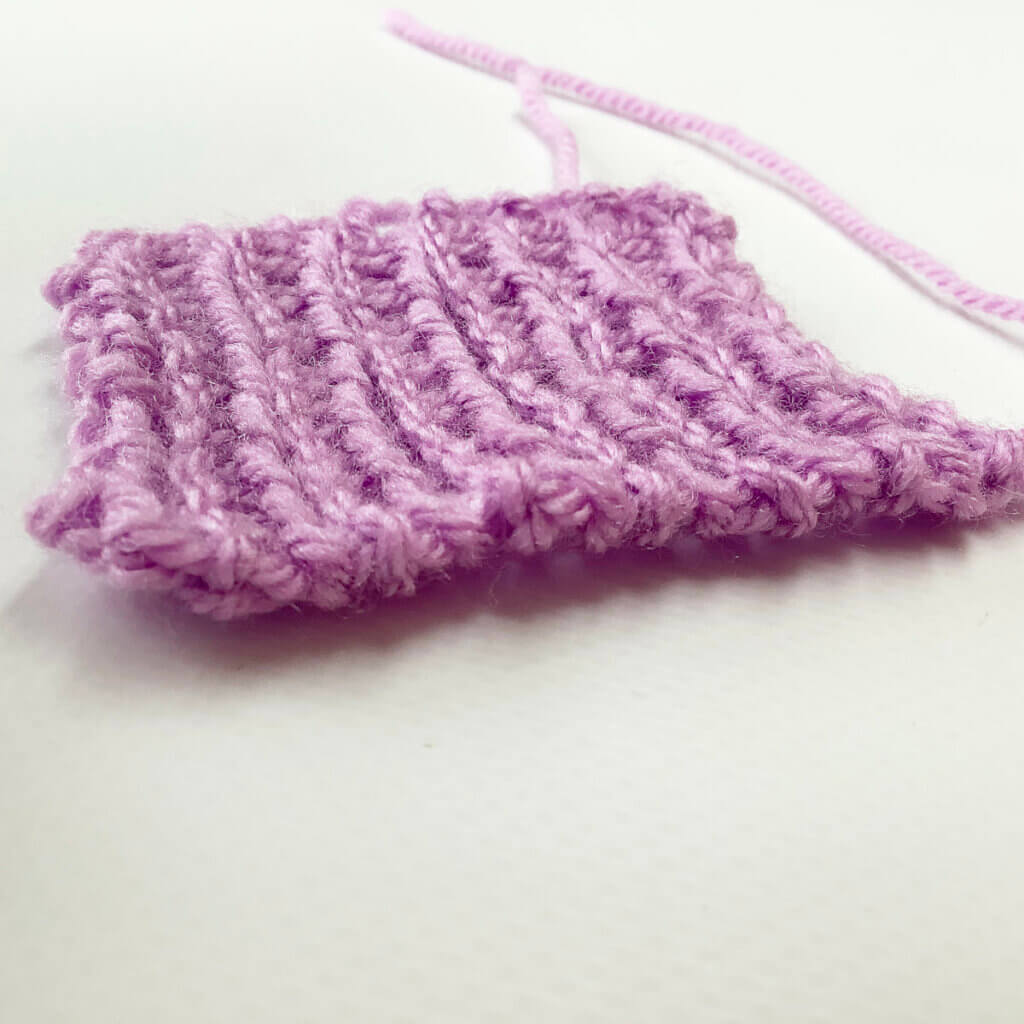
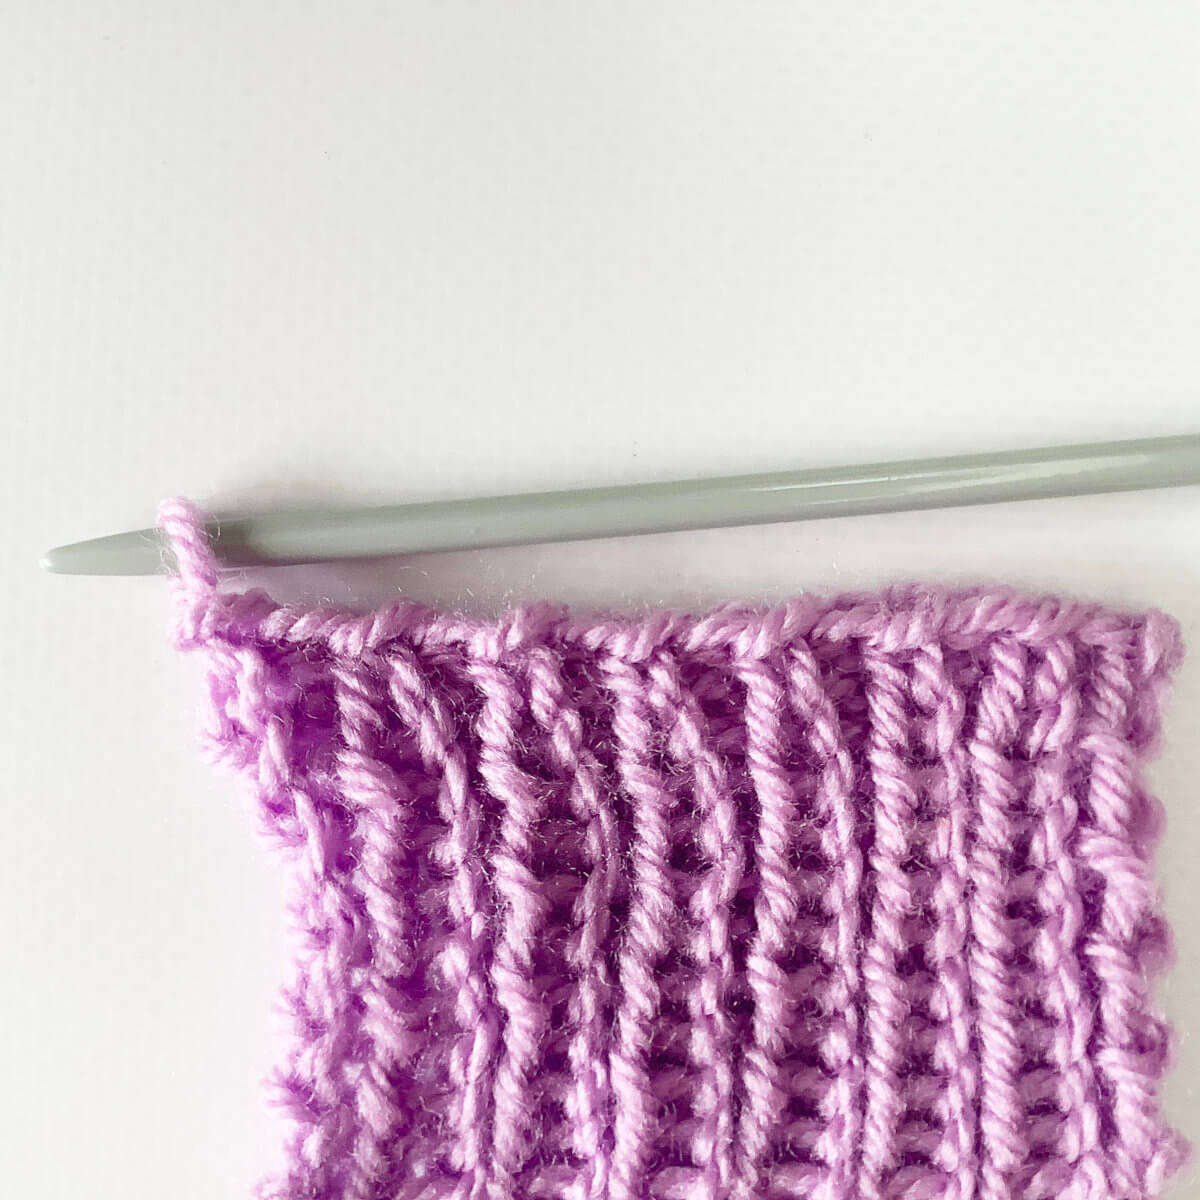
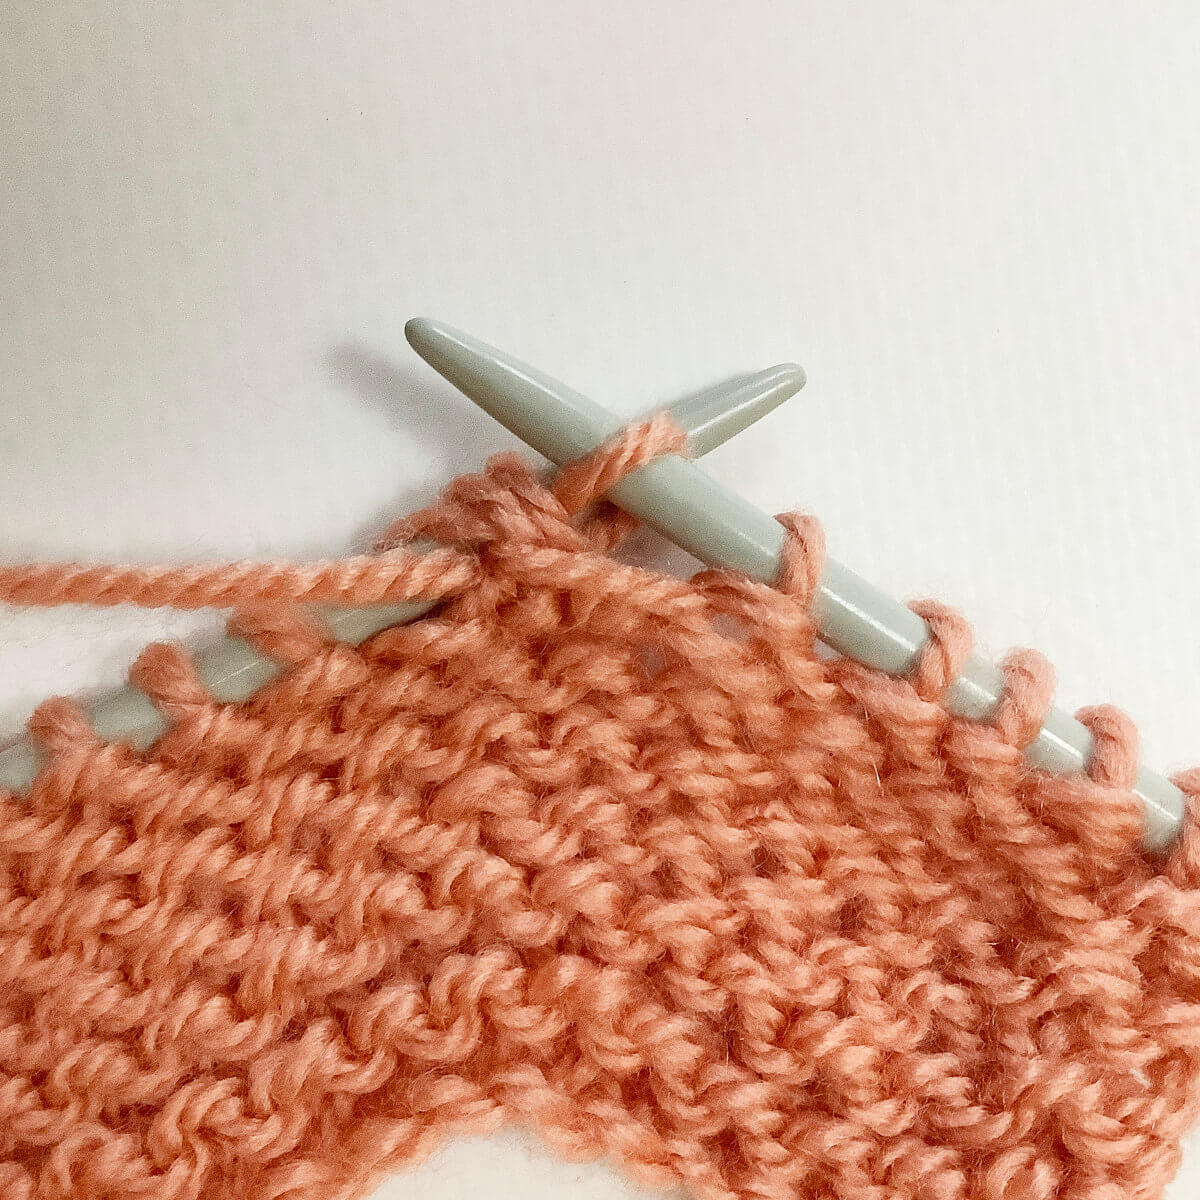
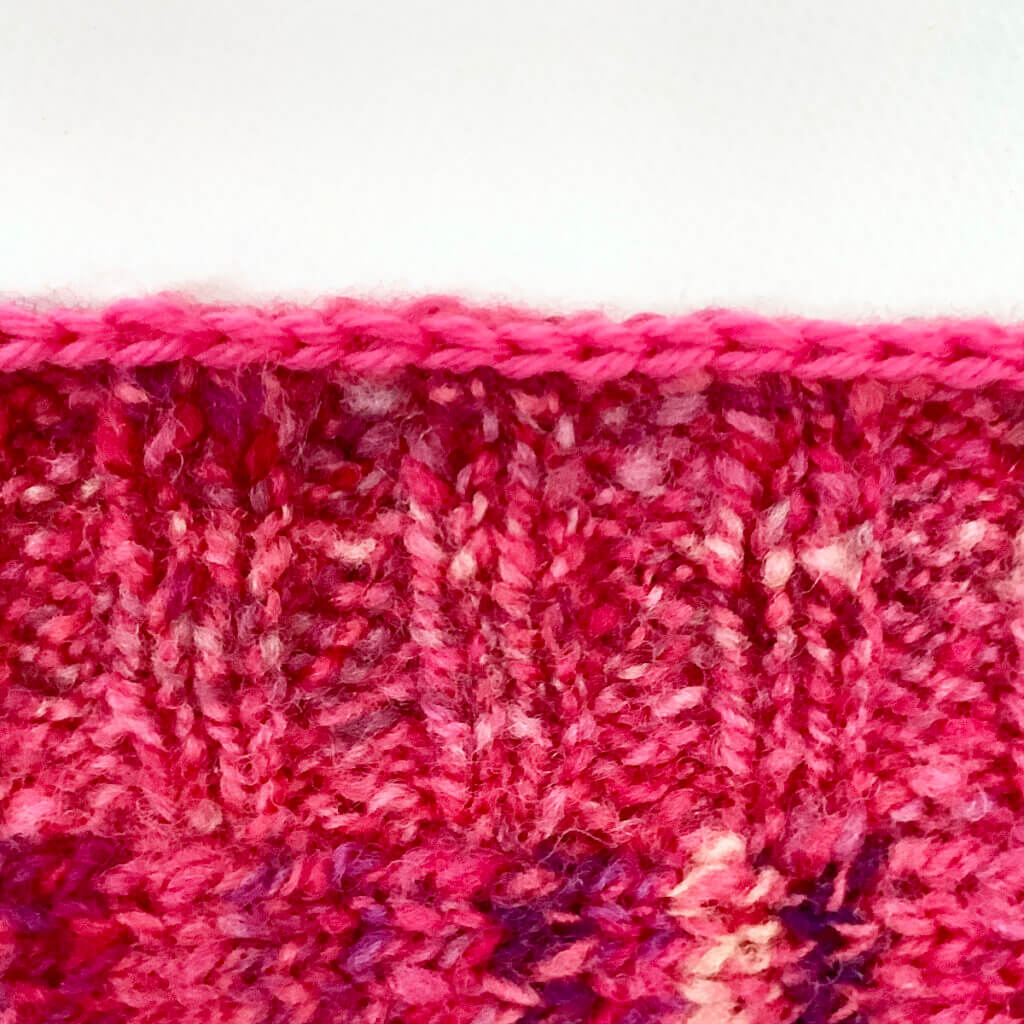
This is the bind-off result, isn’t it neat?!
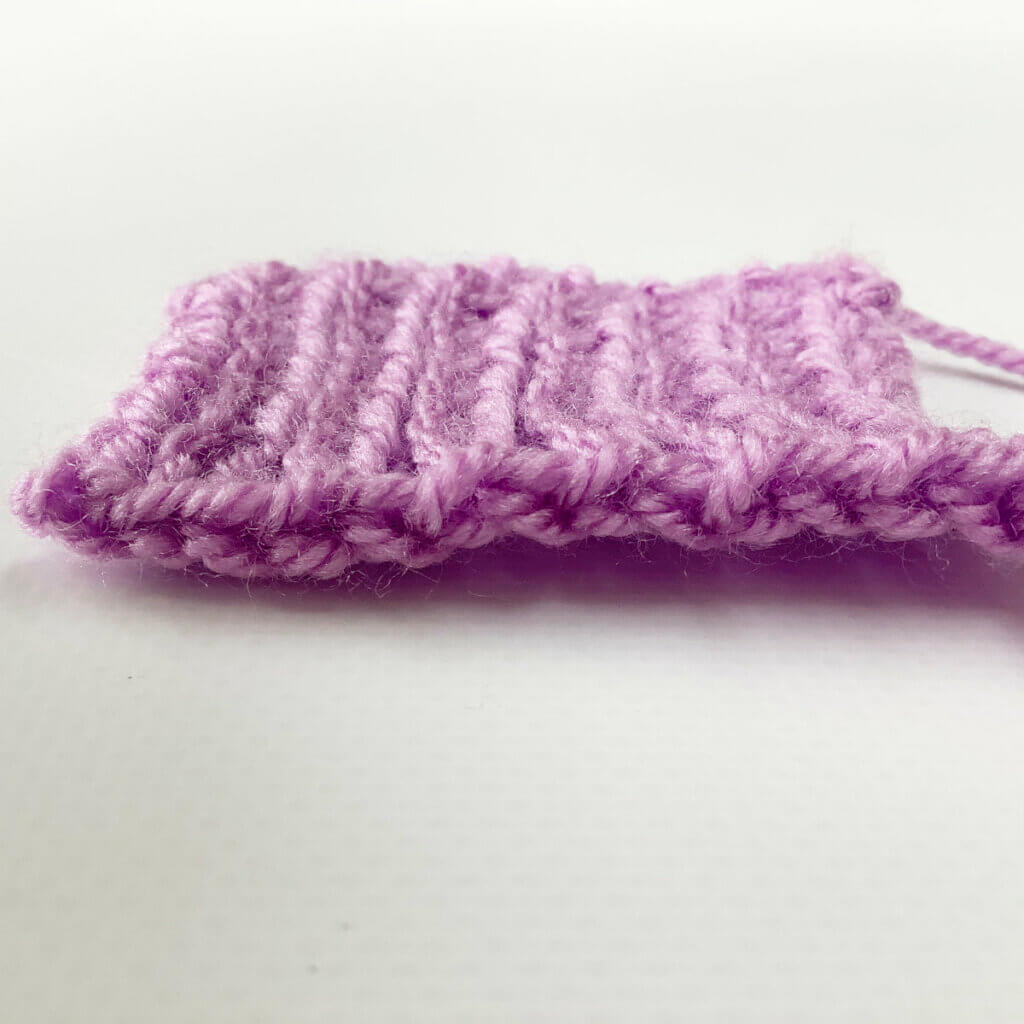
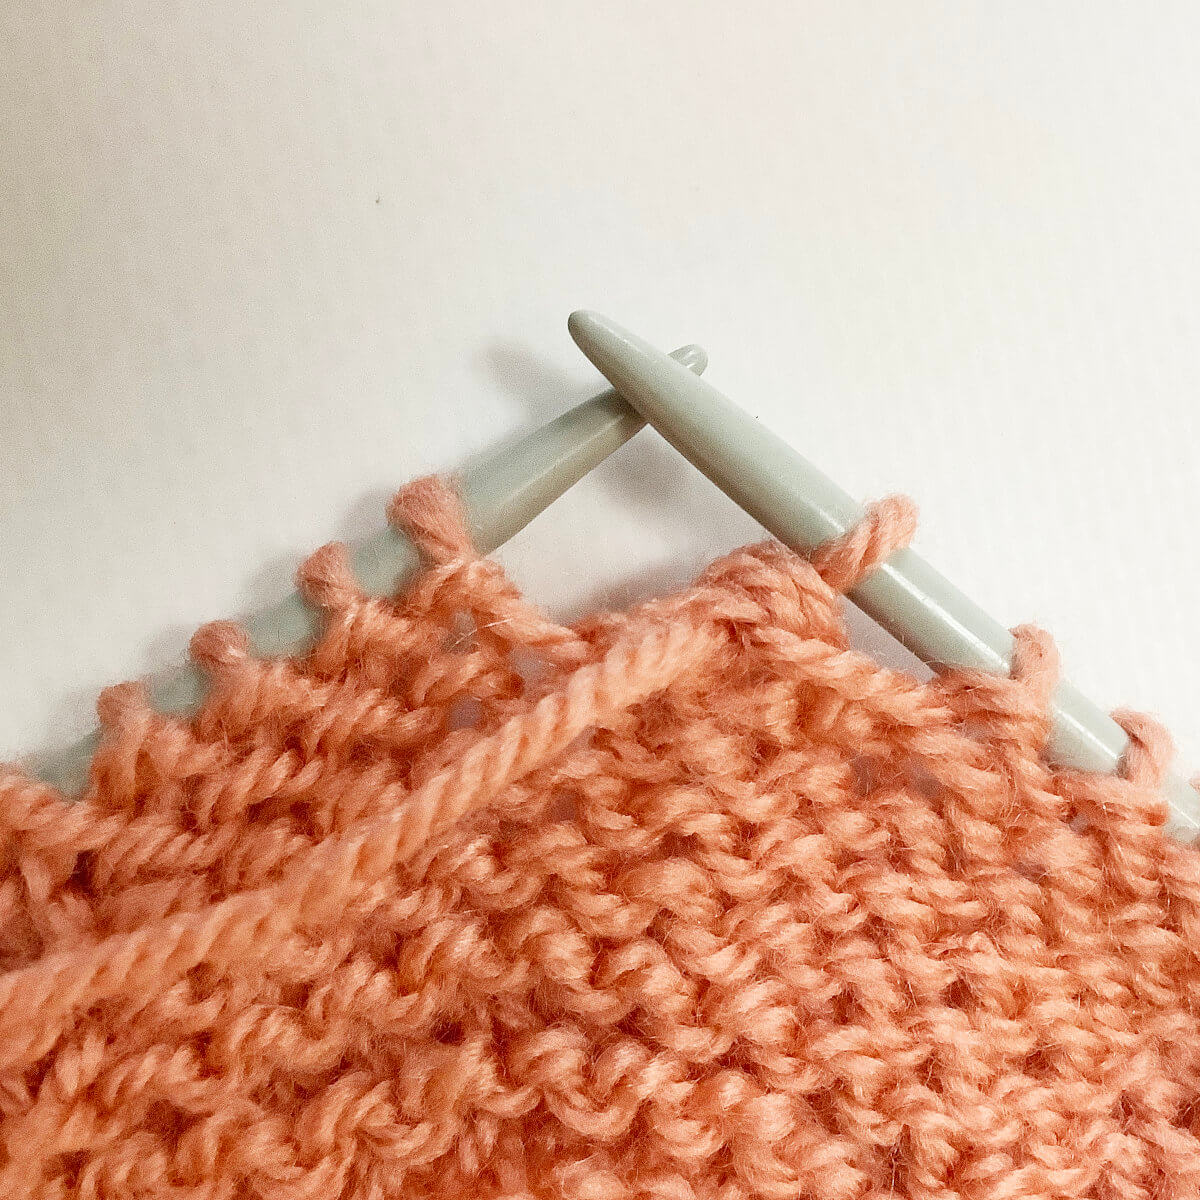
When viewed from the side, this is how the bind off edge looks:
Thanks to my Patreon supporters for bringing you this freebie! Creating quality patterns and tutorials is a lot of work and resource-intensive. However, I find it important to give you free content like this tutorial. Thanks to the generous support of my Patreon supporters, I can make it happen. Thank you, patrons! Click here to join, or click here to read more about La Visch Designs on Patreon.
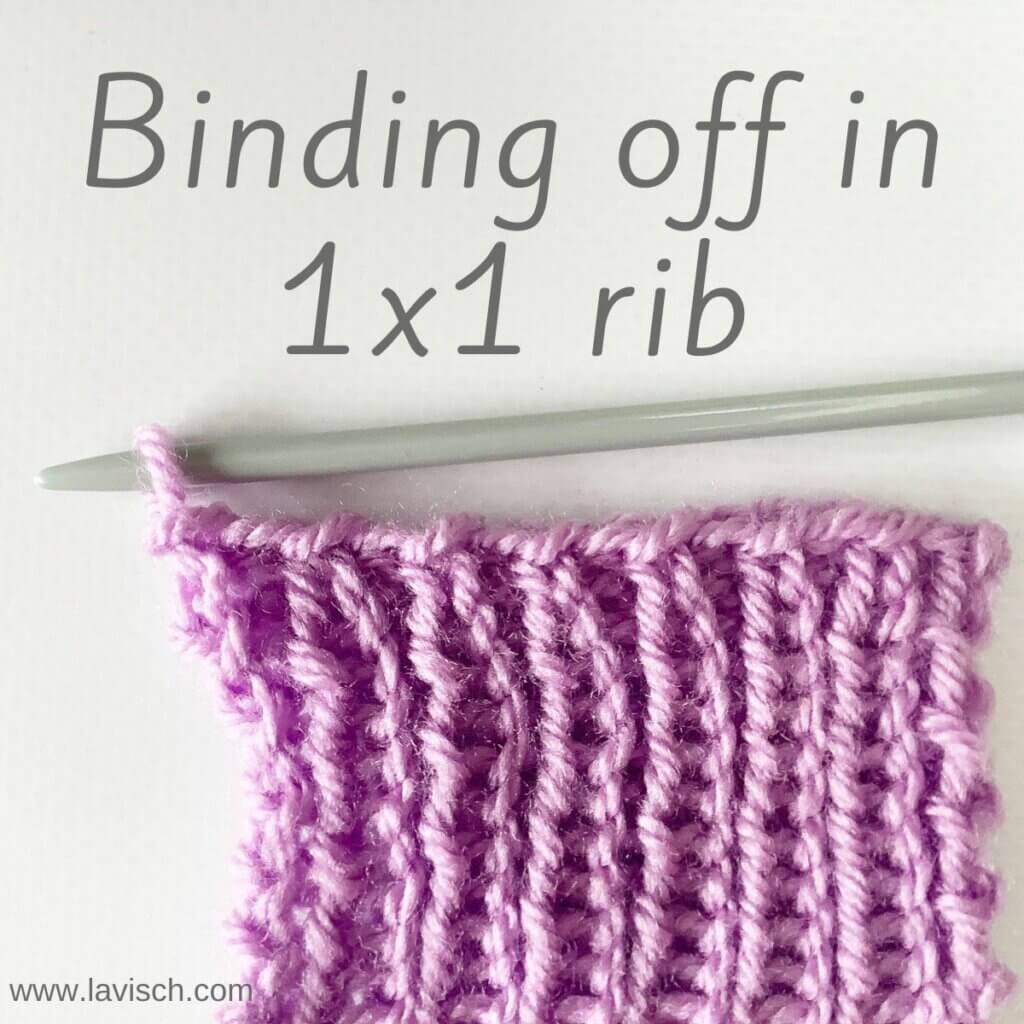
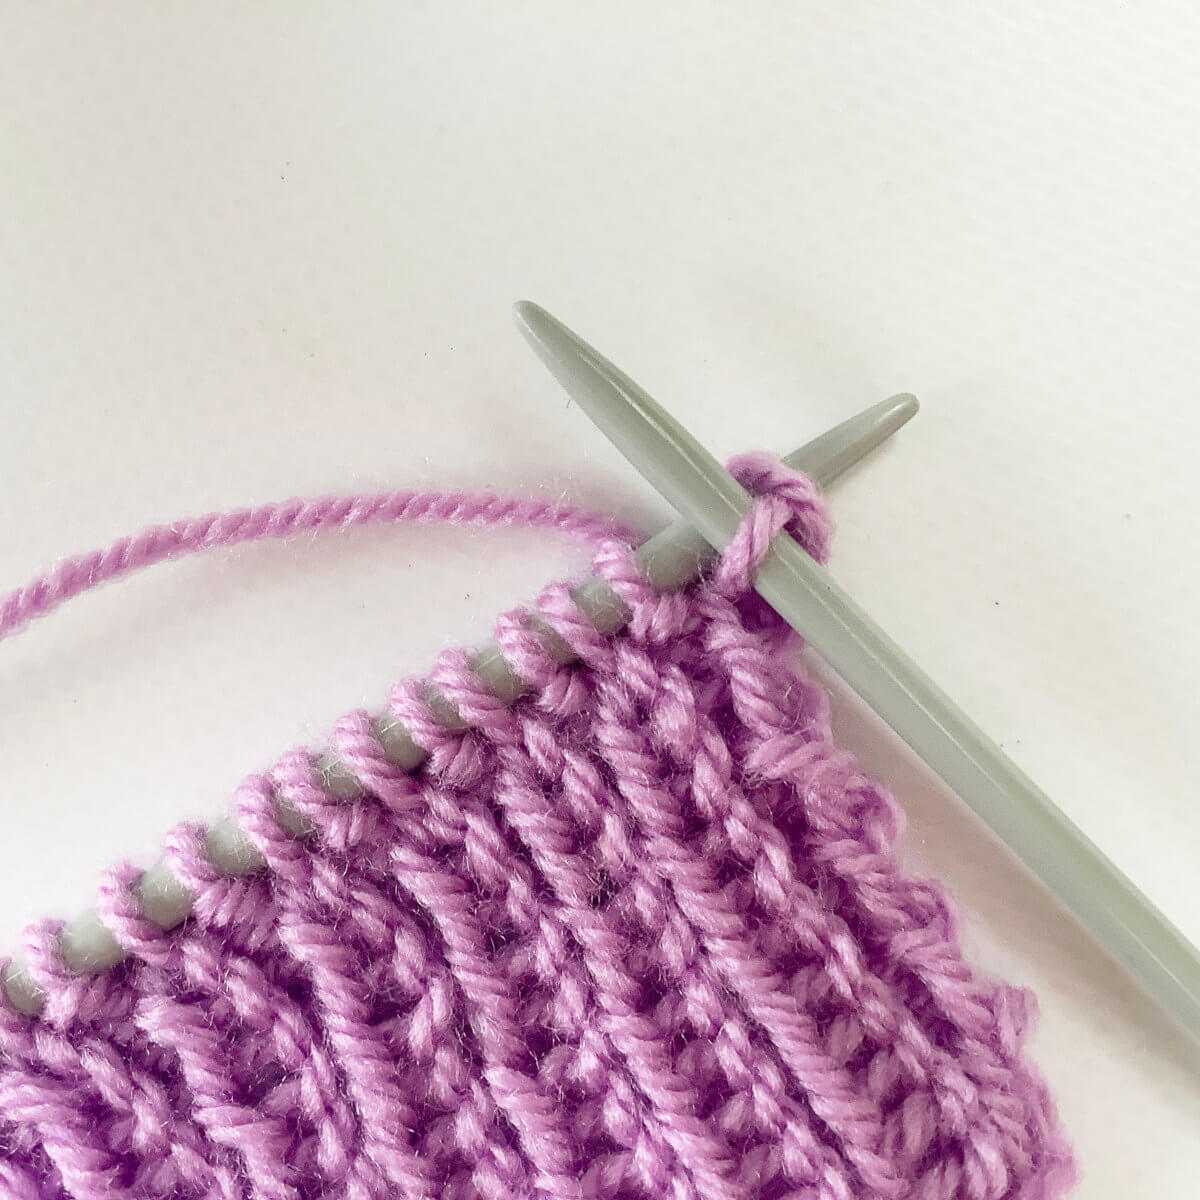
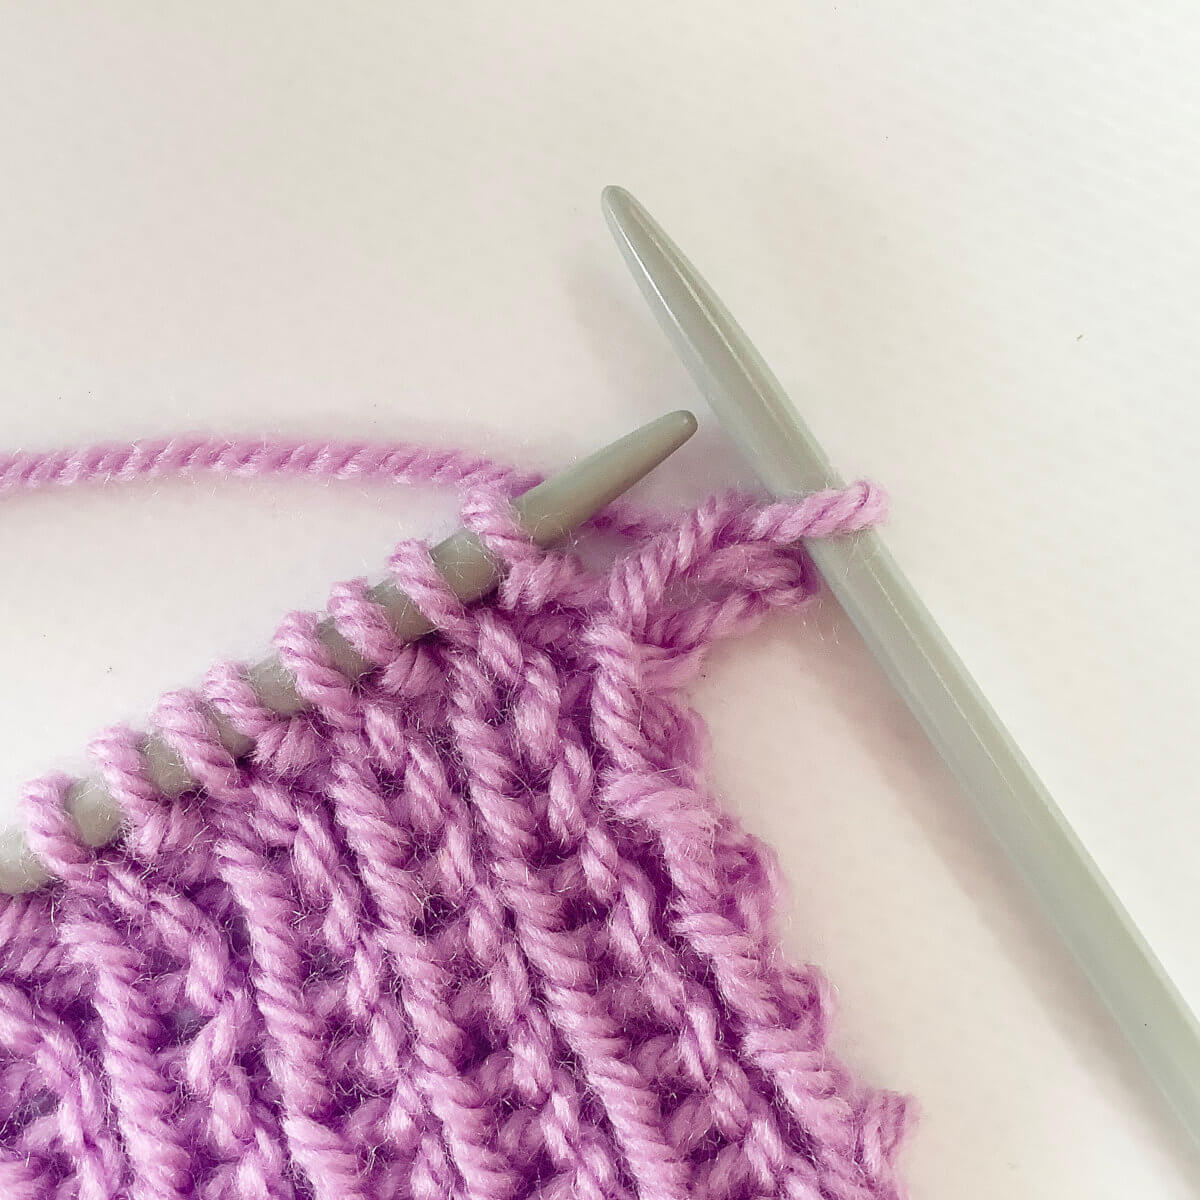
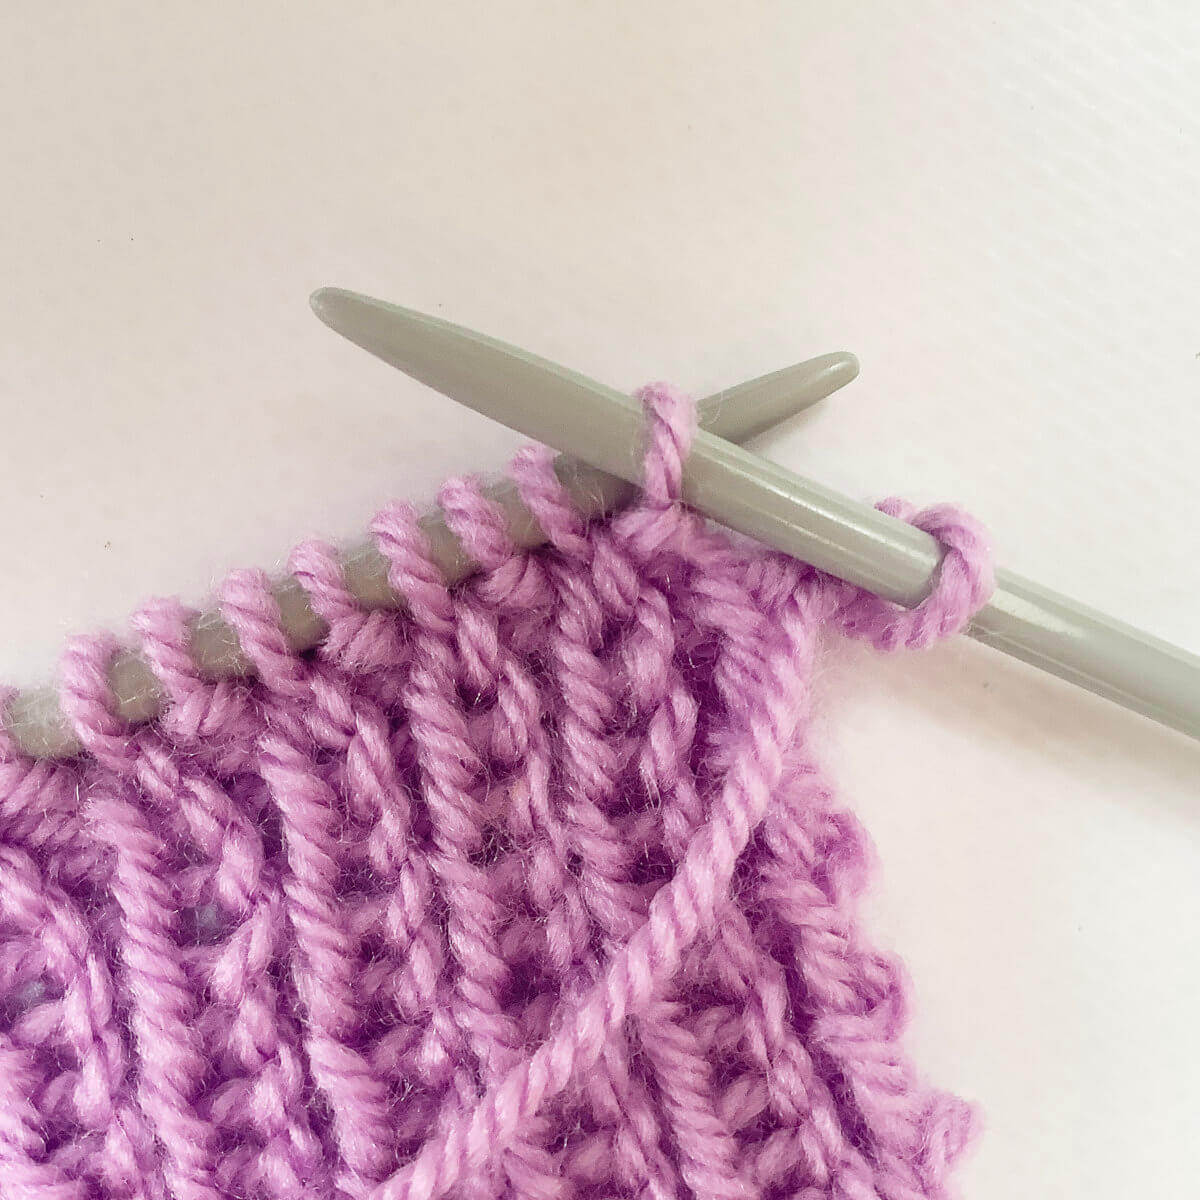
In this tutorial, I’ll show you how to work binding off in 1×1 rib patterning. In knitting patterns you may encounter the phrase “to bind off in pattern”, after working (k1, p1) ribbing. For example, after knitting the cuff of a sleeve or the hem of a sweater. The basic premise of it, is that you continue working the knit stitches as knits, and the purl stitches as purls while binding off. The resulting edge to your work seamlessly blends into the stitch pattern. Also, working the bind off itself in rib patterning ensures that it pulls in somewhat, as ribbing tends to do. This way, it won’t flare out, as it may do when working a non-patterned bind off.
Materials used
Yarn: Paintbox Yarns Simply DK, a good value, good quality 100% acrylic yarn, here in the color 142 Tea Rose.
Knitting needles: This is a pair of straights that I picked up at the second-hand store when I started knitting, brand unknown.
Binding off in 1×1 rib step by step
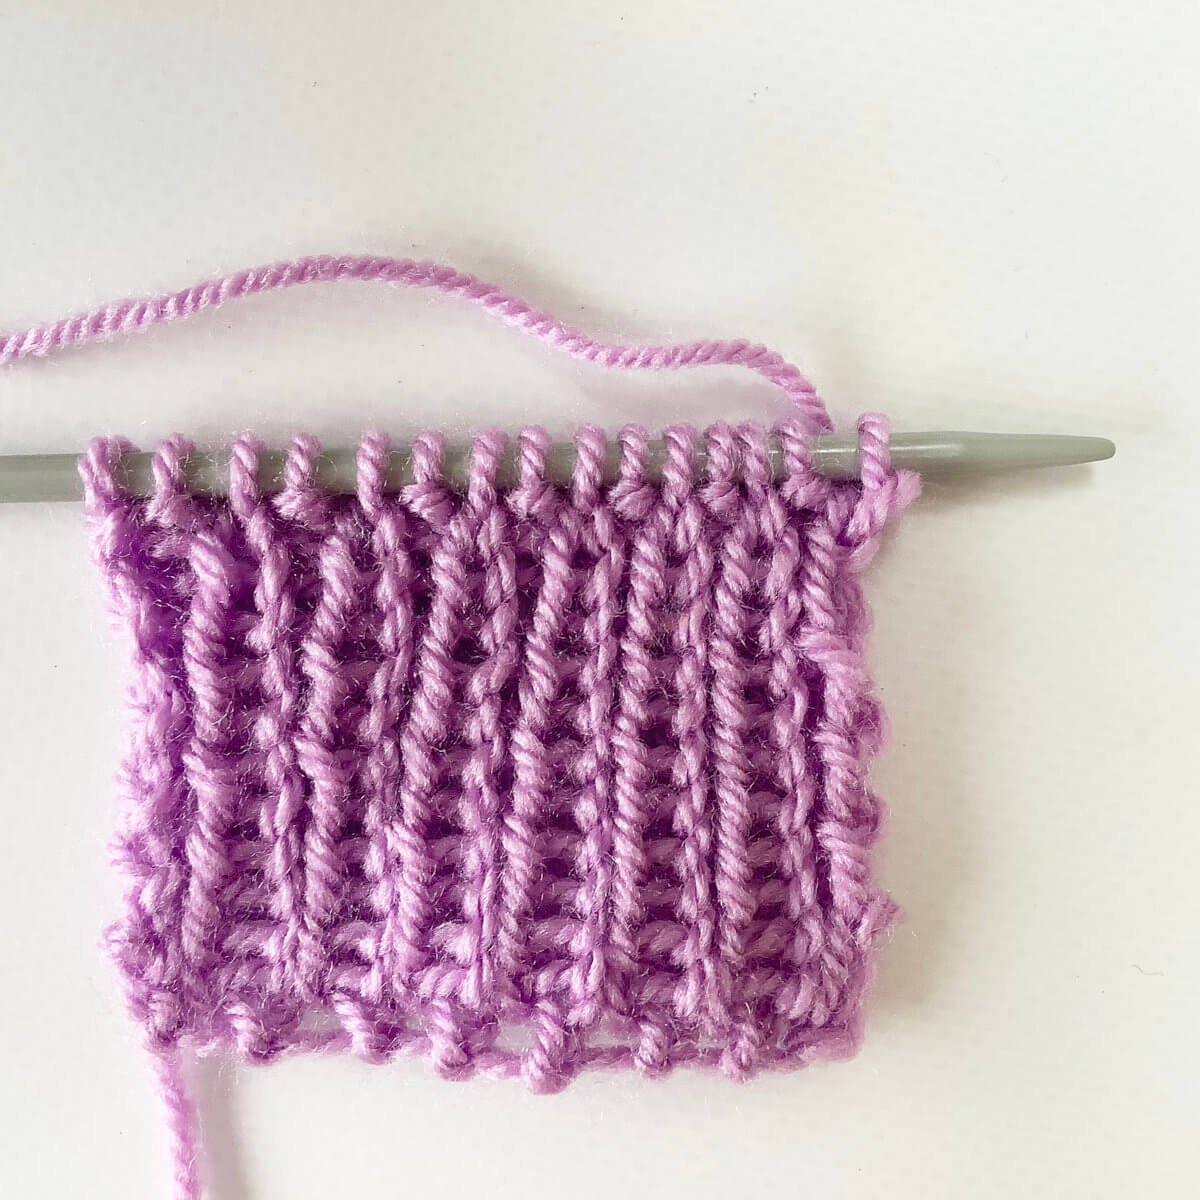
To start, take the piece of knitting you want to bind-off.
First, we’re going to knit the first stitch on the left-hand needle. To do so, insert the right-hand needle knit wise into the first stitch.
Wrap the yarn around the needle…
… and pull it through the stitch.
To complete knitting the first stitch, slip it off the left-hand needle.
Next, we’re going to purl the new stitch nearest to the tip of the left-hand needle. To do so, insert the right-hand needle purl wise into the first stitch.
Wrap the yarn around the needle…
… and pull it through the stitch.
To complete purling the stitch, slip it off the left-hand needle.
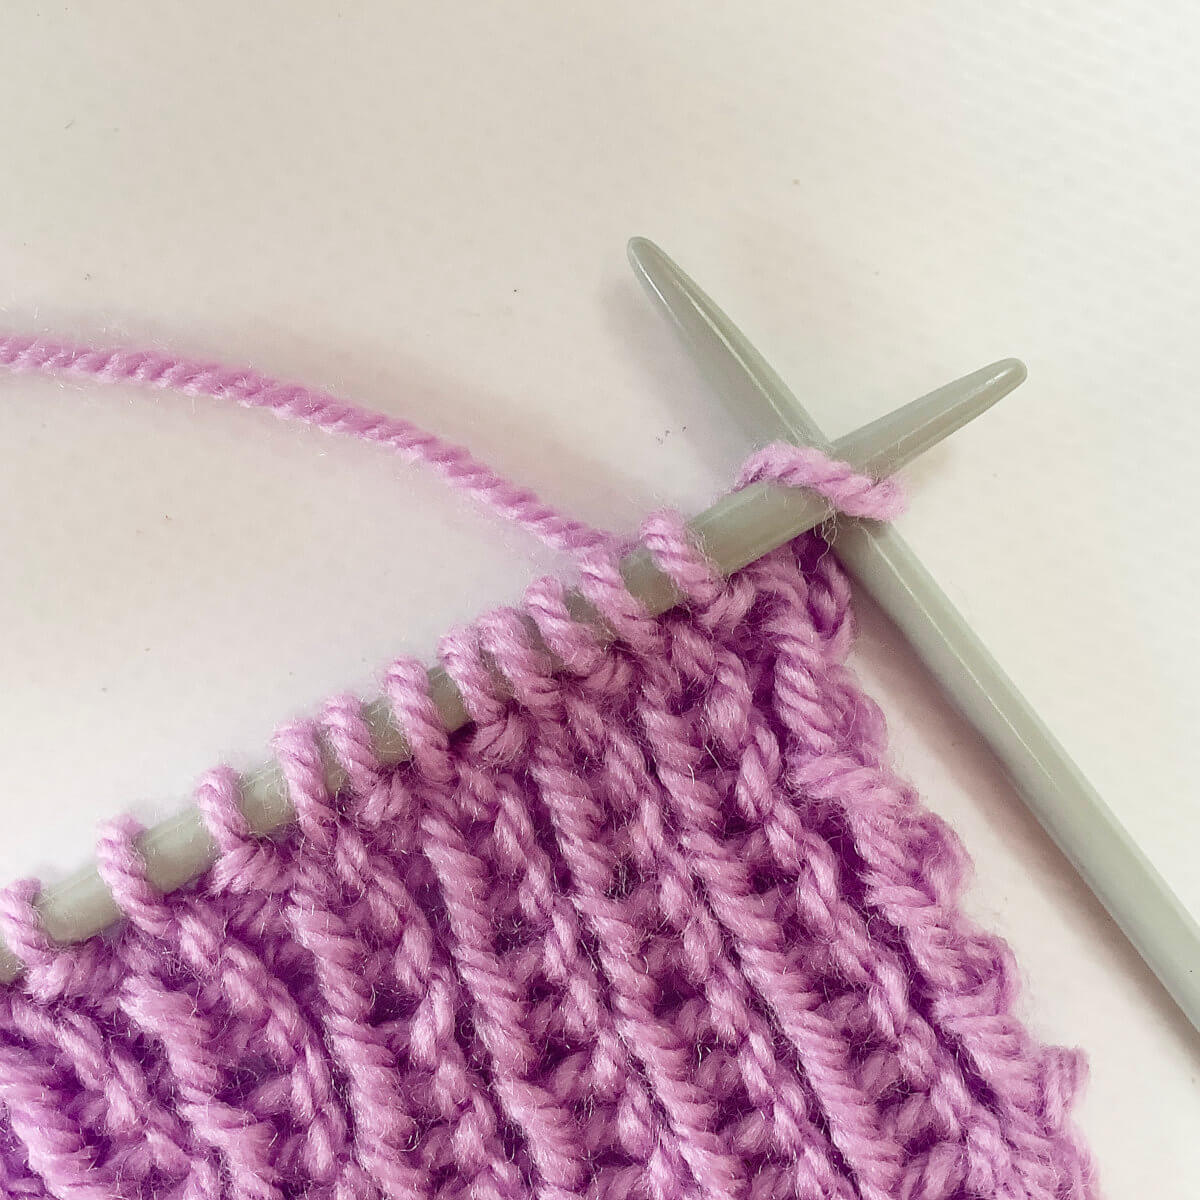
Now insert the tip of the left-hand needle into the second stitch on the right-hand needle….
…., and pass this second stitch over the first one.
You have now bound-off a stitch!
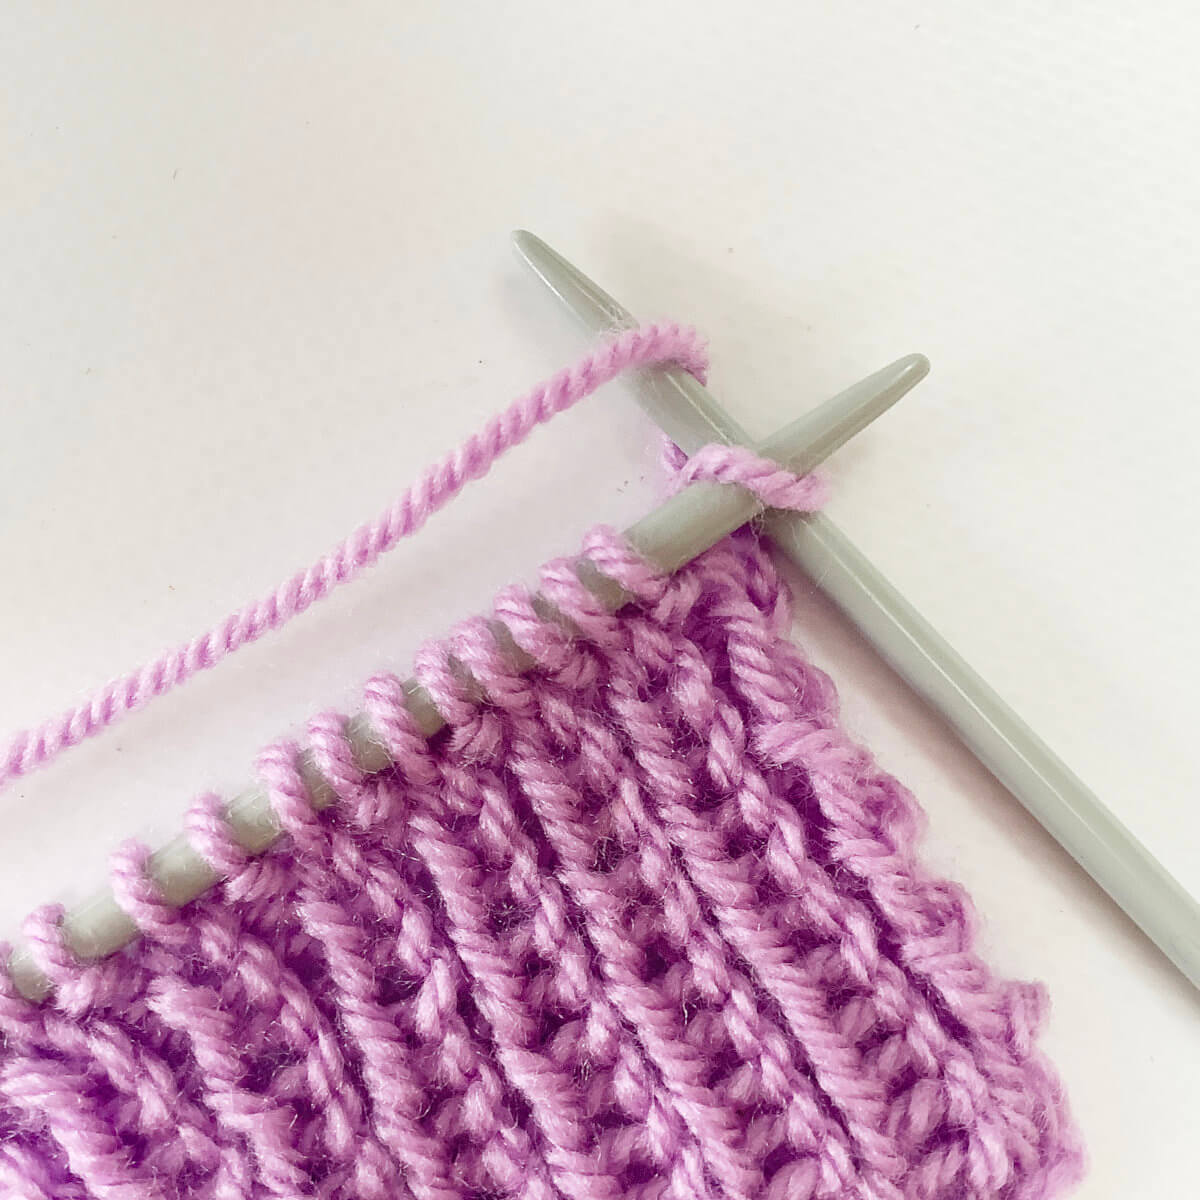
Repeat steps 2-5 plus 10-11, followed by steps 6-9 plus 10-11 until all stitches have been bound-off.
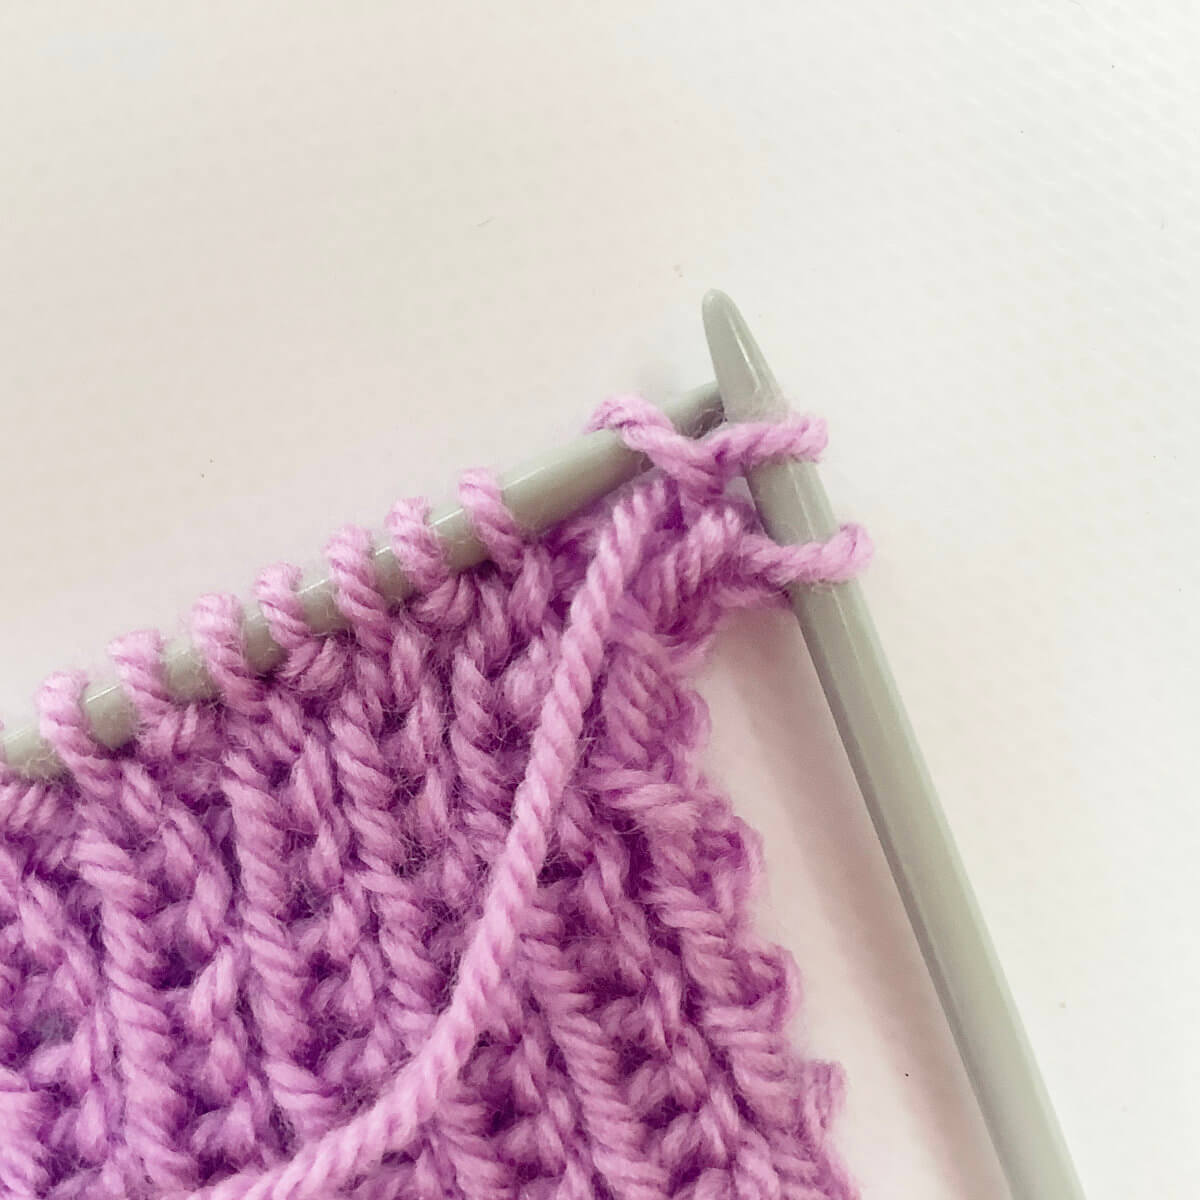
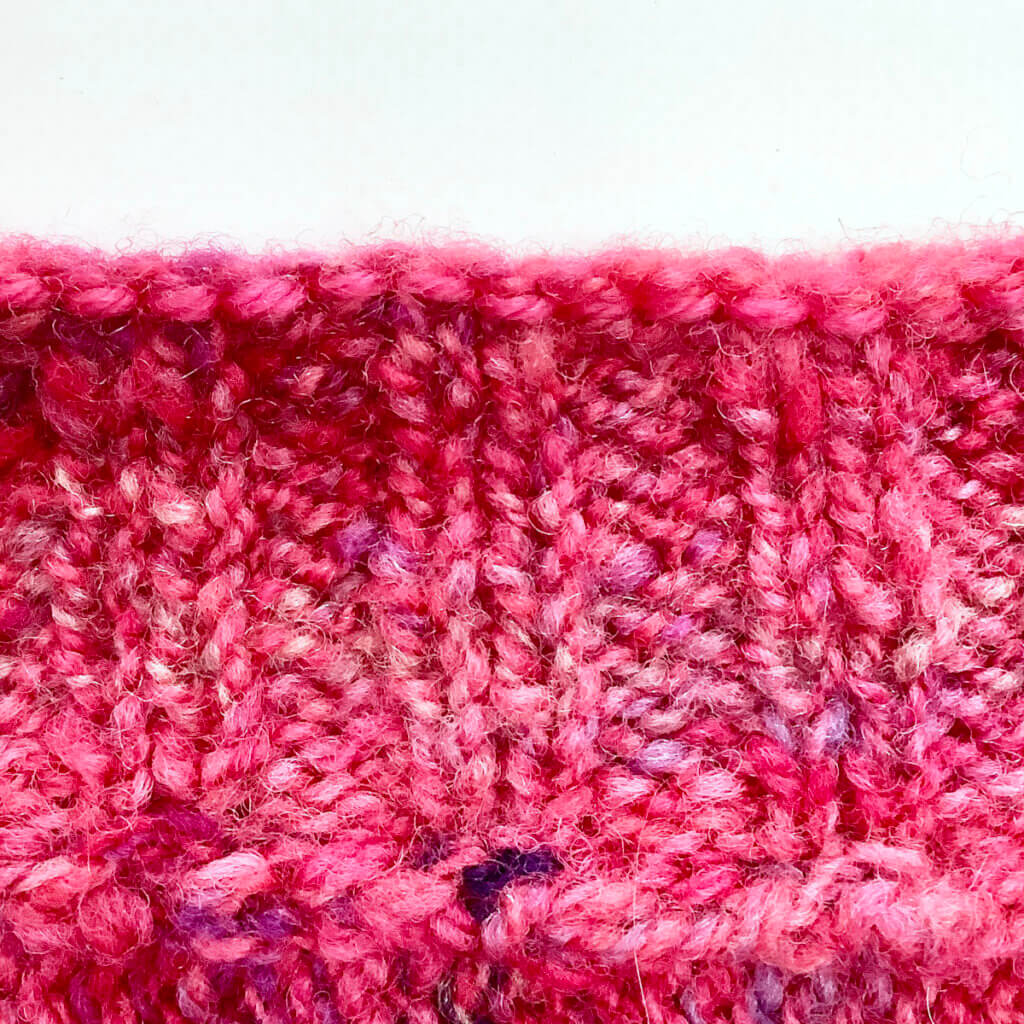
It will look something like this:
That’s how binding off in 1×1 rib is done! And here is a picture of the resulting edge. Pretty, isn’t it?!
Thanks to my Patreon supporters for bringing you this freebie! Creating quality patterns and tutorials is a lot of work and resource-intensive. However, I find it important to give you free content like this tutorial. Thanks to the generous support of my Patreon supporters, I can make it happen. Thank you, patrons! Click here to join, or click here to read more about La Visch Designs on Patreon.
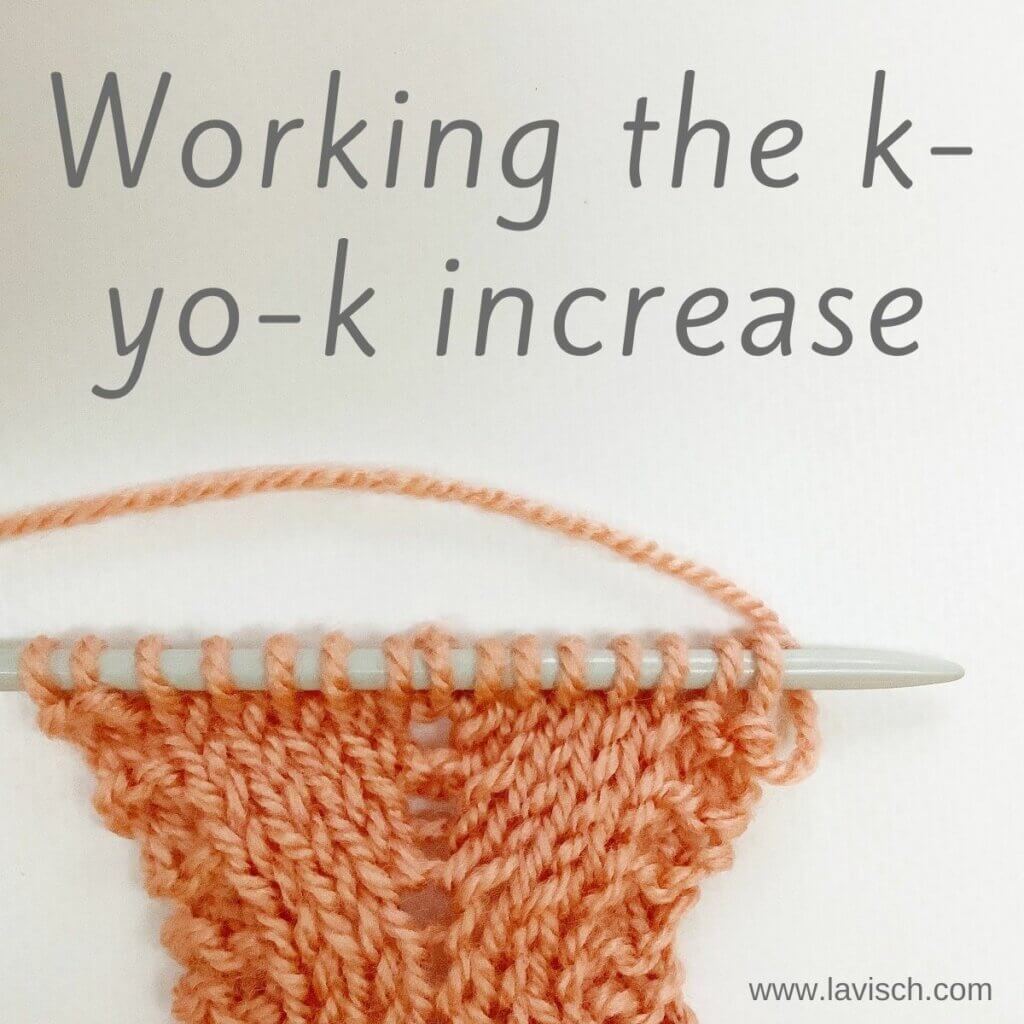
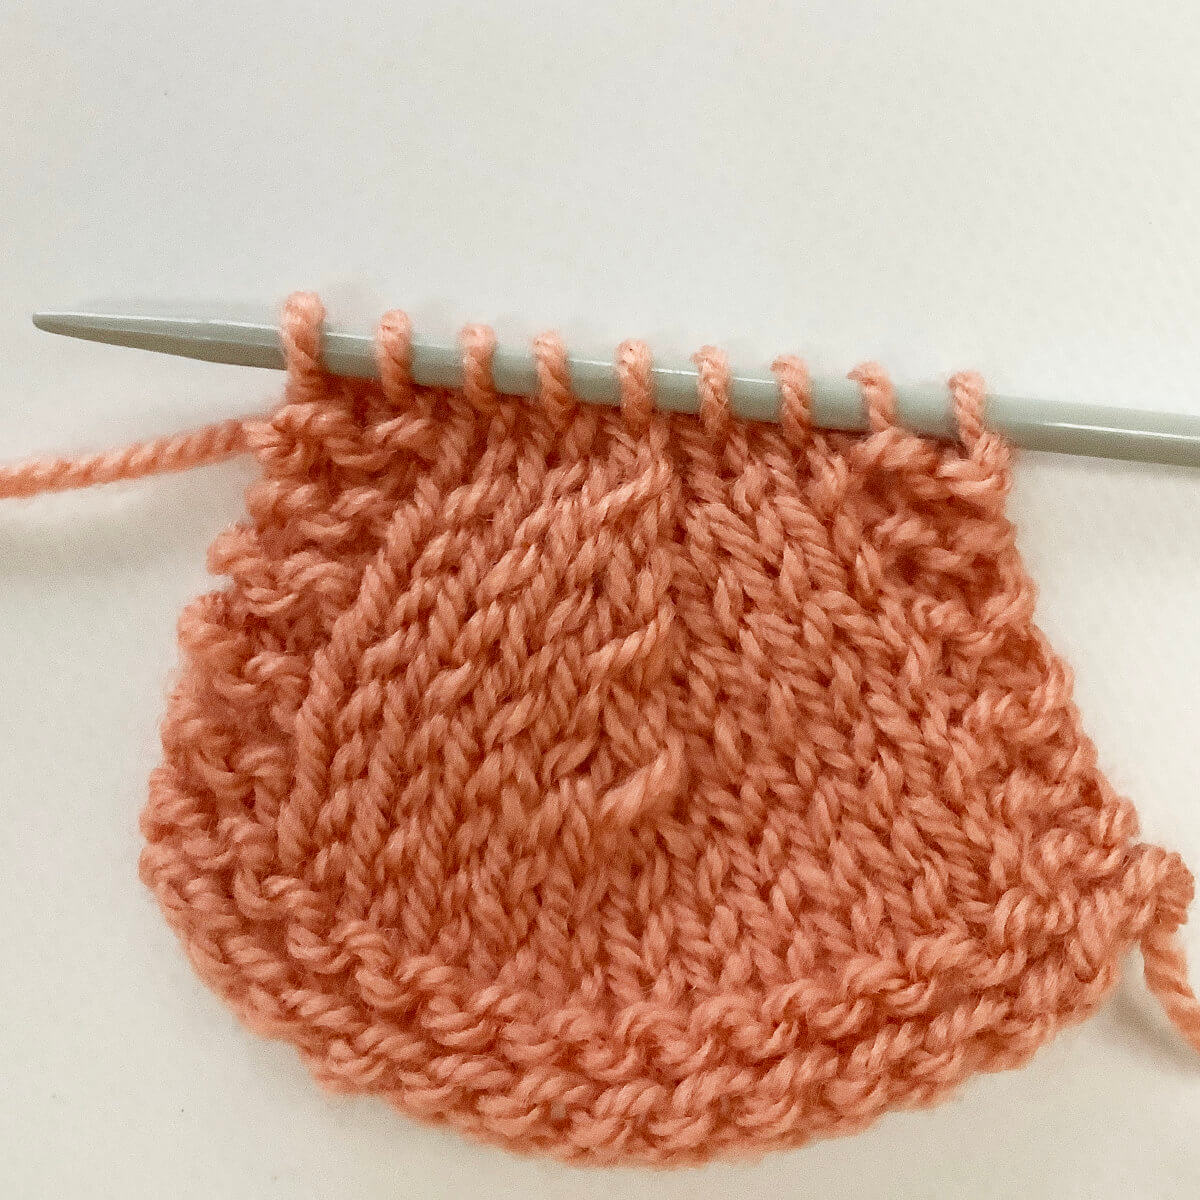
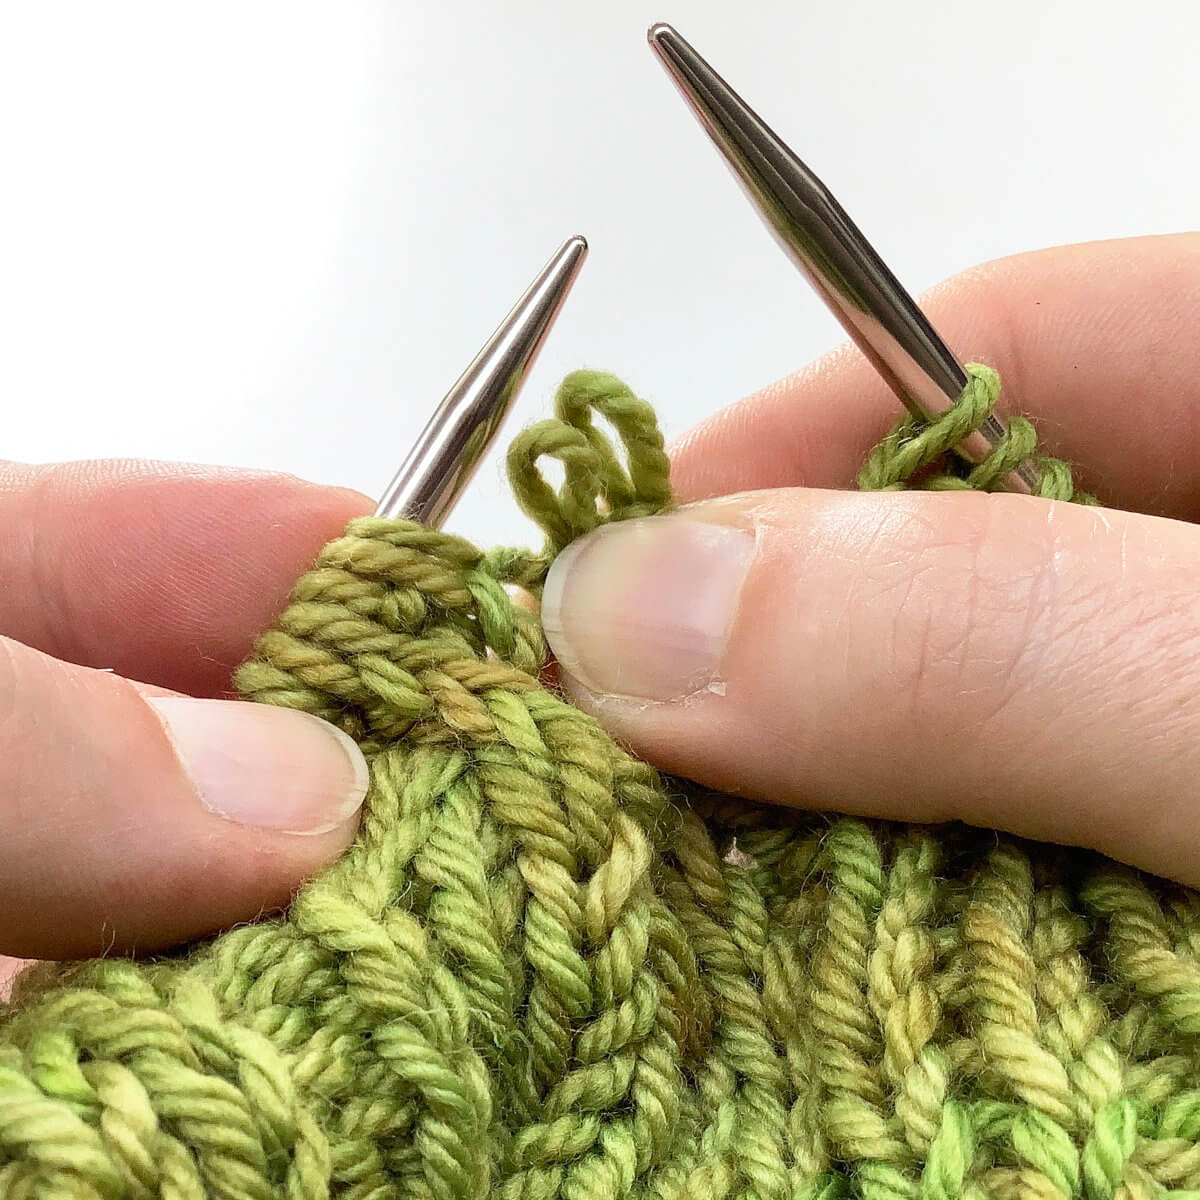
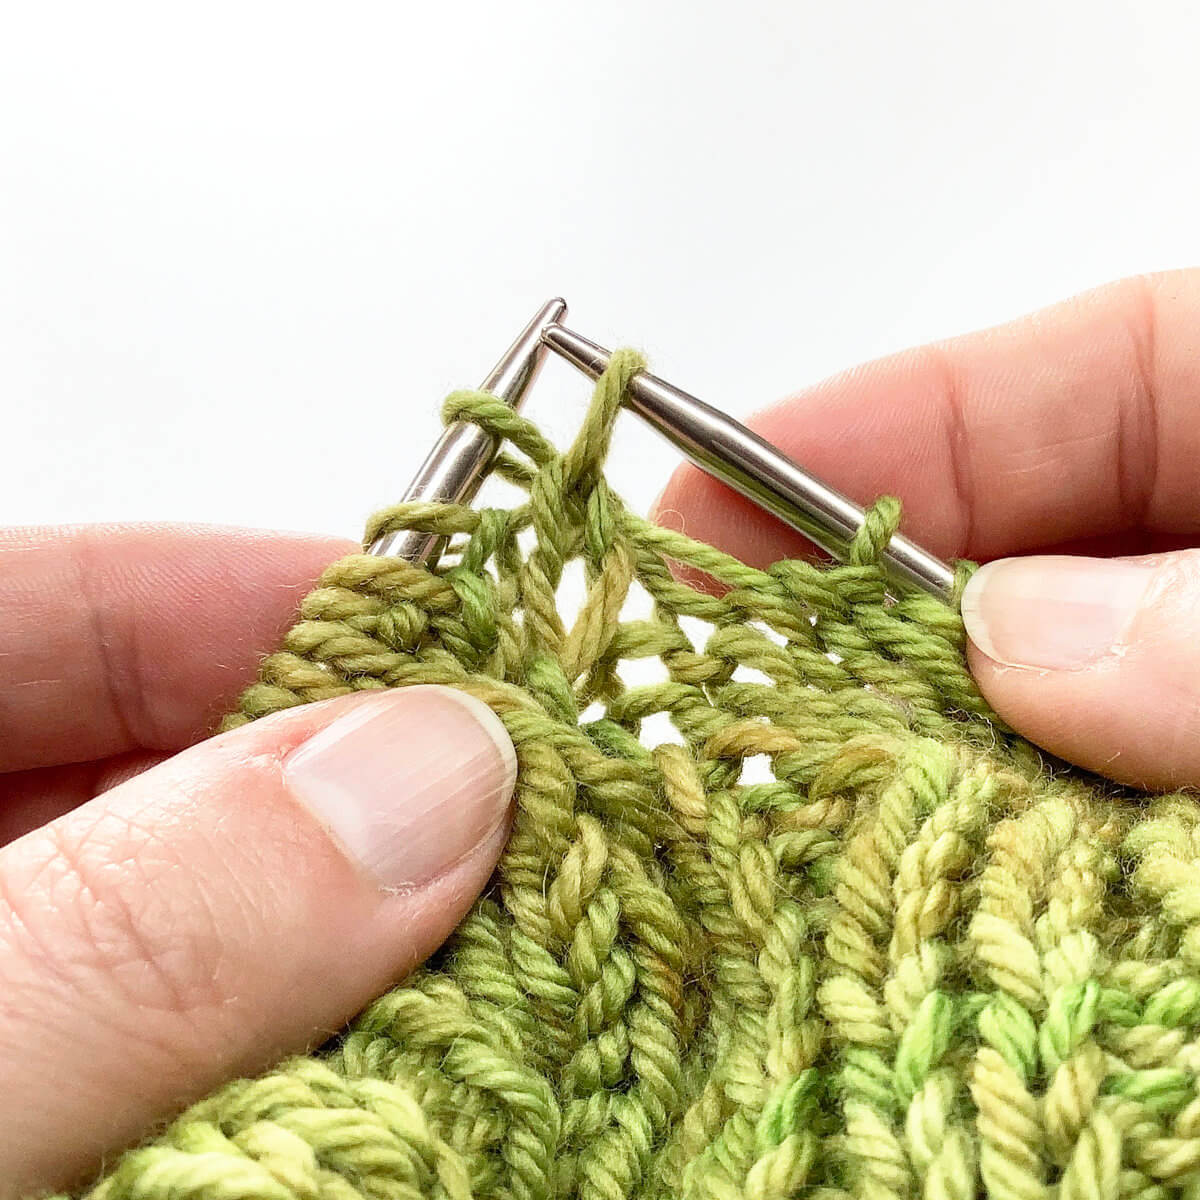
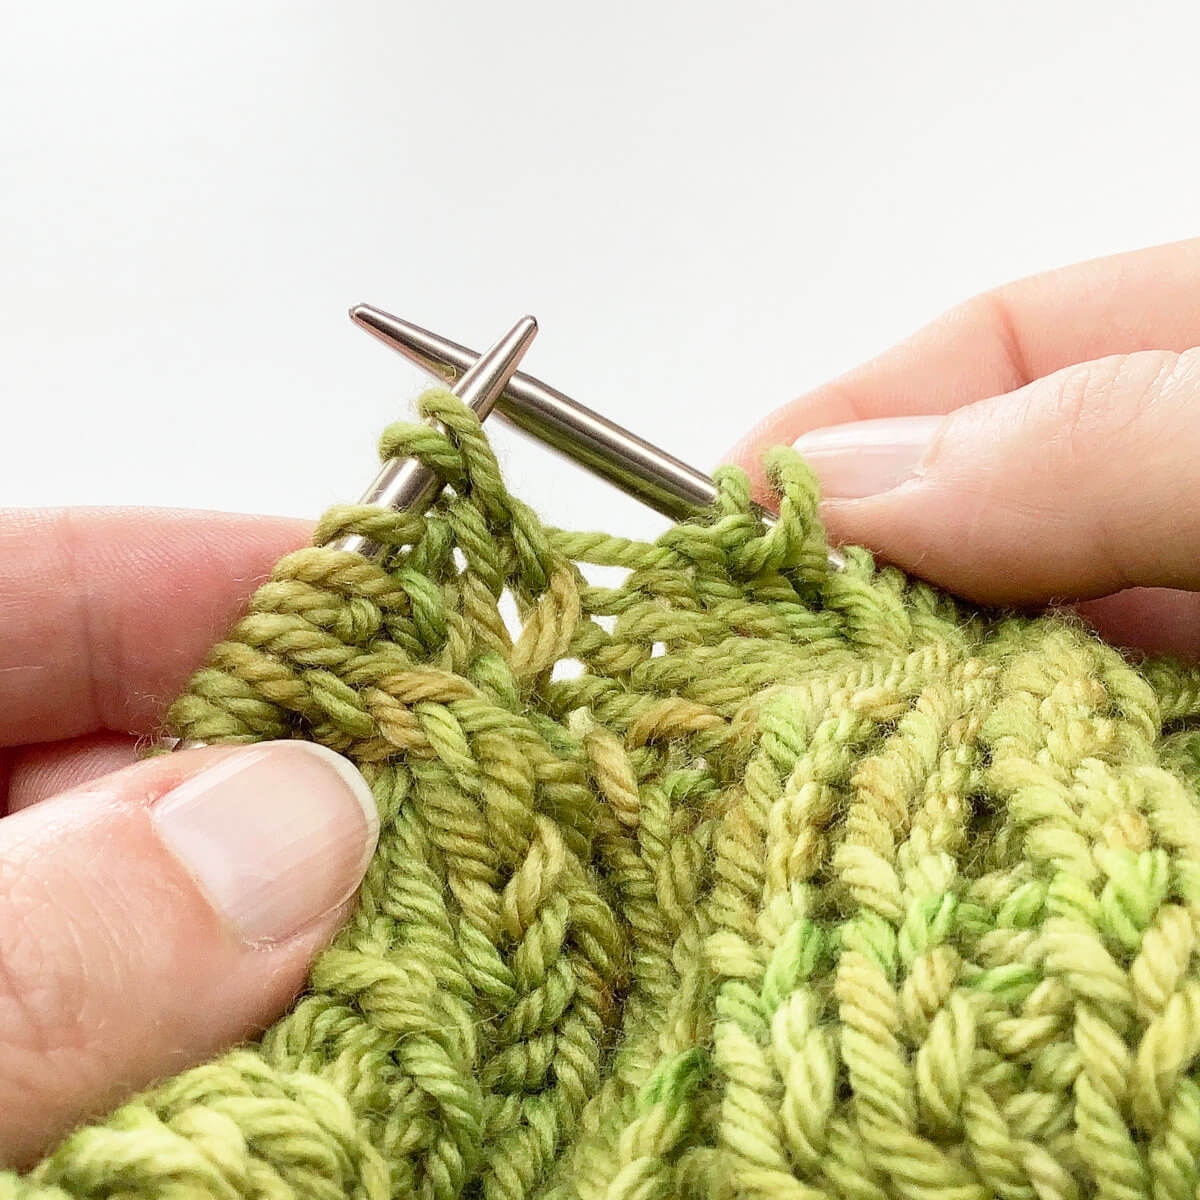
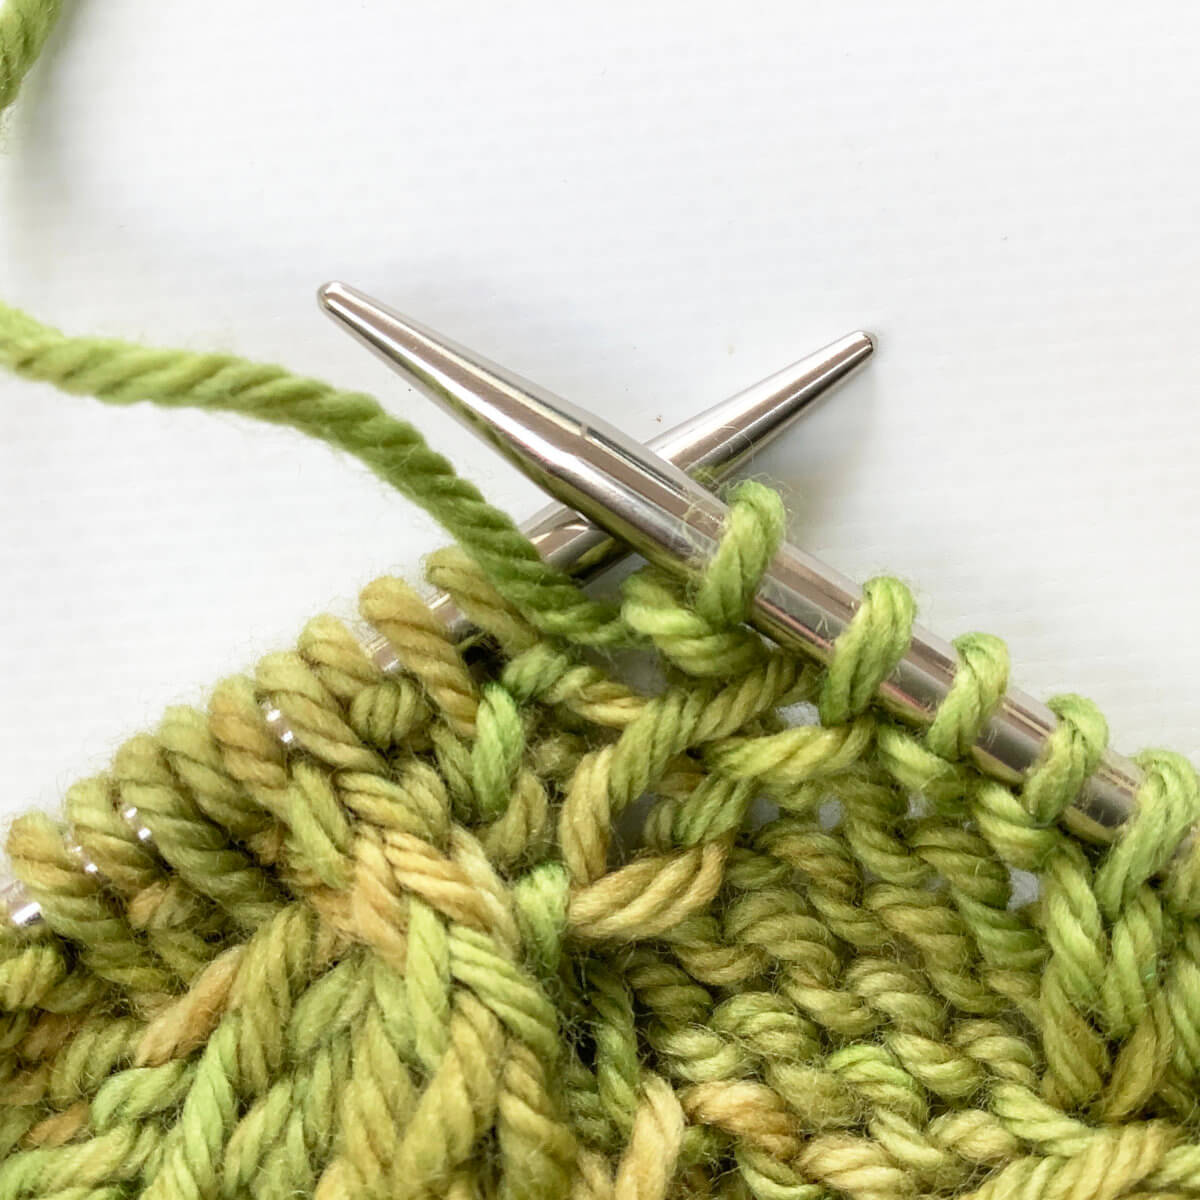
Double increases aren’t as commonly used as basic single increases. Nevertheless, they absolutely have their place in the knitter’s toolkit. Double increases, especially the ones including yarn overs, are most often found in lace stitch patterns. So if you like knitting lace, double increases are something you’ll want to be familiar with. In this tutorial, I’ll show you how to work the increase that consists of working (1 knit, 1 yarn over, 1 knit) all in the same stitch, thus increasing 2 stitches where there was only 1 before. Abbreviated, this increase would be k-yo-k. This double increase is symmetrical and quite decorative, and for this reason also a very good choice to use for the central spine in top-down triangle shawls.
Below you can find how to work this increase step by step, so get your materials and follow along!
Materials
Yarn: Paintbox Yarns Simply DK, a good value, good quality 100% acrylic yarn, here in the color 155 Vintage pink.
Knitting needles: This is a pair of straights that I picked up at the second-hand store when I started knitting, brand unknown.
Working a k-yo-k step by step
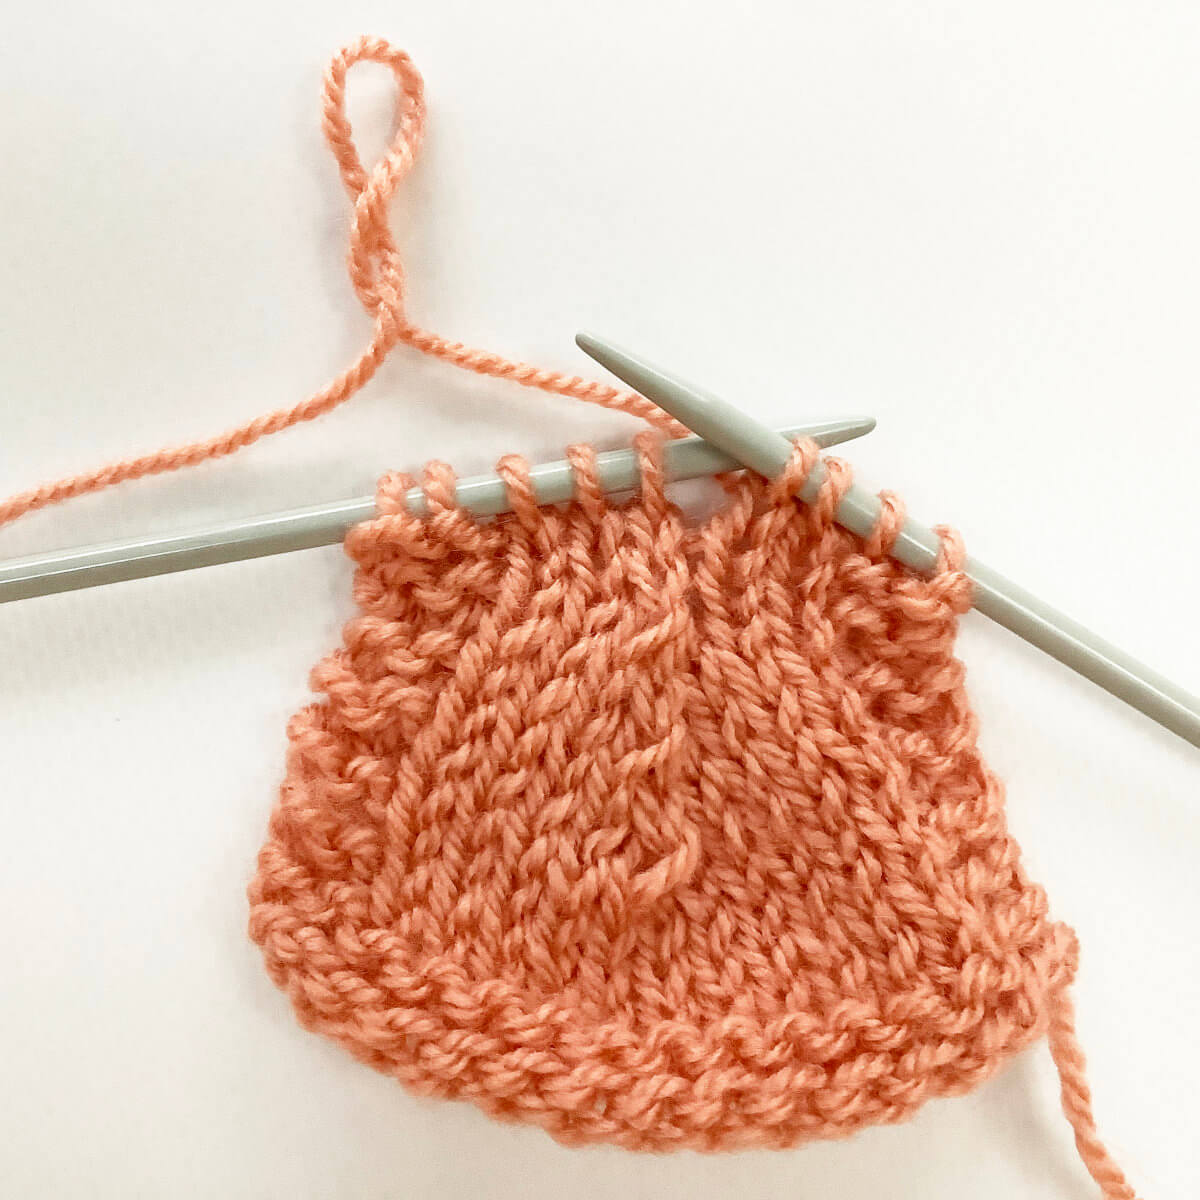
Work your way across the row until you’ve reached the point where you want to make the double increase.
In this case, I want to work the increase in the center stitch of the swatch.
First, work a knit stitch in the first stitch on the left-hand needle.
Don’t let the stitch slide off the needle yet!
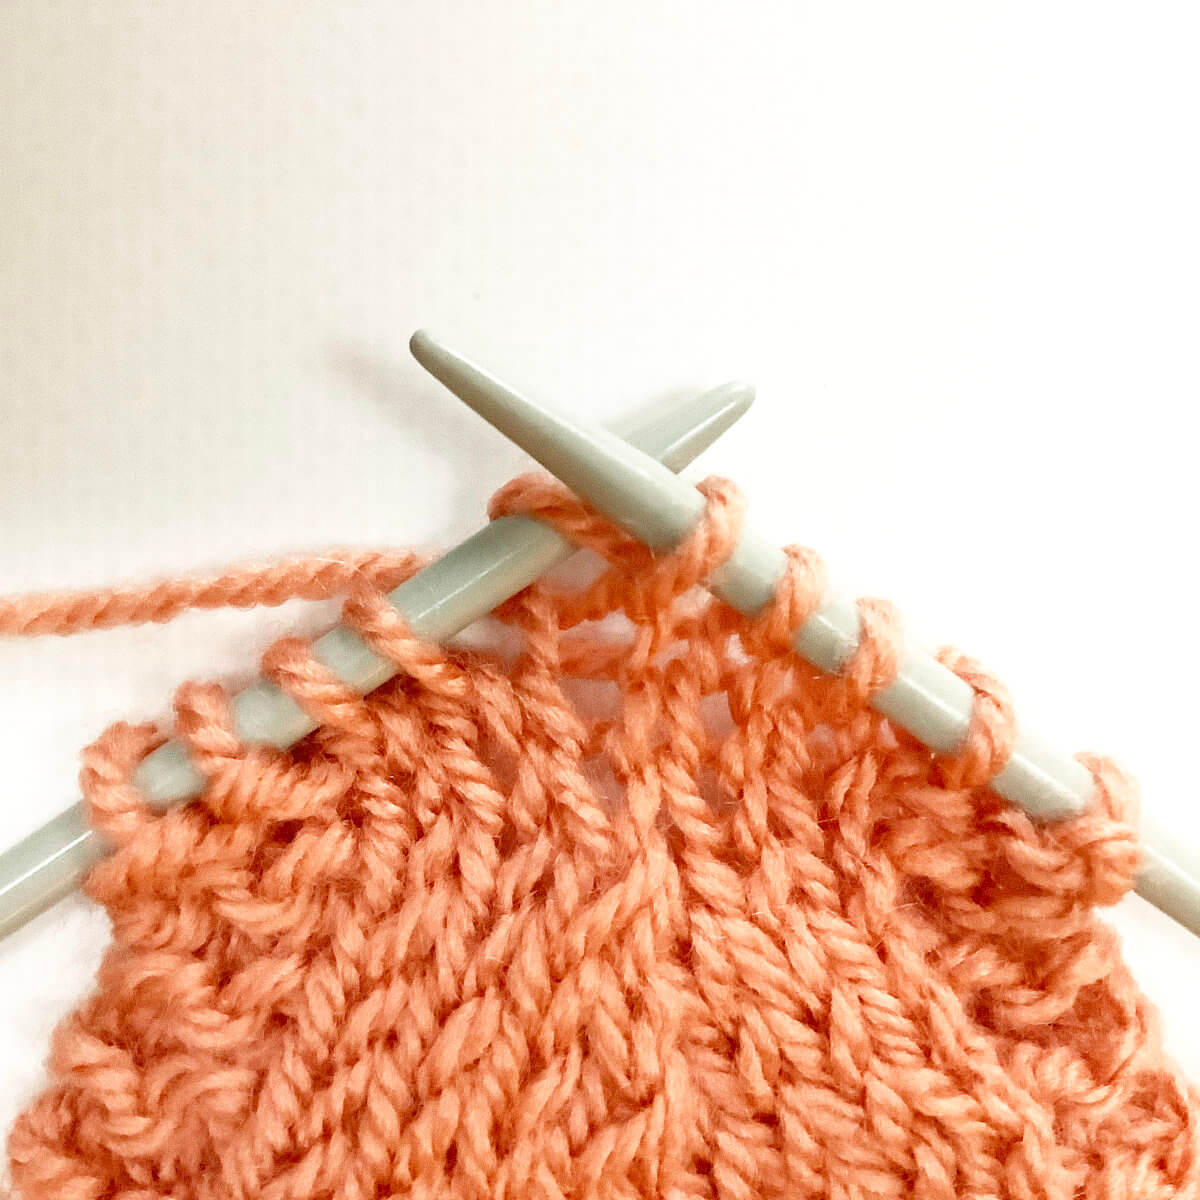
Now wrap the working yarn around the right-hand needle for the “yo” part of the increase.
Then work another knit stitch.
To complete the increase, slip the stitch worked off the needle.
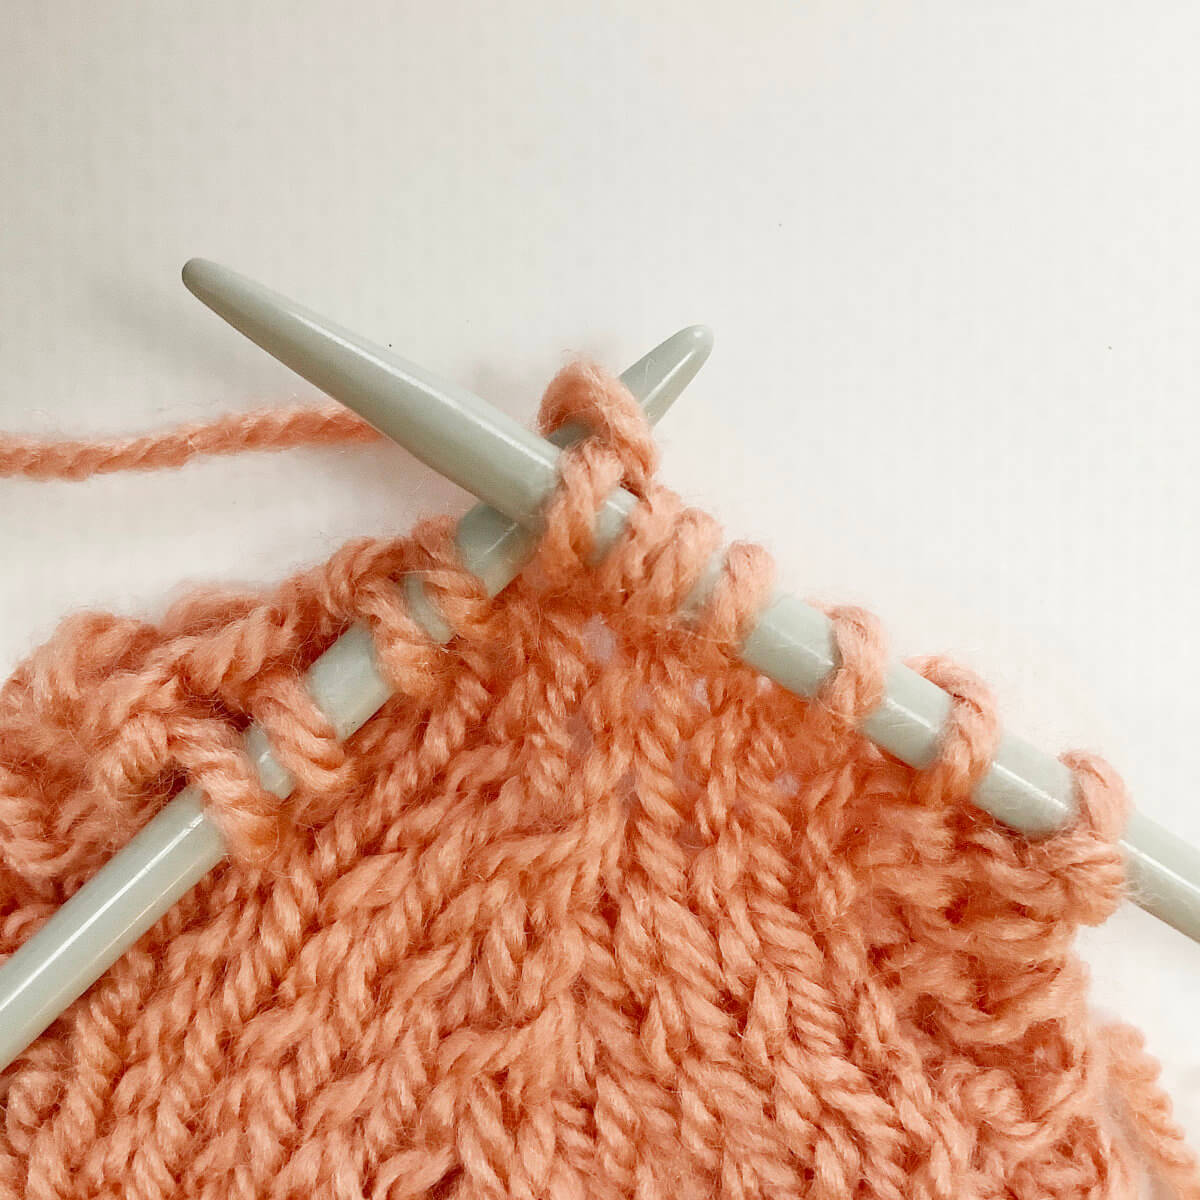
The result when a few more increase rows have been worked on the right side of the fabric.
Doesn’t it look pretty?
Thanks to my Patreon supporters for bringing you this freebie! Creating quality patterns and tutorials is a lot of work and resource-intensive. However, I find it important to give you free content like this tutorial. Thanks to the generous support of my Patreon supporters, I can make it happen. Thank you, patrons! Click here to join, or click here to read more about La Visch Designs on Patreon.
In a previous post, I already showed you how to work the right-leaning double decrease, in which 3 stitches are reduced to one: the one abbreviated with “k3tog”. This stands for “knit 3 stitches together”. It’s a very easy and very common way to reduce the number of stitches in your project and make it narrower. It’s also often used in lace knitting.
But what when your lace also requires decreases to be worked on the wrong side of the fabric? This is where the purled decrease p3tog comes in! This decrease is worked on the wrong side and looks just like a k3tog when the result is viewed on the right side of the fabric. It’s a pretty straight-forward decrease to work; purl 3 stitches together, to decrease the total number of stitches with 2. It is just like making a regular purl stitch, but you work through three stitches instead of one.
Below you can find how to work this decrease step by step, so get your materials and follow along!
Materials
Yarn: Paintbox Yarns Simply DK, a good value, good quality 100% acrylic yarn, here in the color 155 Vintage pink.
Knitting needles: This is a pair of straights that I picked up at the second-hand store when I started knitting, brand unknown.
Working a p3tog step by step
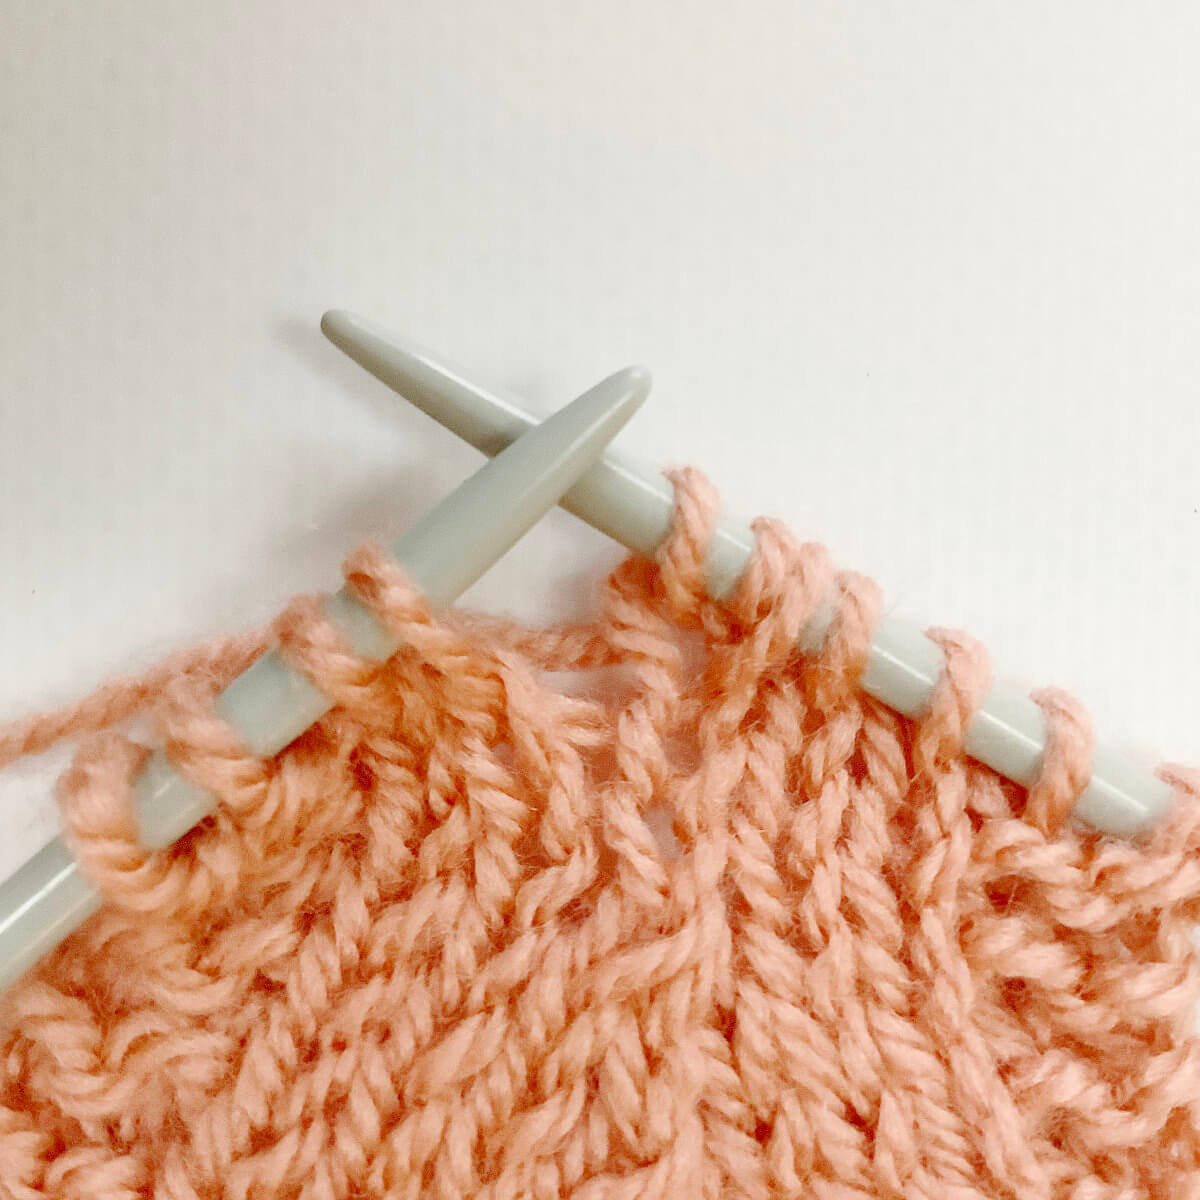
Work your way across the row until you’ve reached the point where you want to make the decrease.
In this case, I want to work the decrease over the 3 stitches in the middle of the swatch.
Insert the needle
Now insert the needle purl wise through the first 3 stitches on the left-hand needle
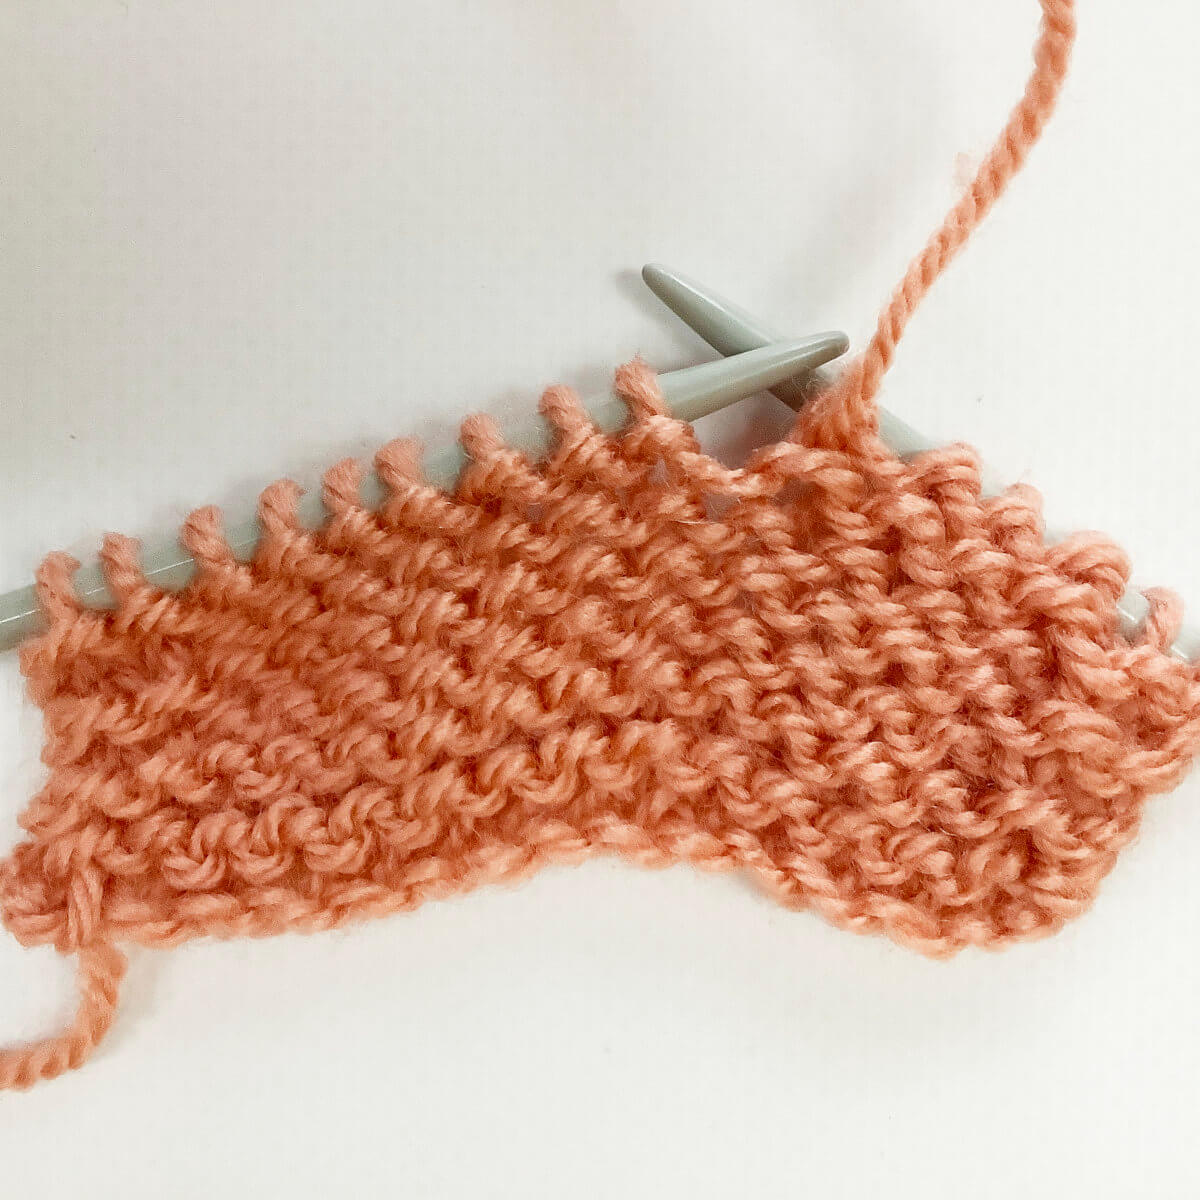
Now wrap the working yarn around the right-hand needle….
… and pull the yarn through the 3 stitches…
To complete the decrease, slip the 3 stitches worked off the needle.
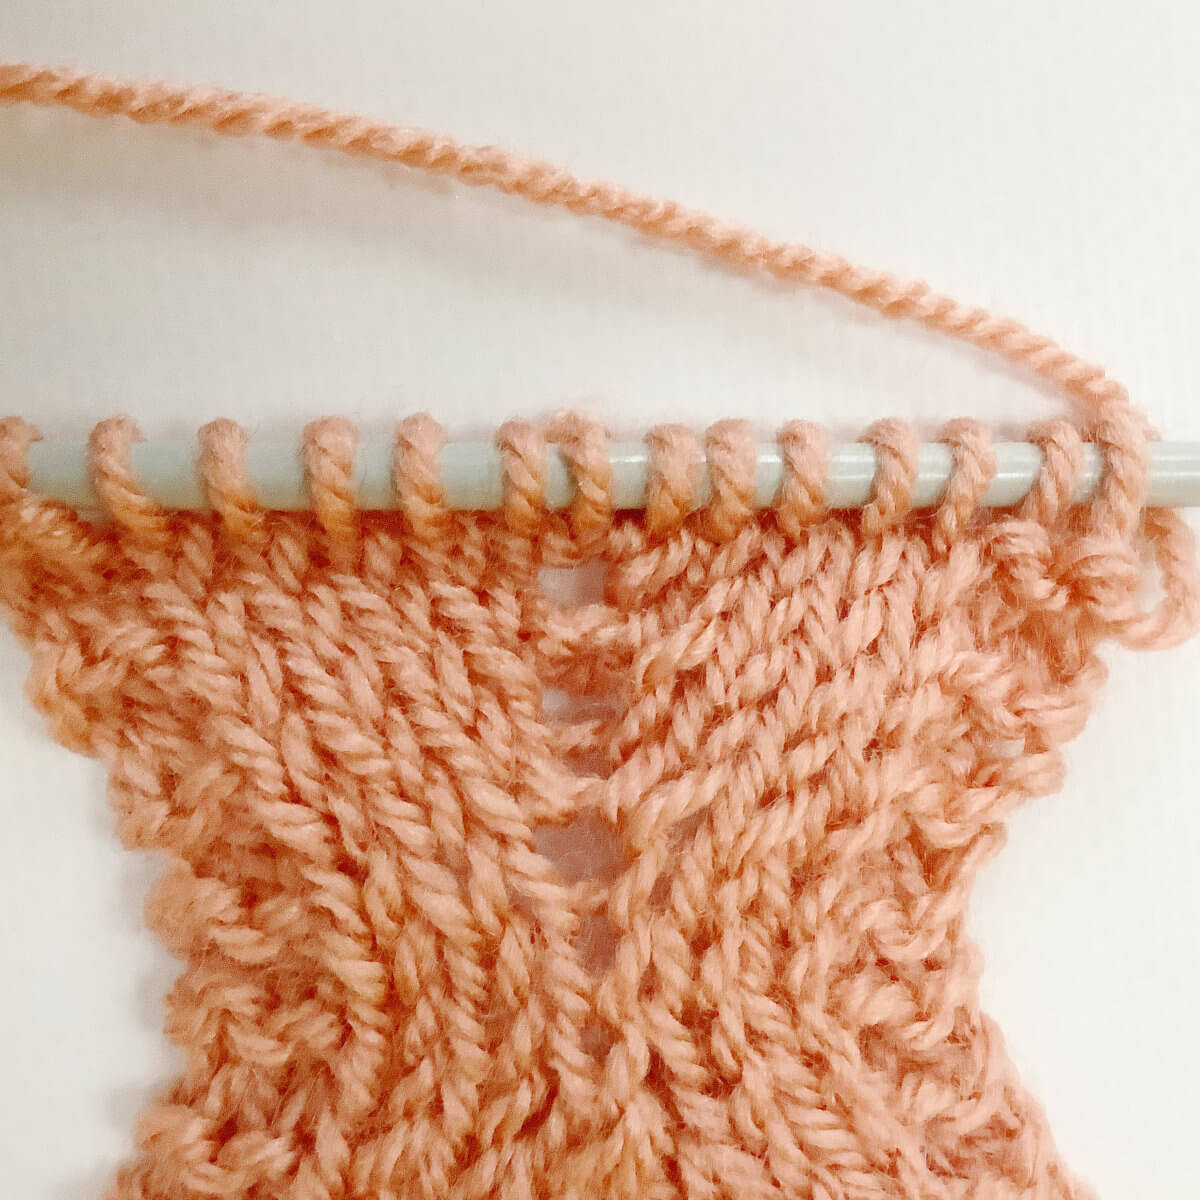
The result
When viewed from the right side of the fabric, this decrease looks exactly like the right-leaning k3tog decrease!
Thanks to my Patreon supporters for bringing you this freebie! Creating quality patterns and tutorials is a lot of work and resource-intensive. However, I find it important to give you free content like this tutorial. Thanks to the generous support of my Patreon supporters, I can make it happen. Thank you, patrons! Click here to join, or click here to read more about La Visch Designs on Patreon.
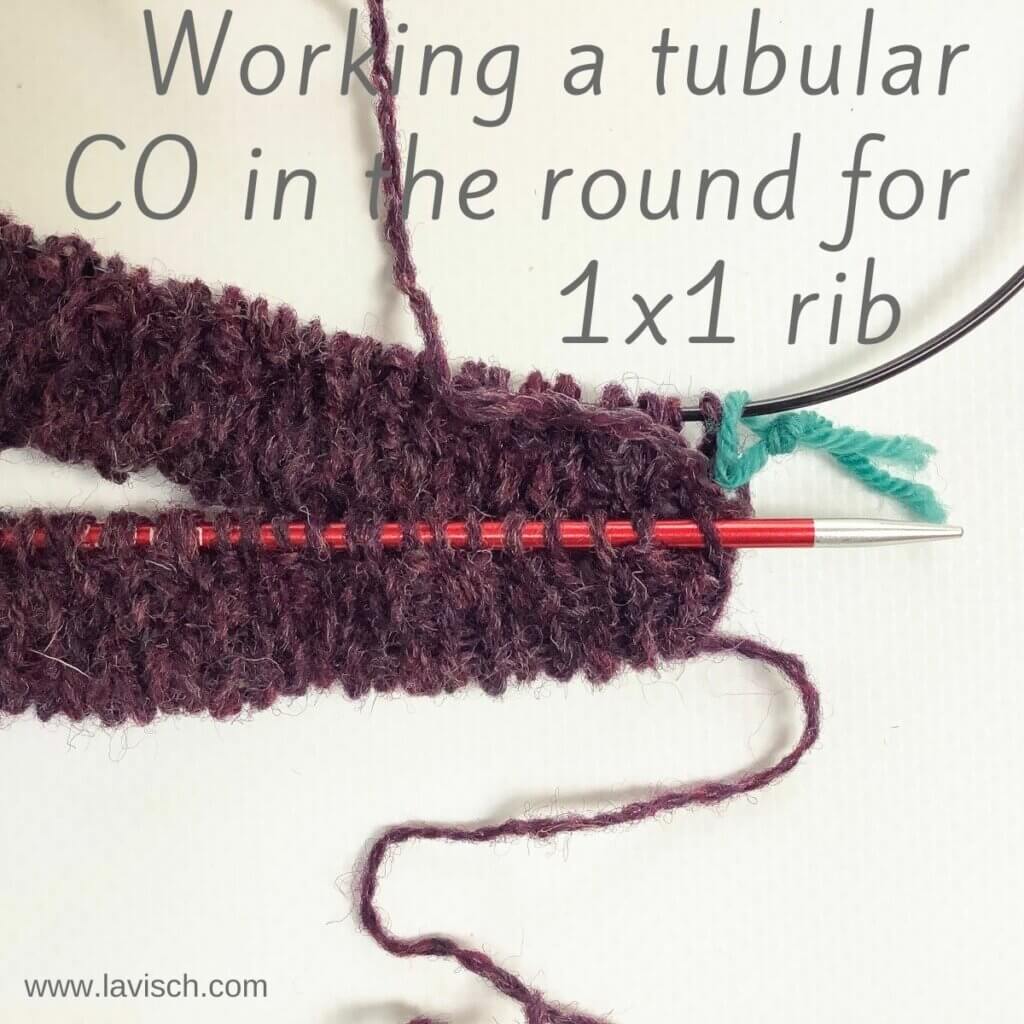
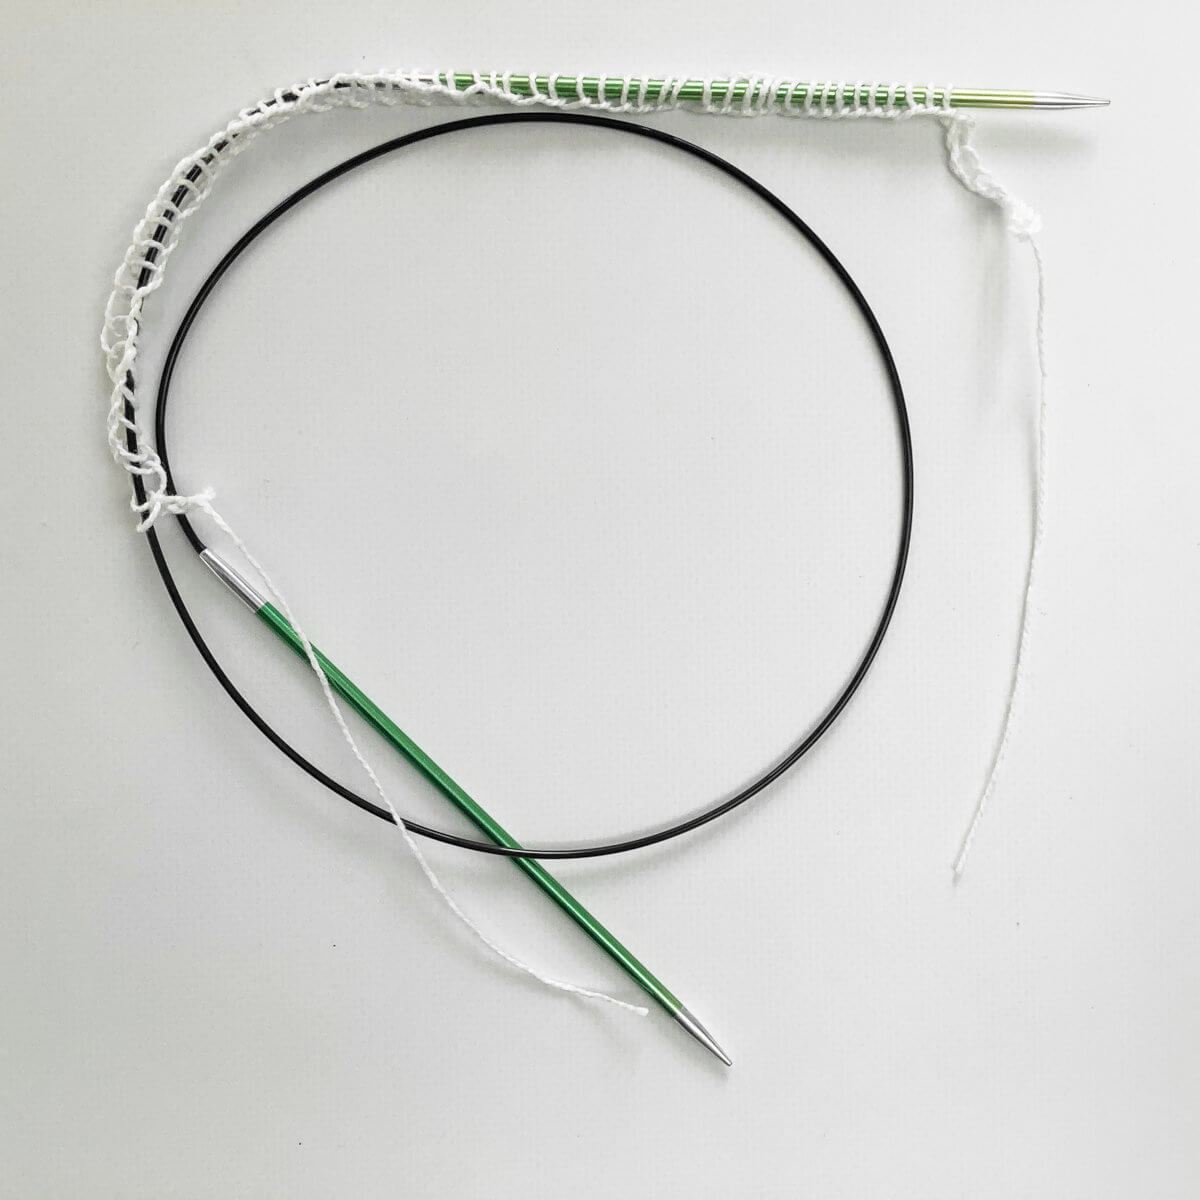
The tubular cast on creates a rounded edge of your knitting project, as well as being very stretchy. This makes it a very good cast on for edges that are prone to wear and tear. And, of course, where the stretch is useful. Think, for example, of top-down socks, and the start of a bottom-up hat. In this example I’m casting on for a top-down sweater.
Of course, there are many ways to work a tubular cast on. This particular version is for working in the round in k1, p1 rib patterning.
Materials used
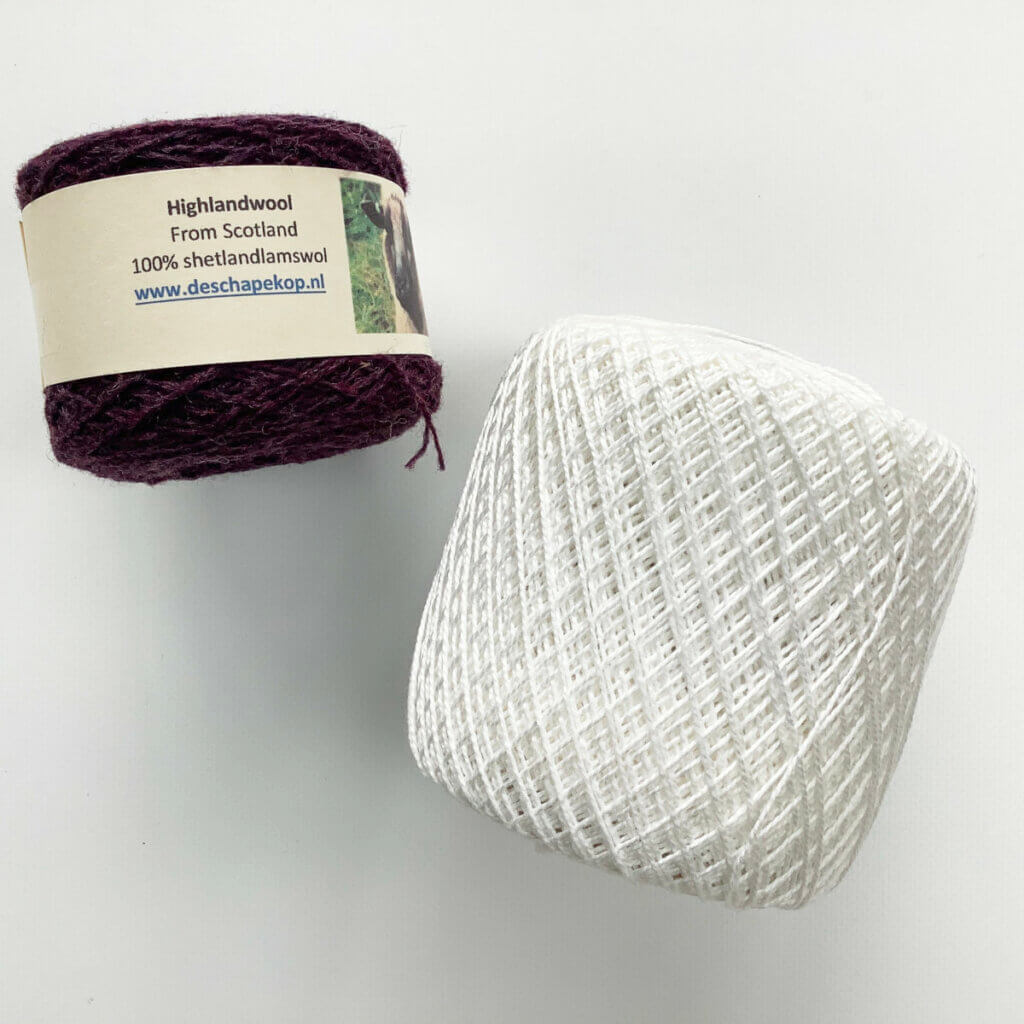
Yarn: Shetland Lambswool from De Schapekop, a yarn very similar to Jamieson & Smith 2ply Jumper Weight, and no. 5 crochet thread or other smooth waste yarn.
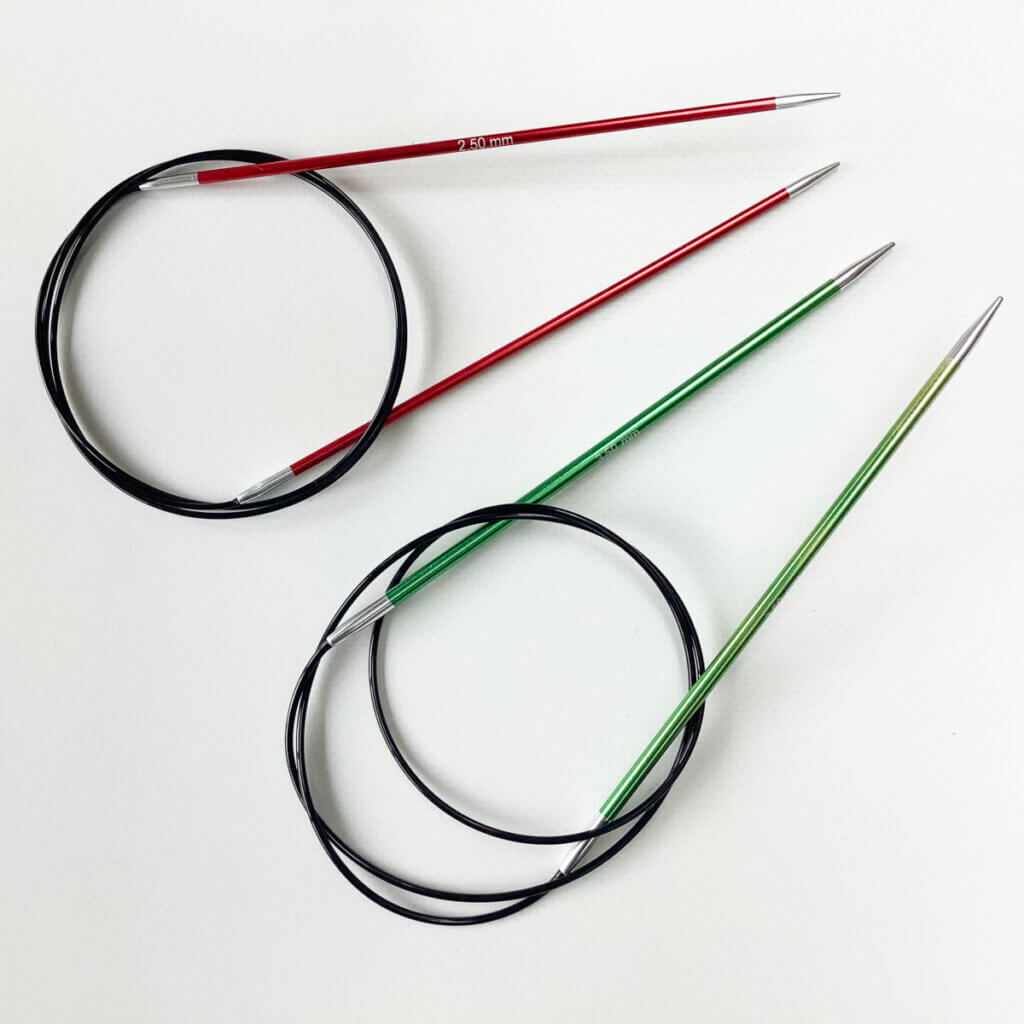
Needles: KnitPro Zing Fixed Circular Needles. In this tutorial, I used the 2.5 mm (US 1 1/2) and the 3.5 mm (US 4) size. Both with a cable length of 80 cm (32 inches).
Other materials: a crochet hook, and a stitch marker.
Working a tubular CO in the round for 1×1 rib step by step
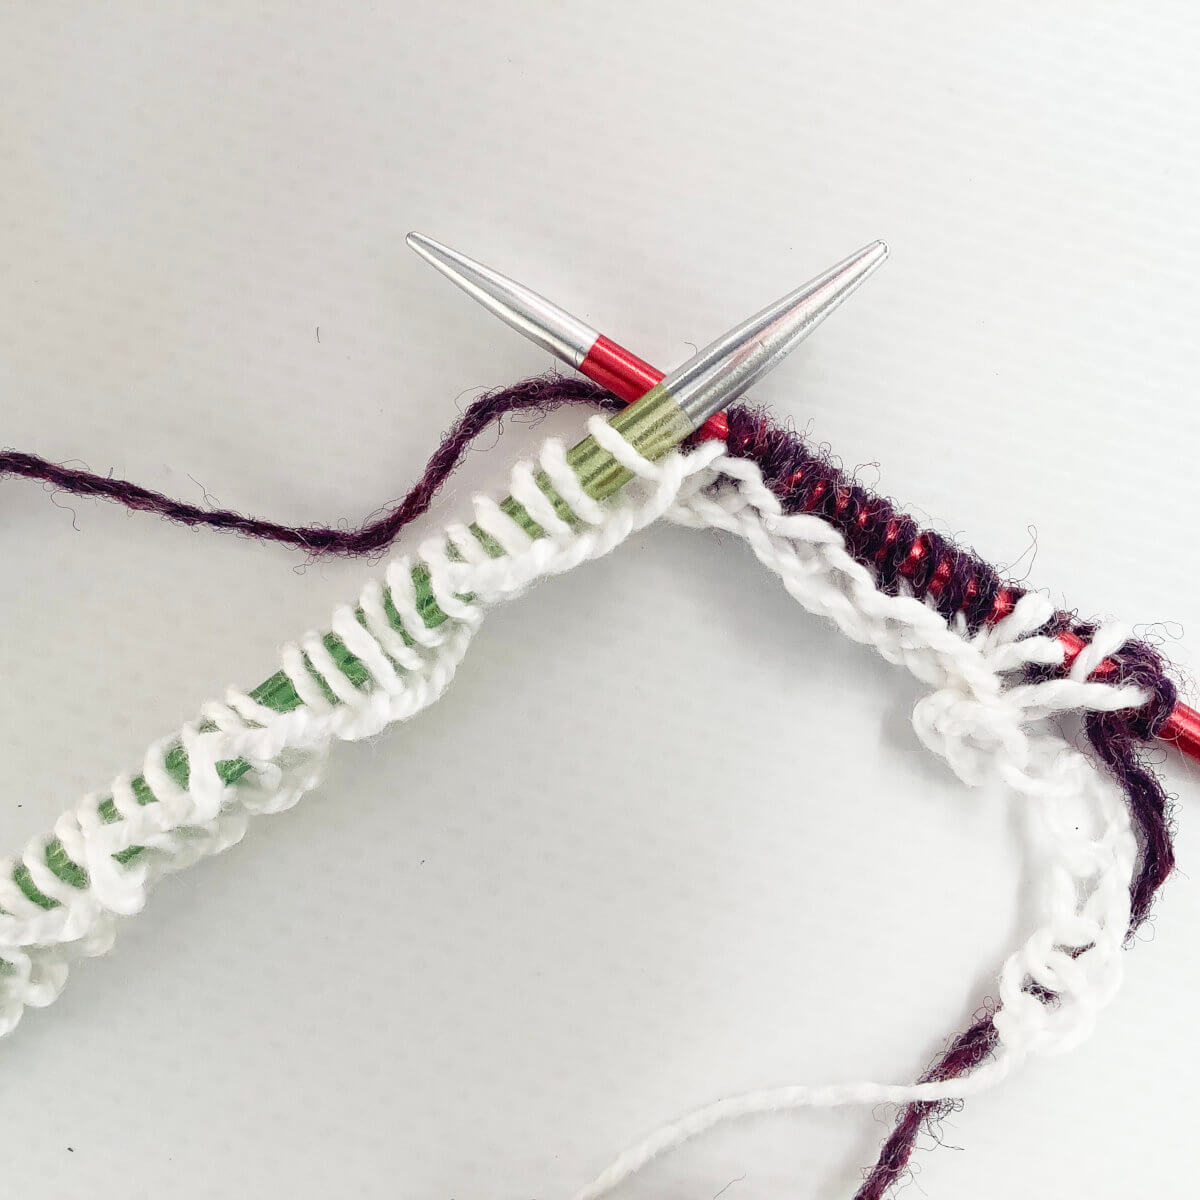
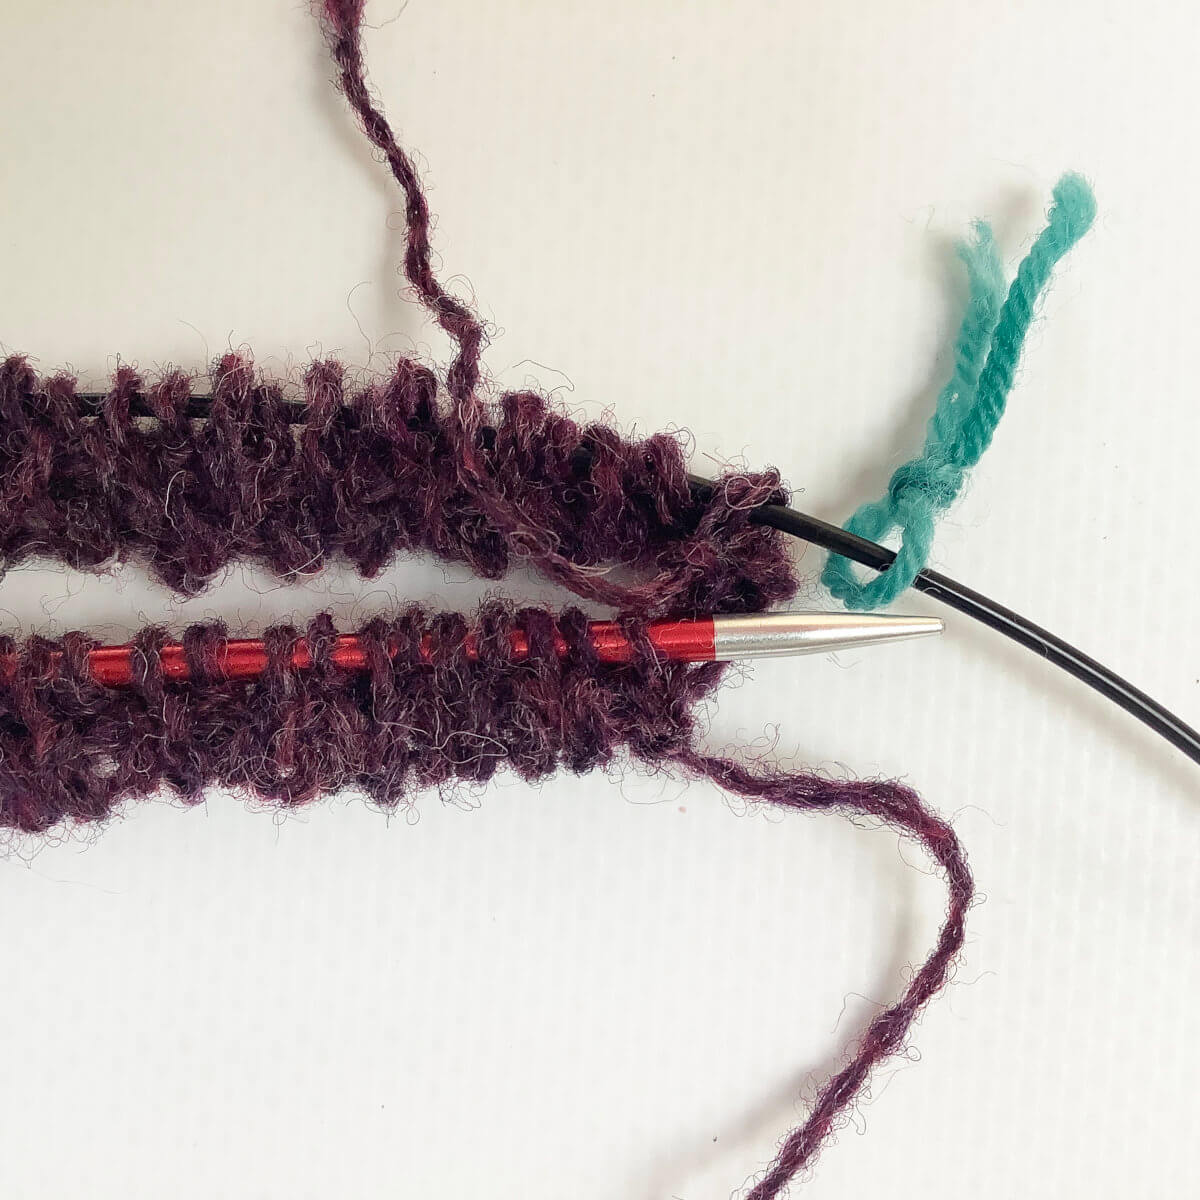
First, using the larger size needles, the smooth waste yarn and the provisional cast on of your choice, cast on half as many stitches as you need according to your pattern.
Now, using the smaller size needle and the working yarn, work (k1, yo) across all provisionally cast on stitches.
After this row is finished, as shown below, it’s time to join into the round.
The last worked stitch is a yarn over, so make sure it stays intact when joining into the round.
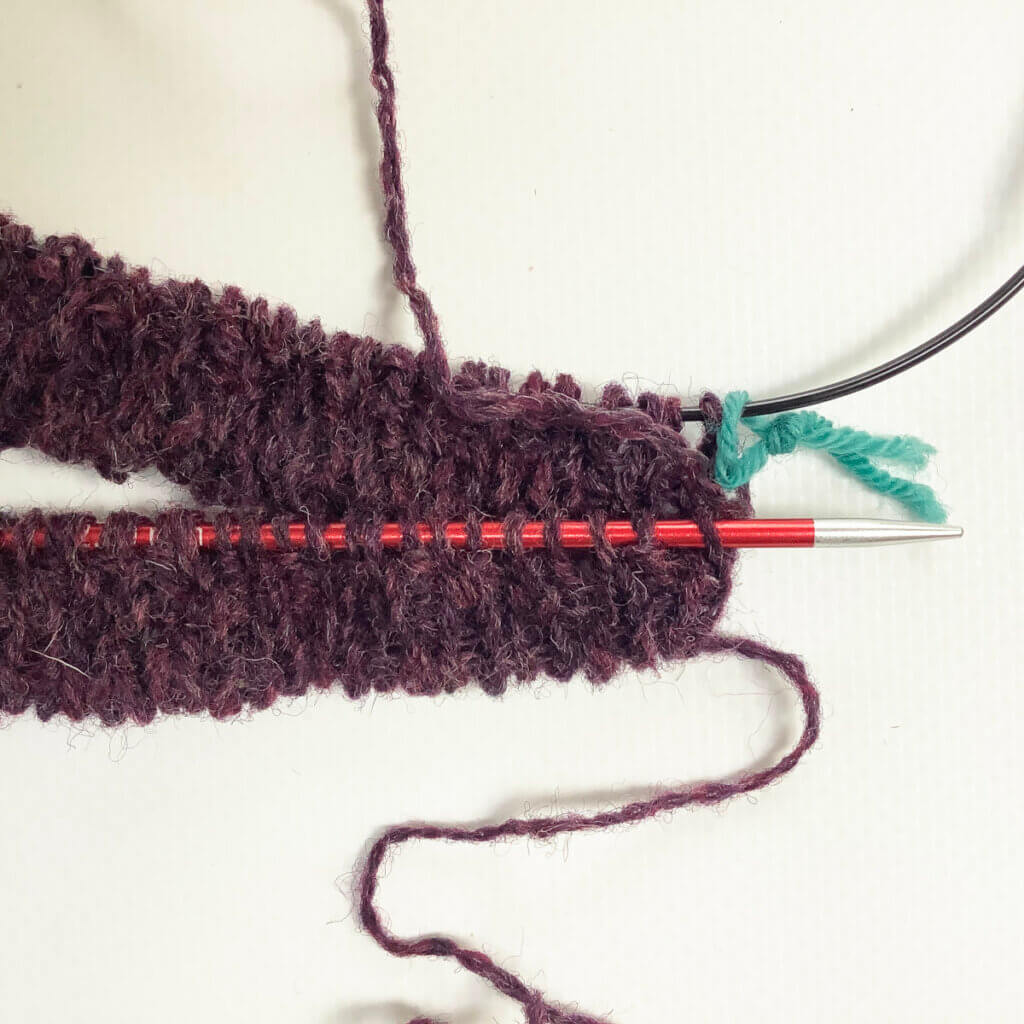
Here I’ve rearranged my stitches to continue knitting in the round, magic loop style.
Before joining, I made sure that my stitches weren’t twisted, and I’ve added the stitch marker to indicate the beginning (and end) of a round. Also, do you see that the yarn over is still there, behind the stitch marker?
In this step, work (knit 1, slip 1 purl wise with the yarn in front) to the end of the round.
In other words: knit every stitch that was knit in the previous round, and slip every yarn over. Below, is how it looks after this round is completed.
Next, work (slip 1 purl wise with the yarn in the back, purl 1) to the end of the round.
In other words: slip every stitch that was knit in the previous round, and purl every stitch that was slipped. This is how it then looks:
In this step, work (knit 1, slip 1 purl wise with the yarn in front) to the end of the round.
In other words: knit every stitch that was slipped in the previous round, and slip every stitch that was purled.
Now we repeat step 6: work (slip 1 purl wise with the yarn in the back, purl 1) to the end of the round.
In other words: slip every stitch that was knit in the previous round, and purl every stitch that was slipped.
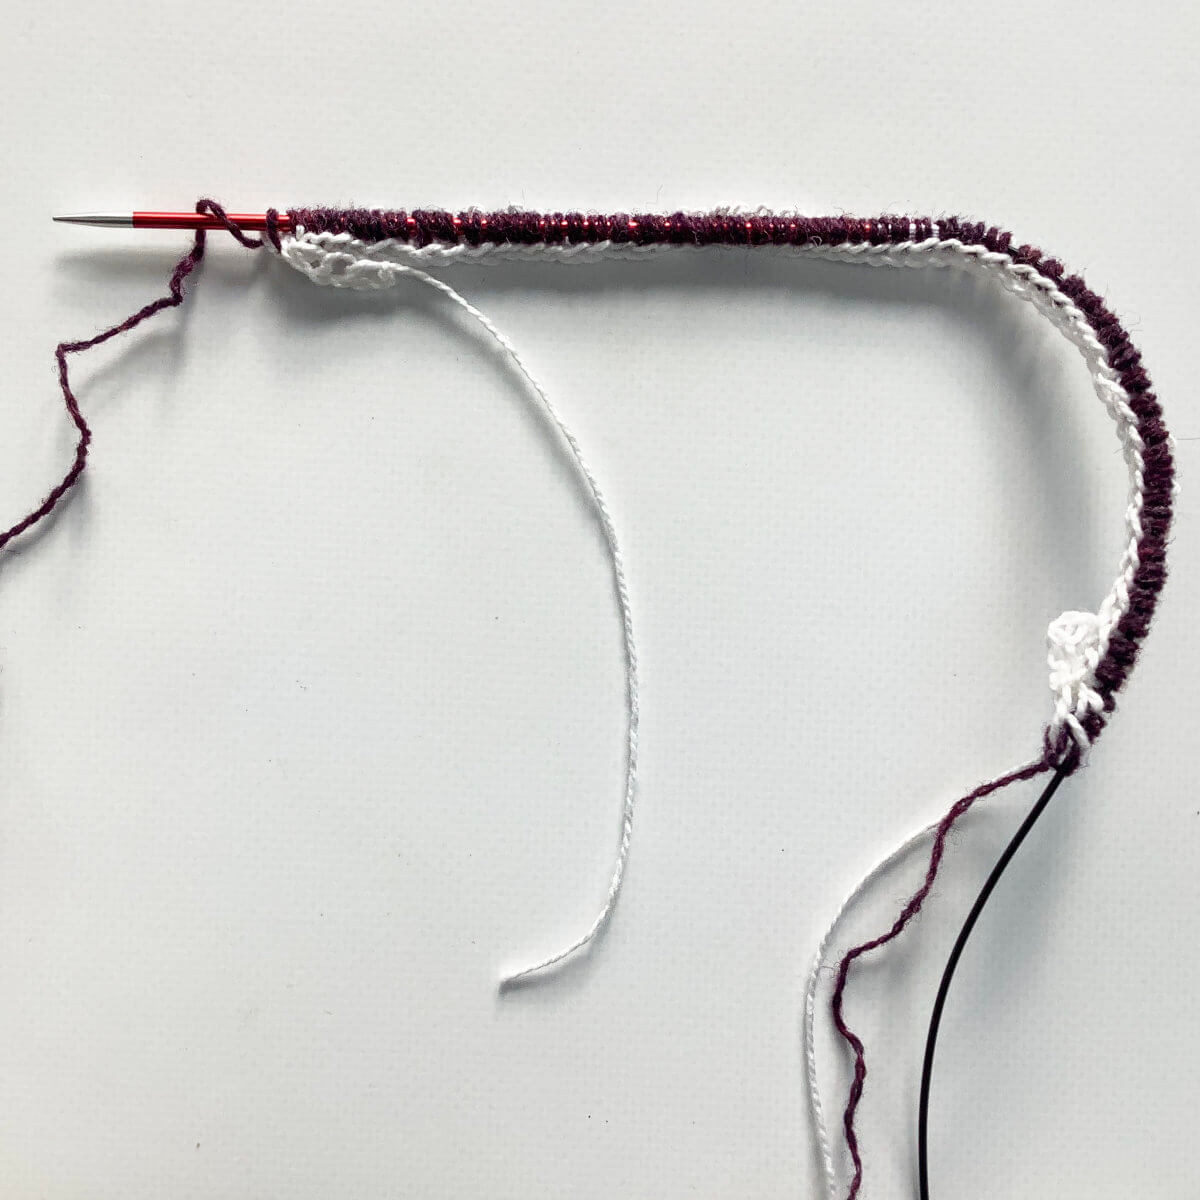
In this step, it’s time to unravel the provisional cast on
Starting at the end that you indicated when doing the provisional cast on, undo the knot and gently pull the cast on loose.
This is the cast-on result, ready for further knitting (k1, p1) rib in the round (using magic loop) as described in your pattern!
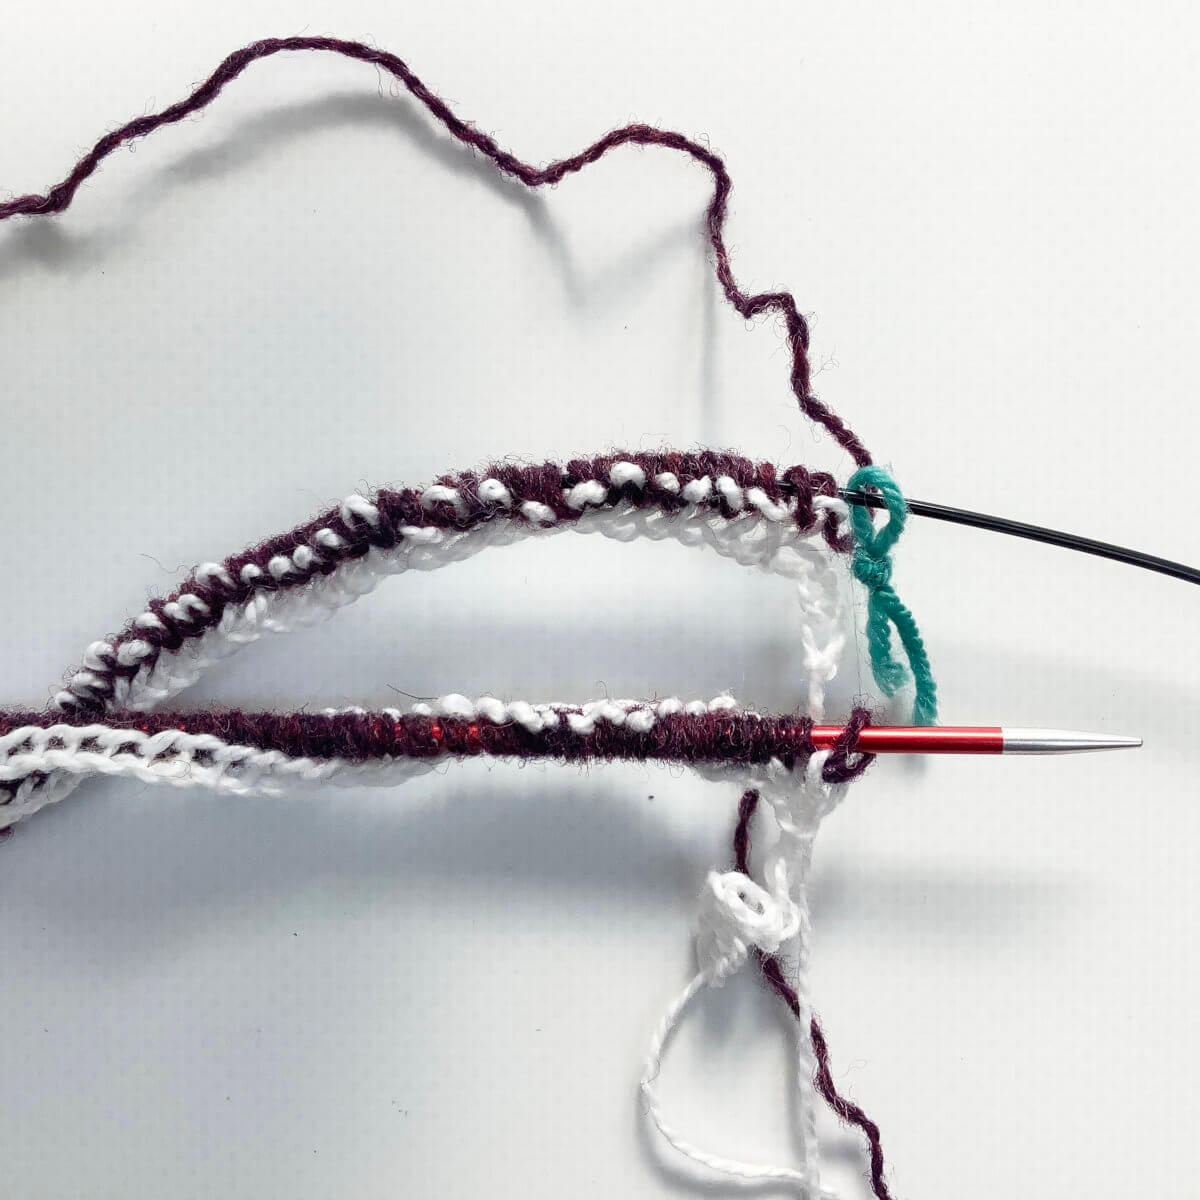
A comparison
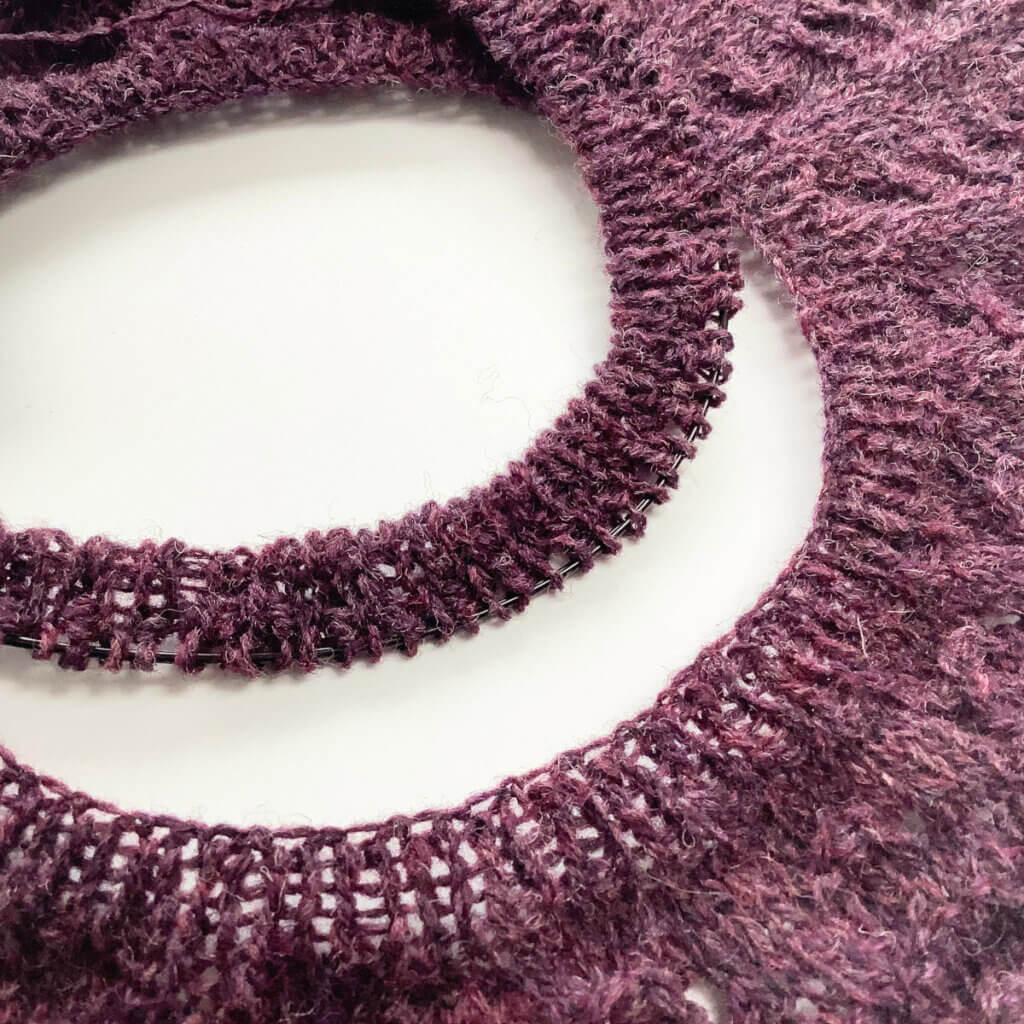
I thought it would be useful to compare the tubular cast on with a regular knitted on cast on one. So, I continued the piece above with another few rounds in (k1, p1) rib until it measured 1.5 cm / 0.6″.
Now take a look at the following picture. The lower neckband has a regular knitted-on cast on, followed by 1×1 rib for 1.5 cm / 0.6″. The one at the top has the tubular cast on in the round with 1×1 rib. Both pieces are worked in the same yarn, and with the same needle size.
I think the neckband with the tubular cast on looks much better, with its rounded edge. It is also much less likely to give issues with wear & tear, because there are no single strands of yarn right at that edge. What do you think?
Thanks to my Patreon supporters for bringing you this freebie! Creating quality patterns and tutorials is a lot of work and resource-intensive. However, I find it important to give you free content like this tutorial. Thanks to the generous support of my Patreon supporters, I can make it happen. Thank you, patrons! Click here to join, or click here to read more about La Visch Designs on Patreon.
Most of my projects are about knitting lace, not cables. The reason? I find that with cabling, my flow is very much interrupted. First by getting the cable needle. Next, by manipulating all three needles I have in my hands at that moment while working the stitches. Followed by laying the cable needle aside again. All of this to repeated multiple times in a row, depending on the patterning, of course.
For complex cables, I see no way around using a cable needle. For the simple twists only involving 2 stitches, it’s another matter, though! Cabling itself is nothing more than working in another order than the one they originally appeared on the knitting needle. So, if we’re talking about simple twists only involving 2 stitches, we can easily change the order around without using a cable needle. And, of course, without having a big risk of dropping a stitch.
Needles: Addi Fixed Circular Needles. In this tutorial, I used the 4.5 mm (US 7) size with a cable length of 80 cm (32 inches).
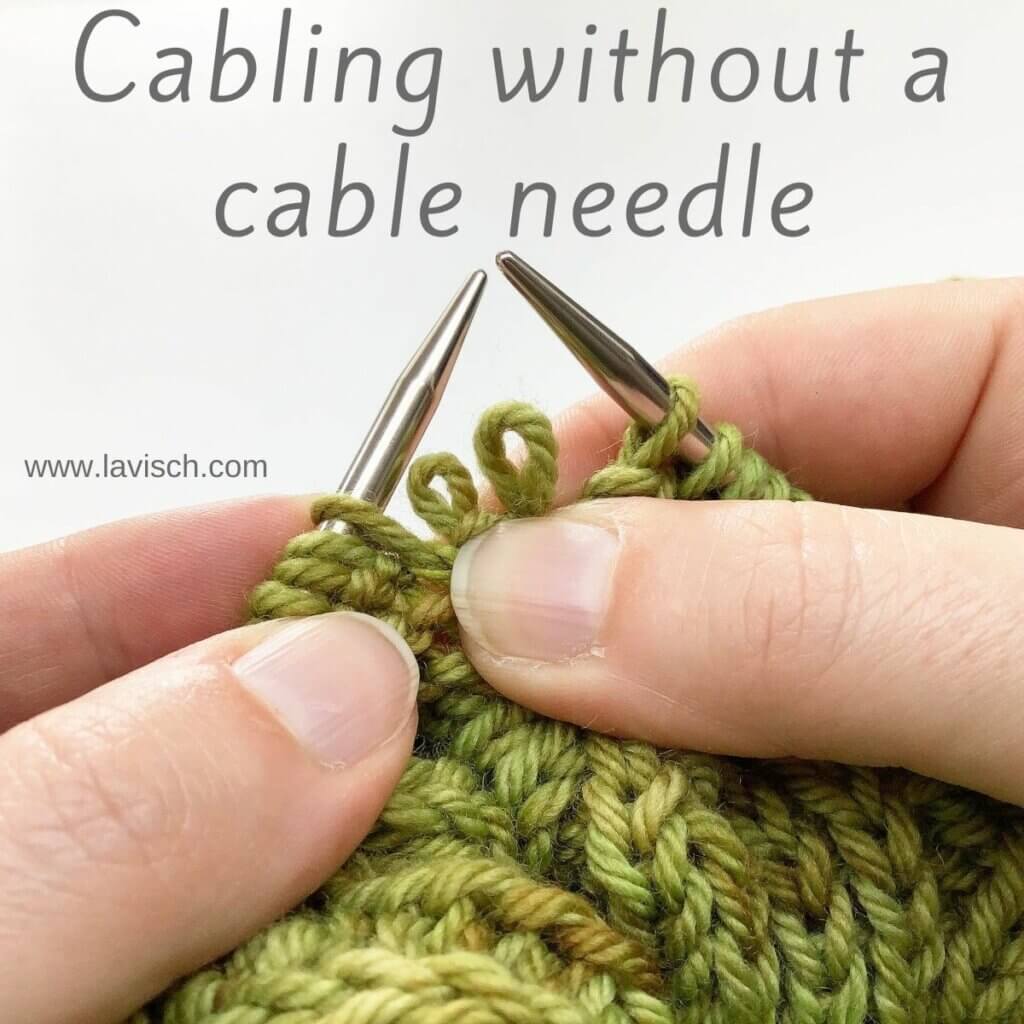
Cabling without a cable needle step by step
In this example, I’m working on my Mossy Cables shawl that involves various types of cables. The ones that can easily be done without a cable needle, are the following ones: 1/1 LPC – a left cross cable over 2 stitches: Slip next stitch to cable needle and place at front of work, p1, then k1 from cable needle. 1/1 RPC – right cross cable over 2 stitches: Slip next stitch to cable needle and place at back of work, k1, then p1 from cable needle.
To start, we knit to the point where a cable has to be worked.
See those 2 stitches on the left-hand needle? I want to reverse the order of that purl and knit stitch, to make it seem that the column of knit stitches curves outwards from the center cable. To do so, I want the knit stitch to cross in front and to the right of the purl stitch. In other words: I’ll be working a 1/1 RPC or right cross cable.
To start, I grab the work directly below the 2 stitches, as shown in the picture below.
This way, I can remove them from the knitting needle without having the risk of them running down and ruining my work.
Here I’ve removed the 2 stitches from the needle.
Keep squeezing that fabric, we don’t want to drop one of these stitches!
To change the order of the stitches, I first place the stitch on the right (the purl stitch in this case) back on the needle.
While doing so, keep your fingers underneath the other stitch to keep it from running down. Please note that if I was working a left cross cable instead of a right cross cable, I would have held the remaining loose stitch at the back, instead of at the front of the work as pictured.
Now use the working (right-hand) needle to catch the remaining loose stitch from the front and also put it on the left-hand needle.
For a left cross cable, I would have caught the remaining stitch from the back of the work.
Now the order of the stitches has been changed, ready to work!
This is how it then looks in the case of the right cross cable:
For this right cross cable, I have to work 1 k, followed by 1 p.
This is how it looks when done:
And that’s all there is to cabling without a cable needle!
Thanks to my Patreon supporters for bringing you this freebie! Creating quality patterns and tutorials is a lot of work and resource-intensive. However, I find it important to give you free content like this tutorial. Thanks to the generous support of my Patreon supporters, I can make it happen. Thank you, patrons! Click here to join, or click here to read more about La Visch Designs on Patreon.
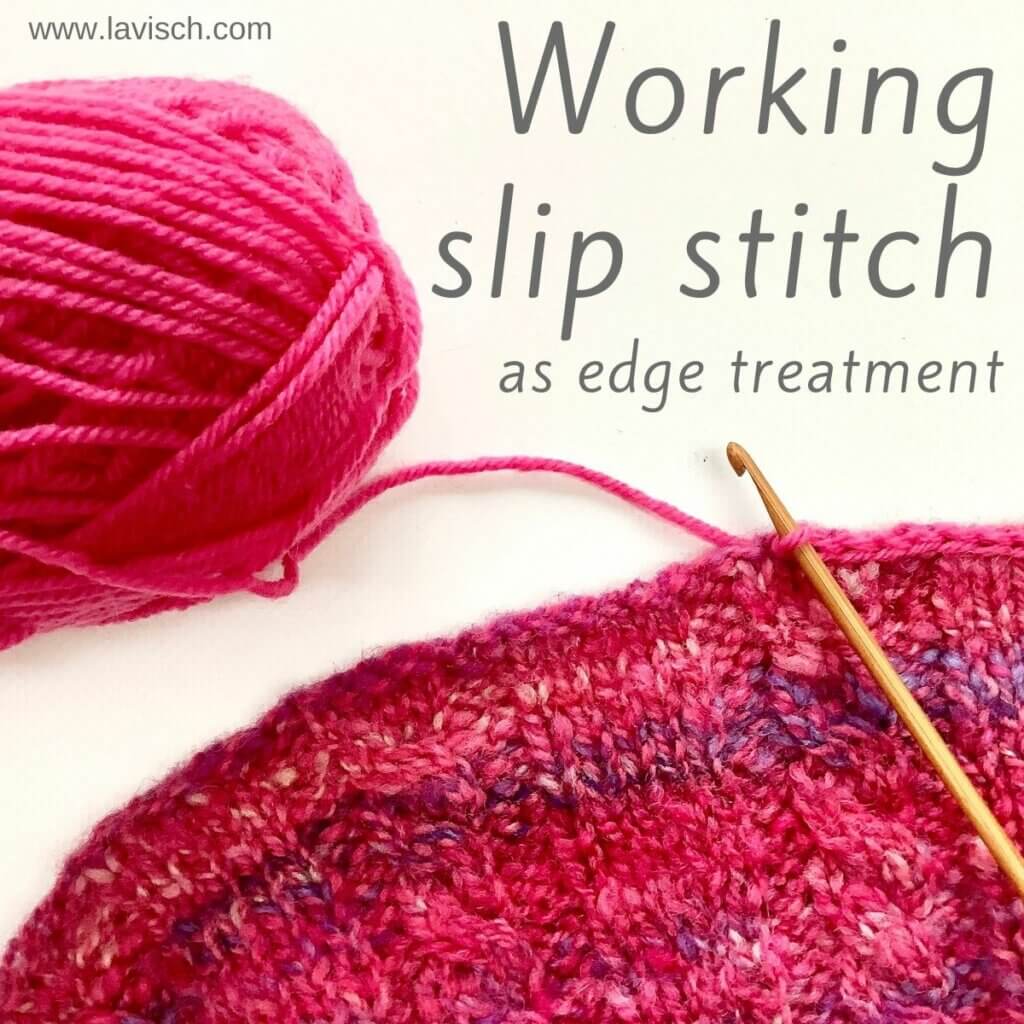
In my previous tutorial, I showed you how I went about fixing my mr Greenjeans cardigan to make it more wearable. As part of the fix, I also worked slip stitching along all outer edges of the cardigan, to tie the new contrasting yarn together better with the original elements of the garment. For this reason, I worked the slip stitch with the right side facing. Doing something similar with the same yarn as used in the rest of the project, could be done to make the edges look a tad neater.
Another application for slip stitching as edge treatment would be to work it on the inside (wrong side facing) of the garment. In particular, along the edge of the back neck, and possibly also the shoulder seam. Doing this with a non-stretchy yarn can help prevent stretching and sagging of these edges, if the garment is prone to that.
So, let’s get started!
Working slip stitch step by step
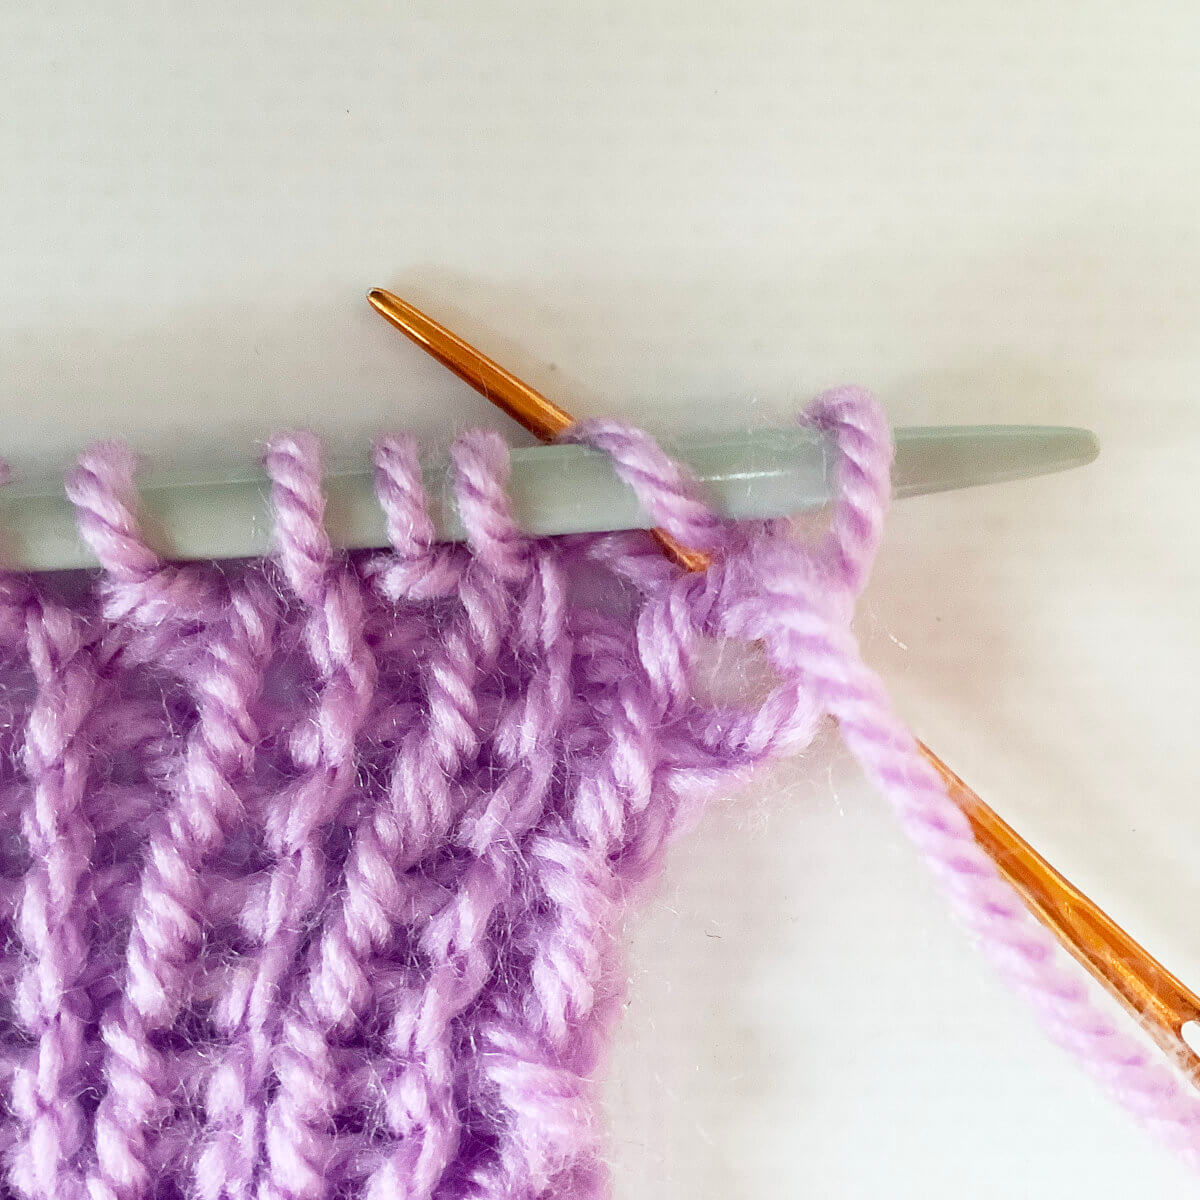
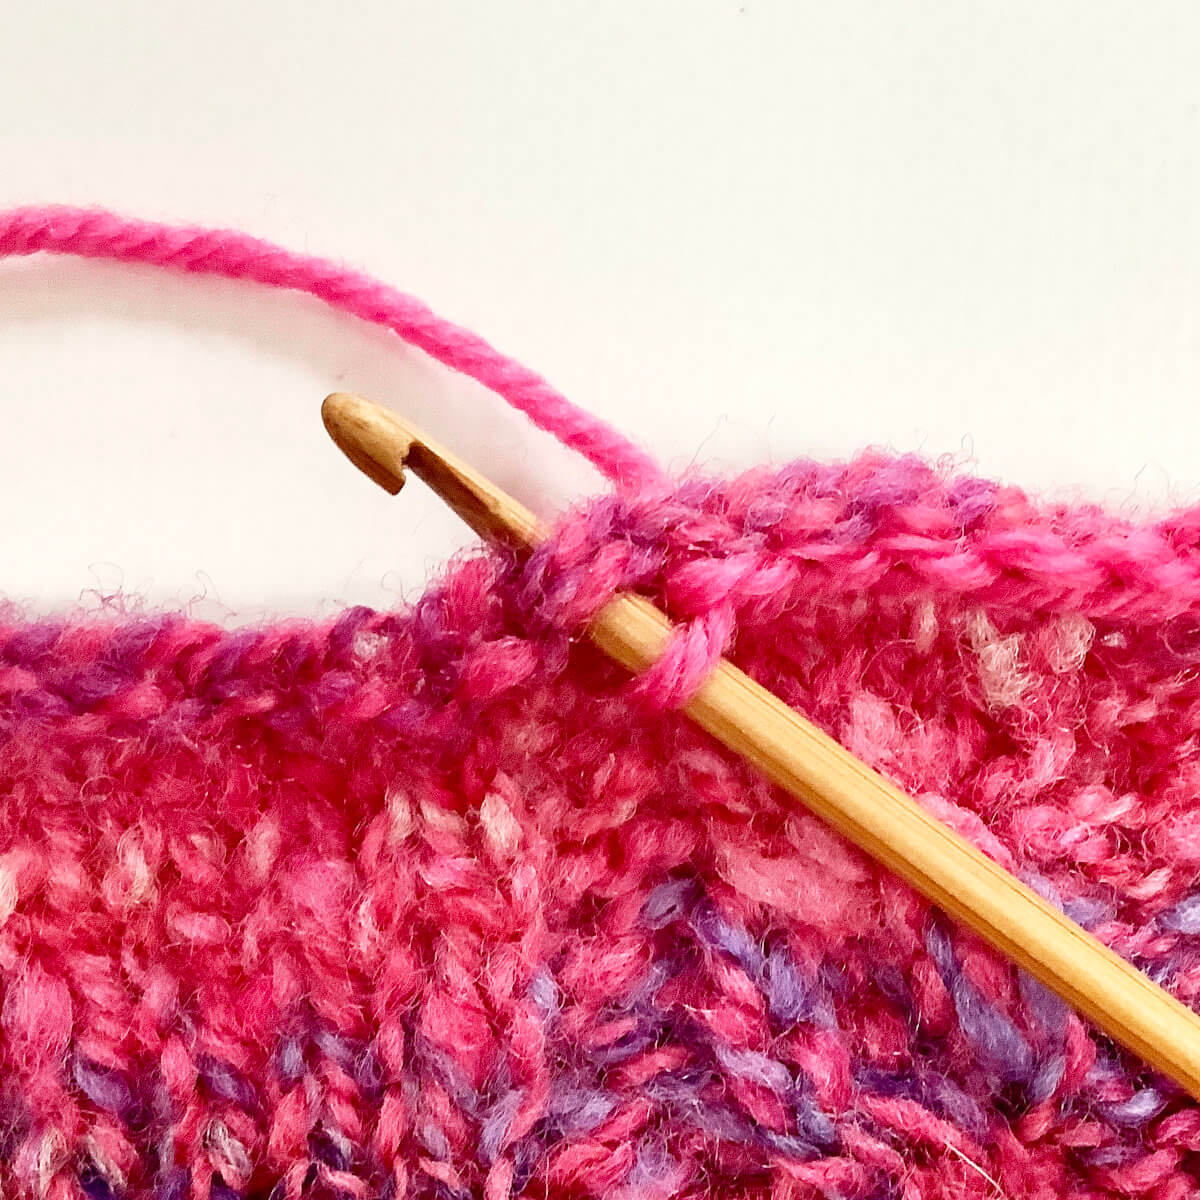
Insert a crochet hook into the stitch at the edge of the fabric.
On both cast-on and bind-off edge, each stitch looks like a little “V”. Insert the hook underneath both strands of the V.
Wrap the yarn around your hook…
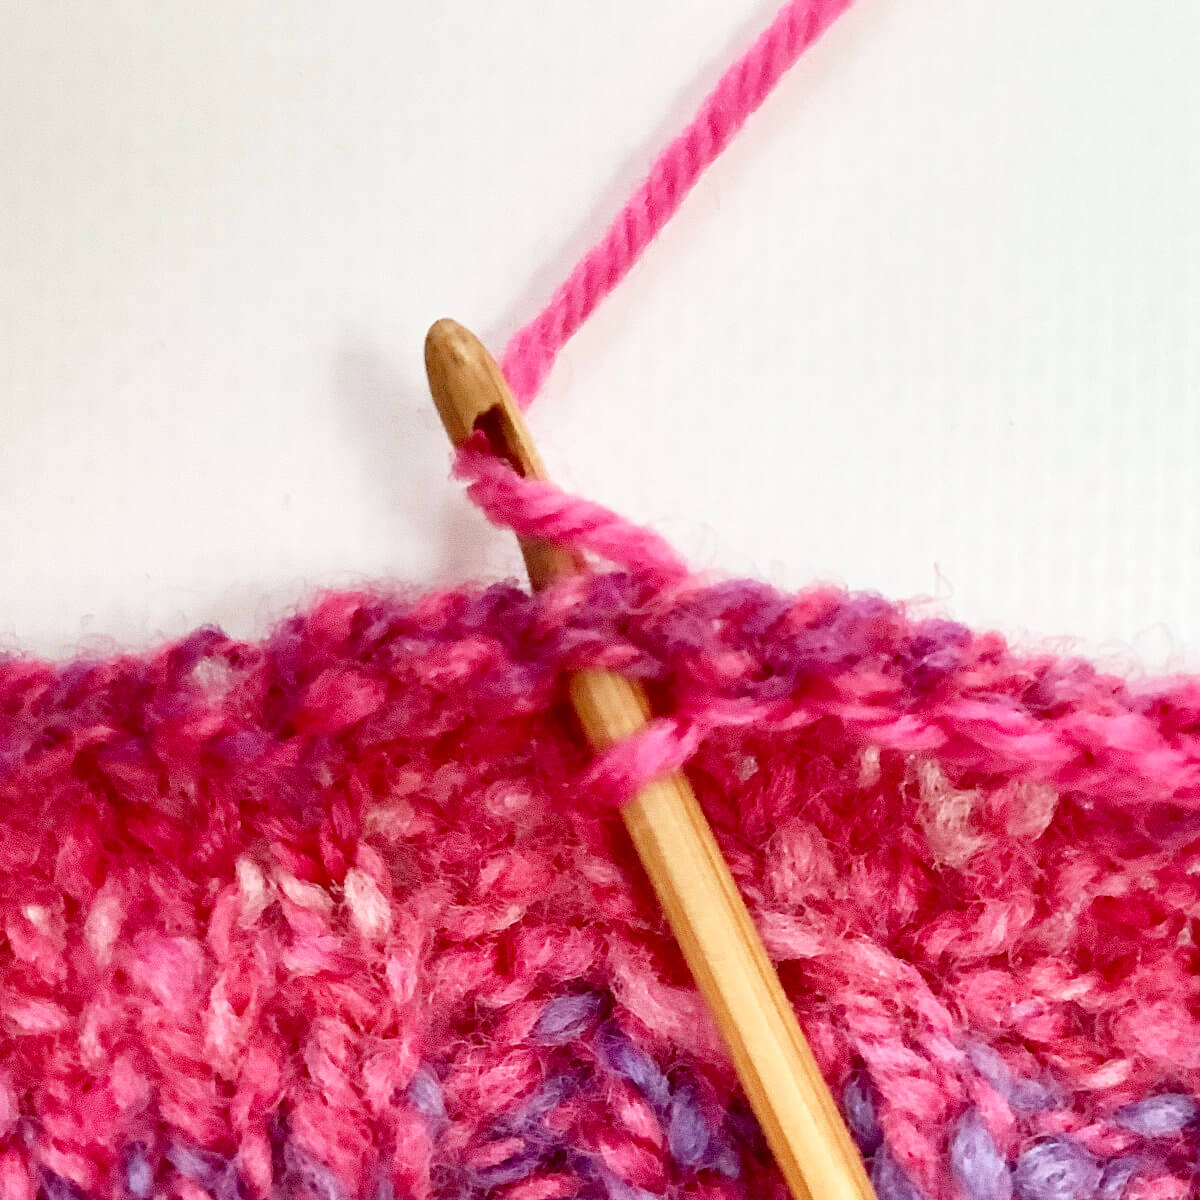
… and pull it through.
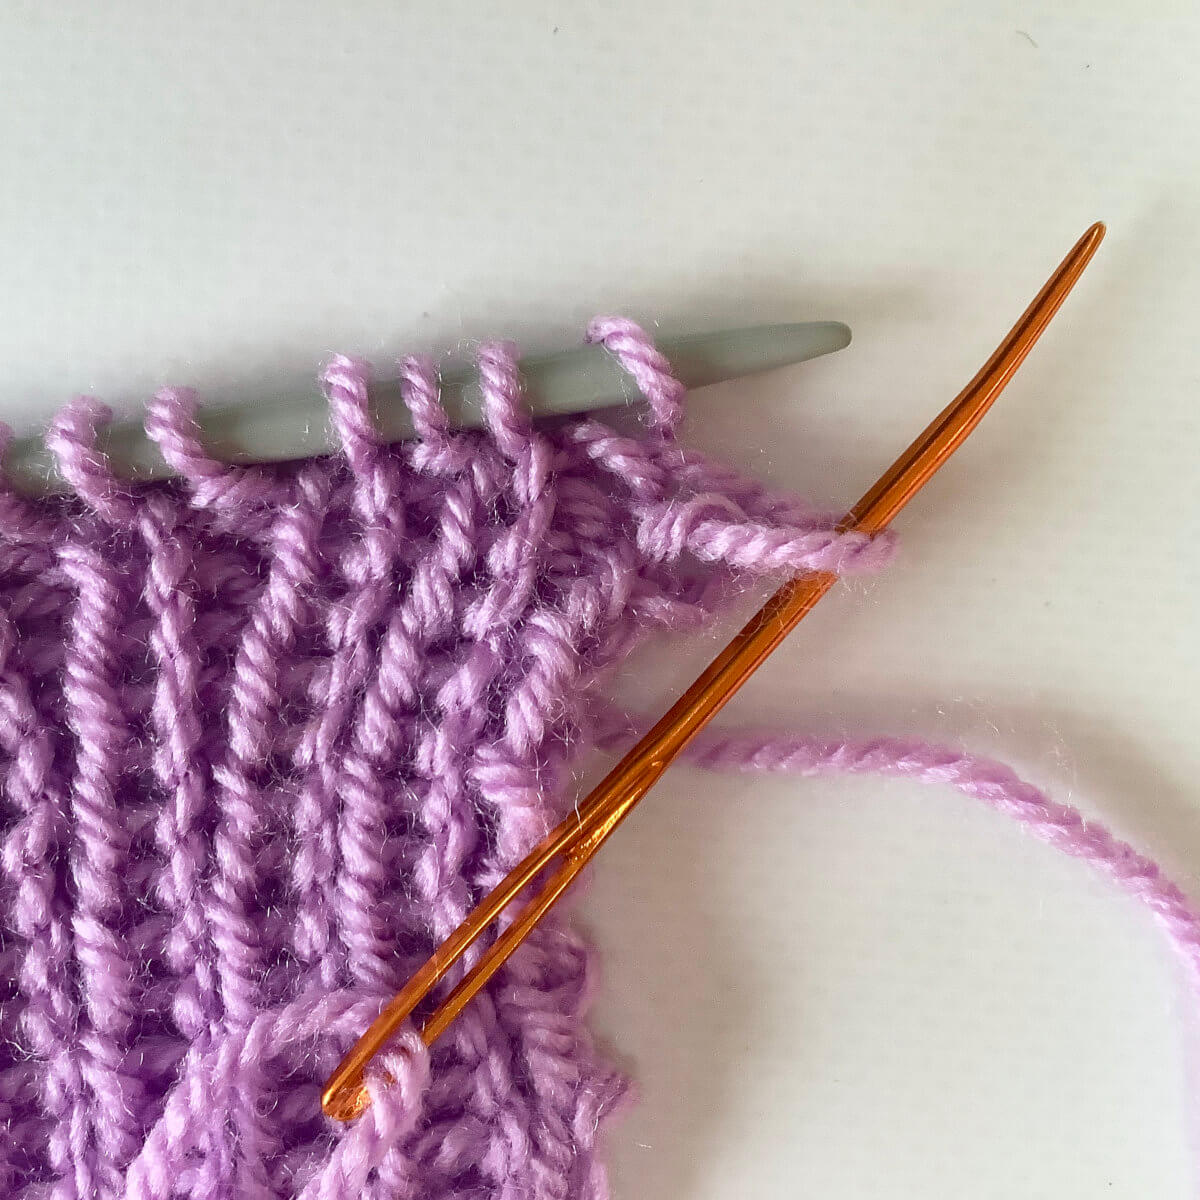
You now have 2 loops on your hook.
To finish, pull the loop that is nearest to the tip of your hook through the other loop.
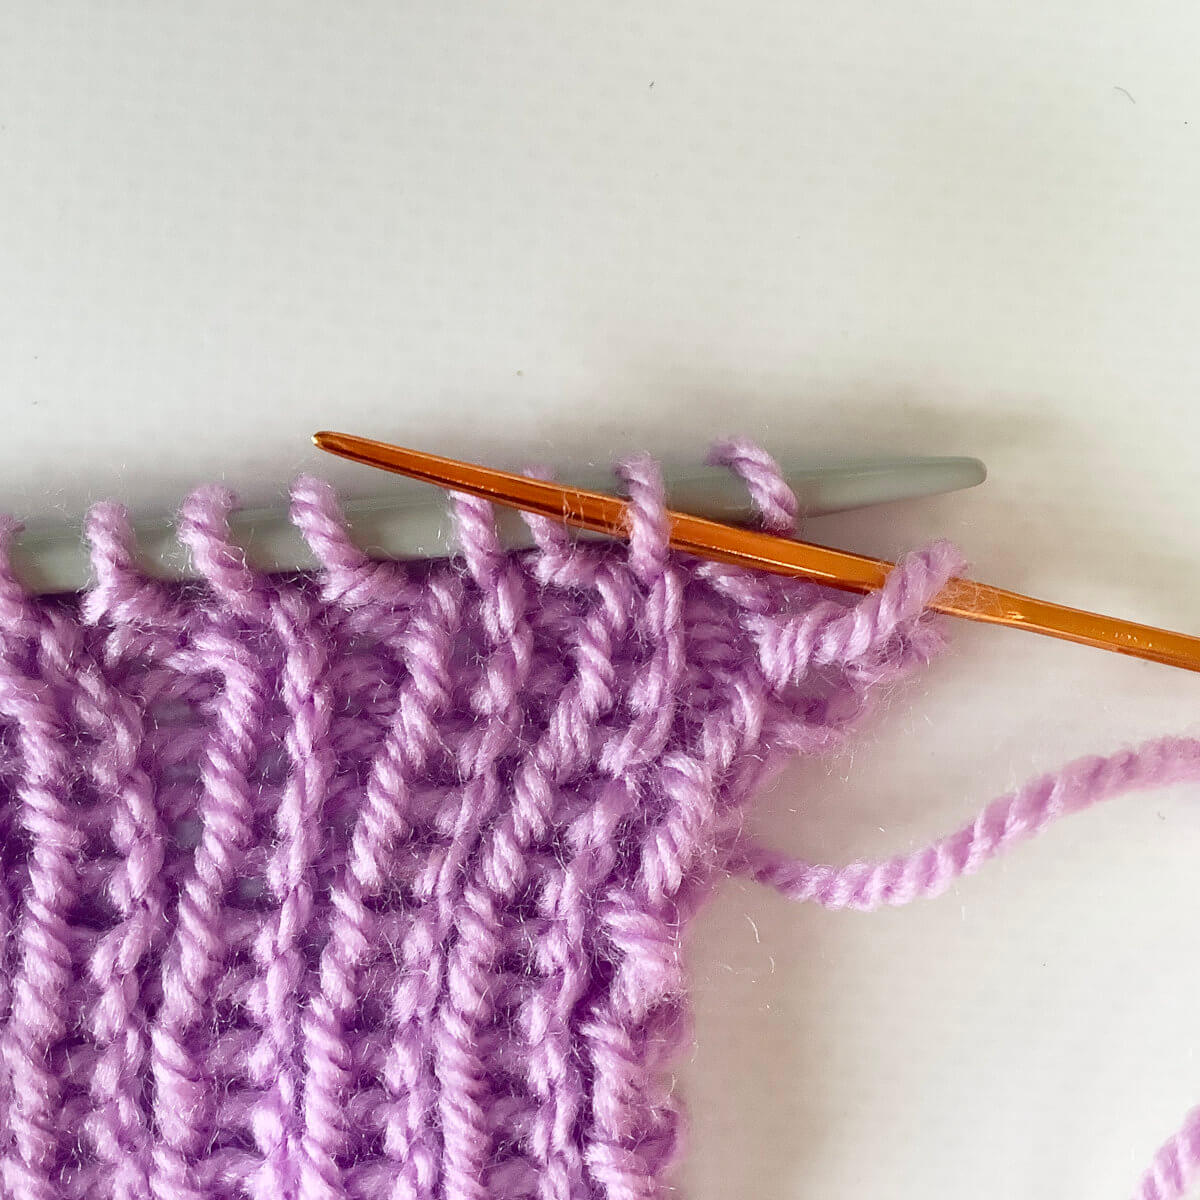
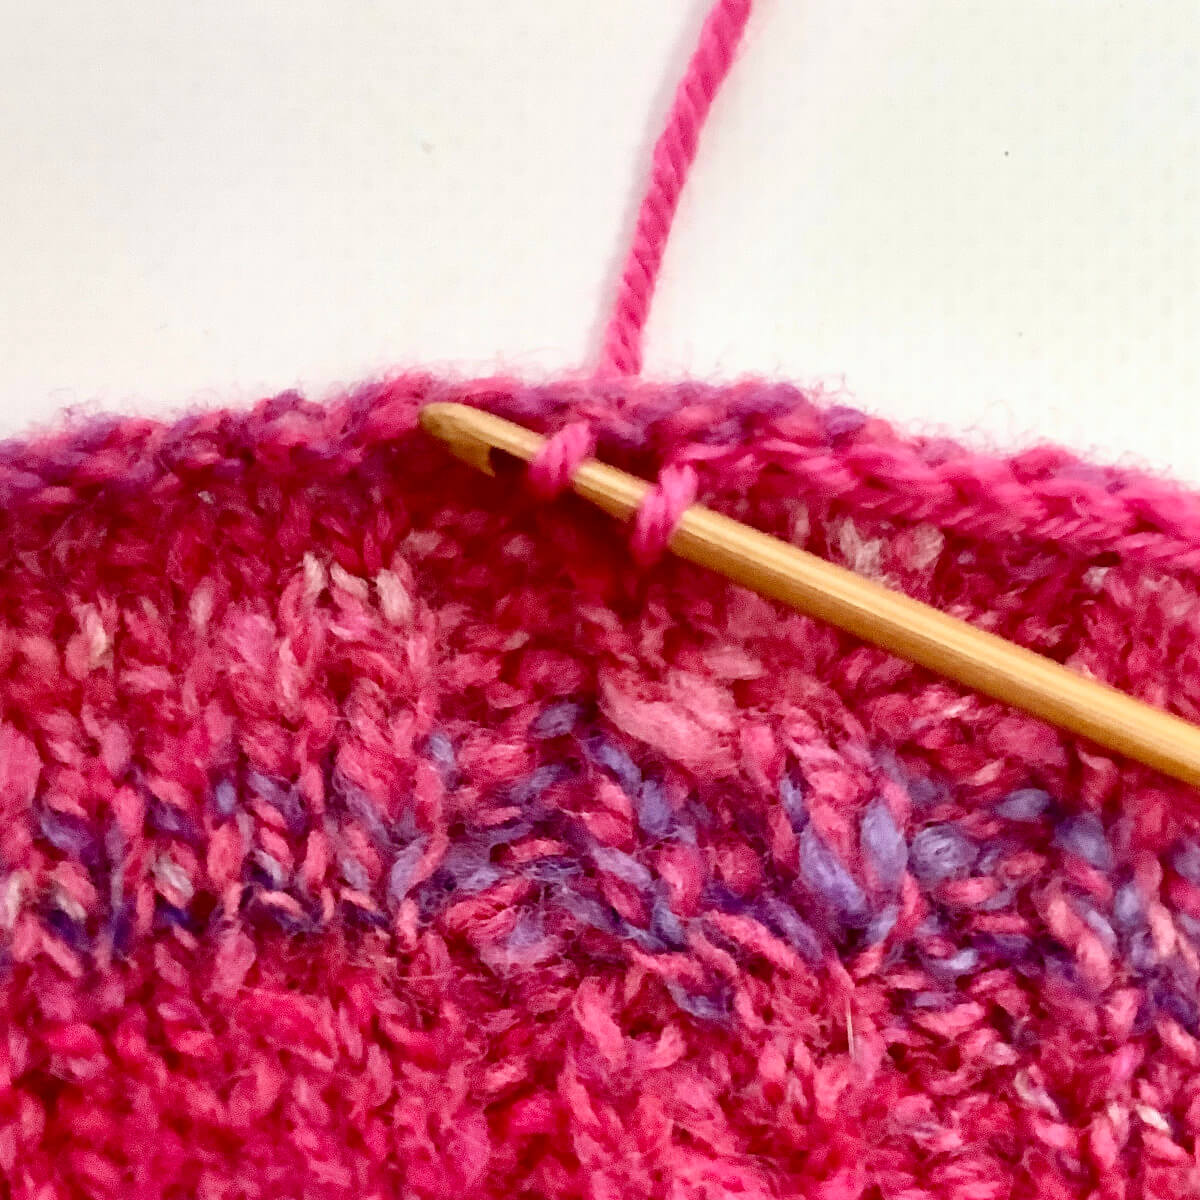
Repeat steps 1-4 until you run out of edge to work!
Note that you may want to work 3 slip stitches in the stitch that sits right at the corner of the fabric, to “turn” that corner.
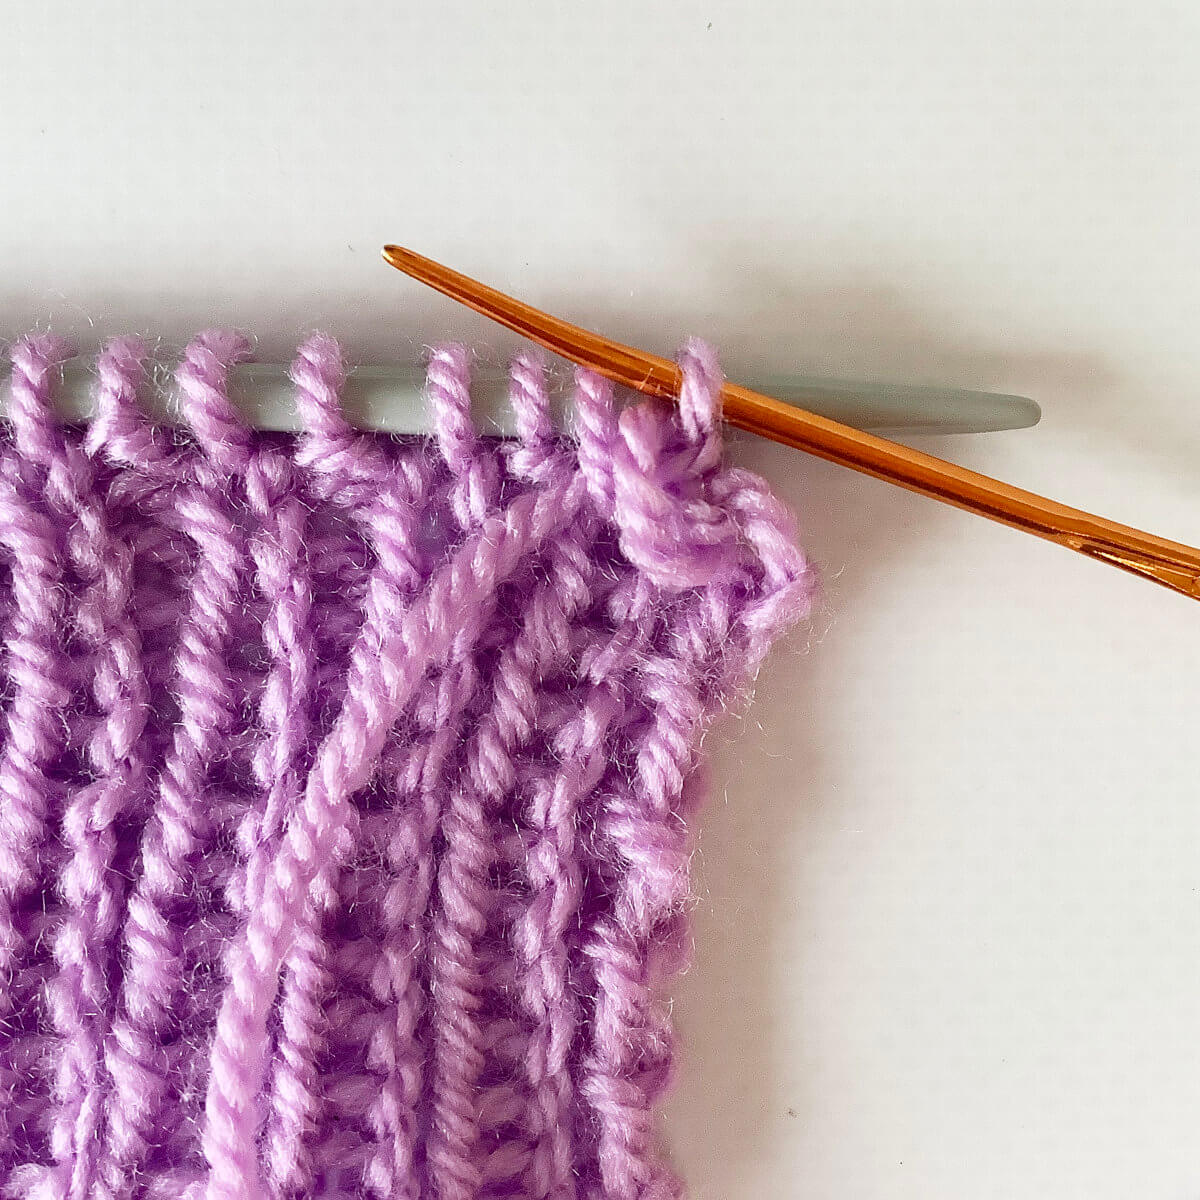
This is the result when viewed from the right side of the fabric:
Neat, isn’t it? Below, you can see the very same piece of fabric, viewed from the wrong side. The horizontal line of stitches in the contrasting pink is almost invisible.
Thanks to my Patreon supporters for bringing you this freebie! Creating quality patterns and tutorials is a lot of work and resource-intensive. However, I find it important to give you free content like this tutorial. Thanks to the generous support of my Patreon supporters, I can make it happen. Thank you, patrons! Click here to join, or click here to read more about La Visch Designs on Patreon.