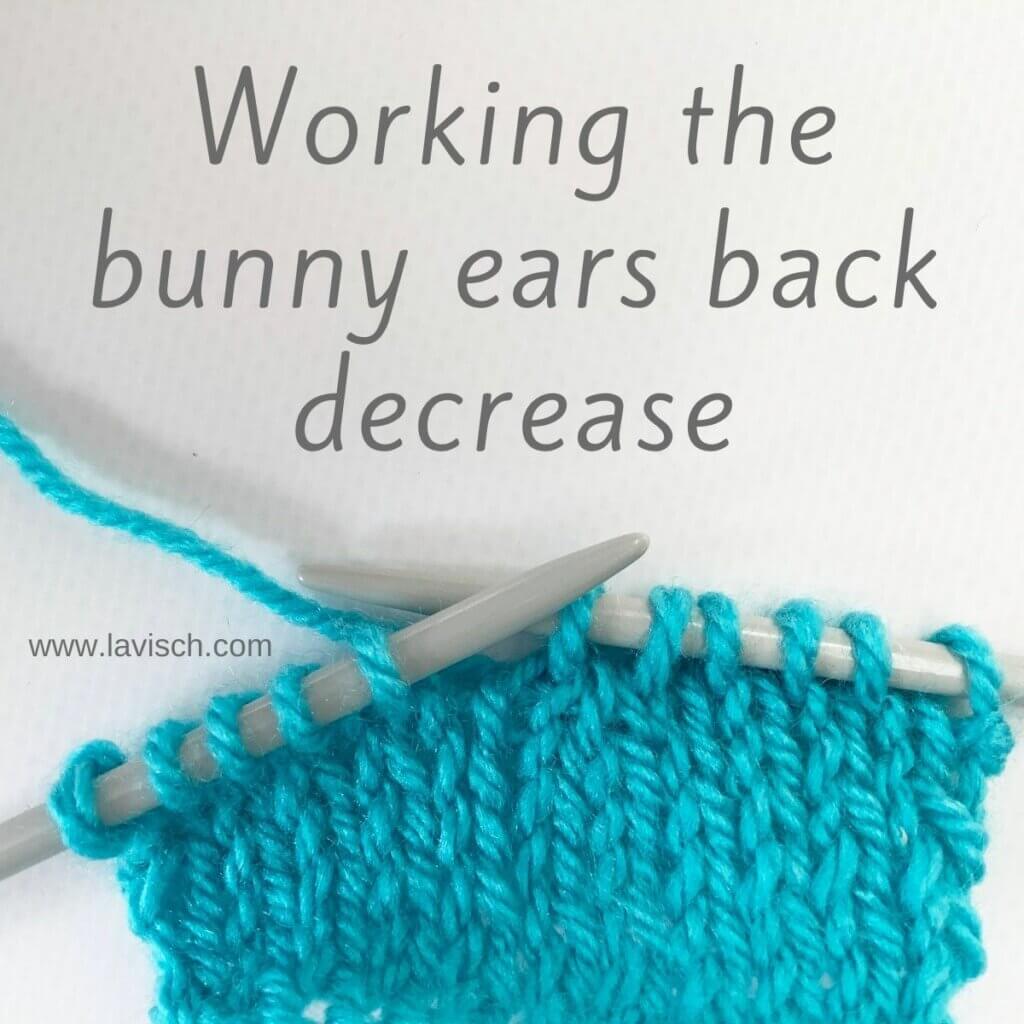
Earlier, I already showed you how to work the bunny ears decrease. In this tutorial, I’m going to show the bunny ears back decrease, which is similar to the bunny ears decrease. It’s also a symmetrical way of decreasing 3 stitches to only 2, called this way, because the result somewhat looks like 2 bunny ears “hugging” the resulting 2 stitches. However, instead of the “ears” pointing outwards, they point inwards.
Part of this decrease is working a left leaning single decrease of your choice. I prefer skp, so that’s what I’ll be showing in this tutorial. But it can be changed to ssk or any other left leaning decrease you prefer.
Materials used
Yarn: Paintbox Yarns Simply DK, a good value, good quality 100% acrylic yarn, here in the color Marine.
Needles: This is a pair of straights that I picked up at the second-hand store when I started knitting, brand unknown.
Working the bunny ears back decrease step by step
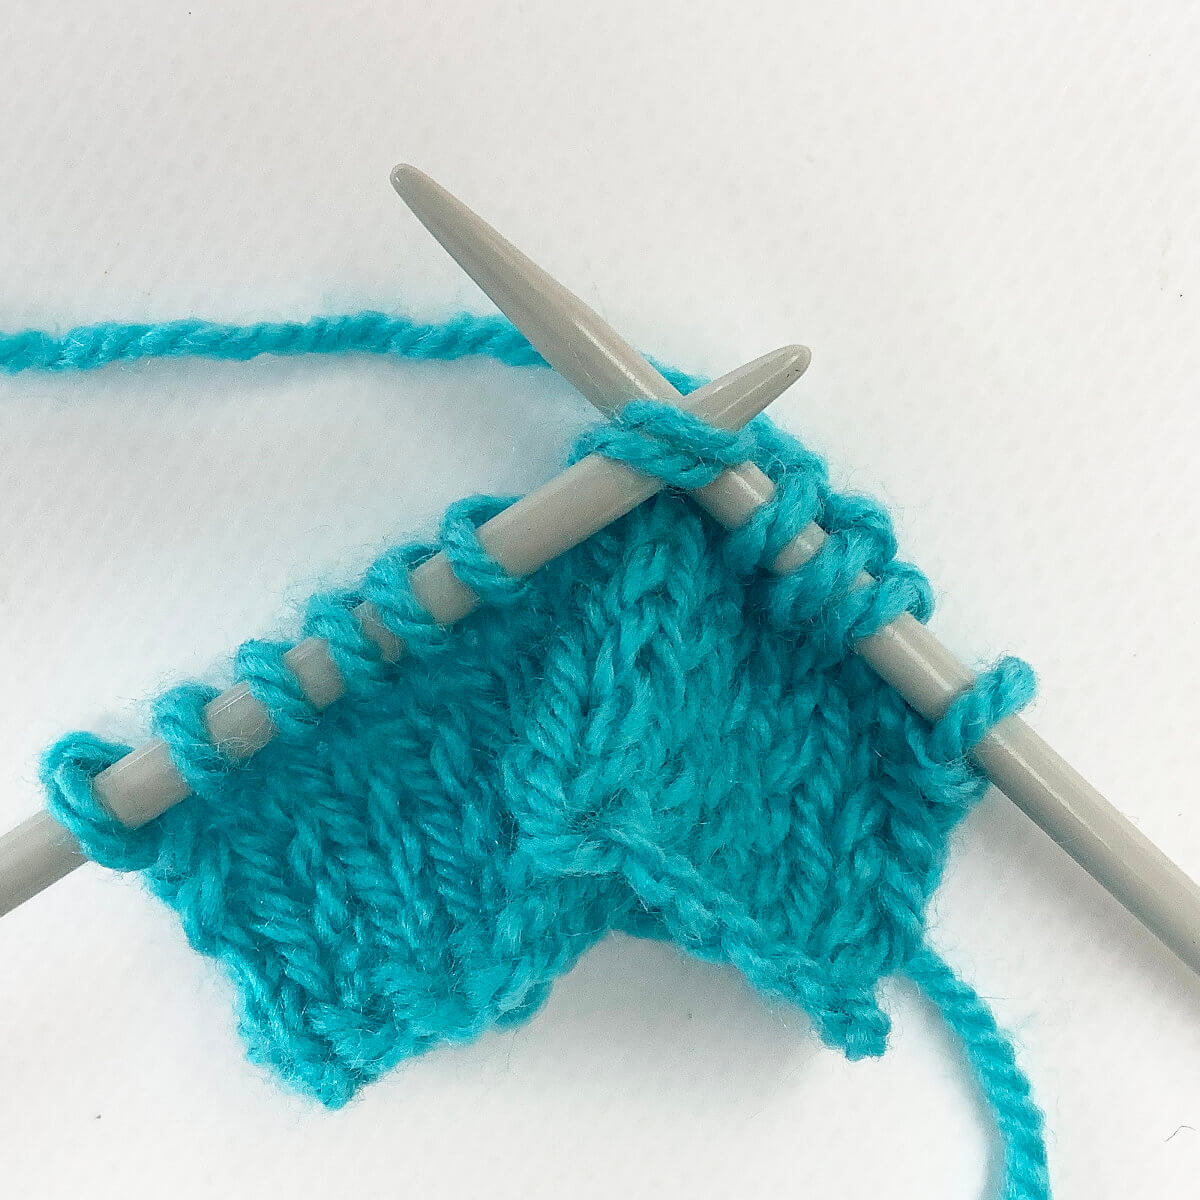
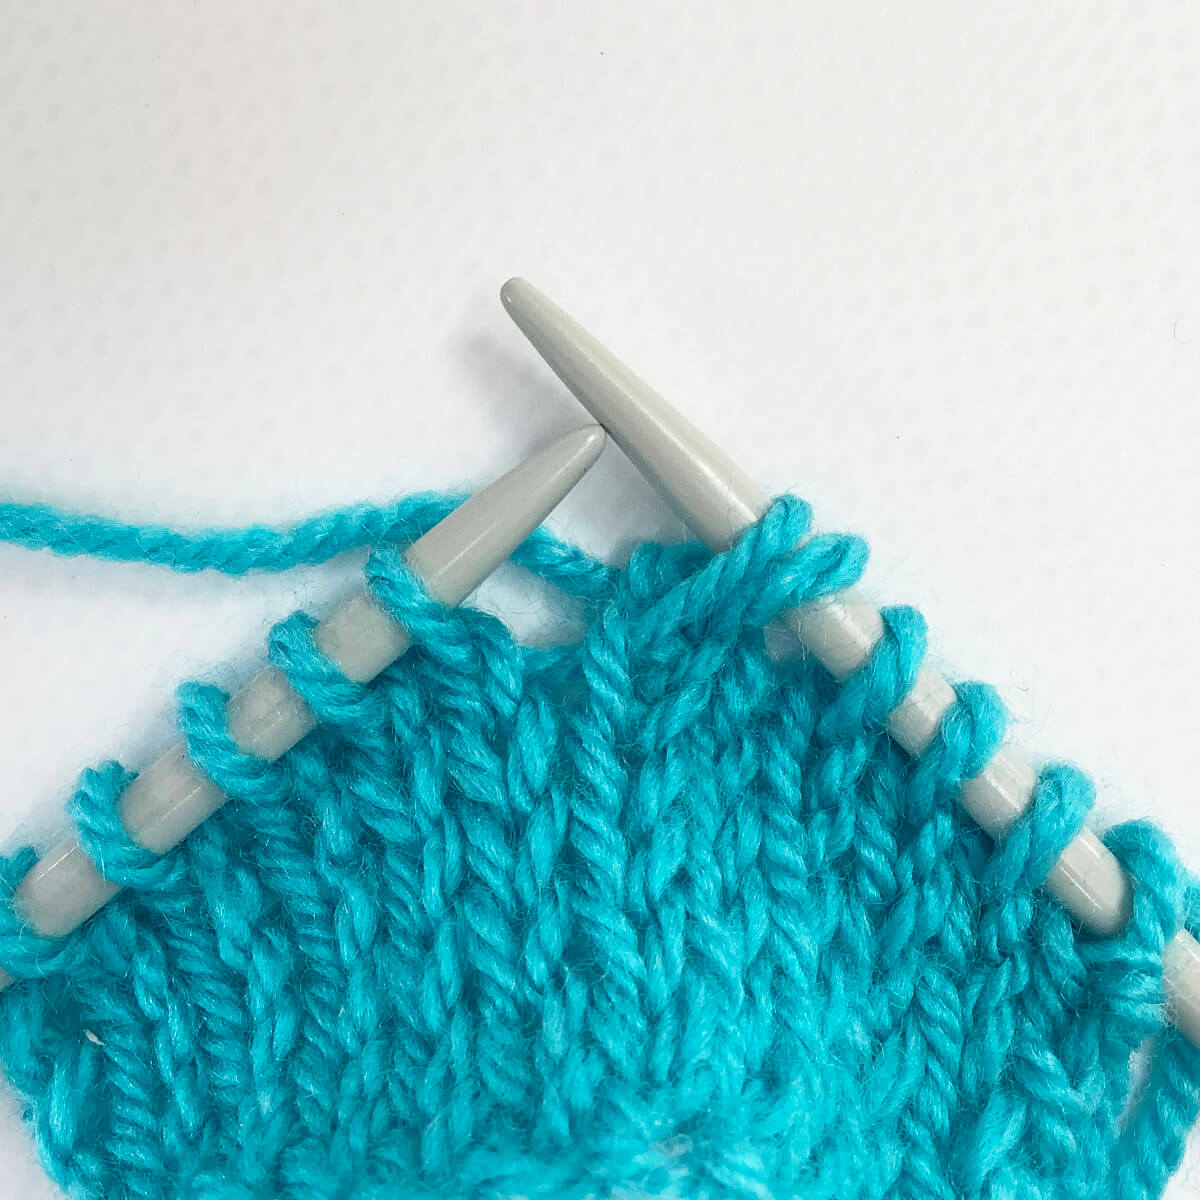
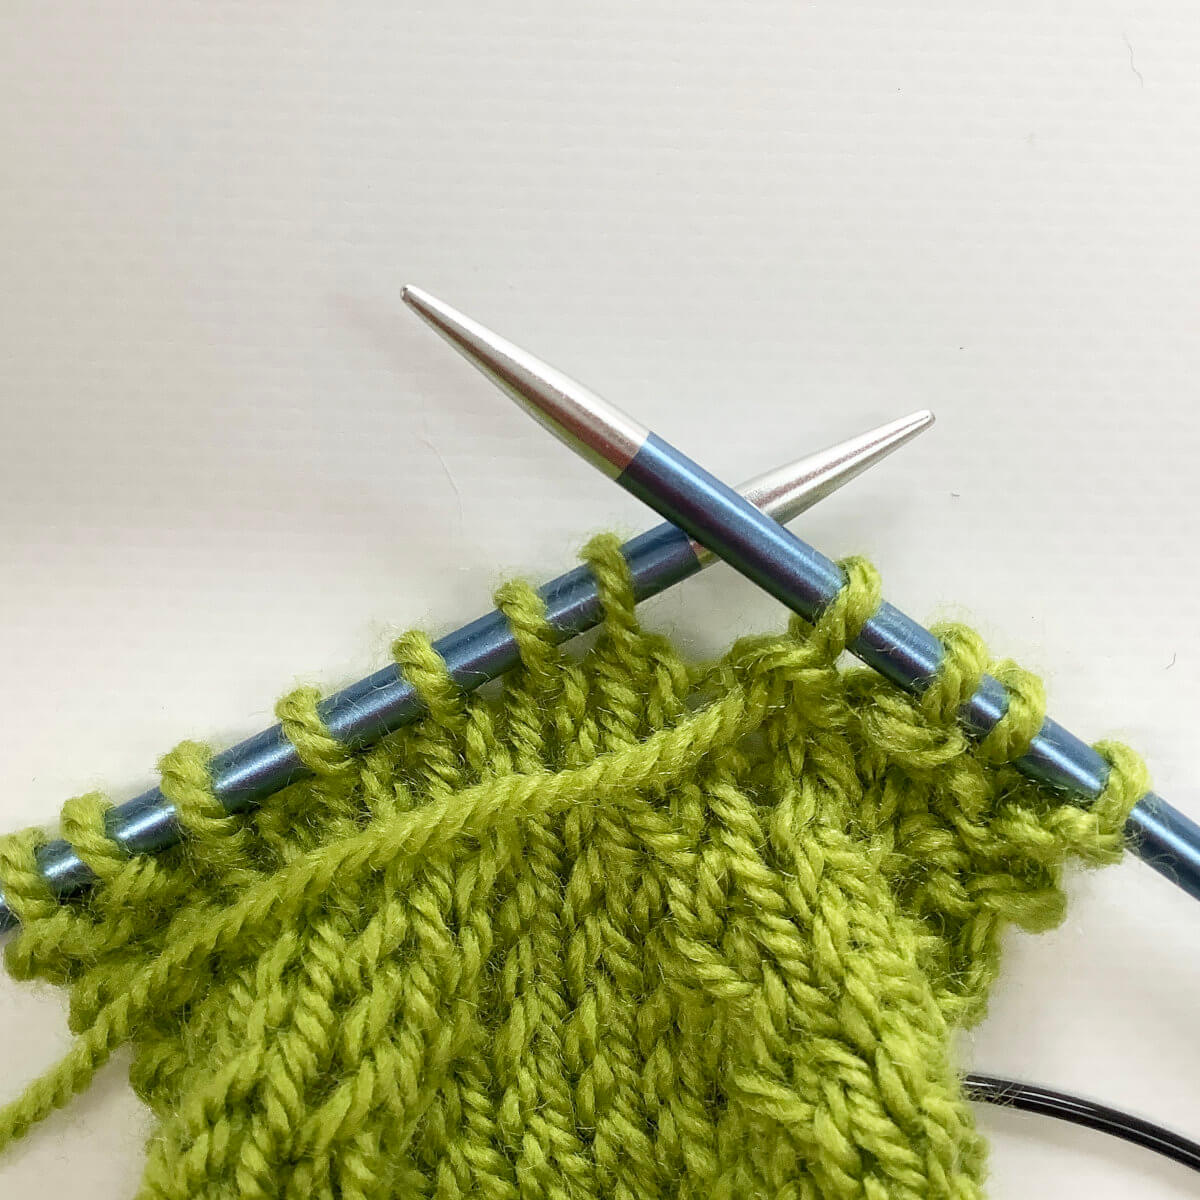
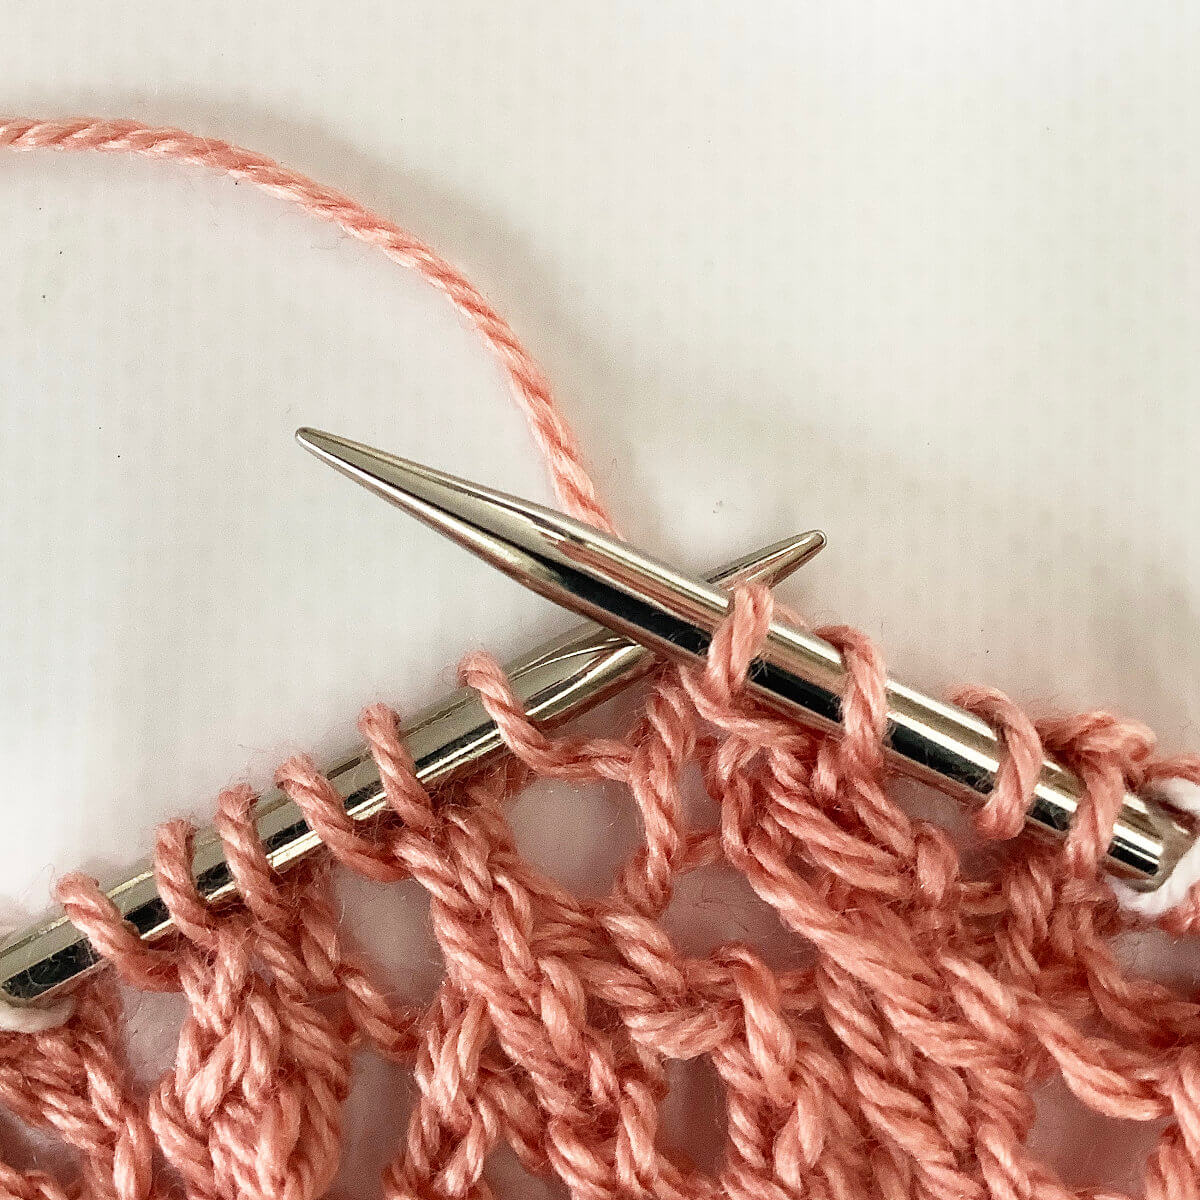
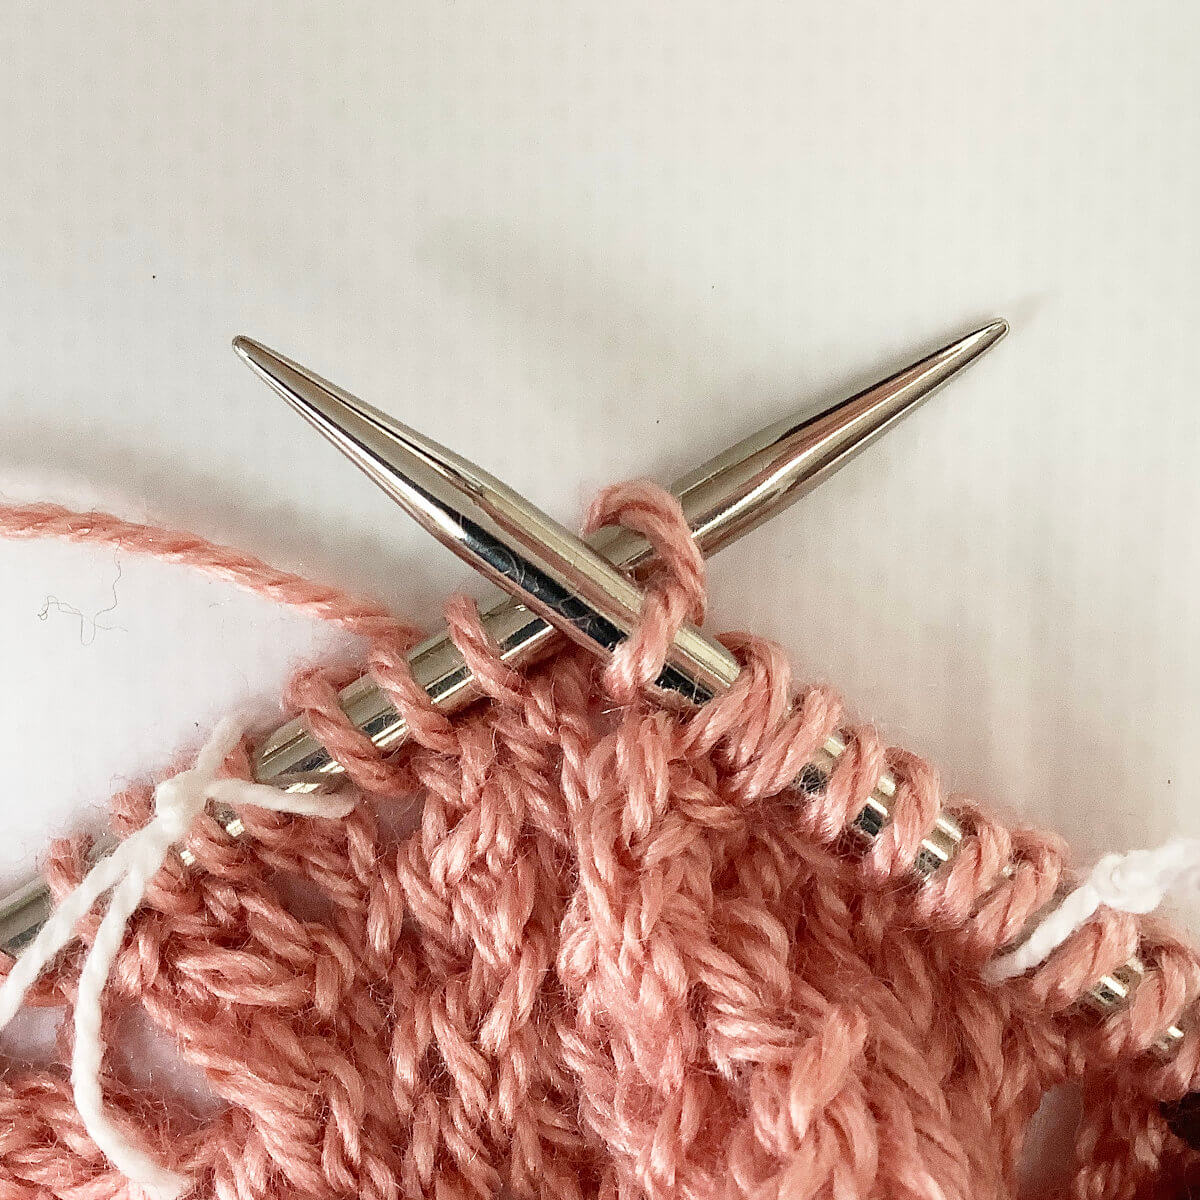
First, work your way across the row until you’ve reached the point where you want to make the decrease.
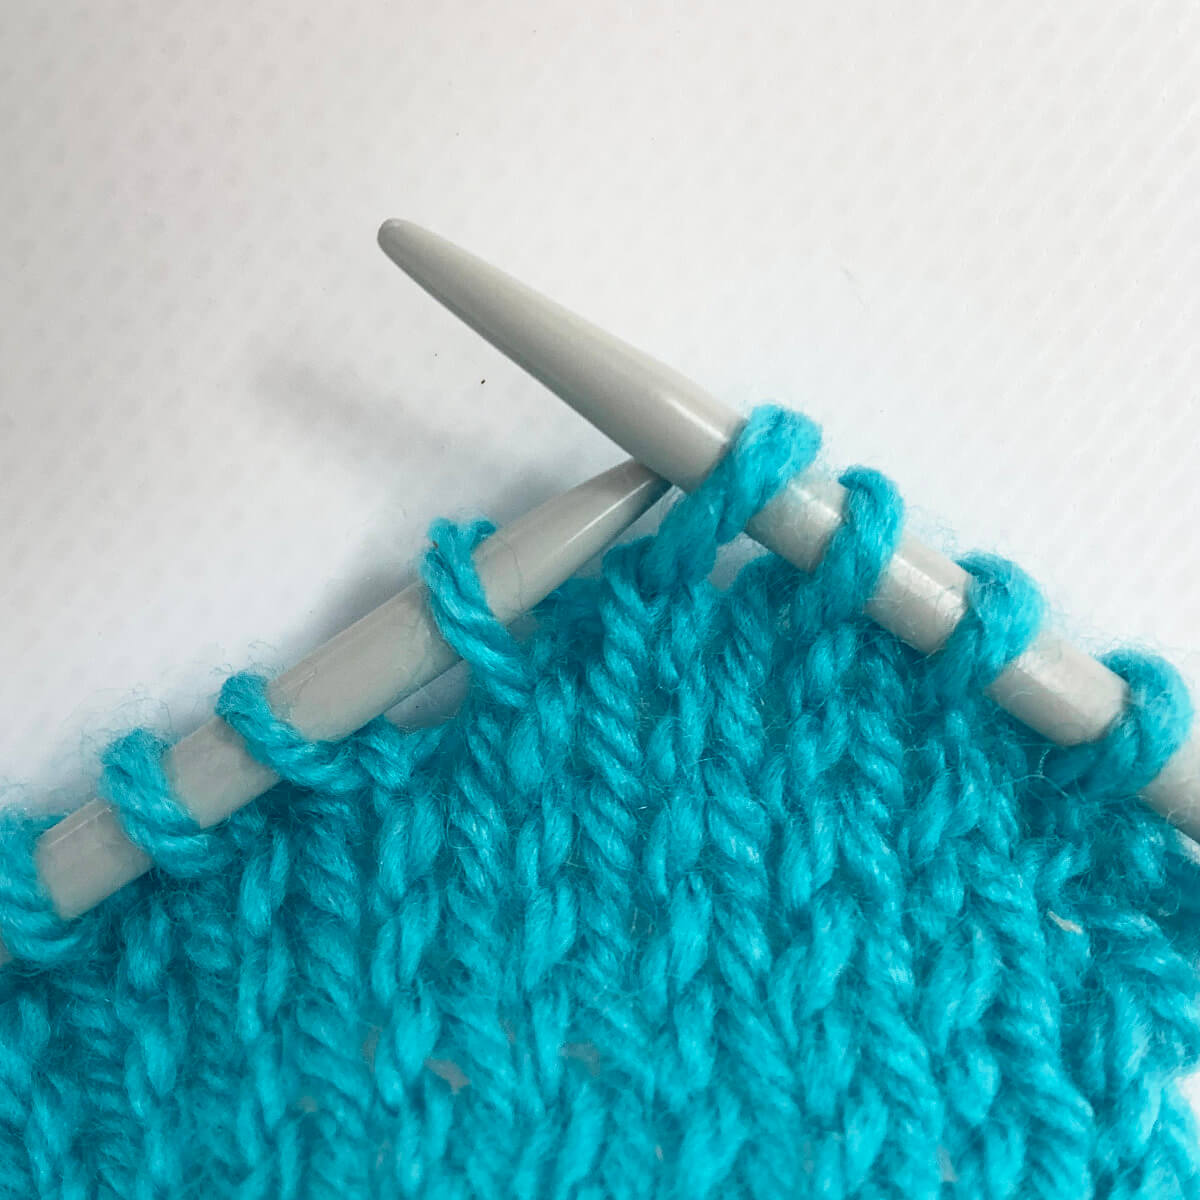
See those first 3 stitches on the left-hand needle? That’s where I’ll be making the bunny ears back decrease.
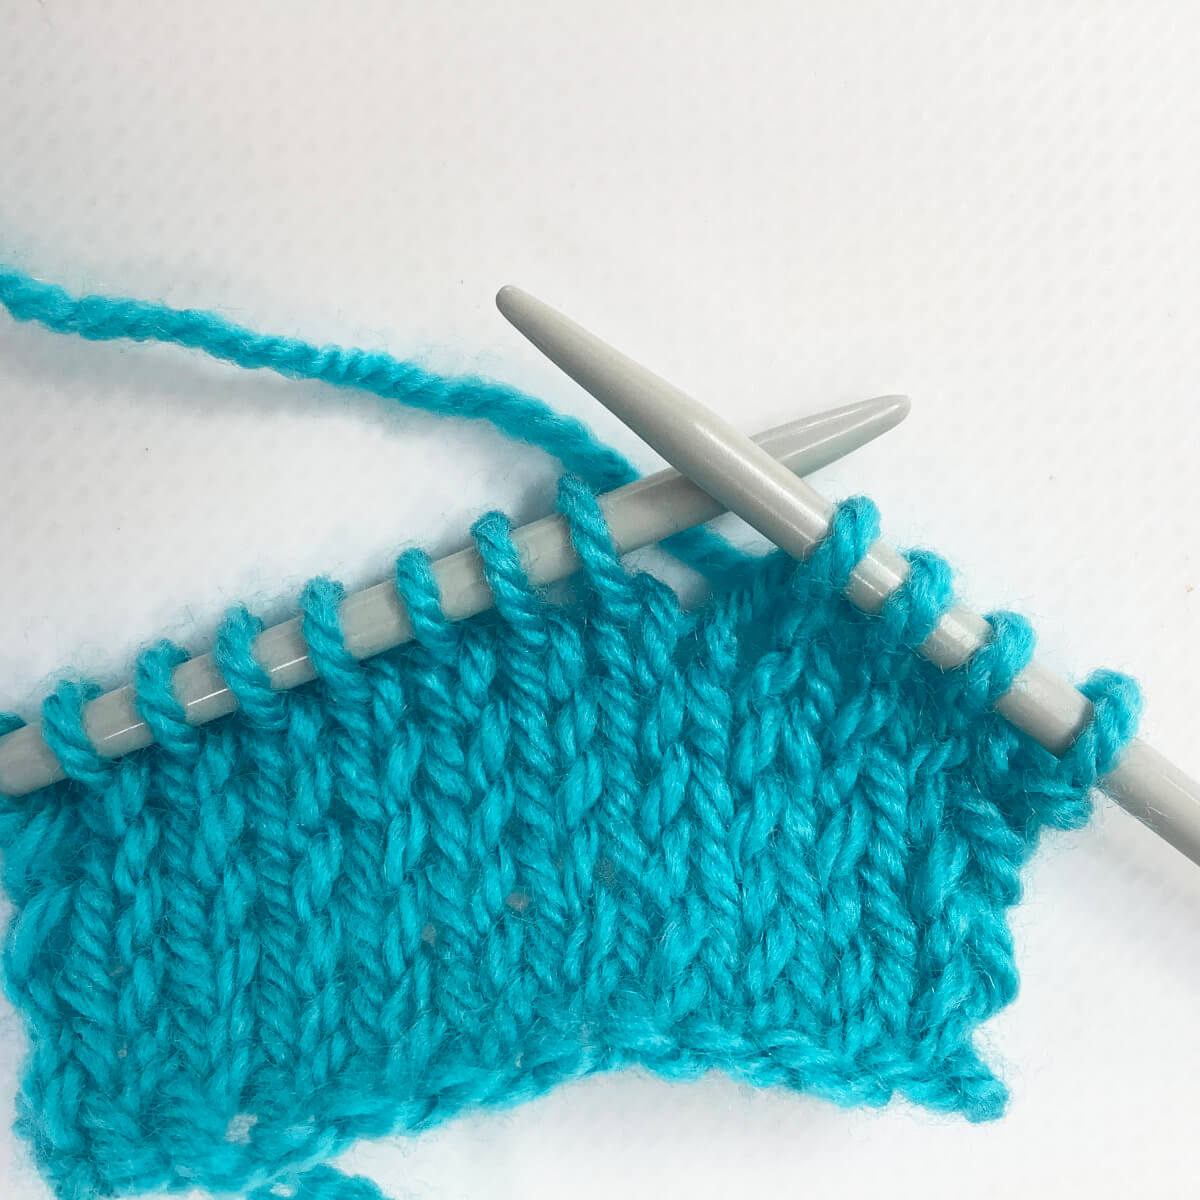
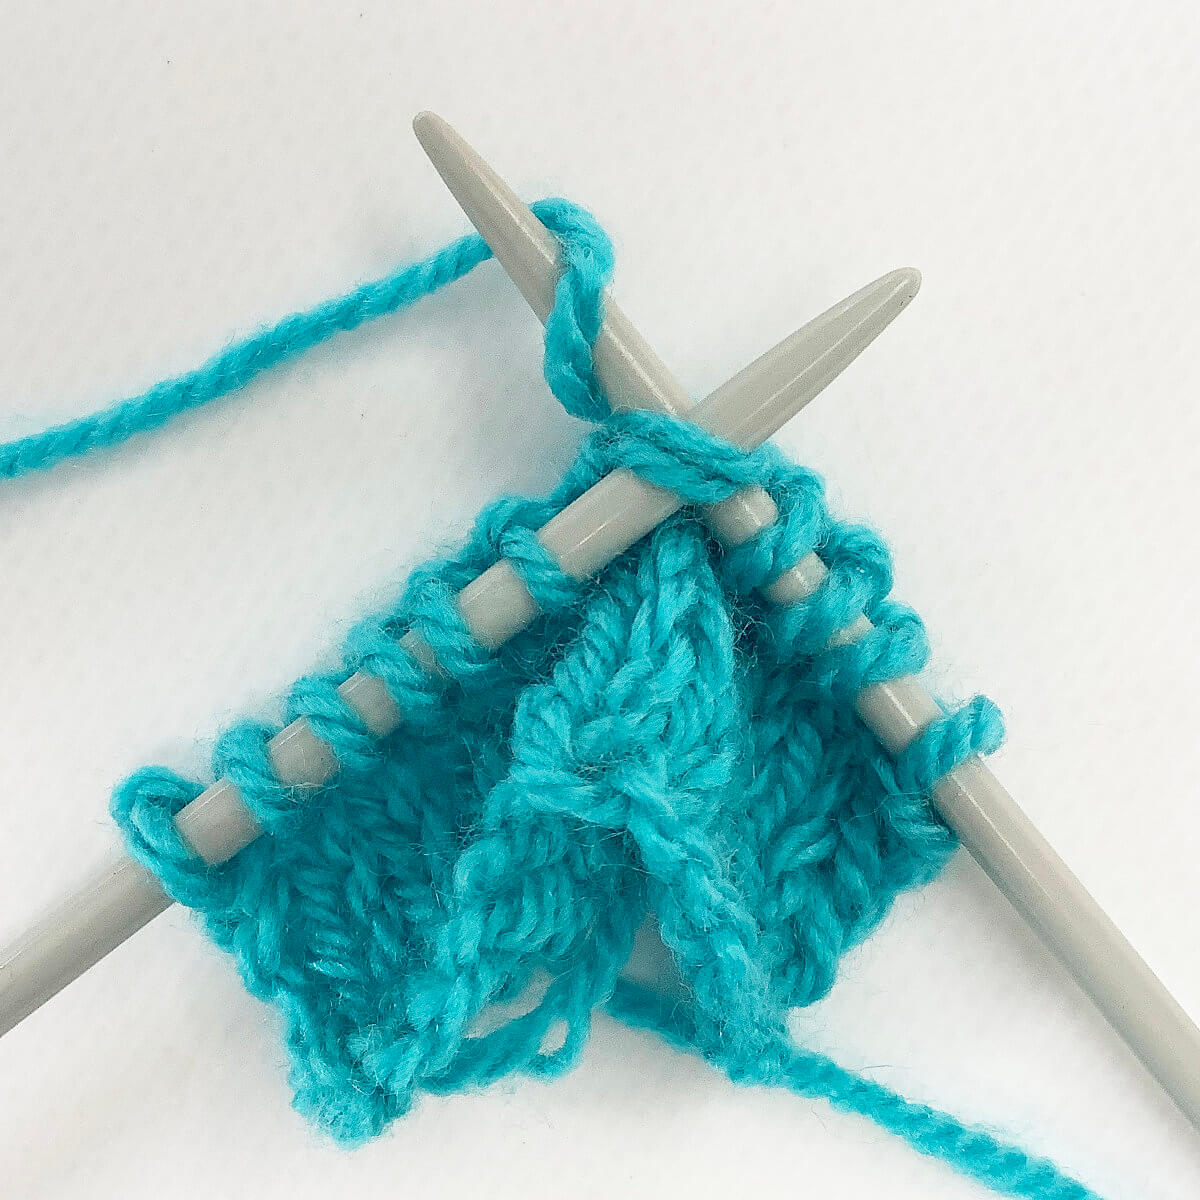
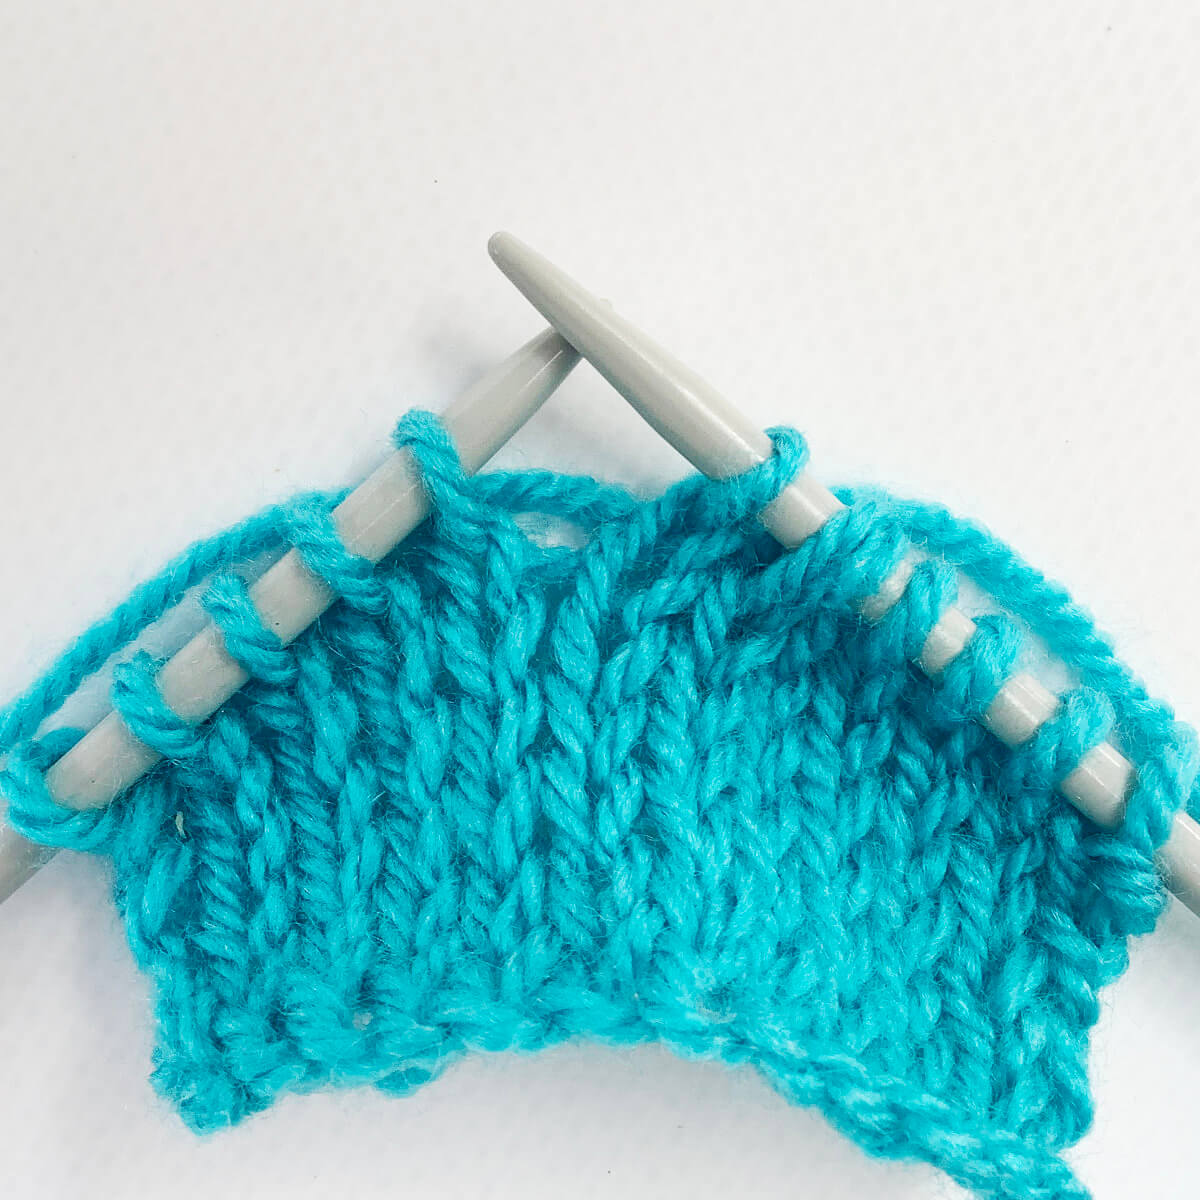
Next, work the left leaning decrease of your preference over the first 2 stitches.
I’ve worked a skp, you can see the result in the picture below.
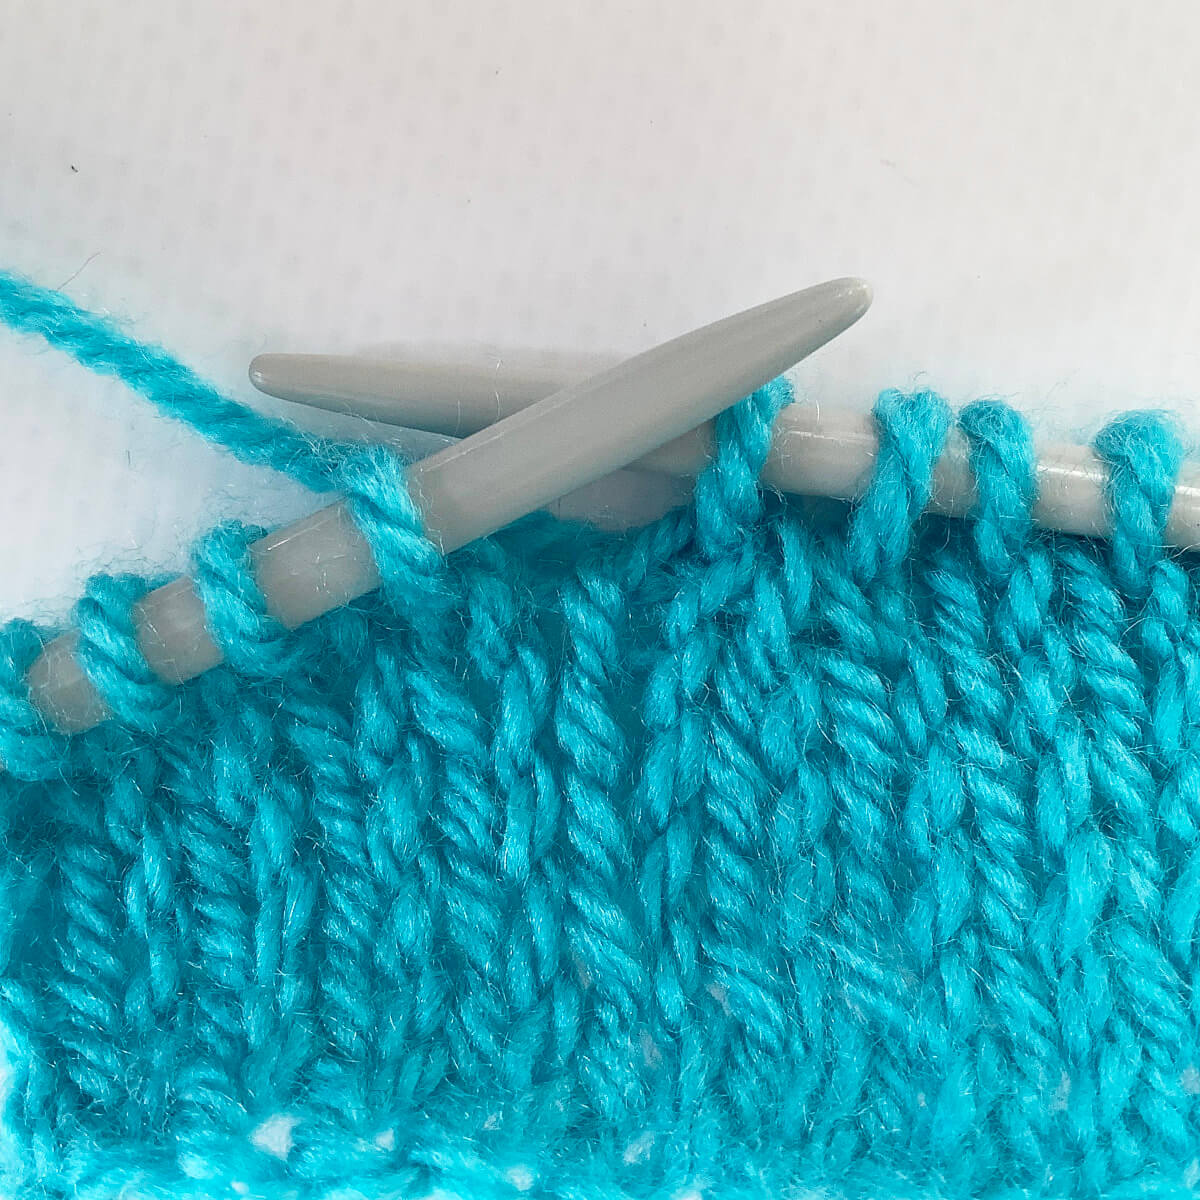
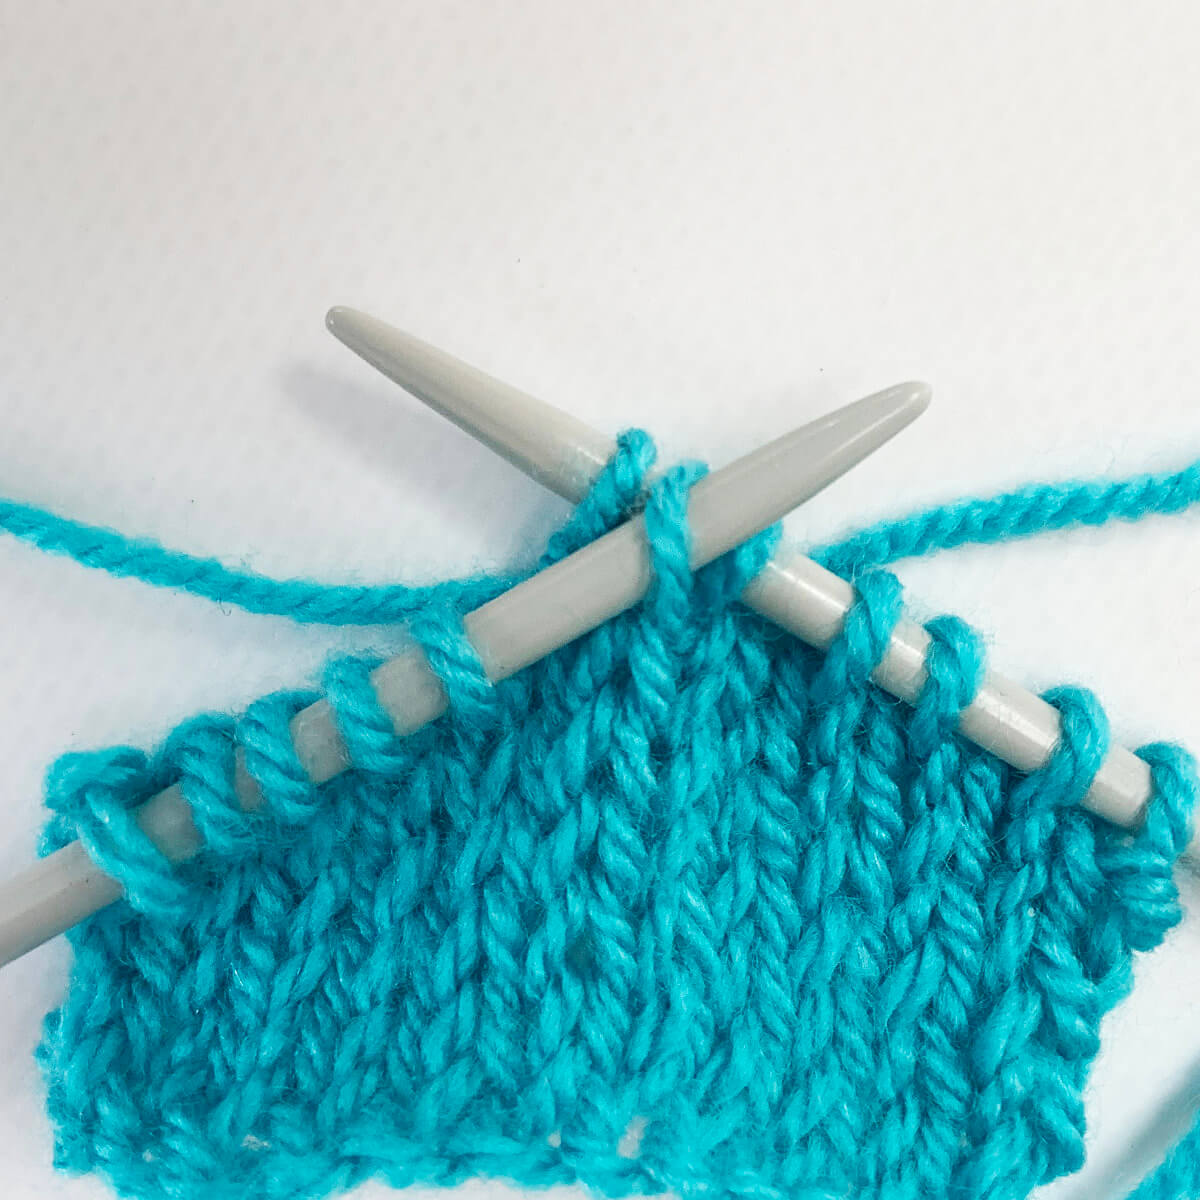
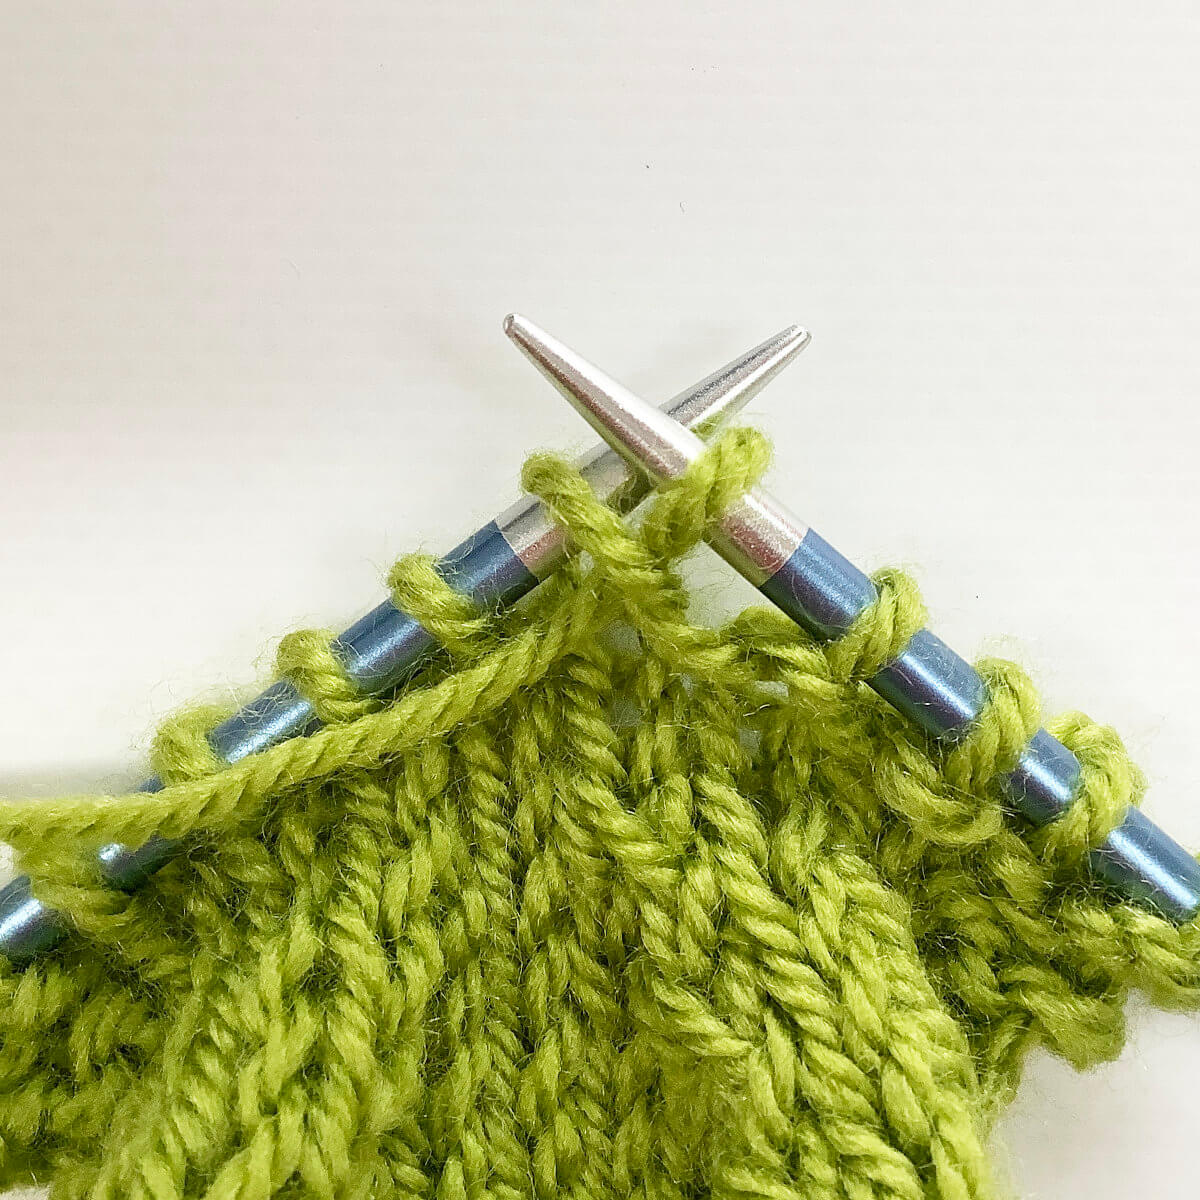
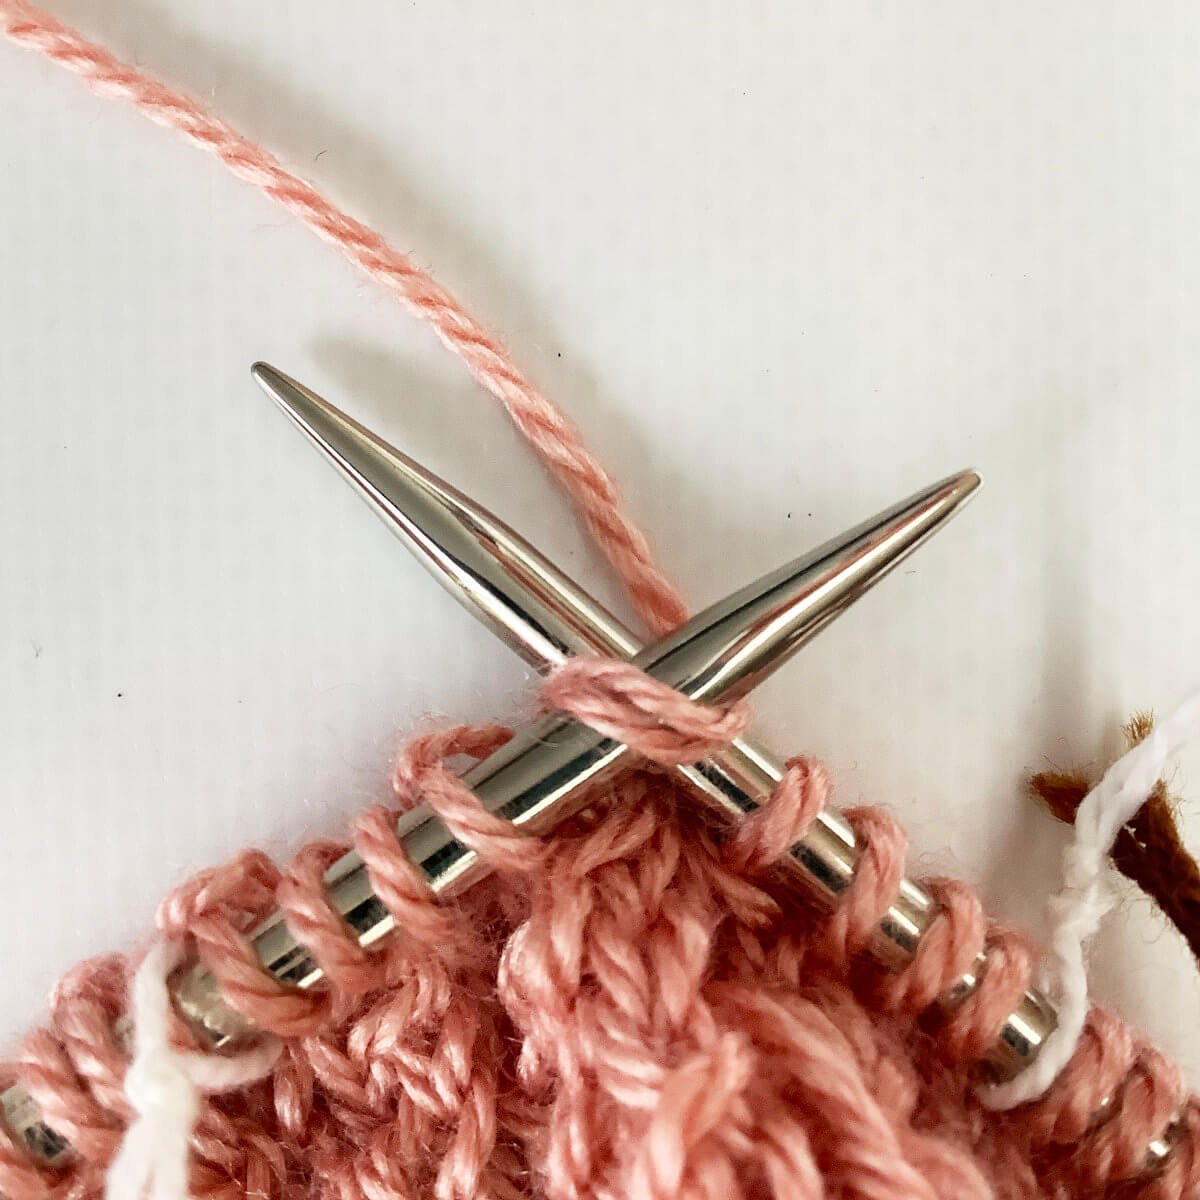
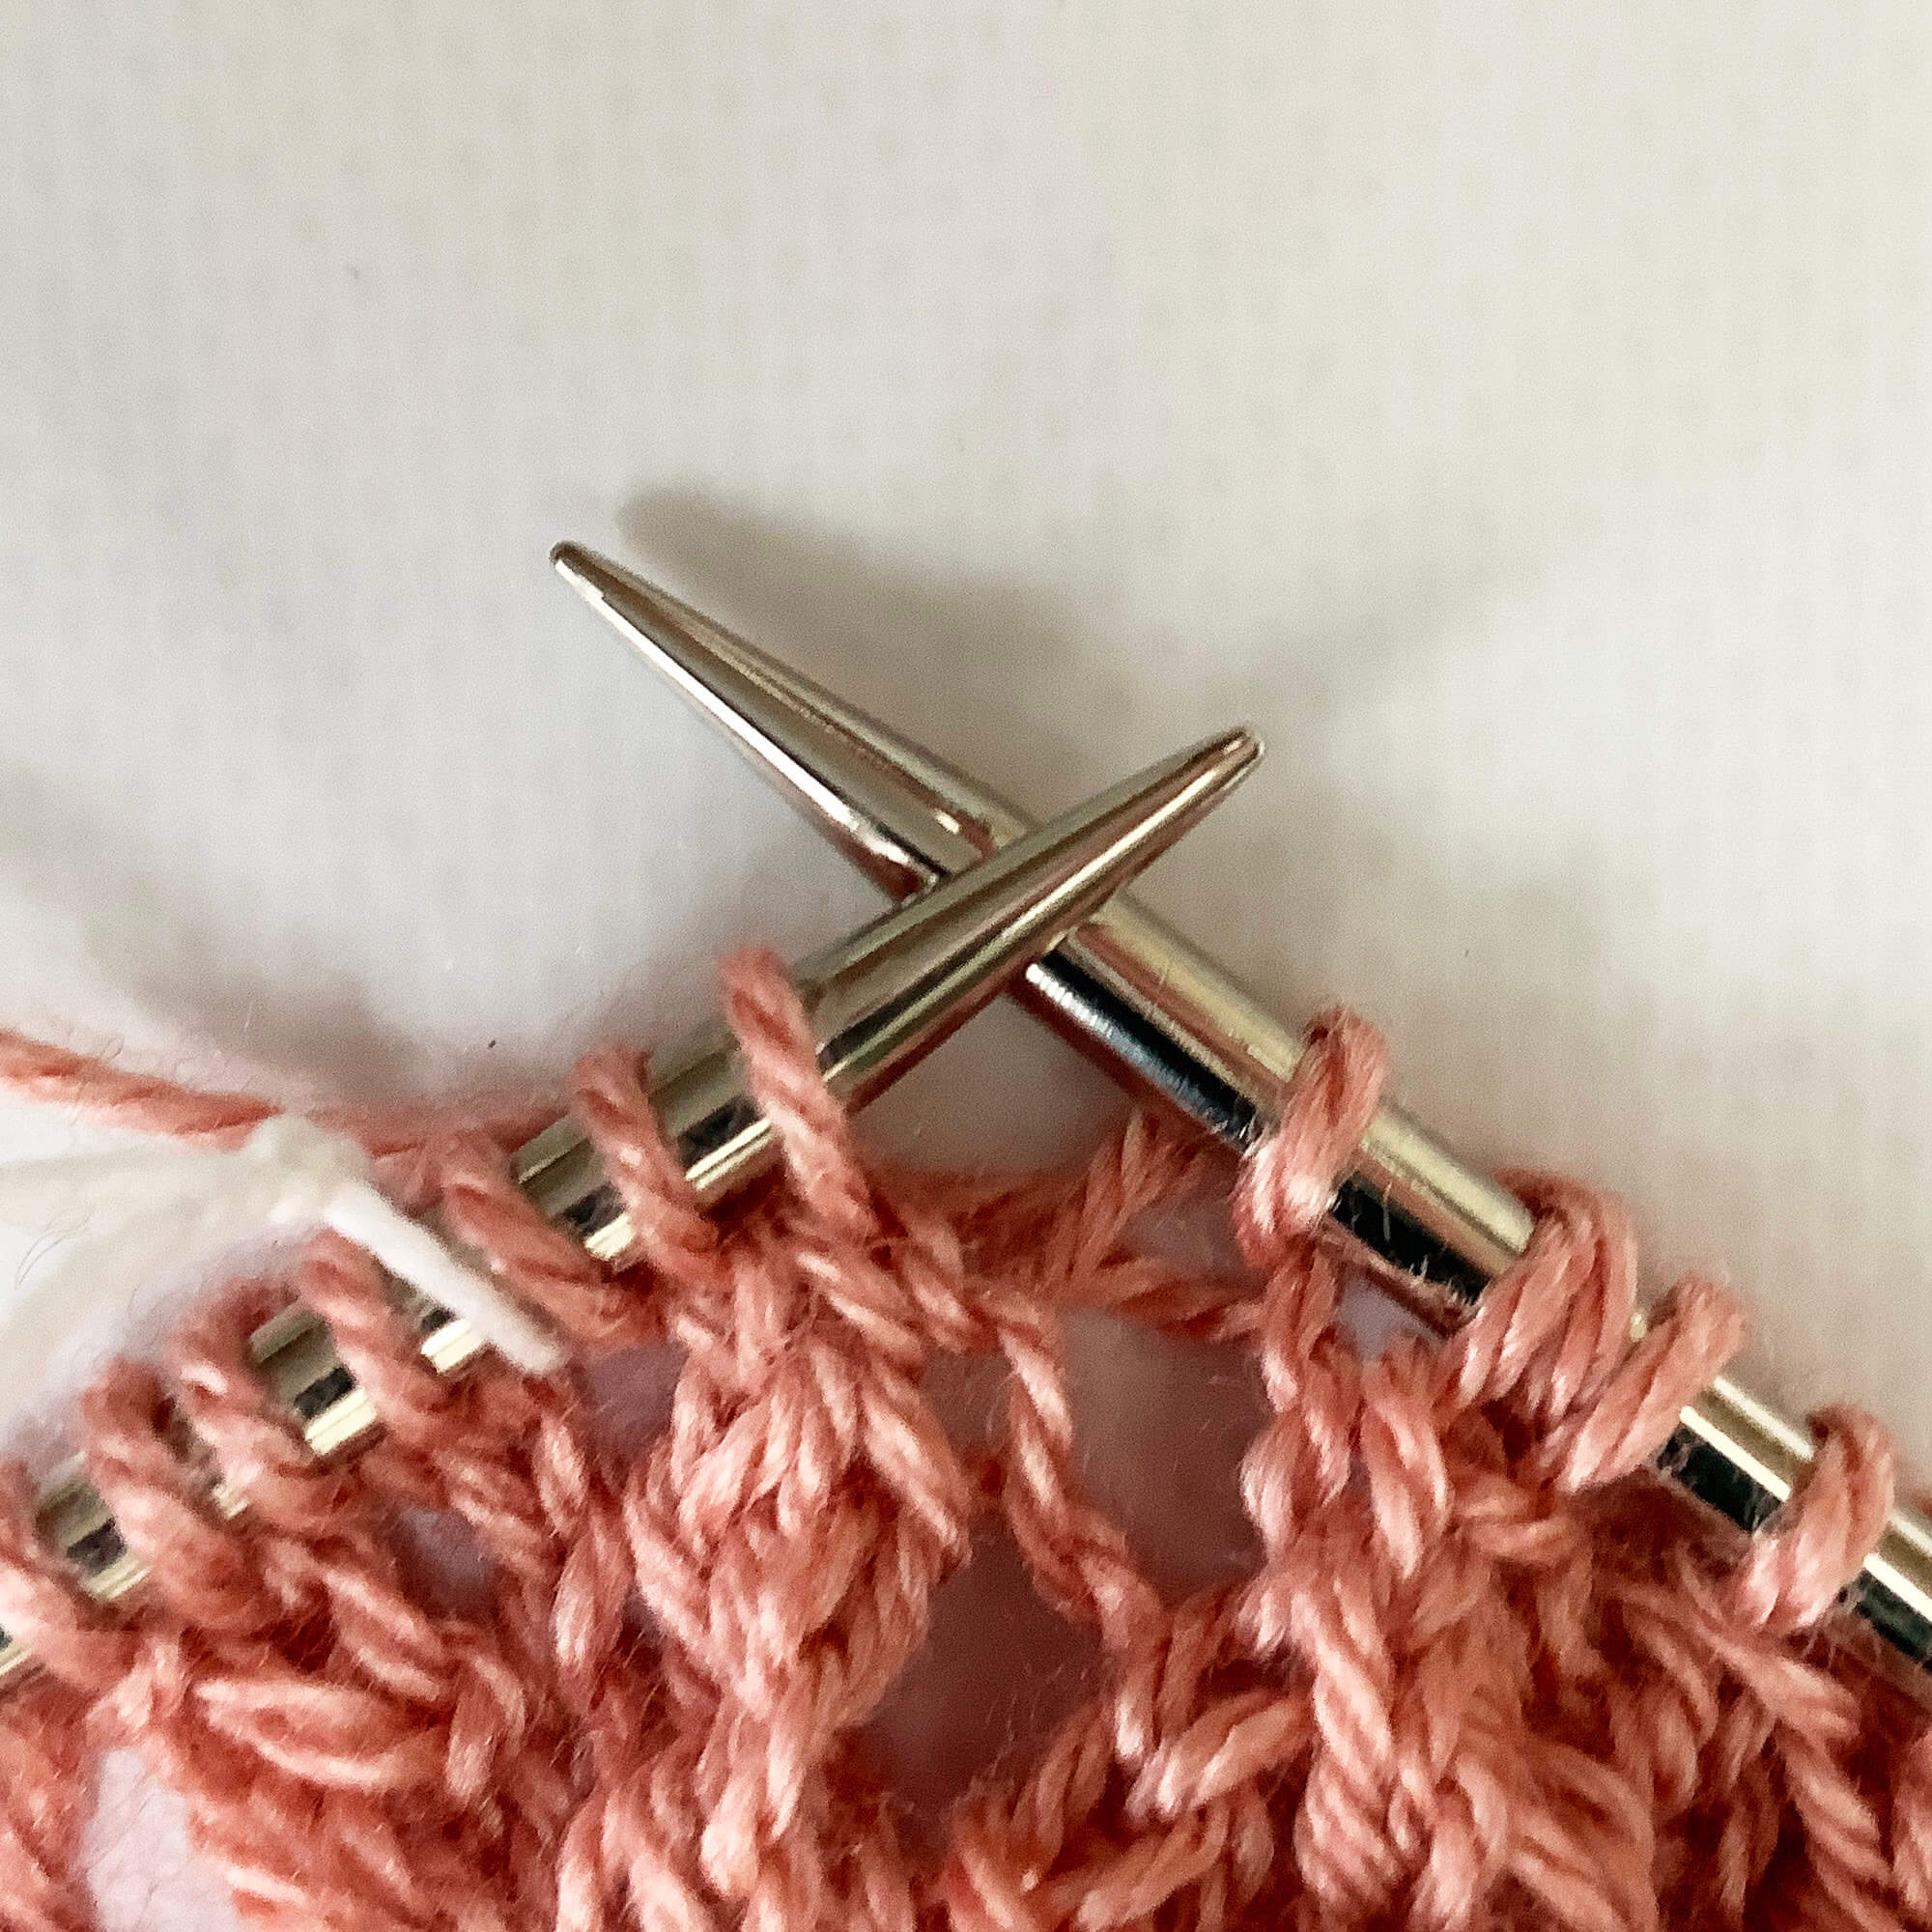
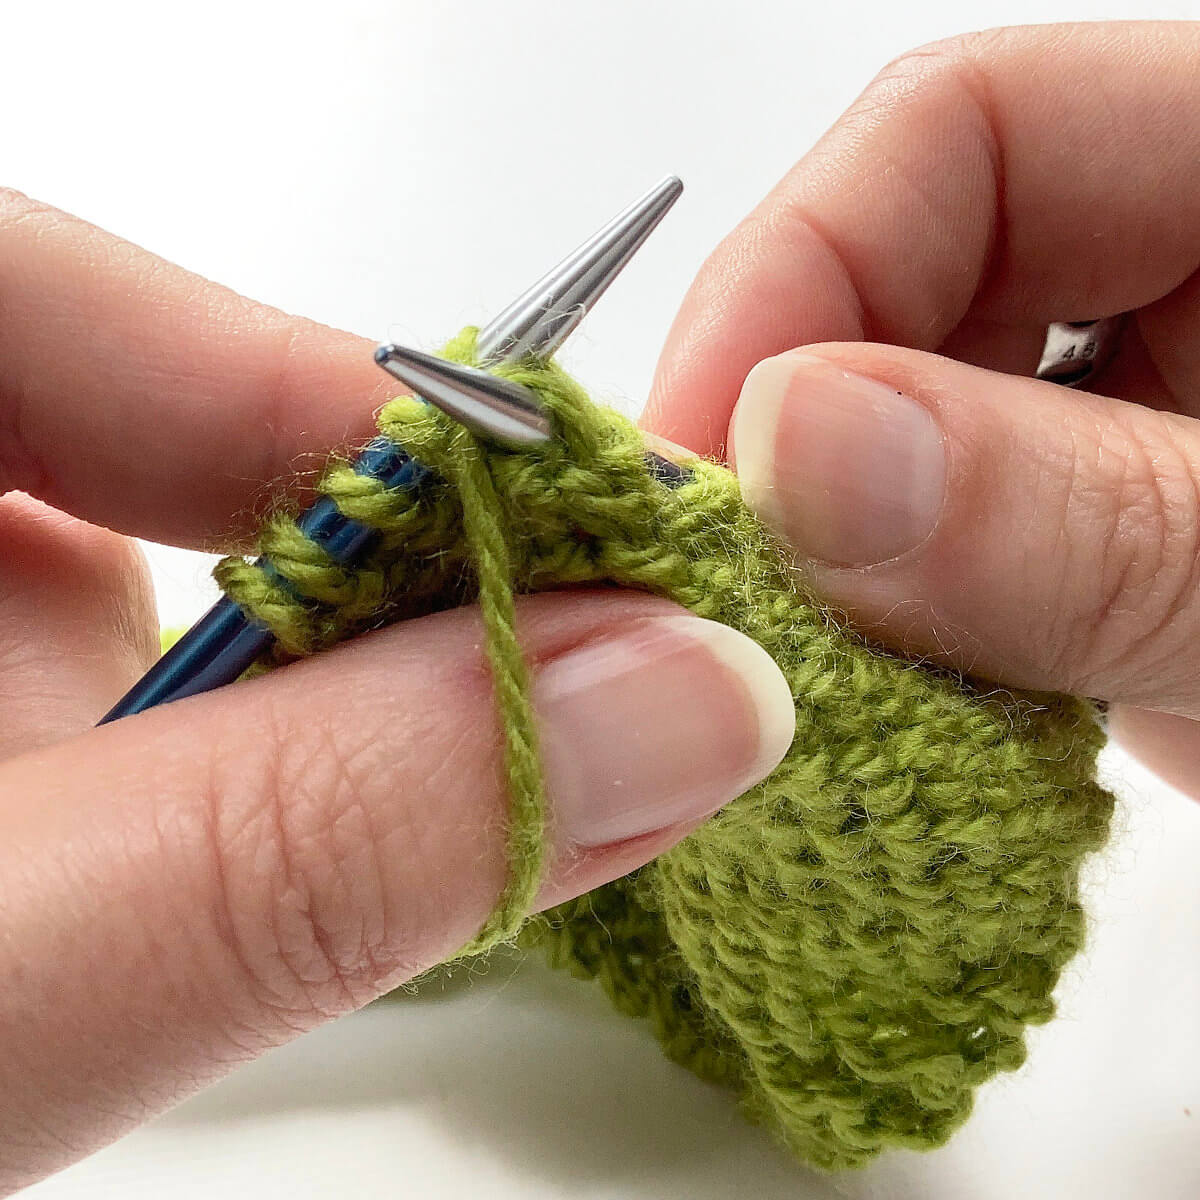
Now take a good look at the decrease you worked.
Do you see the 2 stitches that were decreased to 1, with the one on the left “covered’ by the other one?
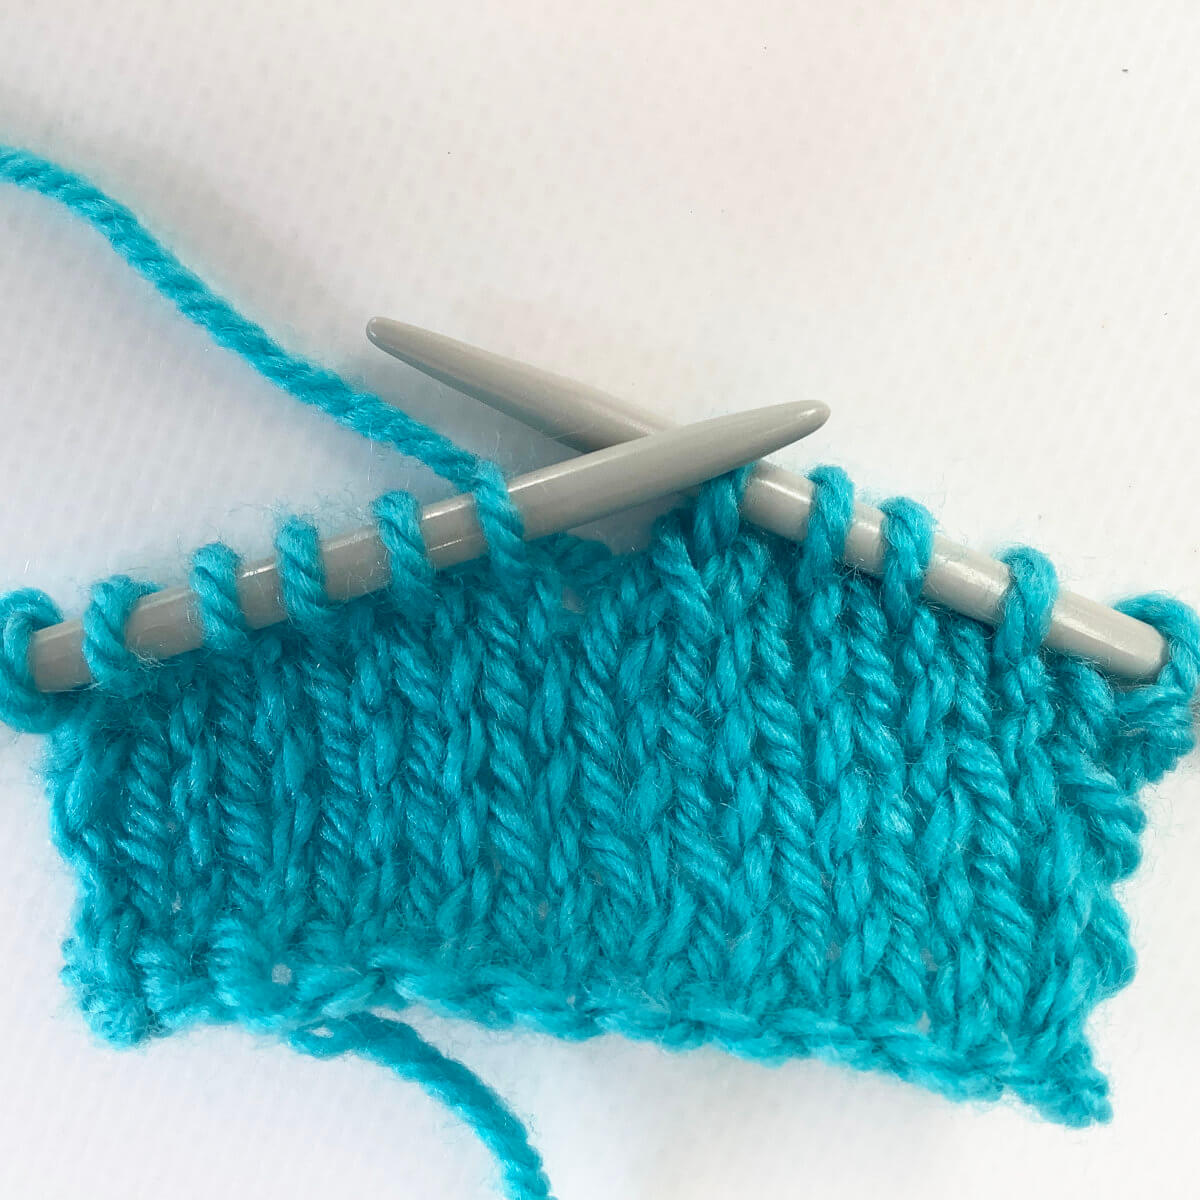
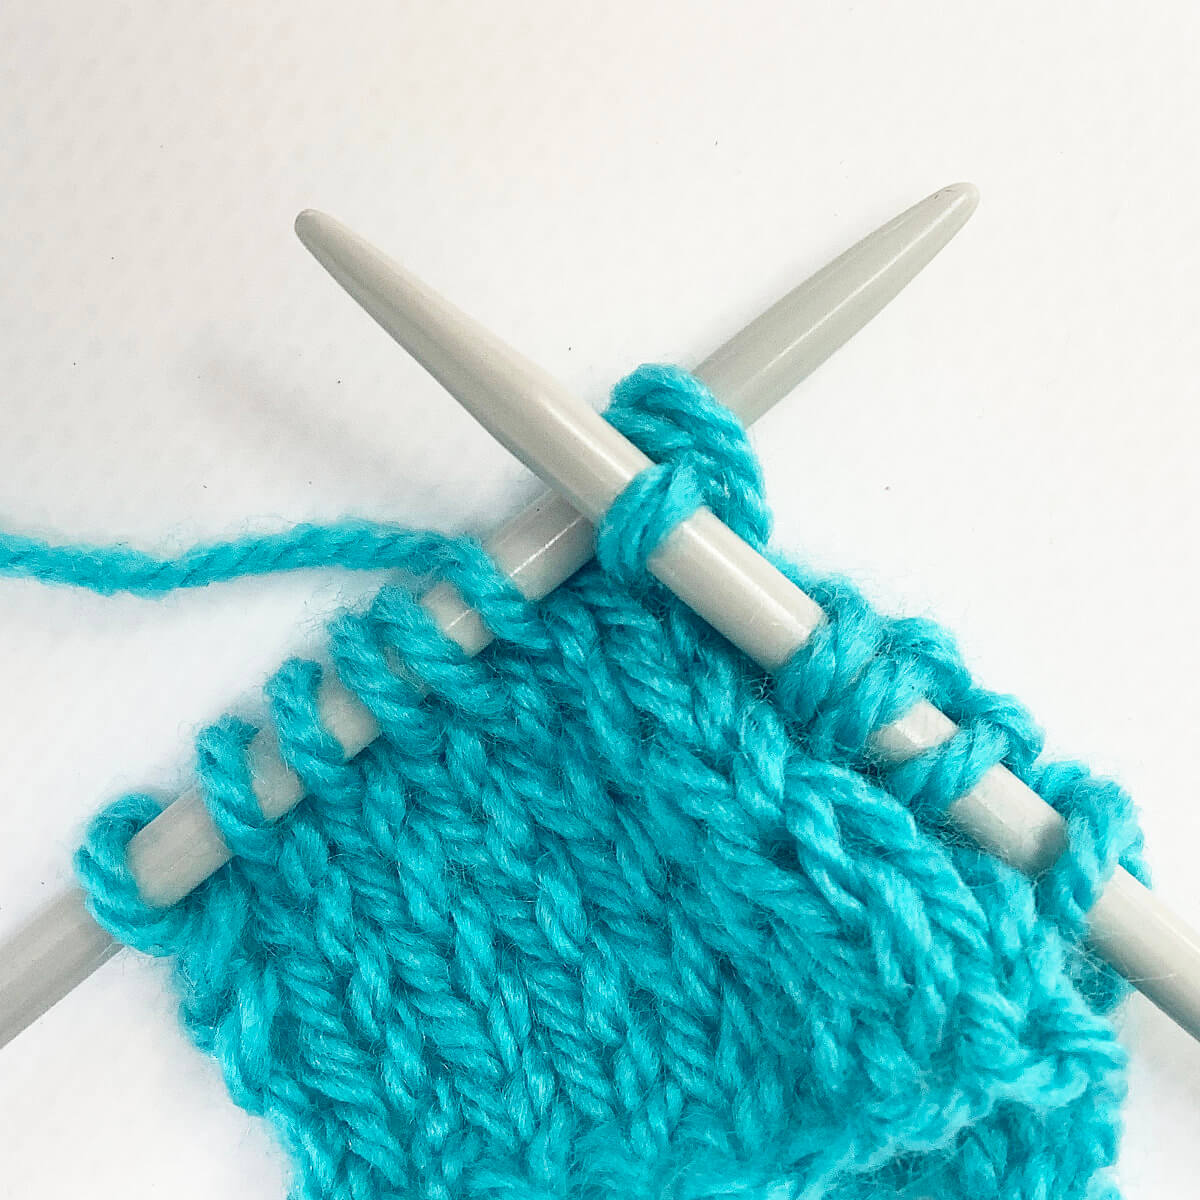
Now insert the left-hand needle underneath the left loop of that lower stitch.
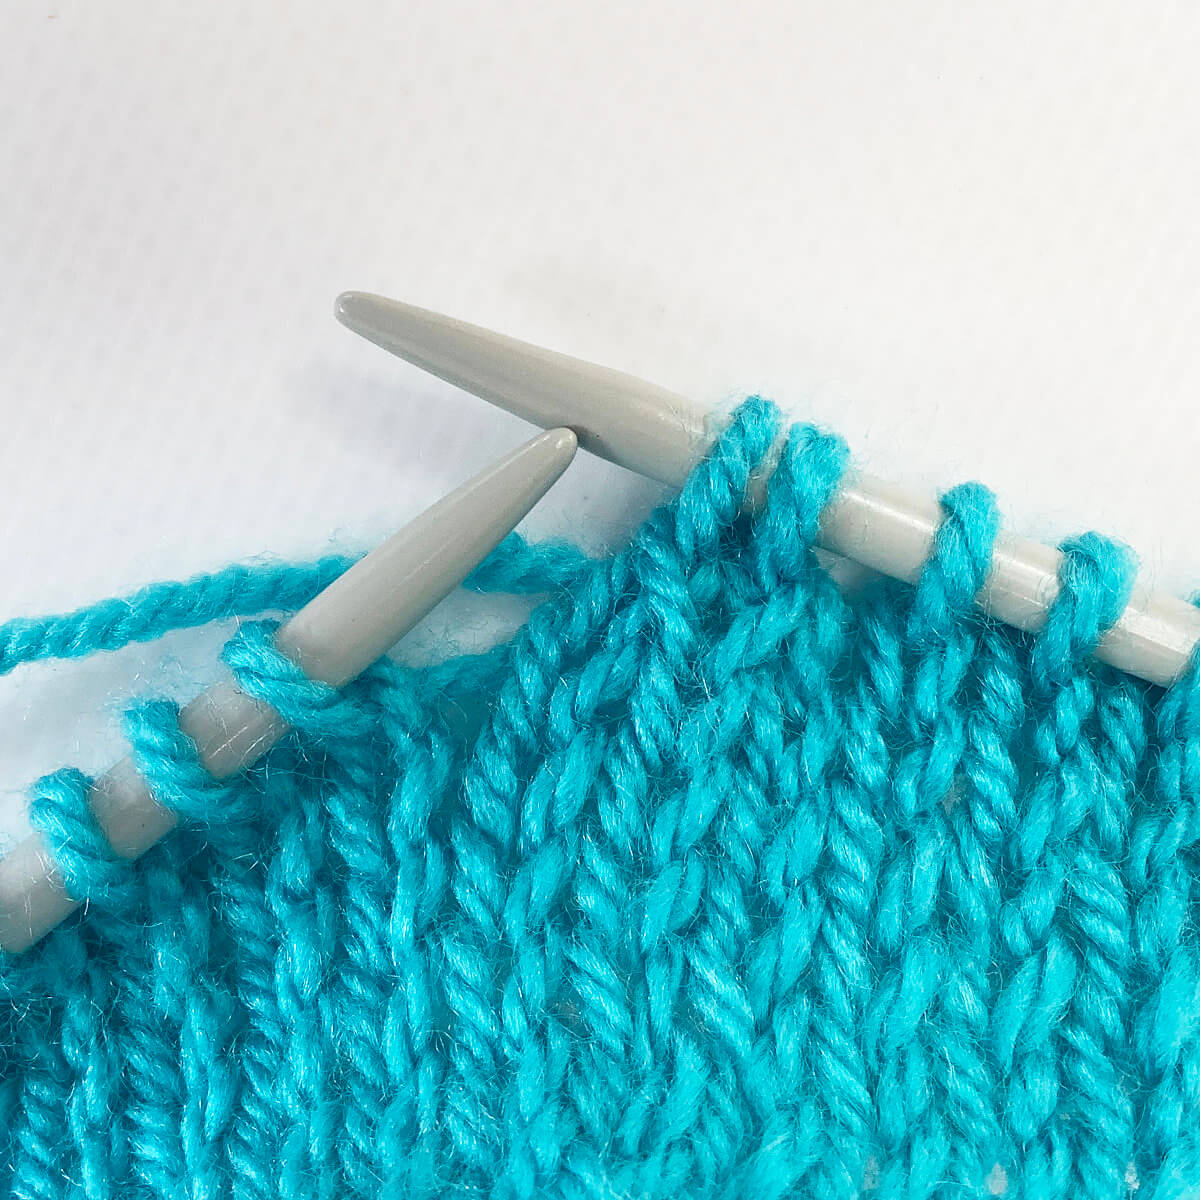
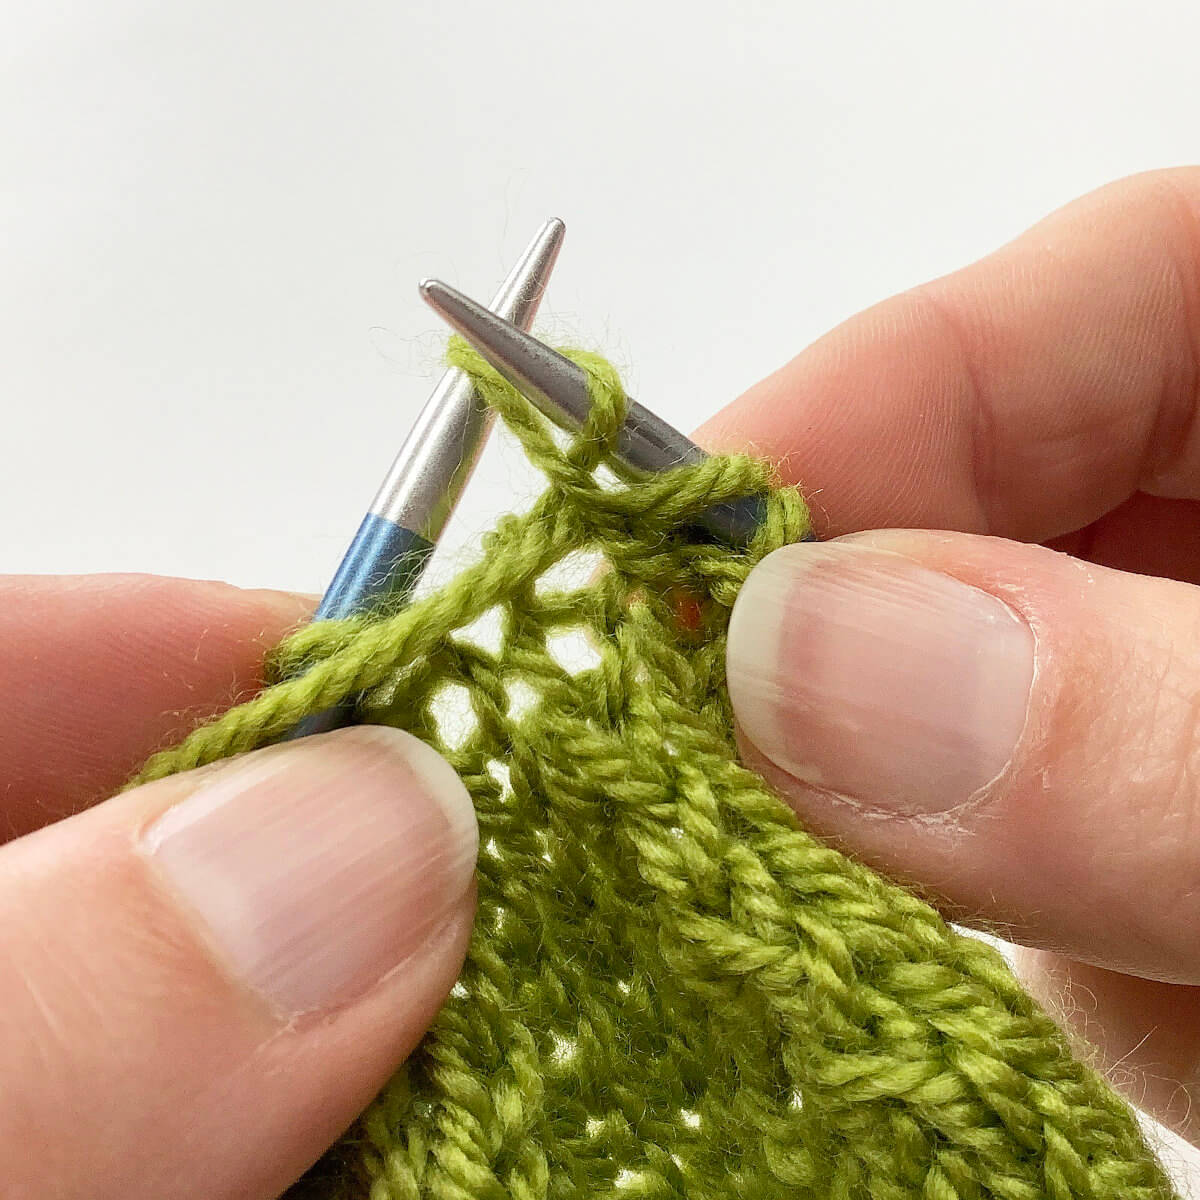
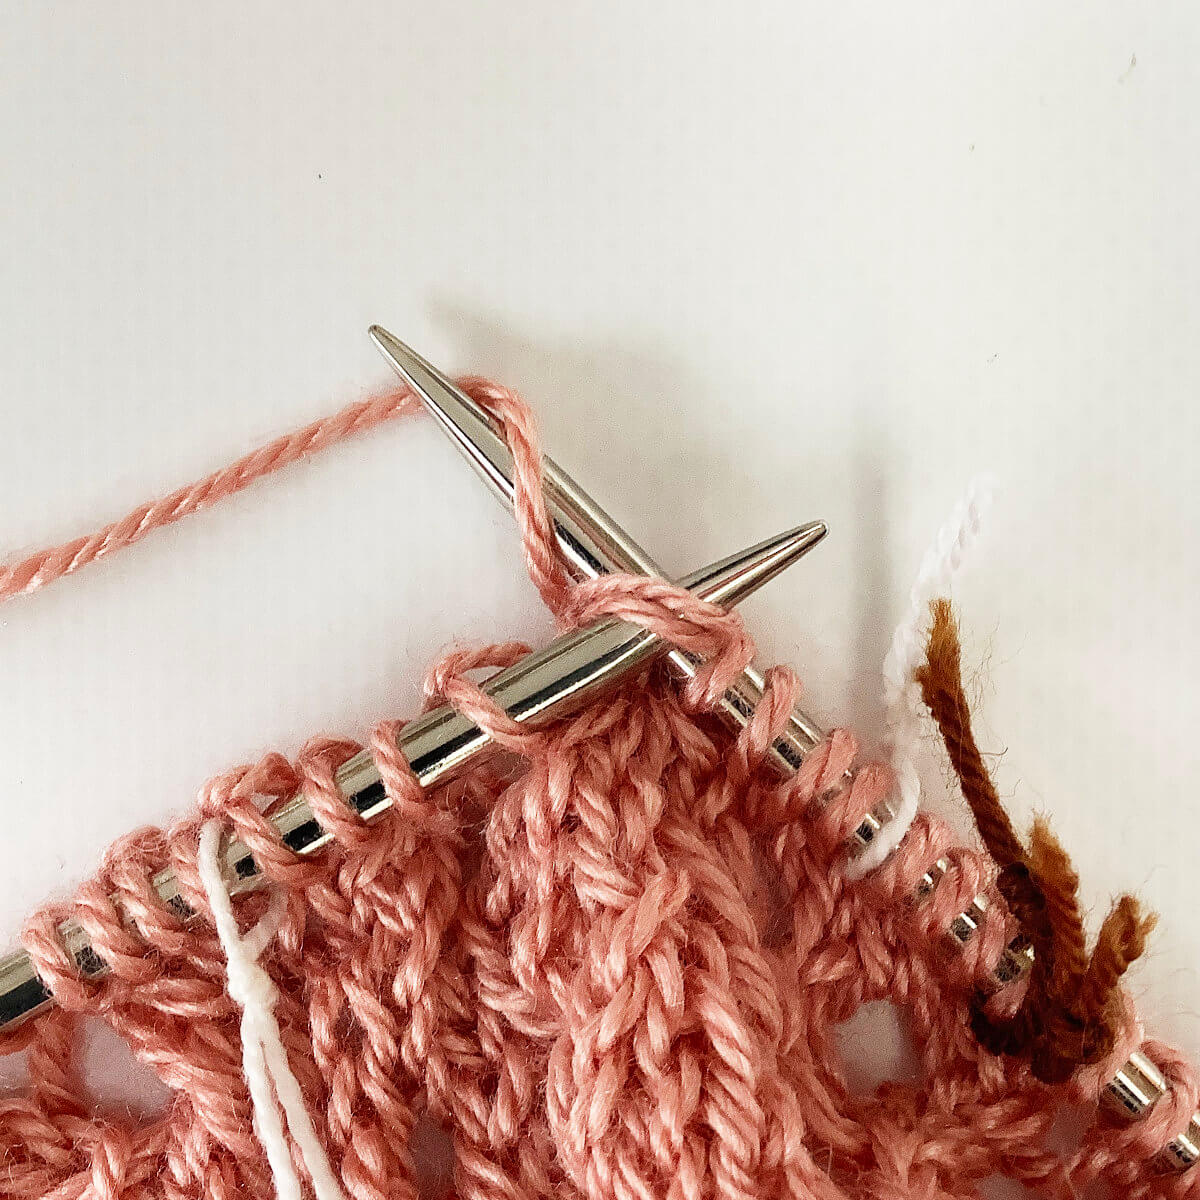
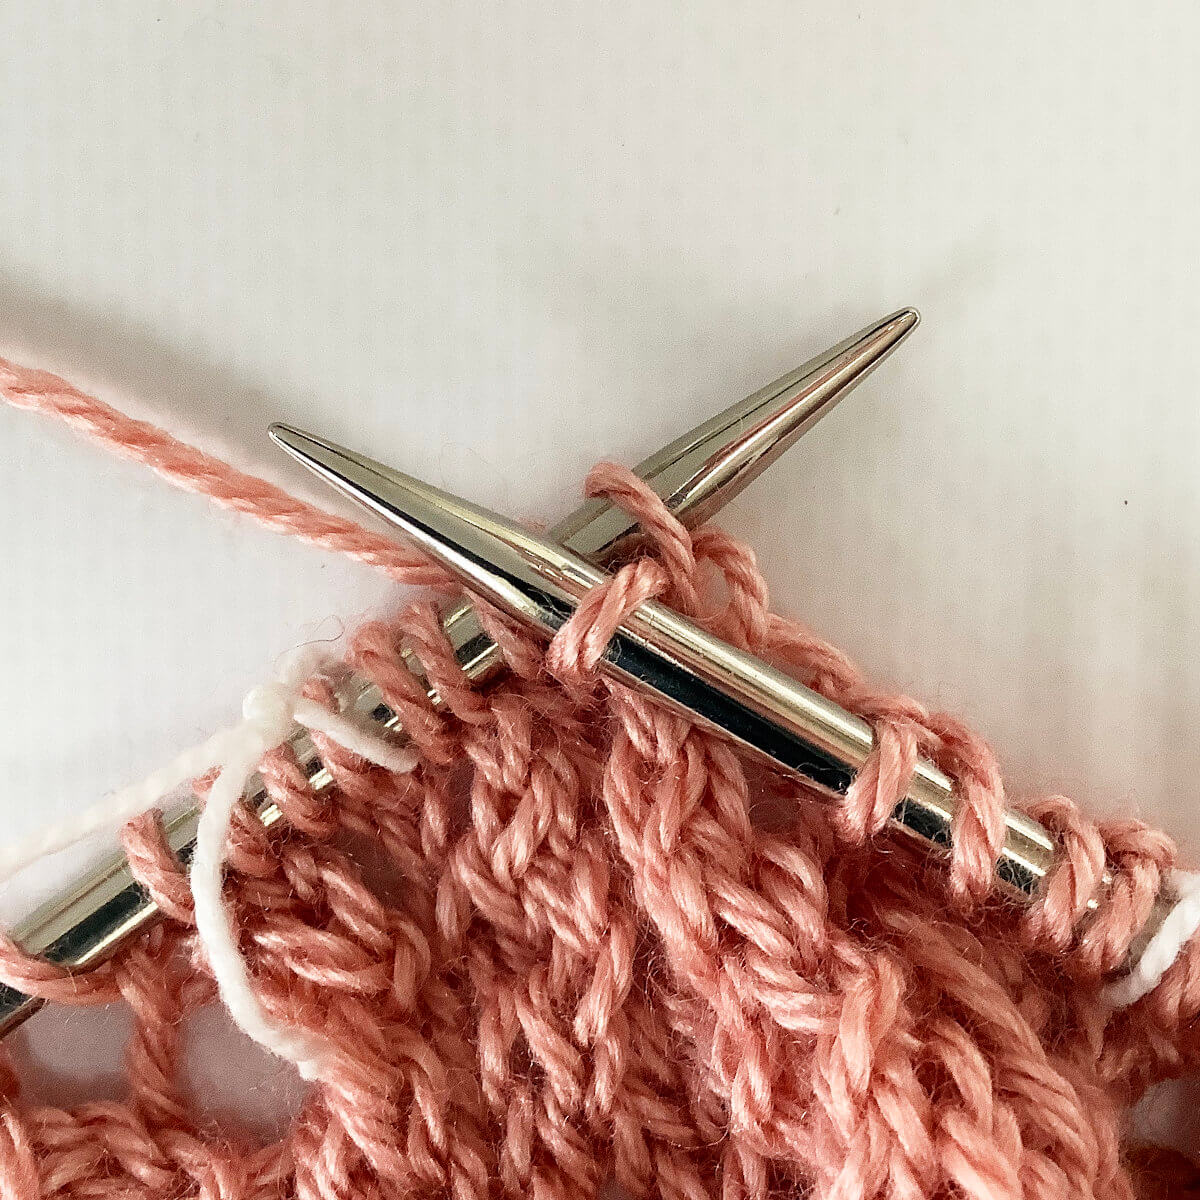
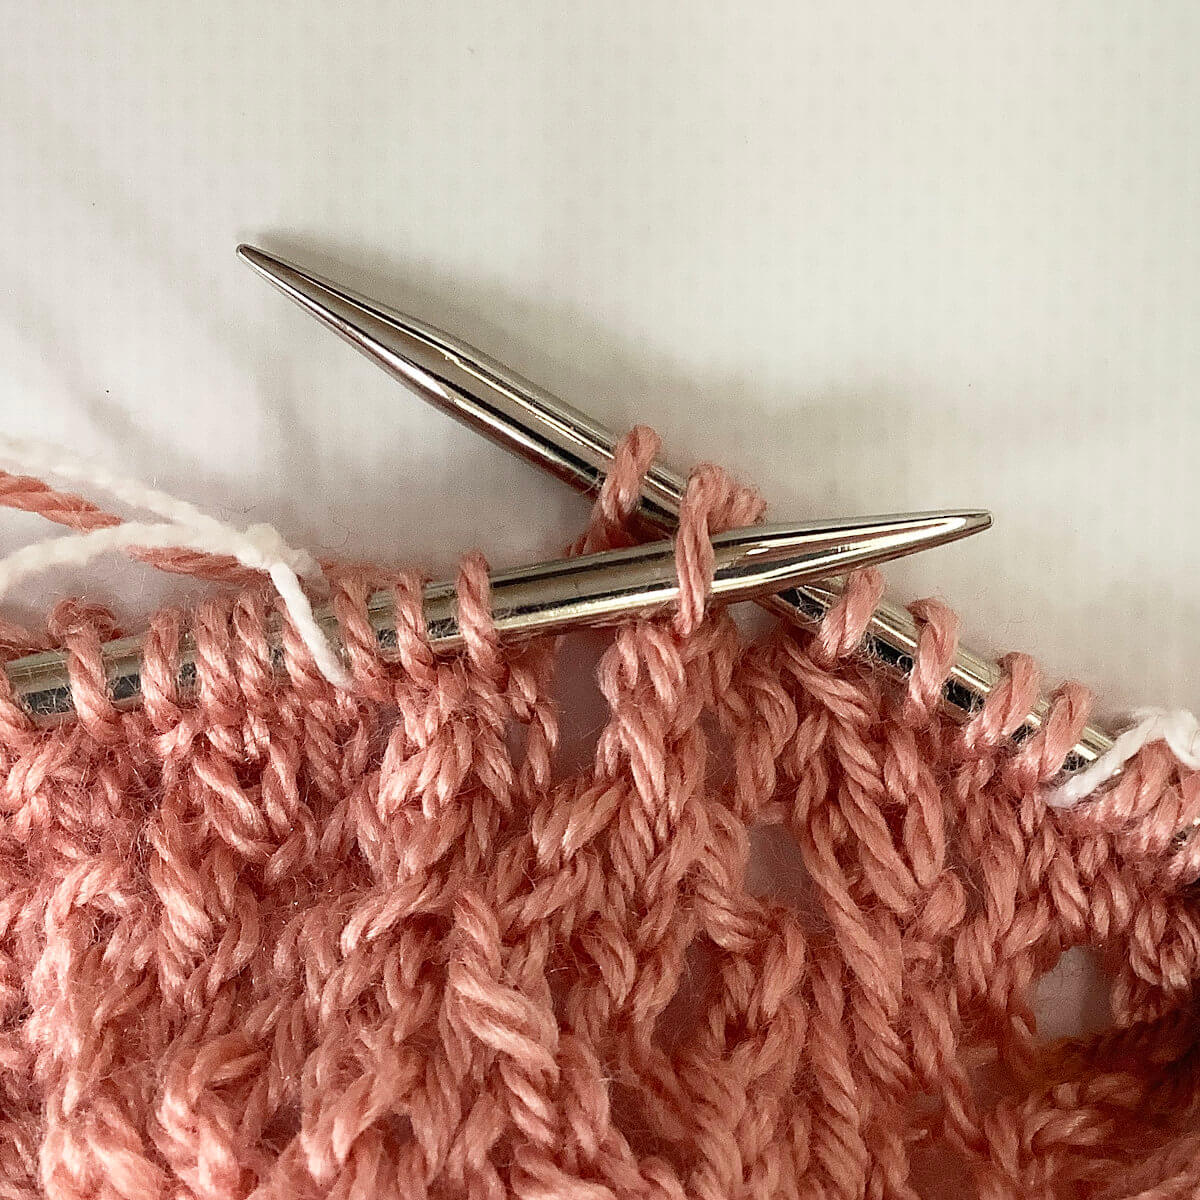
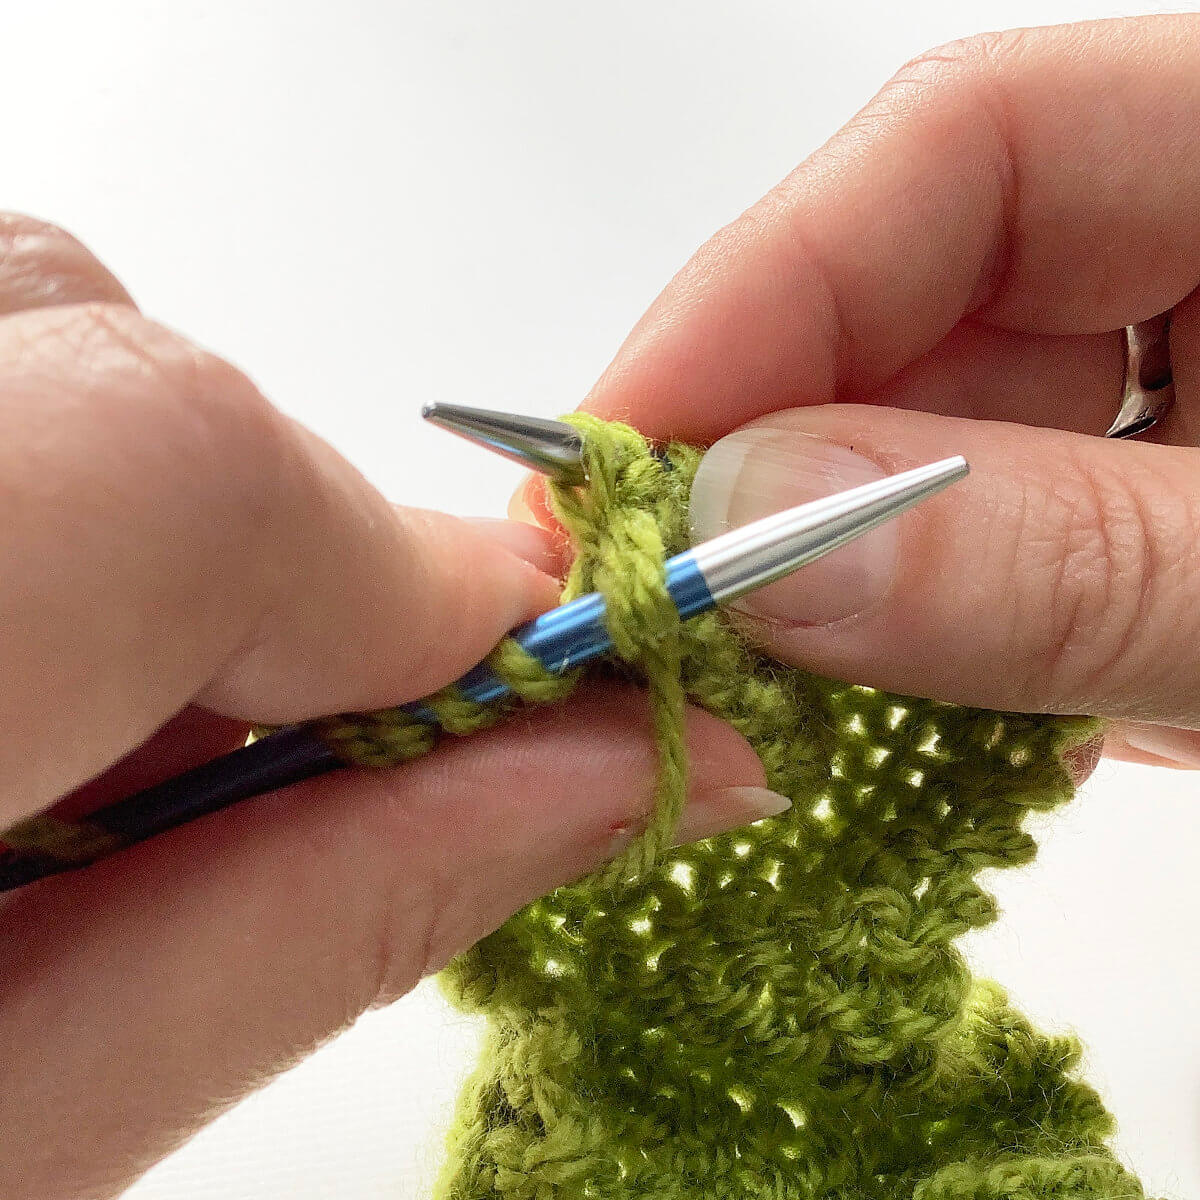
Next, work a k2tog over the first 2 stitches on the left-hand needle as the final step.
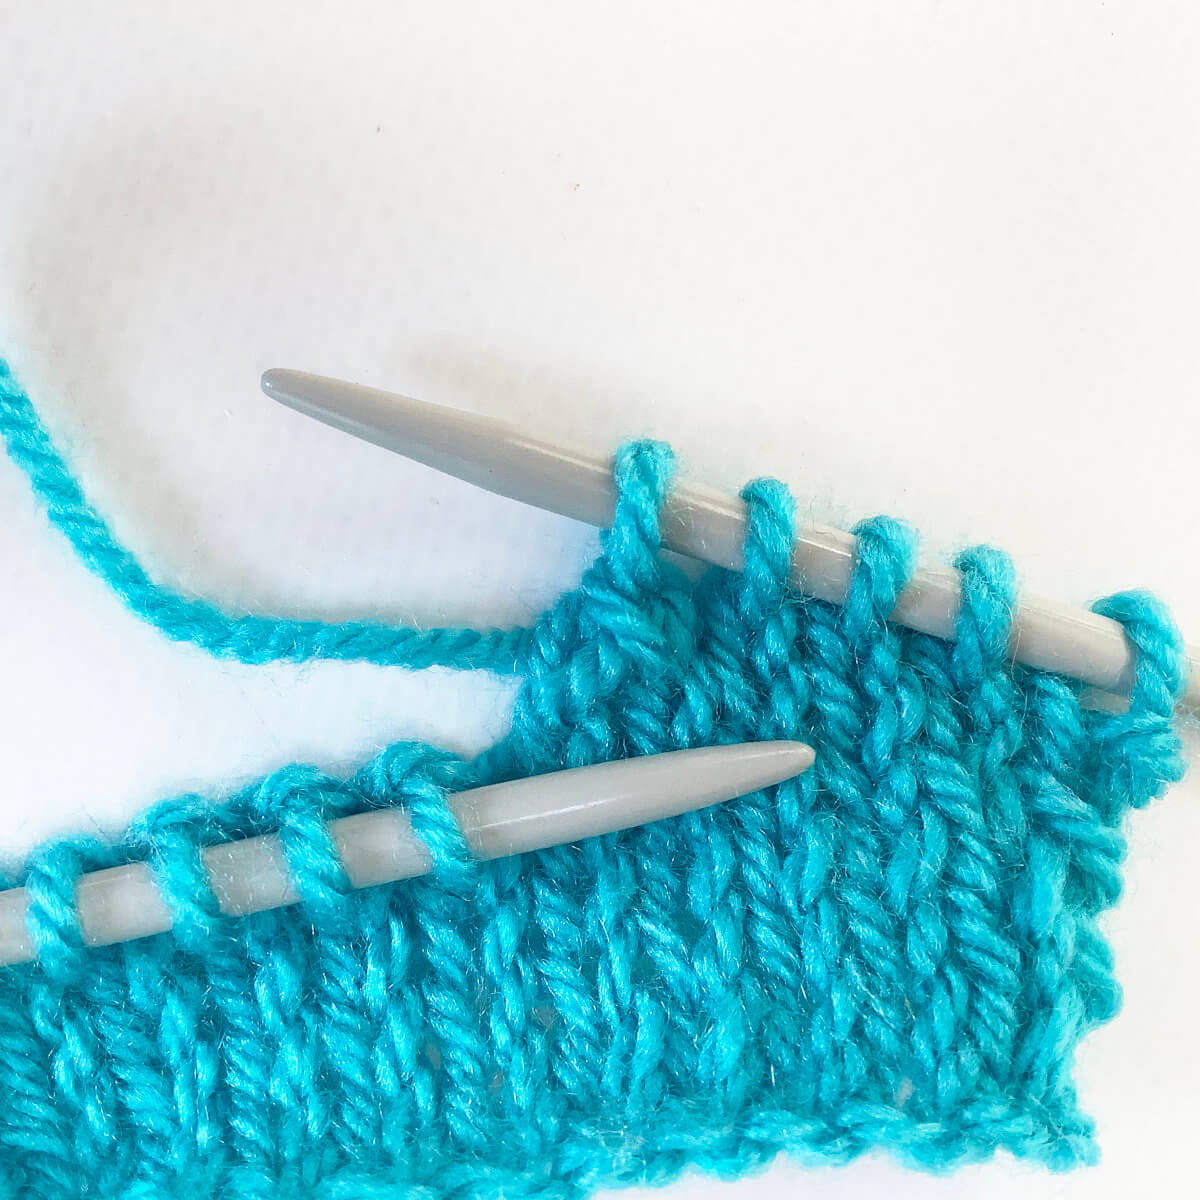
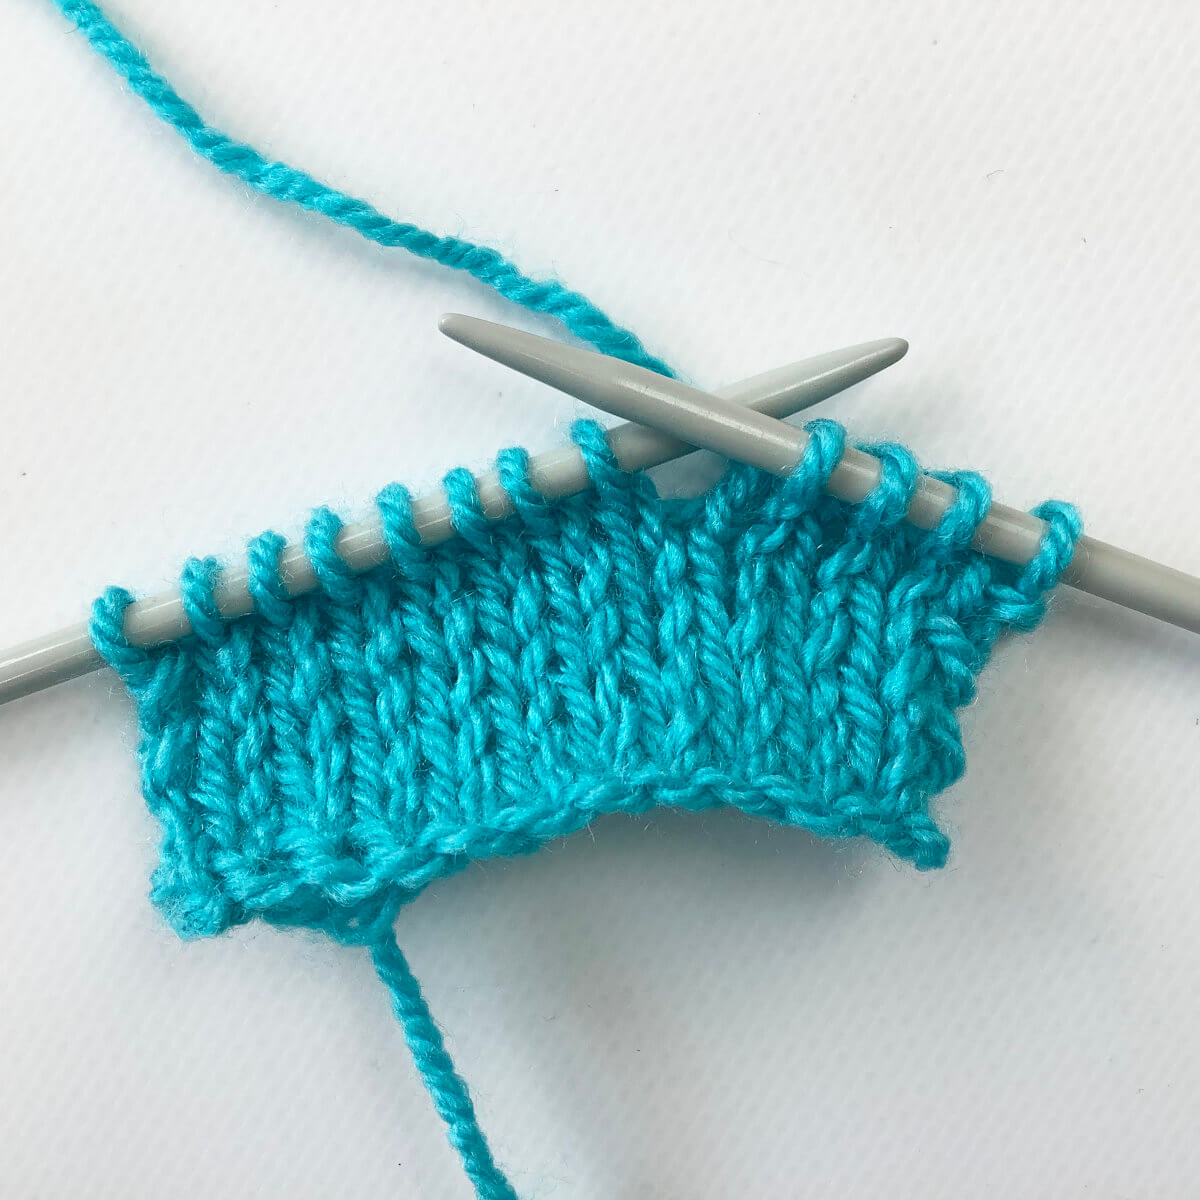
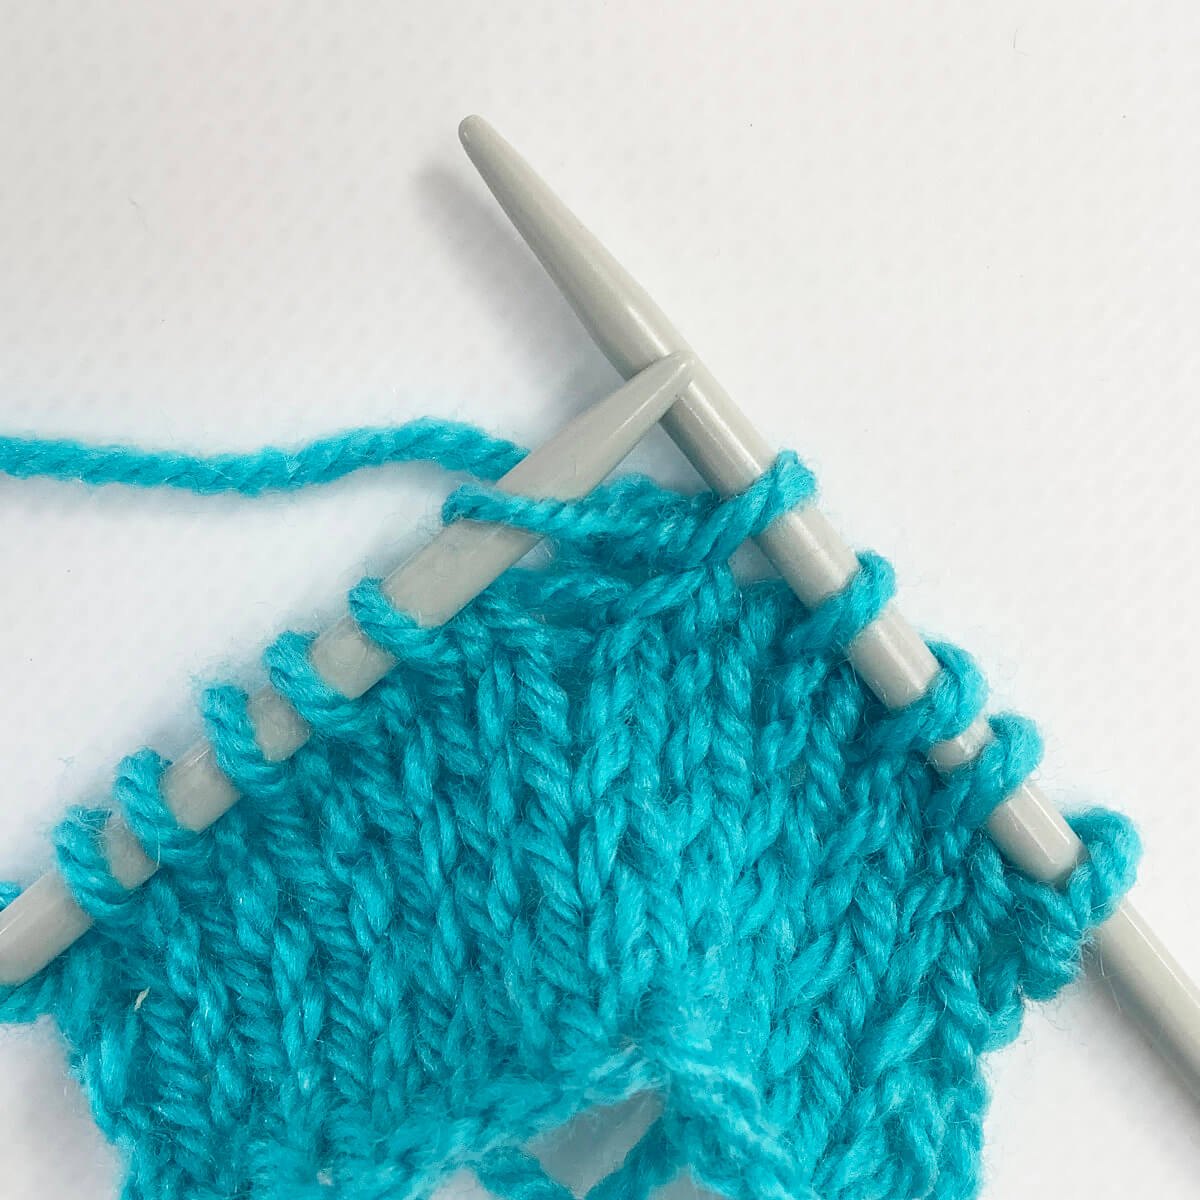
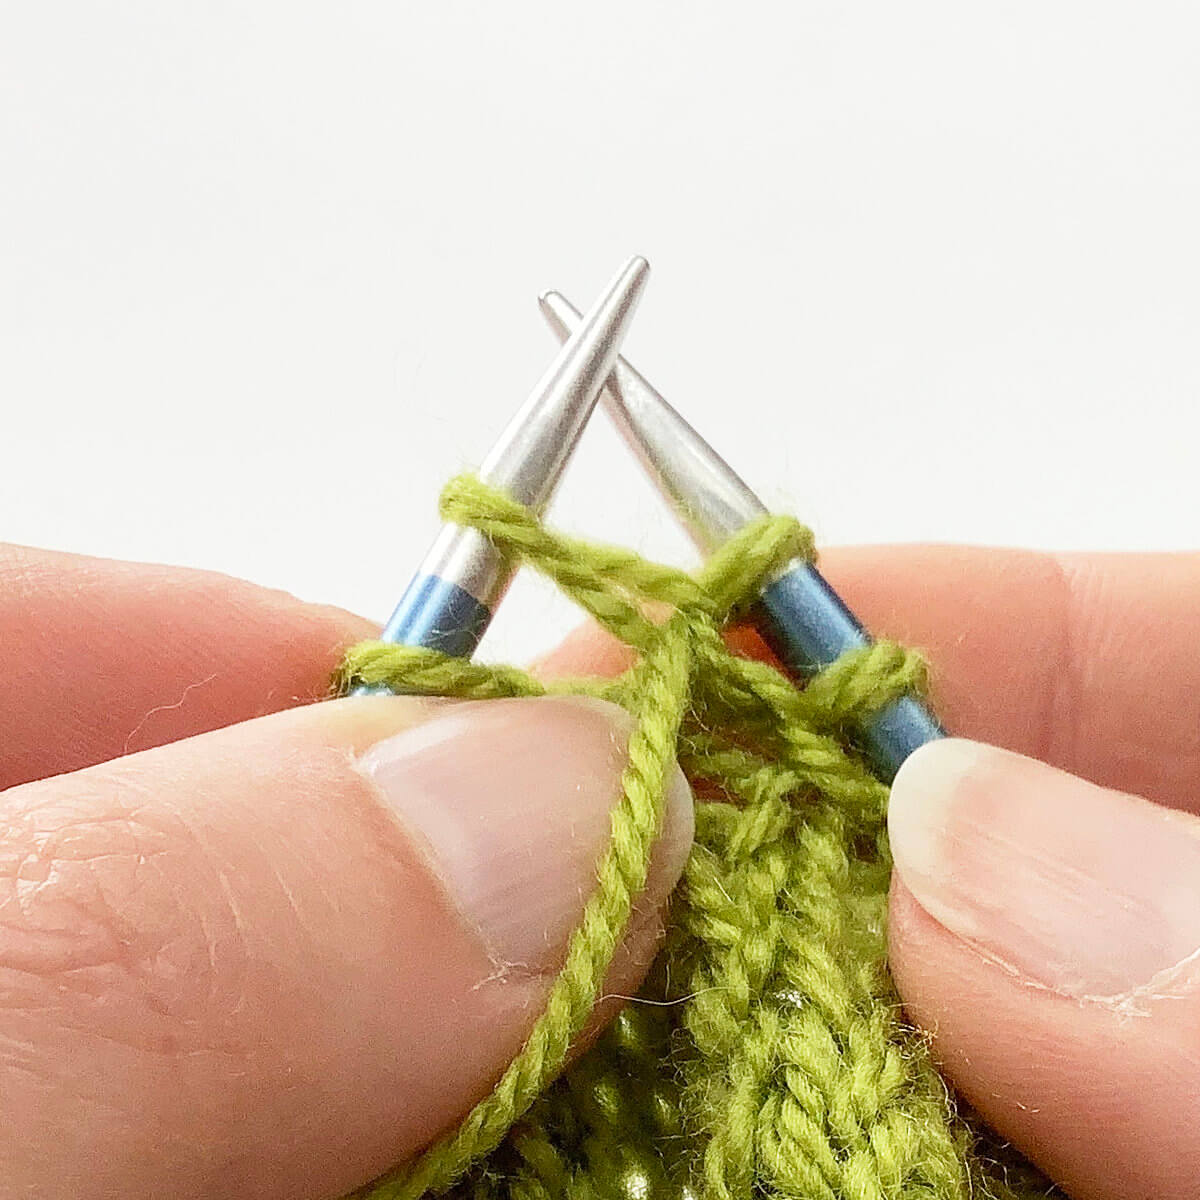
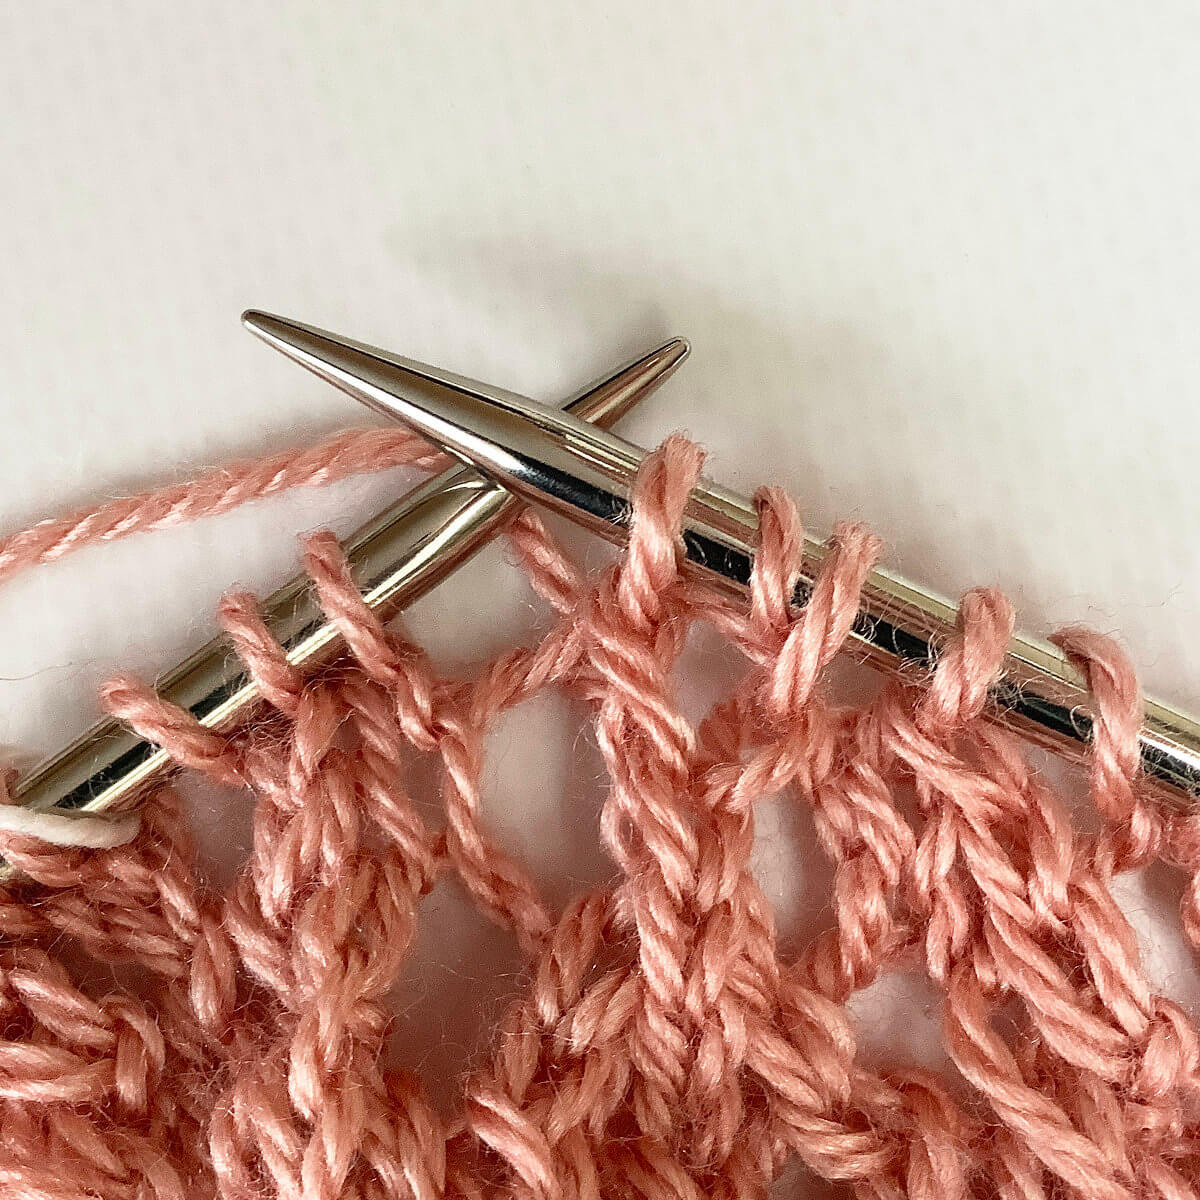
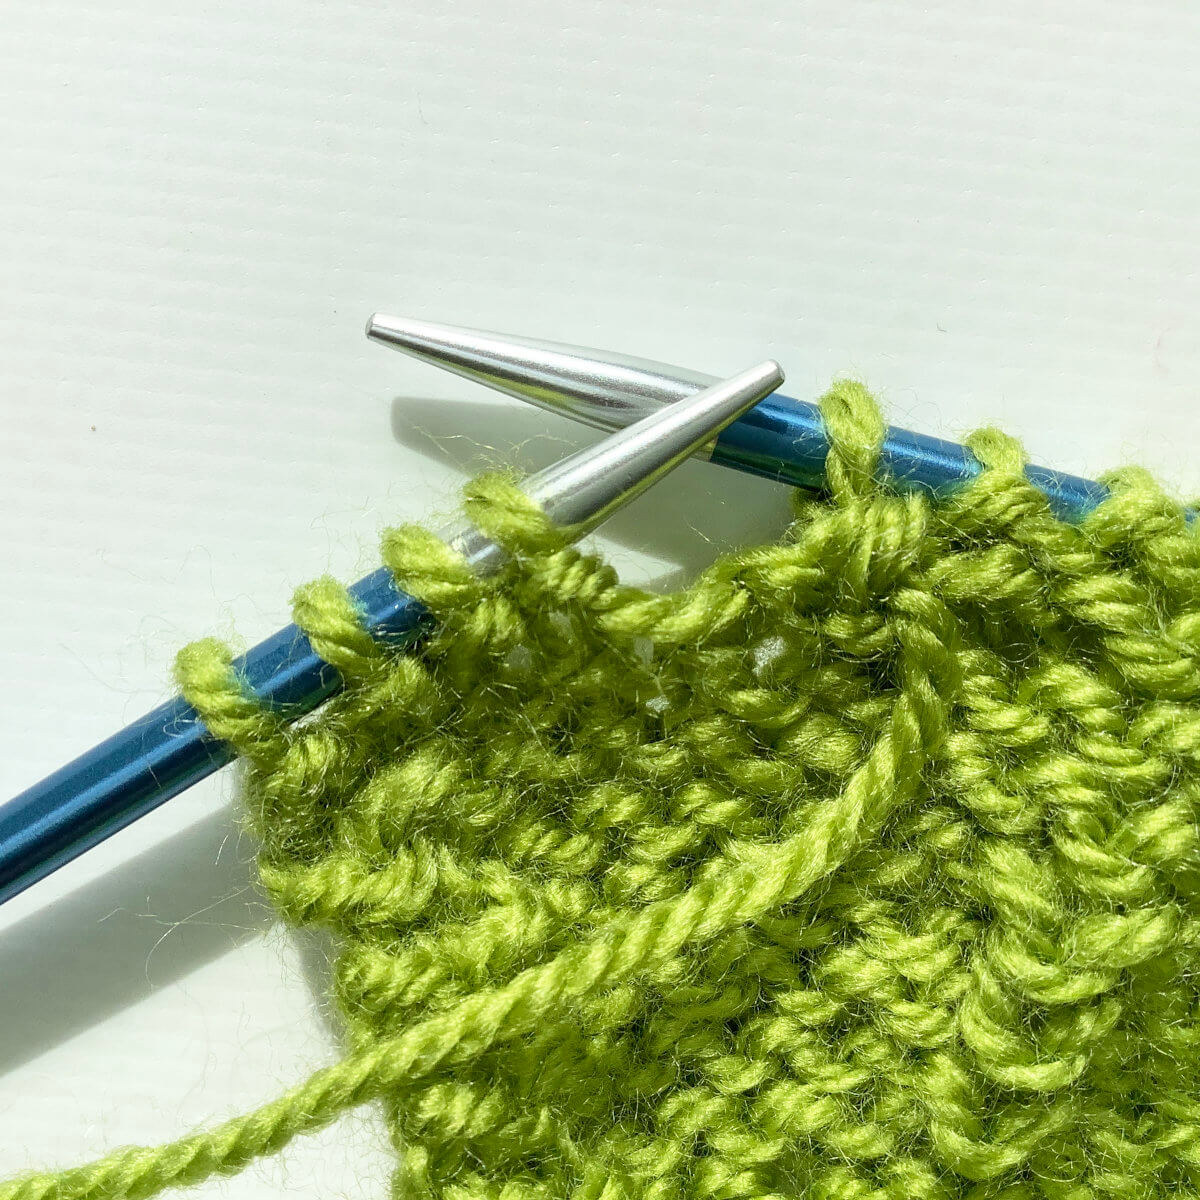
Below, you can see the result: 3 stitches that have been symmetrically decreased to 2 stitches.
And that’s all there is to it!
Thanks to my Patreon supporters for bringing you this freebie! Creating quality patterns and tutorials is a lot of work and resource-intensive. However, I find it important to give you free content like this tutorial. Thanks to the generous support of my Patreon supporters, I can make it happen. Thank you, patrons! Click here to join, or click here to read more about La Visch Designs on Patreon.
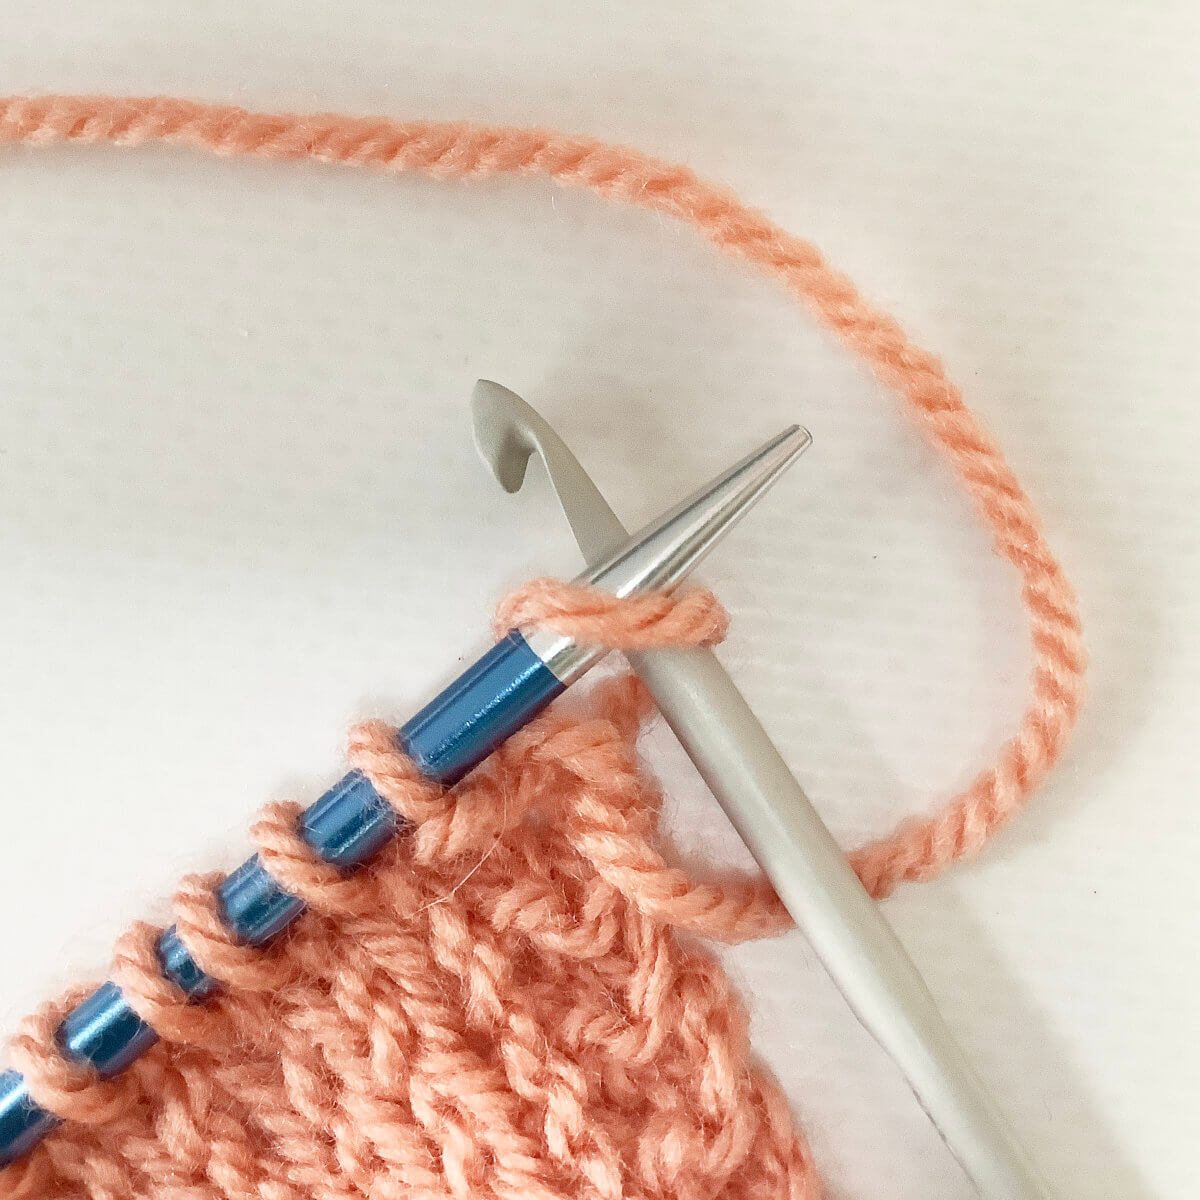
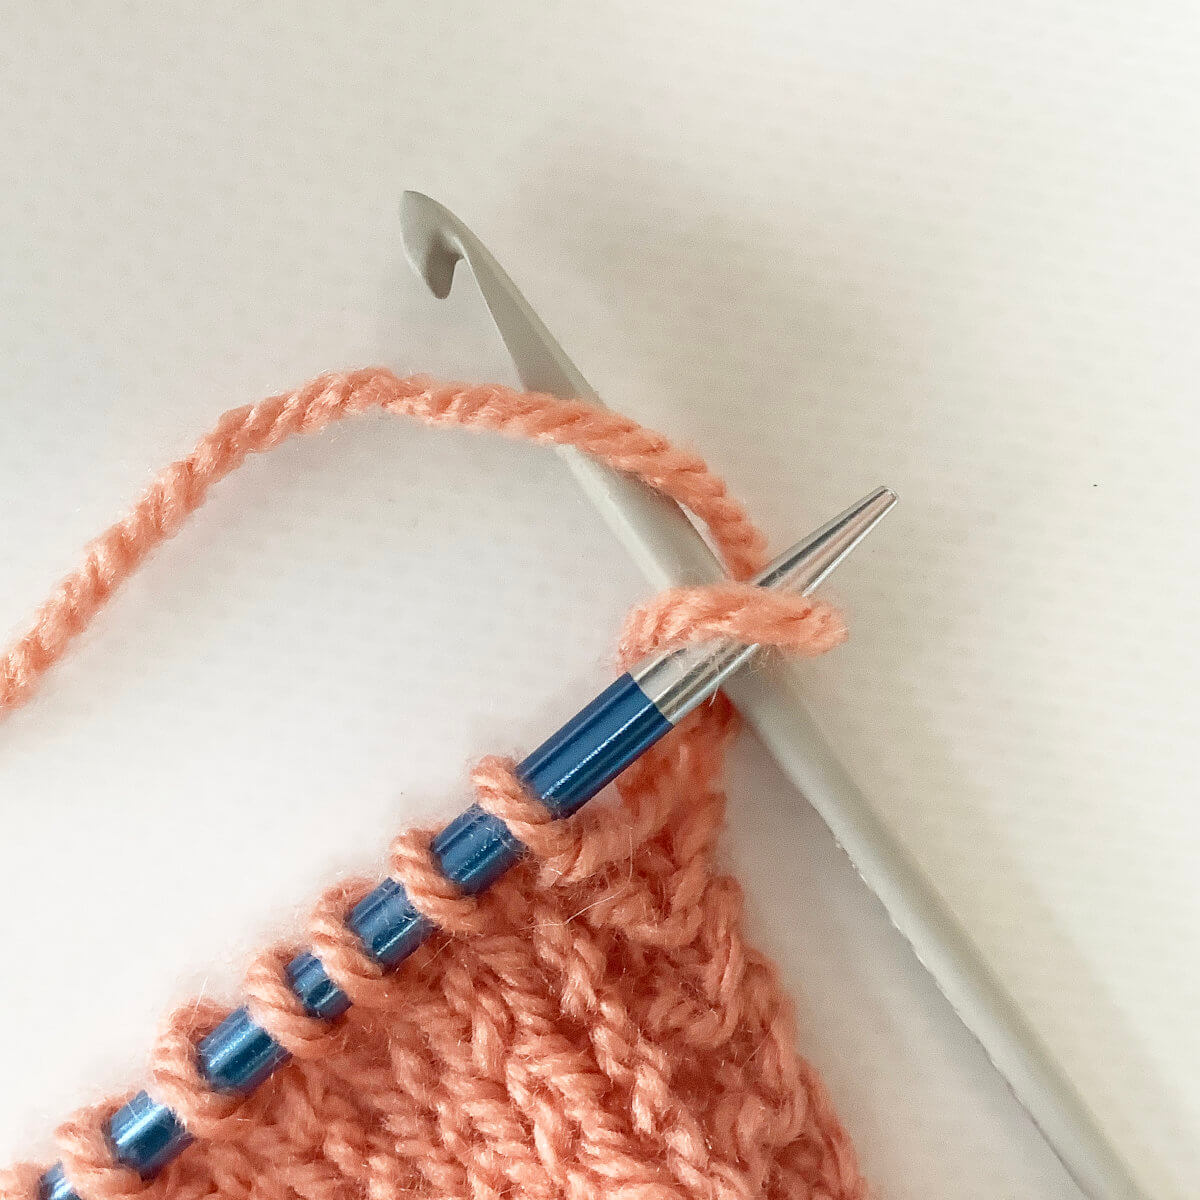
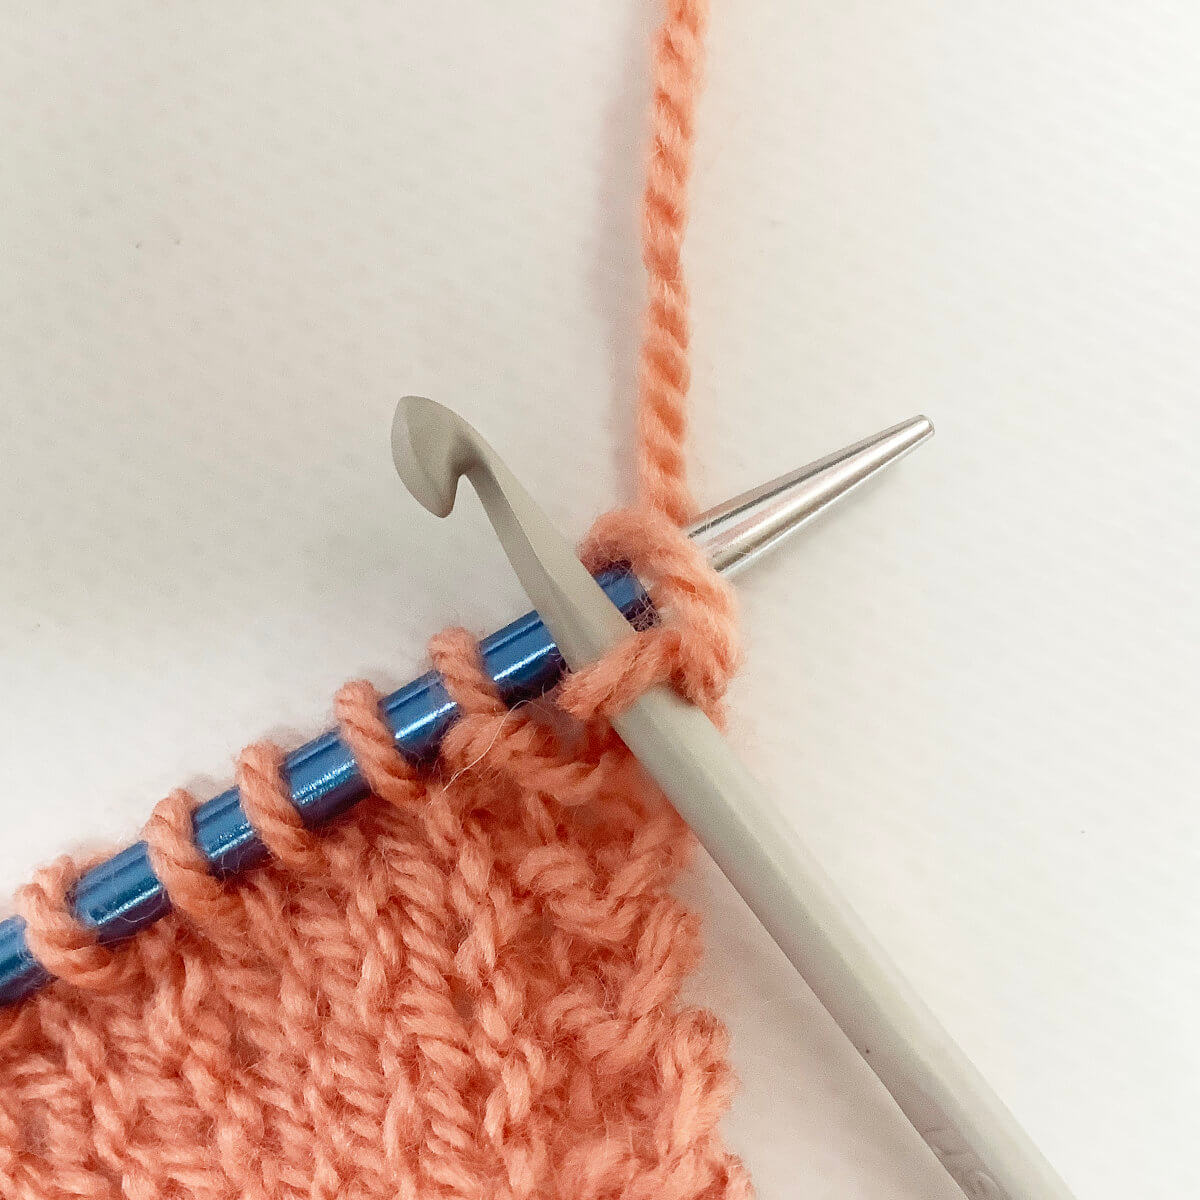
In this tutorial, I’m going to show you a very neat decrease: the bunny ears decrease. It’s a symmetrical way of decreasing 3 stitches to only 2! It’s called this way, because the result somewhat looks like 2 bunny ears “hugging” the resulting 2 stitches. Now, in this version of the decrease, the “ears” are pointing outwards. There is also a version in which the ears point inwards, that one is called the “bunny ears back” decrease. I’ll make a tutorial on that version of the decrease soon.
Materials used
Yarn: Paintbox Yarns Simply DK, a good value, good quality 100% acrylic yarn, here in the color Marine.
Needles: This is a pair of straights that I picked up at the second-hand store when I started knitting, brand unknown.
Working the bunny ears decrease step by step
In patterns, you may encounter the following description of this stitch: Bunny ears decrease (bedec): Knit 2 stitches together but leave the second stitch on the left needle, next work skp over the next 2 stitches. But how to actually do this? Read on!
First, work your way across the row until you’ve reached the point where you want to make the decrease.
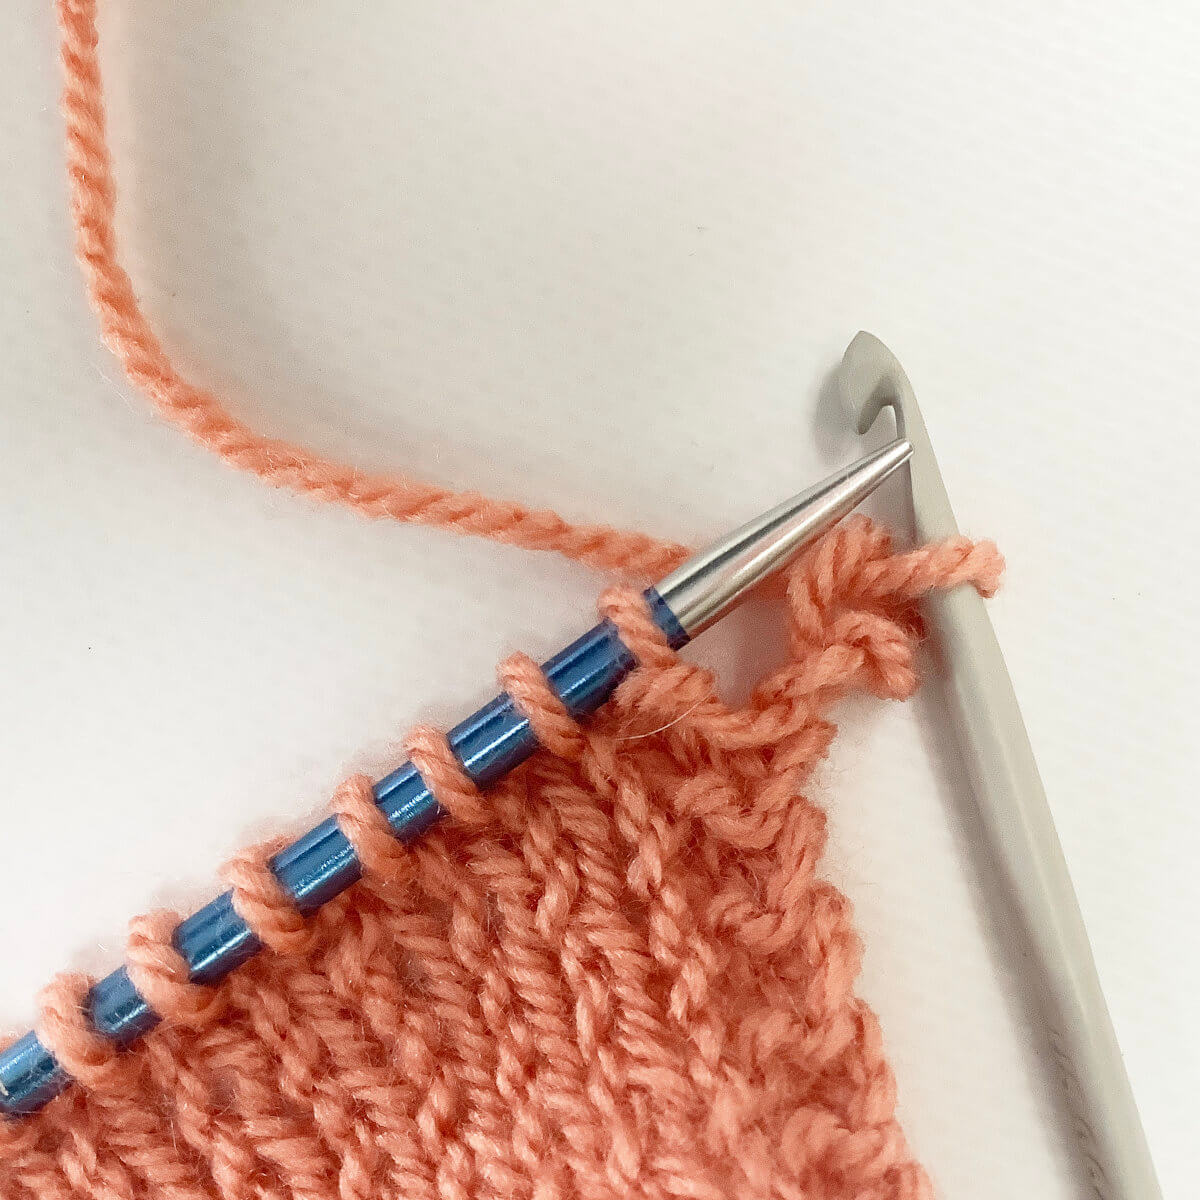
See those 3 stitches on the left-hand needle? That’s where I’ll be making the bunny ears decrease.
Next, insert the tip of the right-hand needle into the first 2 stitches at the same time as if to knit.
Over these stitches, we’ll be doing the first steps of a k2tog.
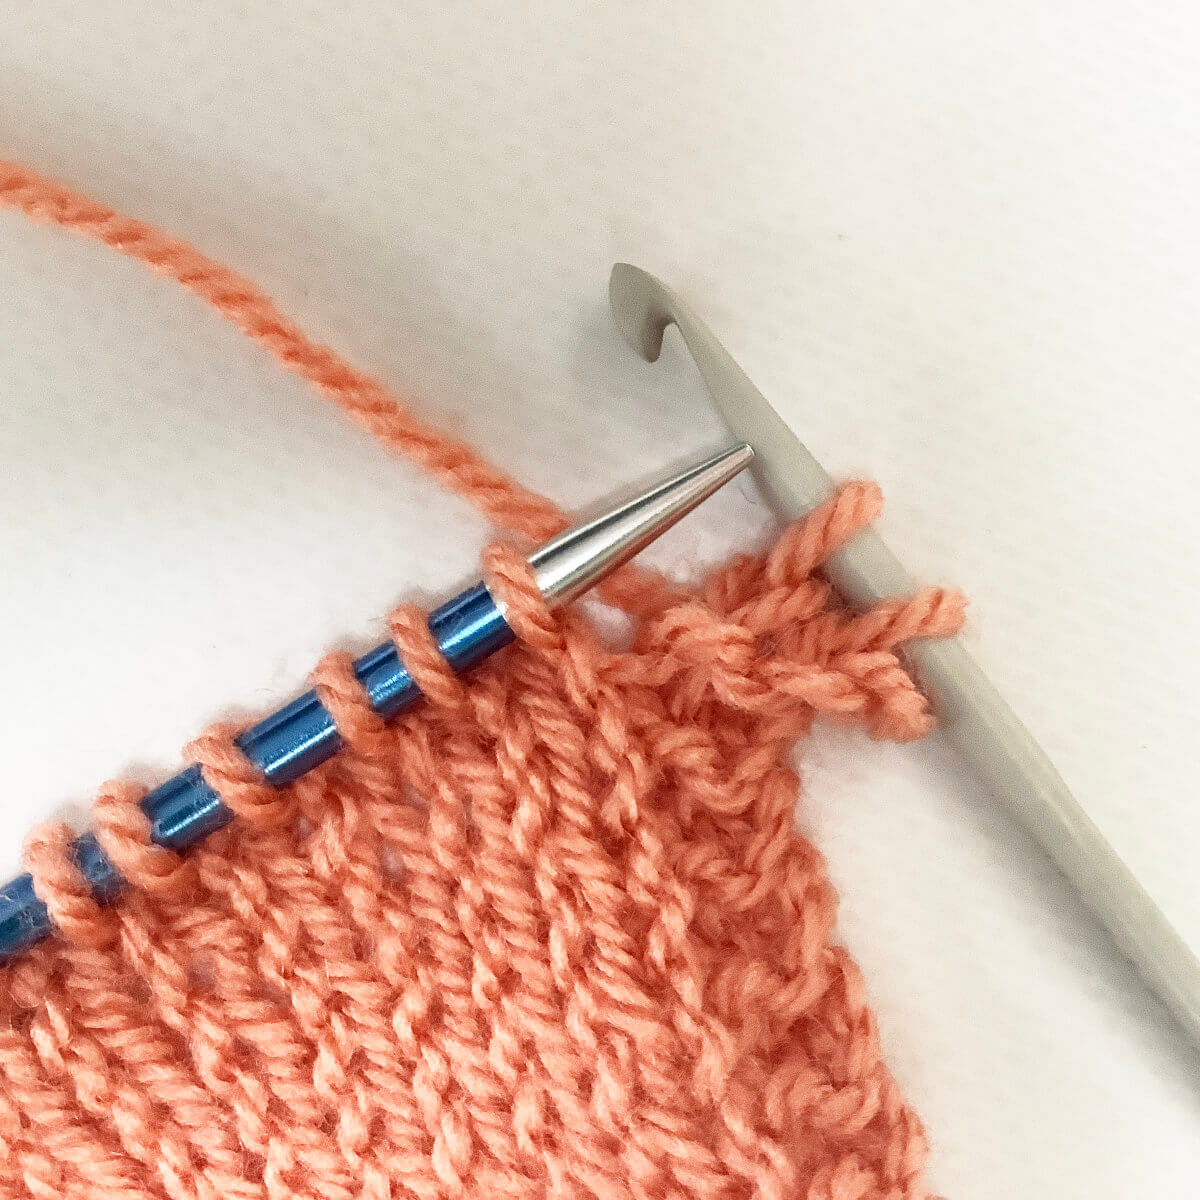
Wrap the yarn around the needle…
… and pull the yarn through the 2 stitches.
Next, slide only 1 of the 2 original stitches of the left-hand needle.
With a regular k2tog, both stitches would be moved off the needle. So this is where it starts to go different.
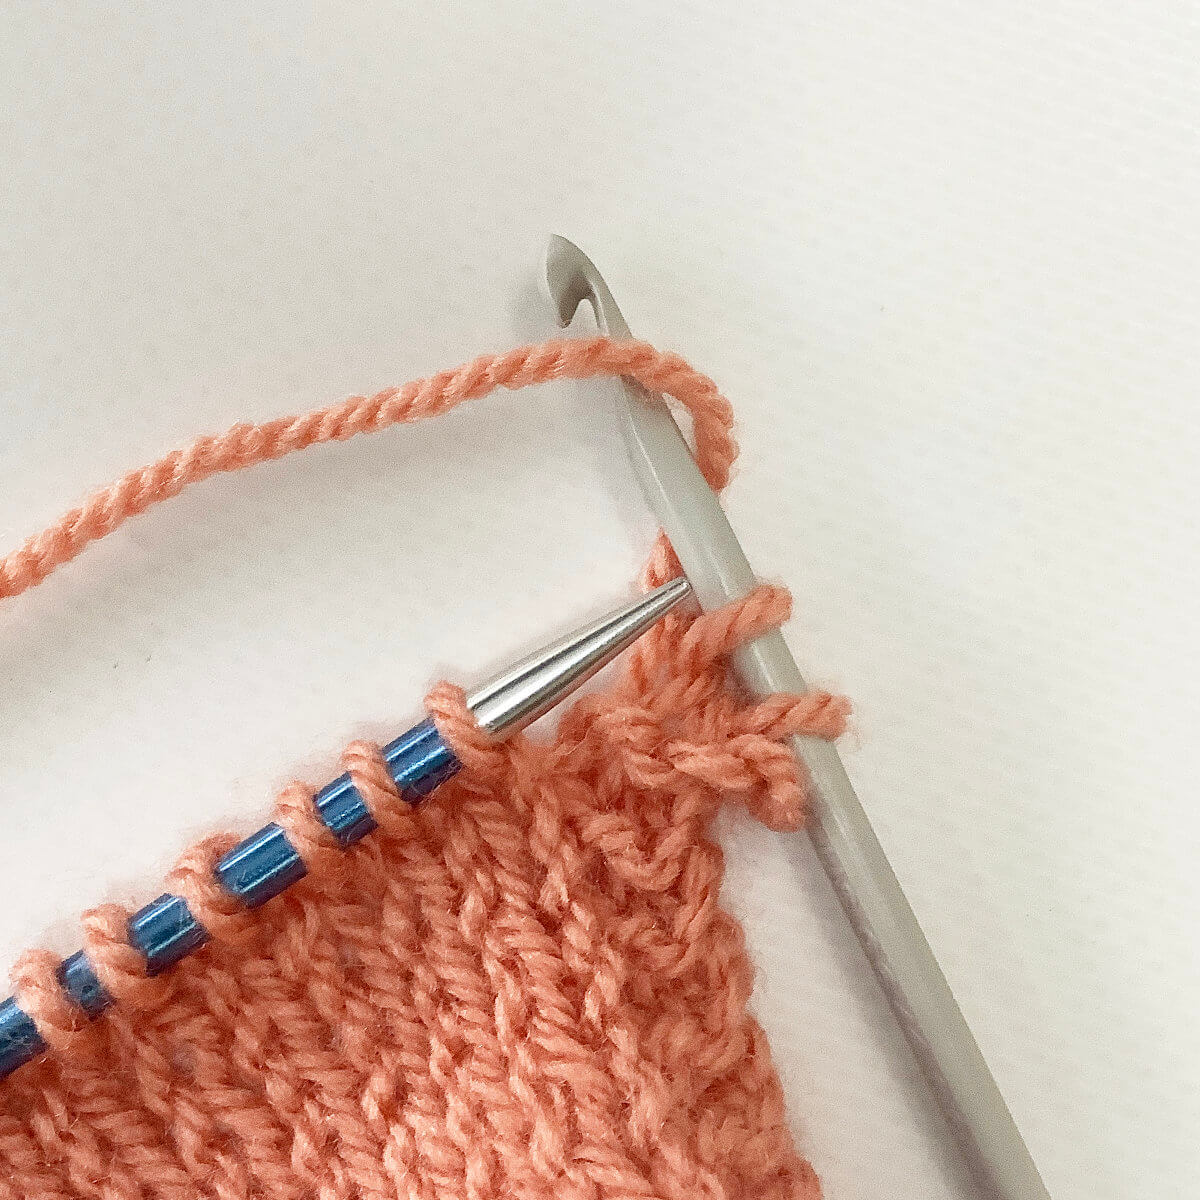
Now we’re starting the left leaning decrease part of the stitch.
The main point here is to work this on the 2 remaining stitches on the left-hand needle: 1 stitch we haven’t handled yet, and 1 stitch that we didn’t move off the needle when working the k2tog right-leaning decrease. This part of the stitch can be worked as ssk, skp, or any other way you may prefer to work a left-leaning decrease. Since I personally prefer skp I’ll be showing this in the tutorial.
To start, insert the tip of the right-hand needle into the first stitch as if to knit, and slip it onto the right-hand needle without actually knitting it. This is how it now looks:
Next, we knit the second stitch.
To do so, we start with inserting the right-hand needle into the first stitch on the other needle, wrap the yarn around the needle, pull it through the stitch you inserted the right-hand needle in, and slip the original stitch off the left-hand needle.
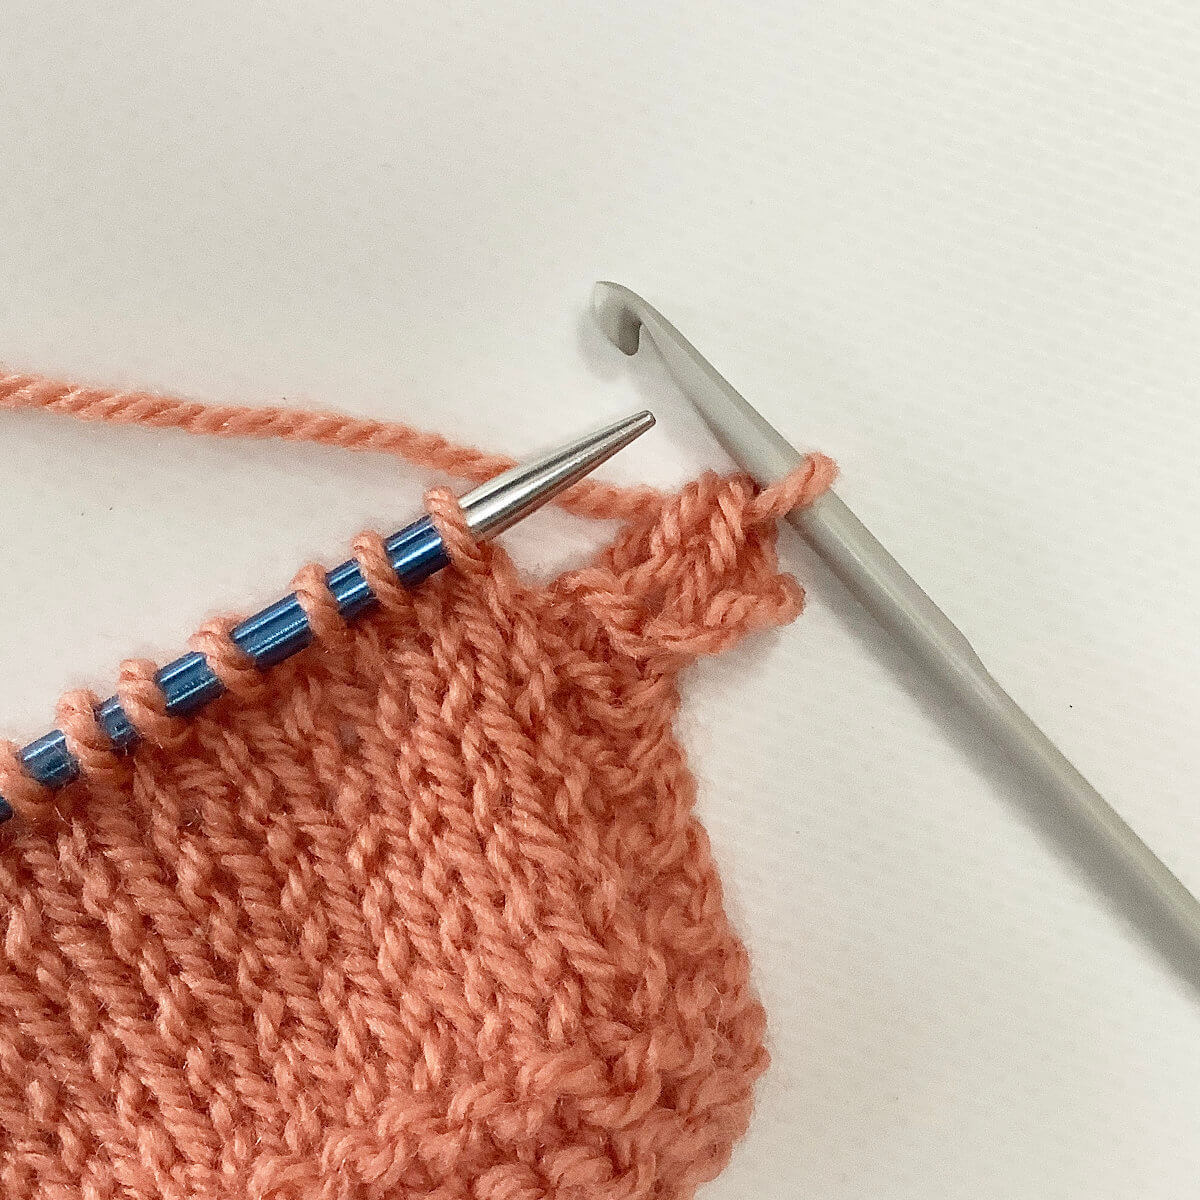
Next, insert the left-hand needle into the second stitch counted from the tip of the right-hand needle…
… and pull it over the first stitch from the tip of the right-hand needle to complete the decrease.
Do you see how this part of the decrease slants to the left? With this, the bunny ears decrease is finished.
And that’s all there is to it!
Thanks to my Patreon supporters for bringing you this freebie! Creating quality patterns and tutorials is a lot of work and resource-intensive. However, I find it important to give you free content like this tutorial. Thanks to the generous support of my Patreon supporters, I can make it happen. Thank you, patrons! Click here to join, or click here to read more about La Visch Designs on Patreon.
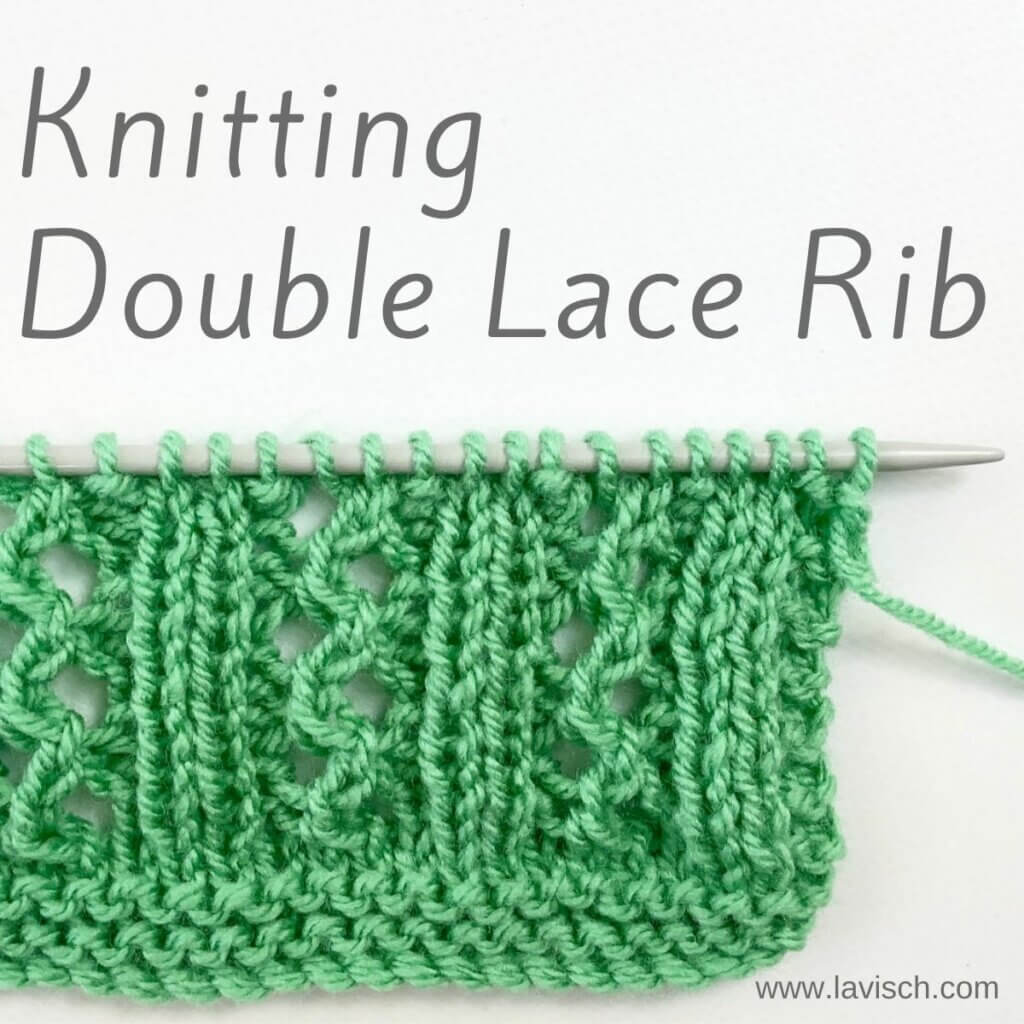
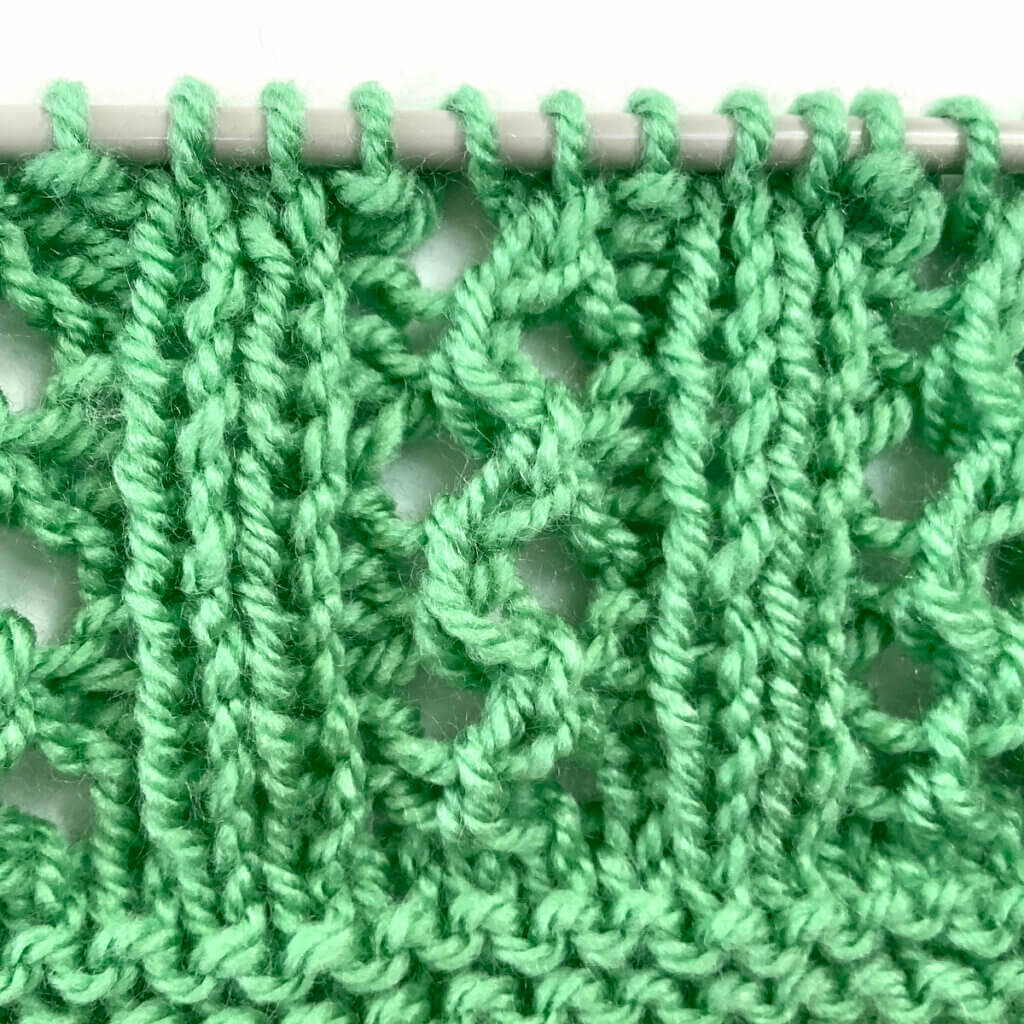
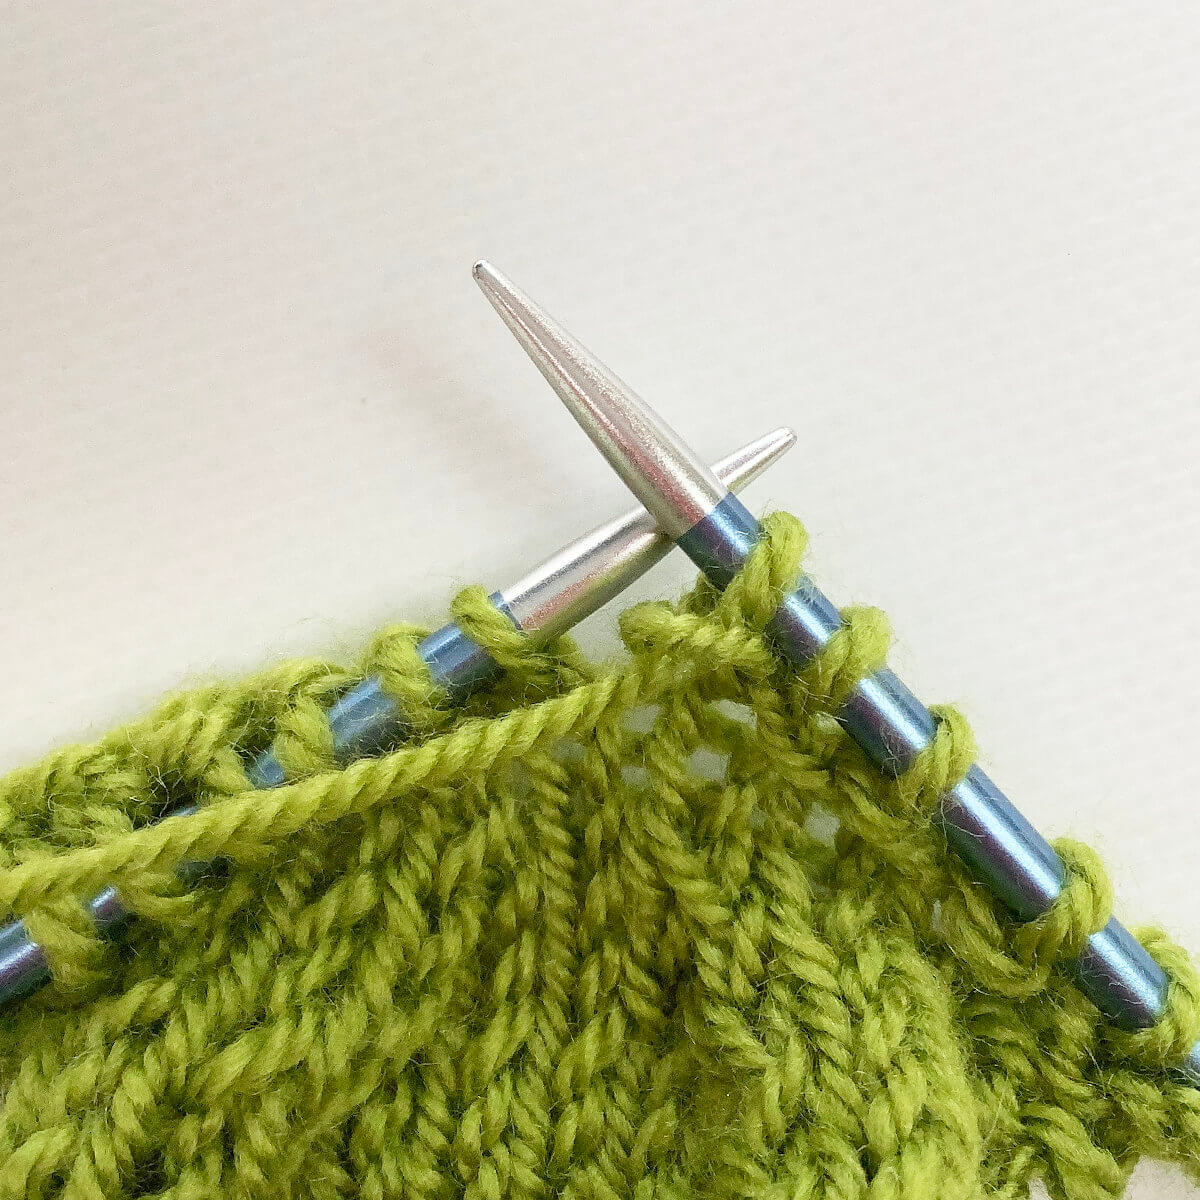
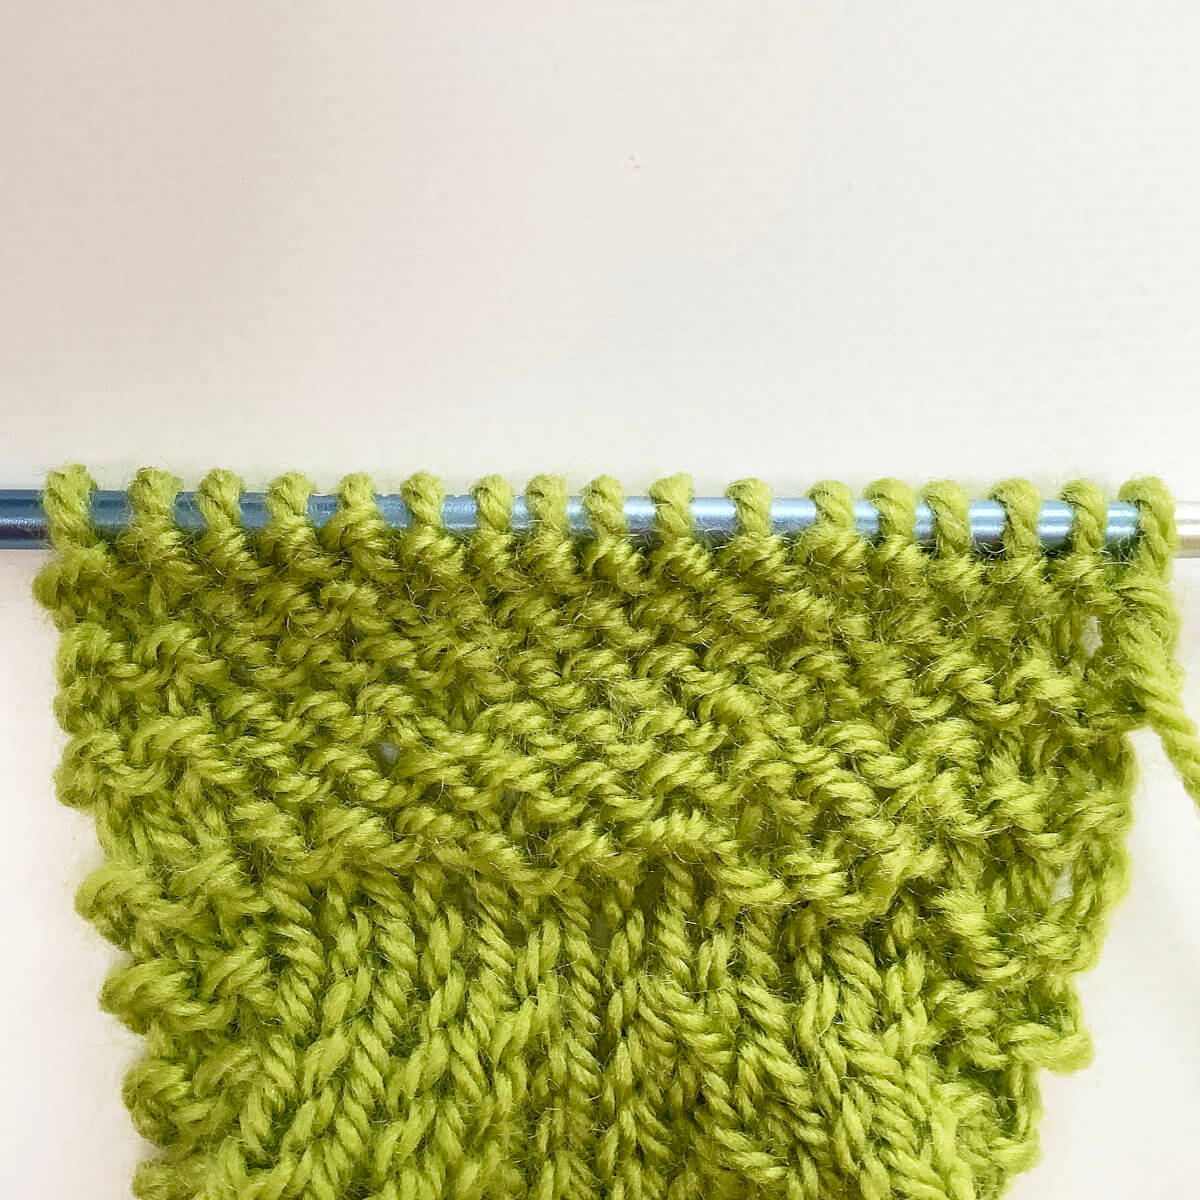
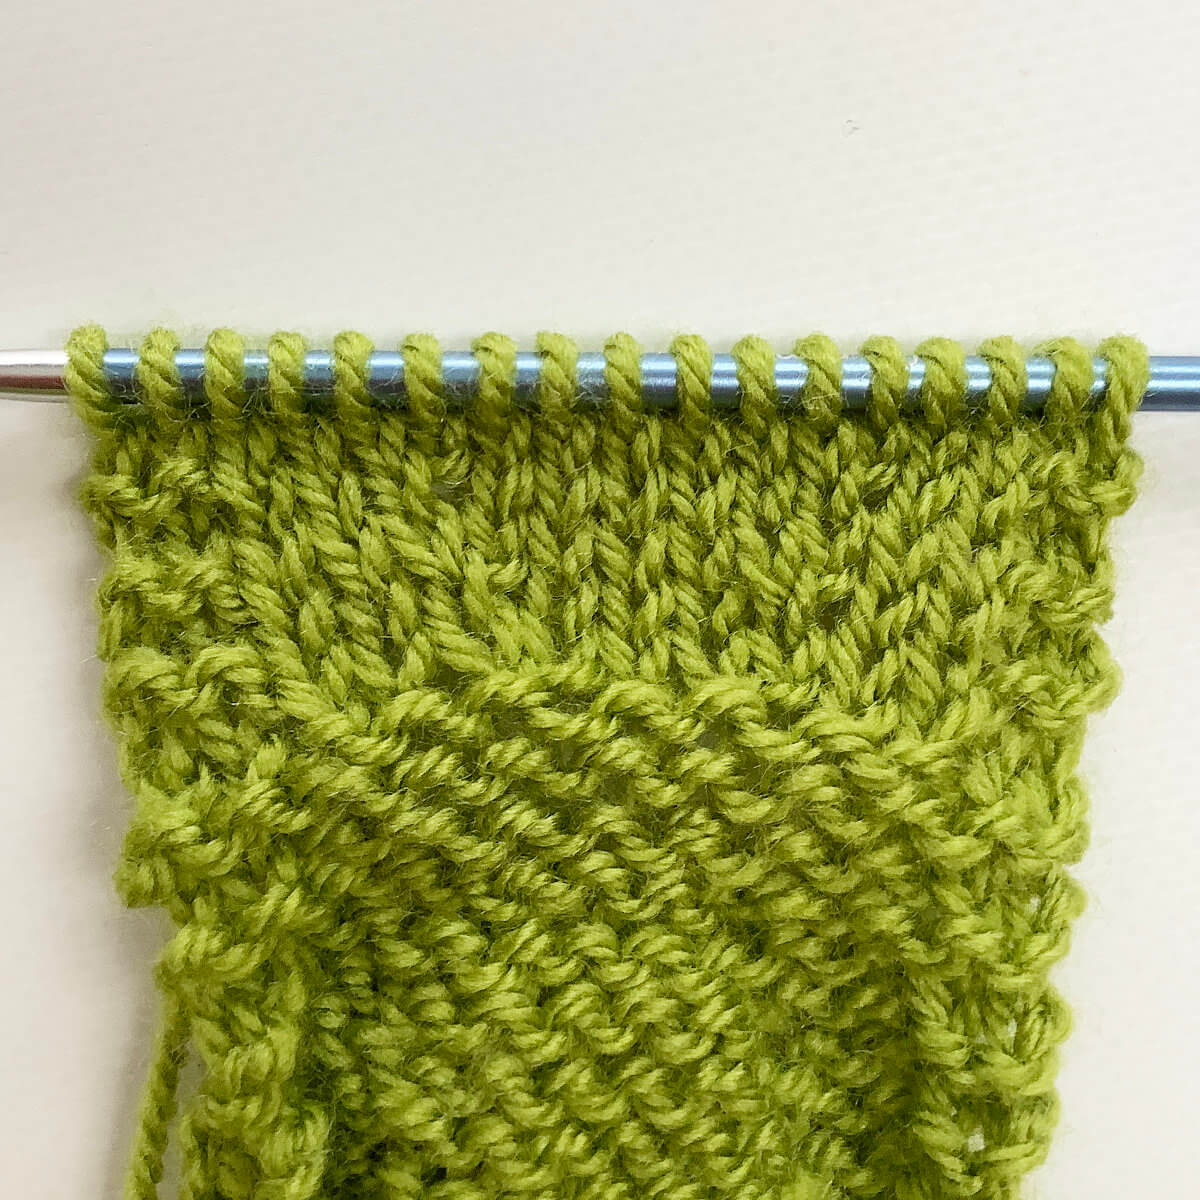
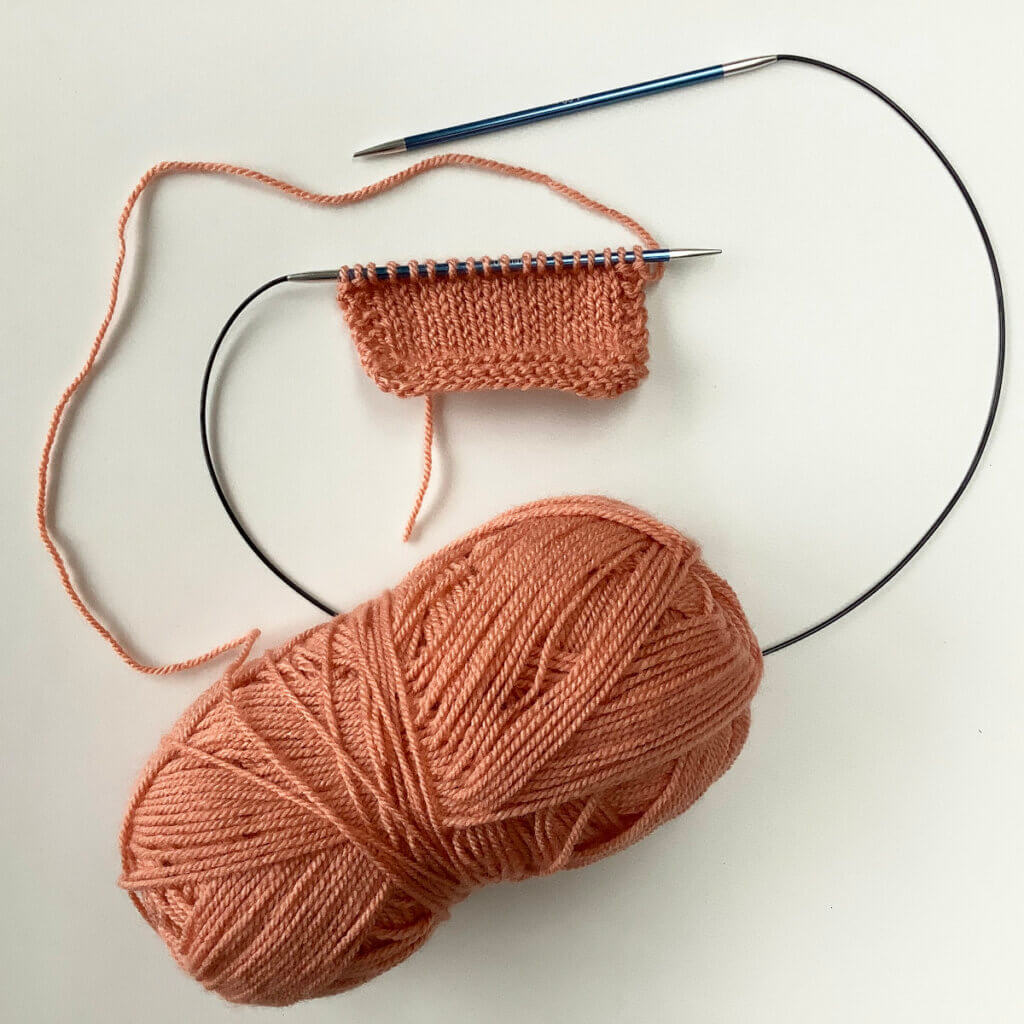
This post is about working the double lace rib stitch pattern. It works well both as an insert or as all-over patterning. This stitch pattern is worked on both right side and wrong side rows, and is a multiple of 6 + 2 stitches.
Materials used
Yarn: Paintbox Yarns Simply DK, a good value, good quality 100% acrylic yarn, here in the color 125 Spearmint Green.
Knitting needles: This is a pair of straights that I picked up at the second-hand store when I started knitting, brand unknown.
Row 1 (right side): K2, *p1, yo, k2tog tbl, p1, k2; rep from * to end.
Row 2: (wrong side): P2, *k1, p2; rep from * to end.
Row 3: K2, *p1, k2tog, yo, p1, k2; rep from * to end.
Row 4: P2, *k1, p2; rep from * to end.
Repeat rows 1-4 for pattern.
Thanks to my Patreon supporters for bringing you this freebie! Creating quality patterns and tutorials is a lot of work and resource-intensive. However, I find it important to give you free content like this tutorial. Thanks to the generous support of my Patreon supporters, I can make it happen. Thank you, patrons! Click here to join, or click here to read more about La Visch Designs on Patreon.
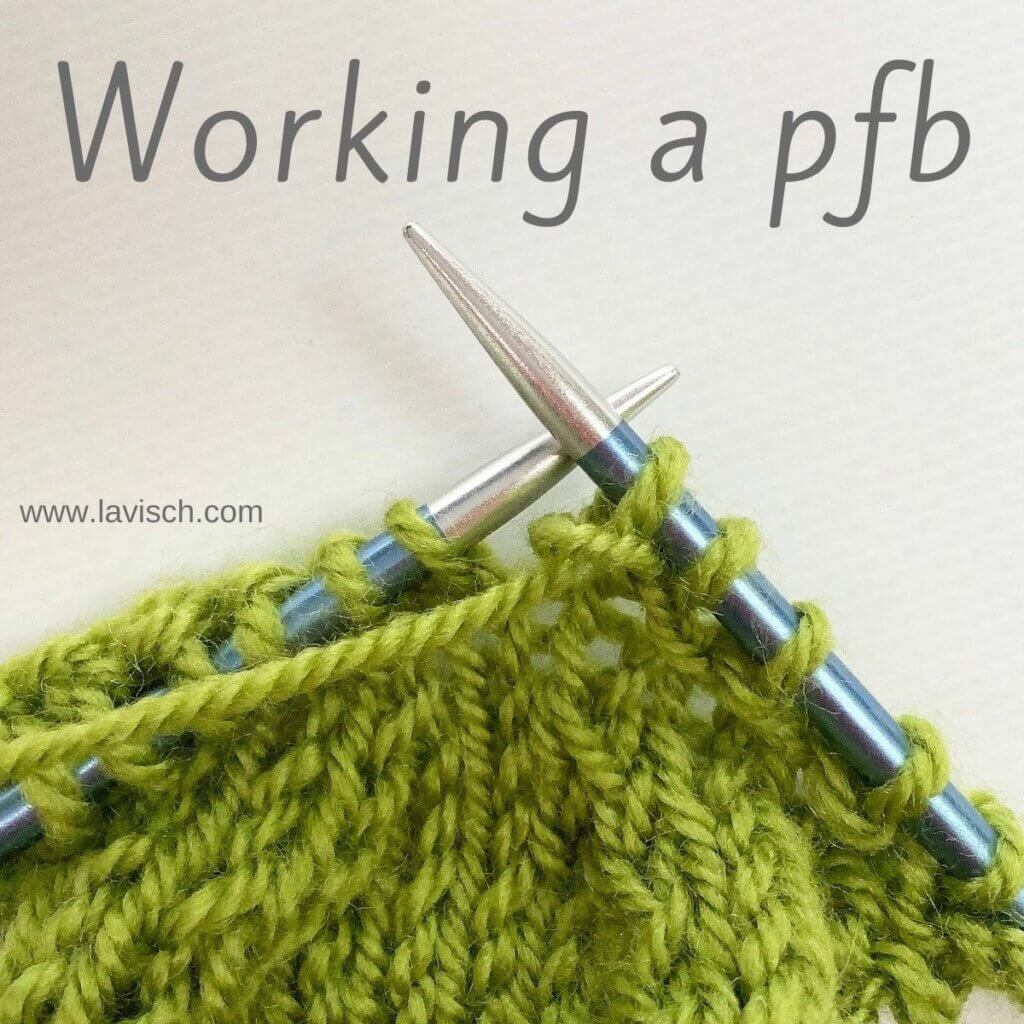
There are lots of ways to increase the number of stitches on your needle. Purling in the front and back of the same stitch, also known as the pfb increase, is the purl side version of the kfb increase. In other words: you work the pfb on the purl side of the fabric, which is often the wrong side) to get an extra stitch that looks like the kfb increase on the knit- or right side of stockinette fabric. This increase can be a bit tricky to work at first, but once you know how to do it, you will breeze right through them.
The pfb increase is also known as a “bar increase” because it forms a little horizontal bar in your work. Due to this little bar, this increase is virtually invisible in garter stitch. When used in stockinette, as shown in this tutorial, it forms a series of decorative bars along the increase line when viewed from the knit side of the fabric. This how-to will give you step-by-step instructions on how to work the “purl front and back” increase.
Materials used
Yarn: * Paintbox Yarns Simply DK, a good value, good quality 100% acrylic yarn, here in the color 128 Lime Green.
In this tutorial I’ll continue the swatch that I used in previous tutorials on increases and decreases.
First, work your way across the row until you’ve reached the point where you want to make the increase.
In this case, I want the increase 2 sts in from the garter stitch border on the right. A pfb first makes a purl stitch, followed by the extra “bar” stitch on the left of it. Because of this, I start working the pfb over the third stitch.
To start, insert the right-hand needle purl wise into the front loop of the stitch.
To finish this part of the stitch, wrap your yarn around the needle, and pull it through the stitch. Don’t drop it of the needle yet!
Now we insert the right-hand needle purl wise into the back loop of the stitch.
To do so, insert the needle from the left to the right through the back loop. This is the tricky part, I find it helps to pull the fabric down a bit as shown in the picture, because it makes it easier to see where to insert the needle.
Next, wrap the yarn around the needle and pull it through the stitch.
To complete the pfb stitch, drop the loop from the original stitch off the left-hand needle.
This is how it looks now.
Do you see the purl stitch with an extra “bar stitch” to the left of it?
This is how it looks after some more rows with increases, when viewed from the purl side of the fabric.
In this swatch, I’ve also made increases on the left side of the fabric. Very invisible here!
And here is the view from the knit side of the fabric.
When viewed from this side, it really looks like a kfb, right?!
And that’s all there is to it!
Thanks to my Patreon supporters for bringing you this freebie! Creating quality patterns and tutorials is a lot of work and resource-intensive. However, I find it important to give you free content like this tutorial. Thanks to the generous support of my Patreon supporters, I can make it happen. Thank you, patrons! Click here to join, or click here to read more about La Visch Designs on Patreon.
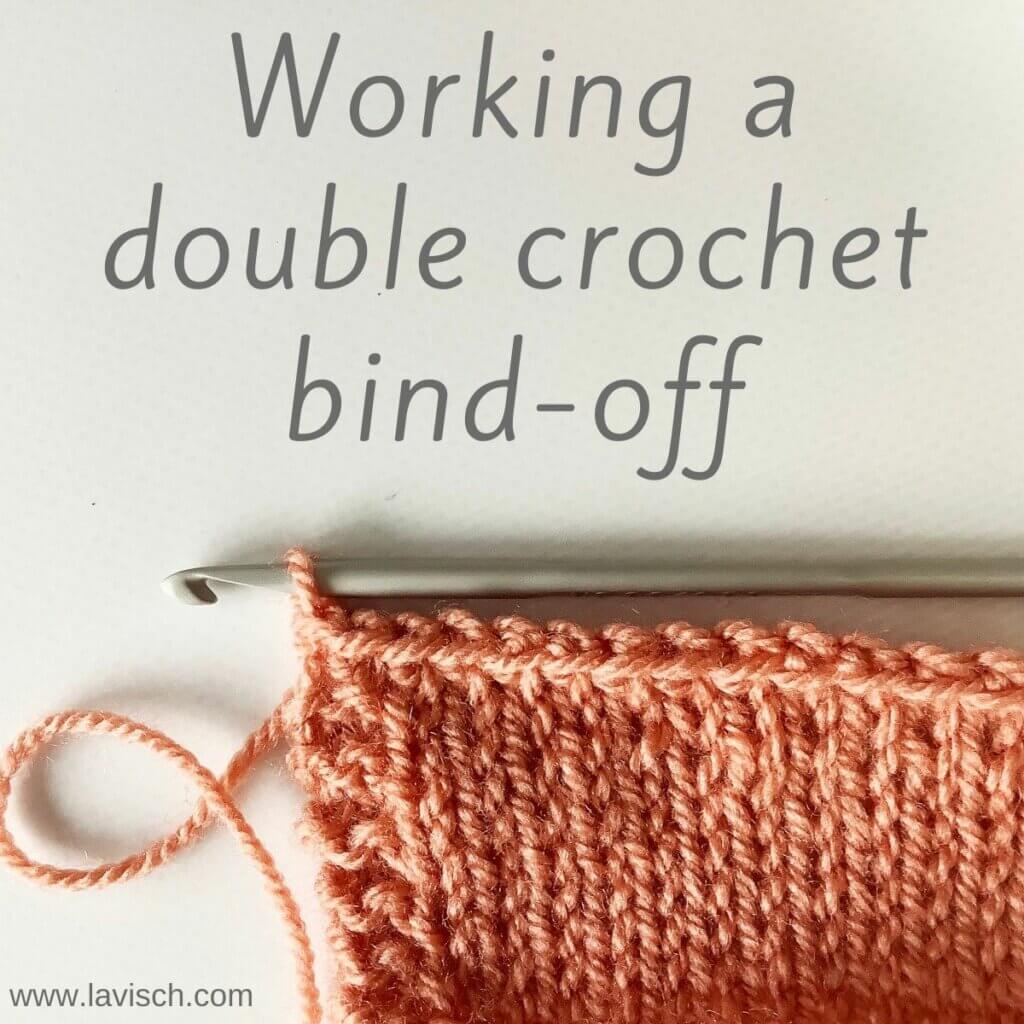
In this tutorial I’ll show you how to work a double crochet bind-off. As you know, there are many ways to bind off knitted fabric, which one to choose depends greatly on various factors. Take the amount of stretch in the bind-off itself, for example. The Russian bind-off is wonderful for lace shawls that are blocked to the max, but is less suitable for projects that need more structure at the bind-off edge. For that an i-cord bind-off may be more suitable. Another thing to take into account is the way it looks, does it match the cast-on used?
The double crochet bind-off is reasonably flexible and, due to its taller height when compared with other bind-offs, a pretty good match with the German twisted cast-on. Let’s take a look at how it’s worked!
Materials used
Yarn: * Paintbox Yarns Simply DK, a good value, good quality 100% acrylic yarn. Pictured here in the color 155 Vintage Pink.
First, insert your crochet hook into the first stitch on the needle knit wise.
Next, wrap the yarn around the hook….
…and pull it through the stitch on the needle.
Next, remove the stitch and let it drop from the needle.
Repeat steps 1-4 once.
Now you have 2 loops on your crochet hook.
Now wrap your yarn around the crochet hook…
This is the start of the “double crochet” part of this bind-off.
…and pull the wrapped yarn through both loops that are on the hook.
Repeat steps 5 to 7 until all stitches are bound off.
This is how it looks:
Thanks to my Patreon supporters for bringing you this freebie! Creating quality patterns and tutorials is a lot of work and resource-intensive. However, I find it important to give you free content like this tutorial. Thanks to the generous support of my Patreon supporters, I can make it happen. Thank you, patrons! Click here to join, or click here to read more about La Visch Designs on Patreon.
As shown in the post about life lines, these are very handy. They can be used for added security when you’re sure that a certain stretch of knitting is error-free. Just insert the life line and you have a safe place in your knitting to rip back to in the event you make a mistake in your knitting. But what to do when you’ve forgotten to add in a life line?
No worries! In that case you can insert an afterthought life line. In this post I’ll show you how.
Materials used
Yarn: * Paintbox Yarns Simply DK, a good value, good quality 100% acrylic yarn. Pictured here in the color 155 Vintage Pink.
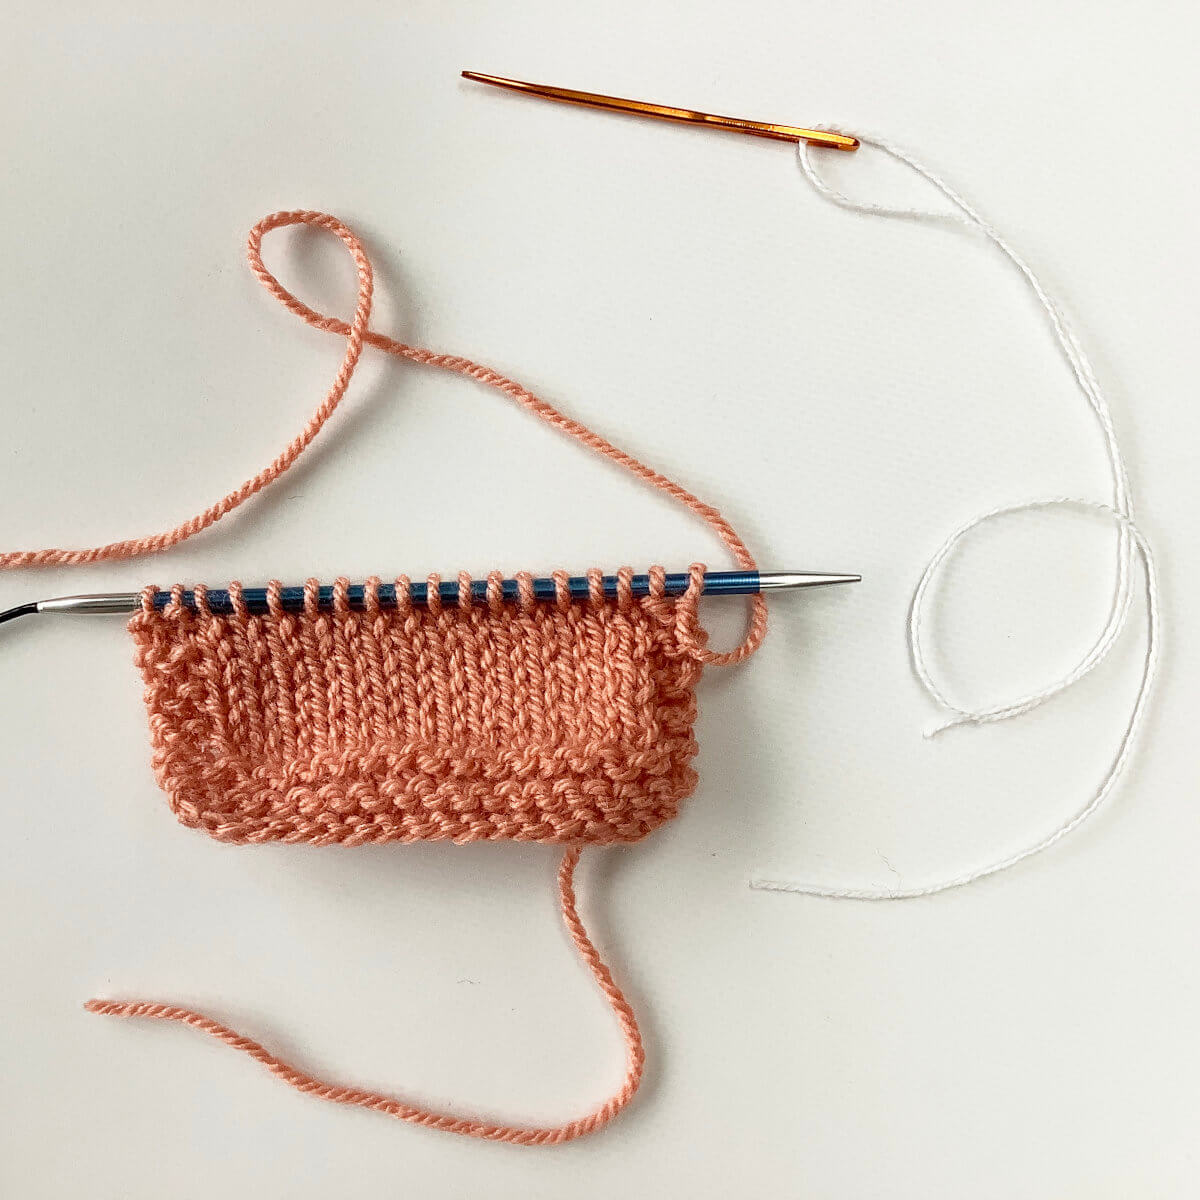
In this example, I’m using the same stockinette swatch as for the previous life line tutorial. I’ll use it to show you how to insert a life line using a darning needle and thread. When doing so in a piece of knitted lace, you may find it easiest to do so after a plain knit of purl row if that’s possible in your patterning.
First, make sure you have your thread and darning needle ready.
Don’t cut your thread too short, or you may not have enough length to thread through all stitches, and allow for some stretch.
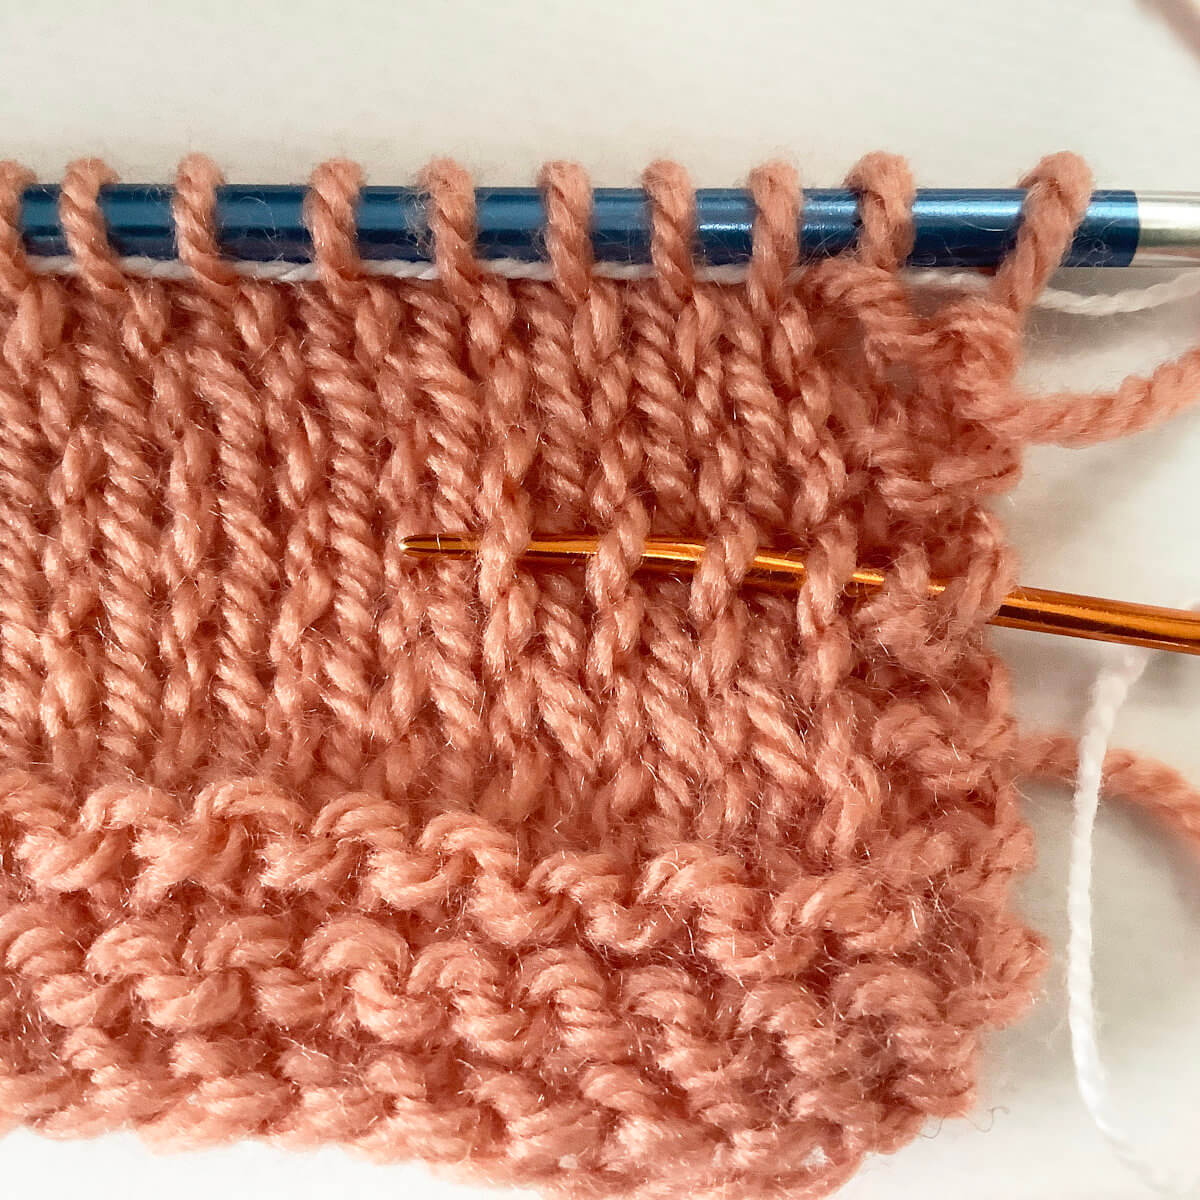
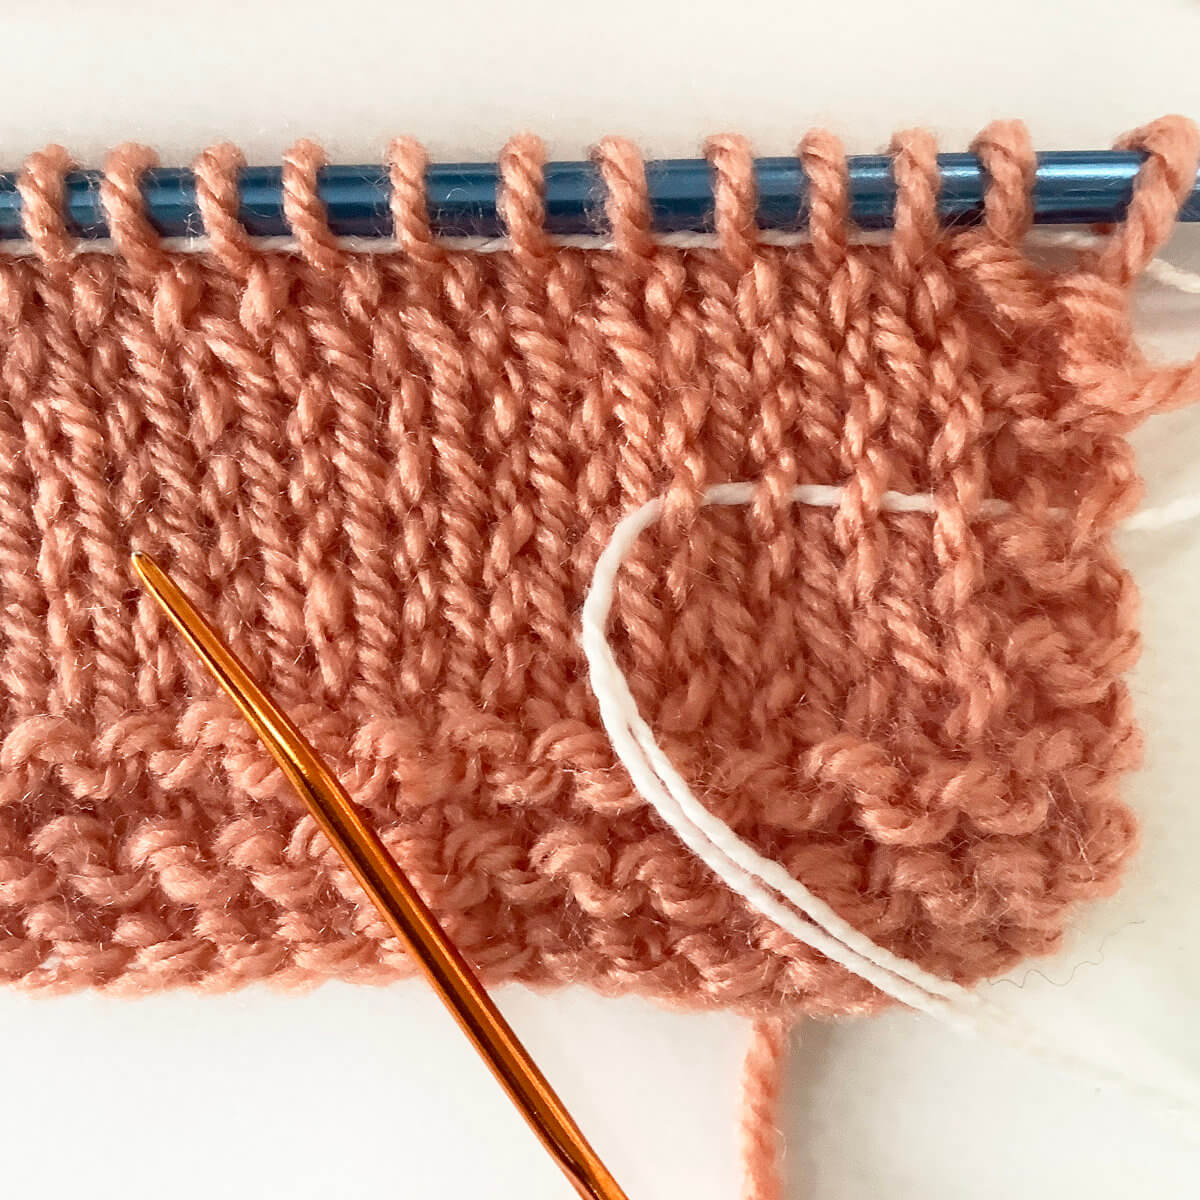
Next, identify the row and stitches to insert the life line in, take your darning needle and insert it through the first couple of stitches on the needle.
For this, it is of importance to correctly select which “leg” of the stitch to insert the darning needle under. In stockinette stitch fabric, the individual stitches look like a “V”. When inserting the needle, make sure to insert pass it underneath the right leg and over the left leg of the “V”. This way the stitches are mounted correctly on the life line. When doing it like this, you just have to follow the path of the life line when putting the fabric back on your knitting needle, to correctly mount the stitches there too. In other words: not twisted! Take care not to pierce any strands of yarn.
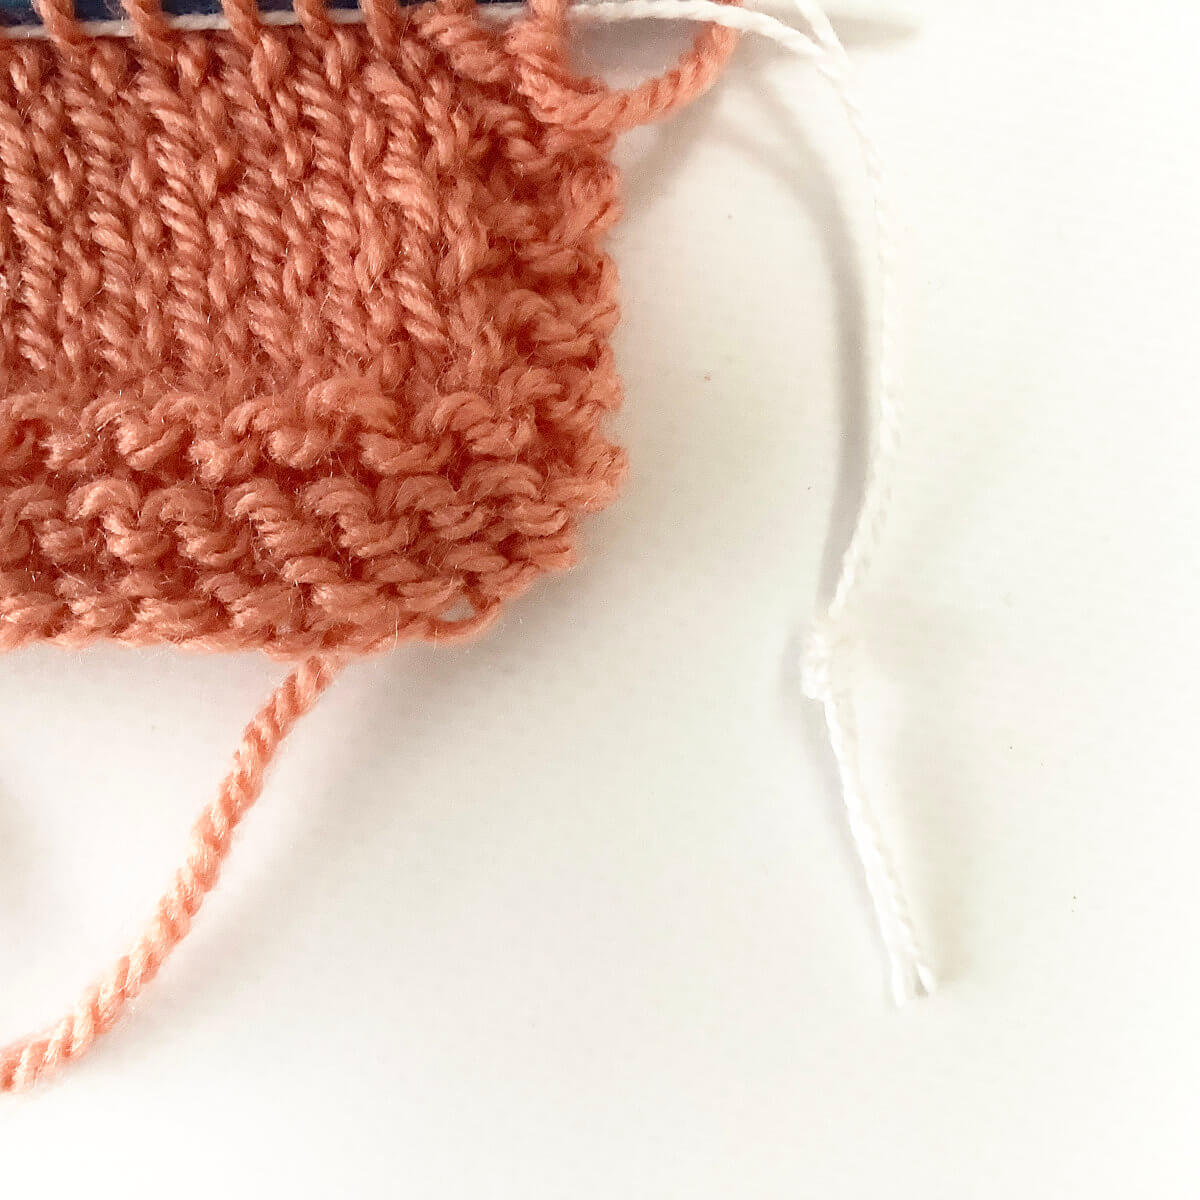
After the first few stitches, pull the cotton thread through, taking care to leave a tail outside the piece of knitting.
Then, you can insert the darning needle into the next couple of stitches and so on, to put all stitches on the thread.
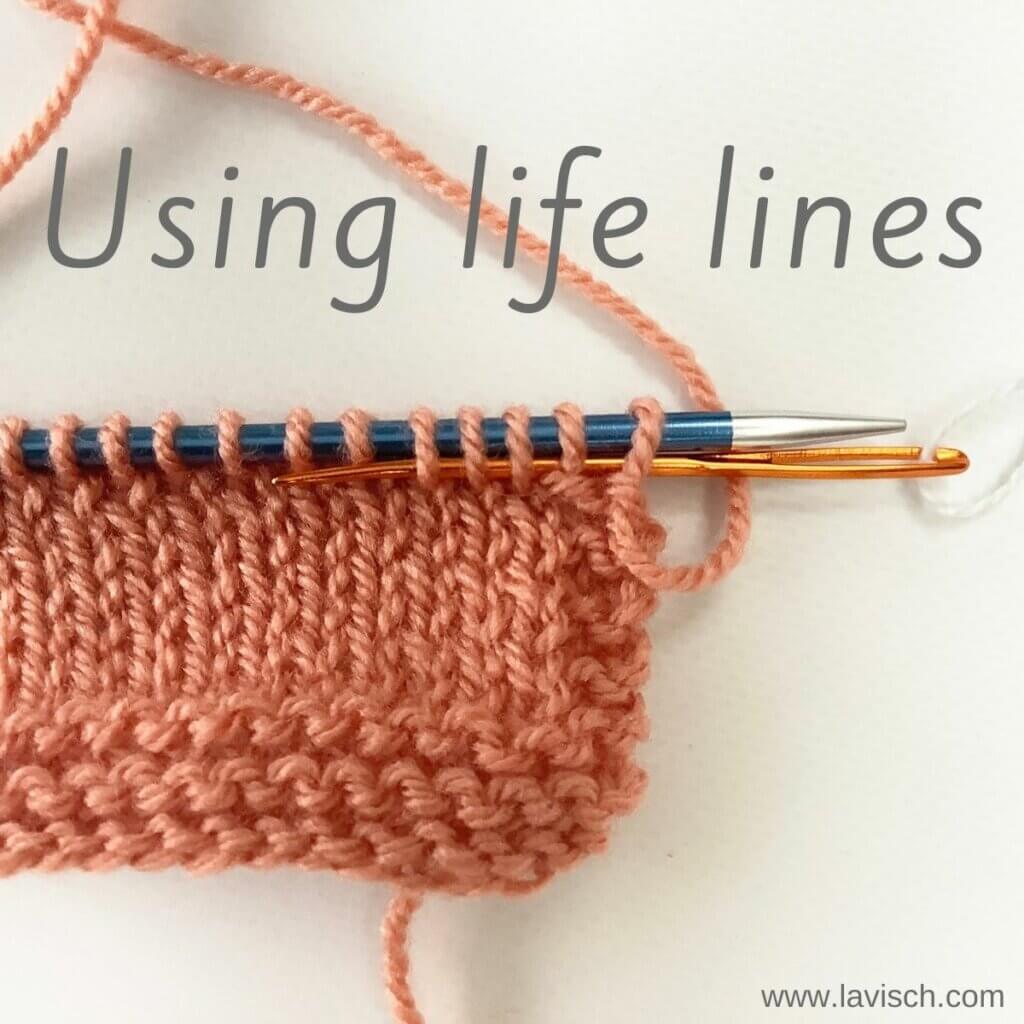
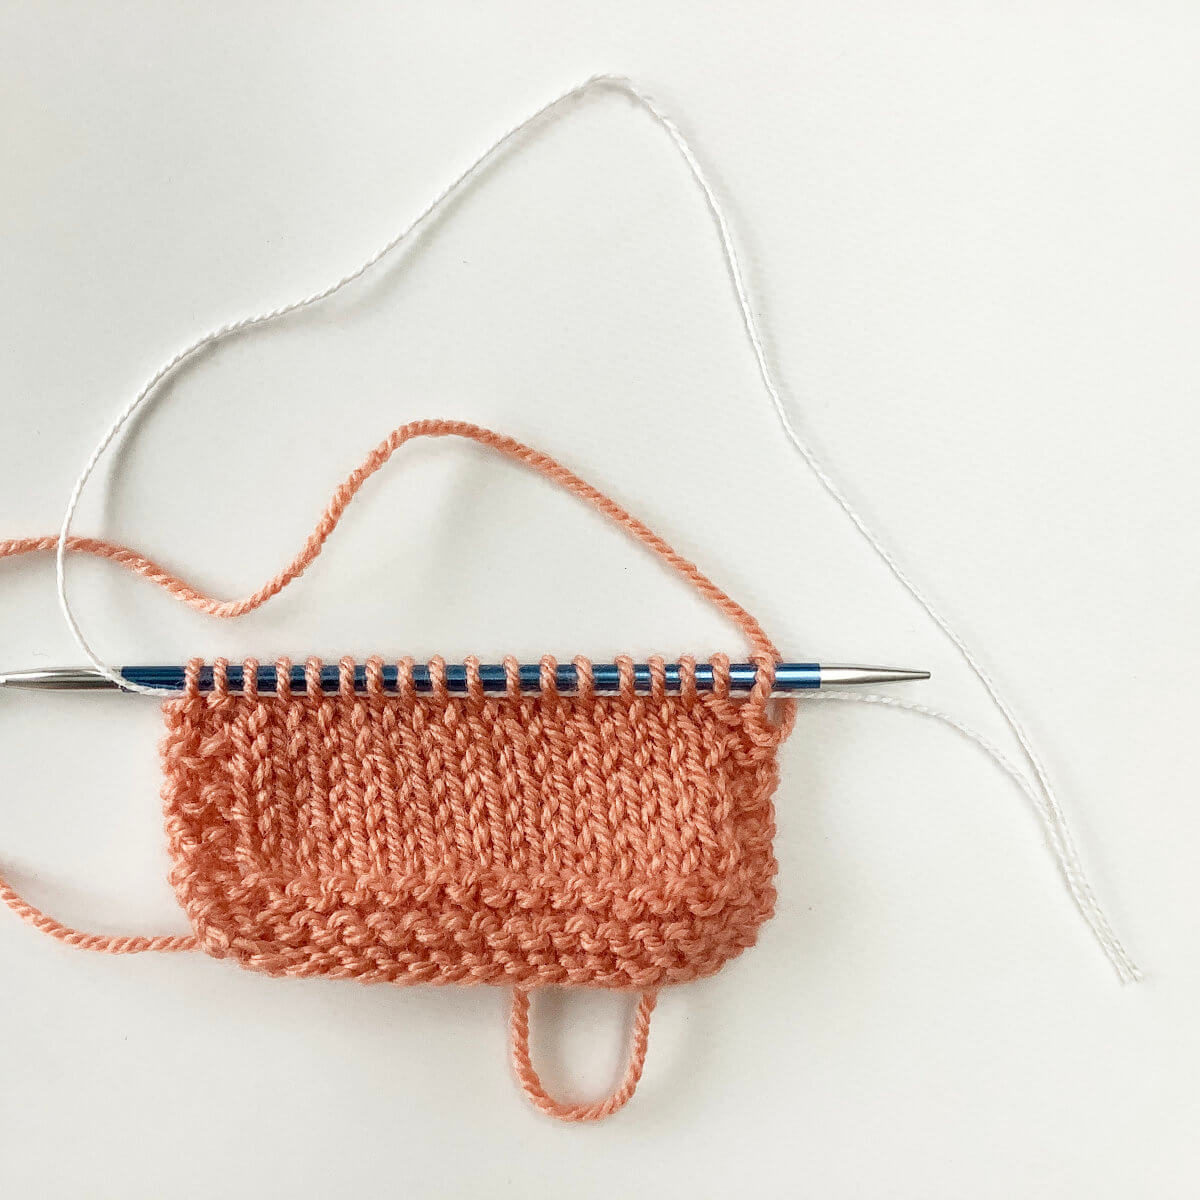
Now we have to secure the life line.
To do so, I prefer making a loose knot in the ends of the cotton thread.
And this is the result!
When the life line is no longer needed, just undo the knot and pull the thread out of the knitting. Or follow the path of the life line through the stitches with a knitting needle before ripping back your knitting…
Thanks to my Patreon supporters for bringing you this freebie! Creating quality patterns and tutorials is a lot of work and resource-intensive. However, I find it important to give you free content like this tutorial. Thanks to the generous support of my Patreon supporters, I can make it happen. Thank you, patrons! Click here to join, or click here to read more about La Visch Designs on Patreon.
You may have heard about life lines and wonder about what they are and why they’re useful. I’ll tell you all about it in this post! In short: A life line in knitting is a temporarily inserted thread, to make sure that any dropped stitches can’t unravel down beyond the line you’ve inserted. This is particularly useful when knitting lace with a smooth yarn. Working lace back up with the correct stitches is much more complex than regular stockinette!
A life line can also be used for added security when you’re sure that a certain stretch of knitting is error-free. Just insert the life line and you have a safe place in your knitting to rip back to in the event you make a mistake in your knitting after that.
The technique for adding a life line is the very same as for putting live stitches on a piece of waste yarn or stitch holder, to work further on later on. The only difference is that with just adding a life line, the stitches are kept on the needle. With putting stitches on waste yarn, the stitches are pushed off the needle. The latter I also use when trying out the fit of sweaters, when the length of the cable of my circular knitting needles doesn’t allow for trying the piece on.
Many yarns are suitable to be used as a life line. Personally, though, I prefer yarn that is
Thinner than my working yarn, so it doesn’t distort the surrounding stitches.
A different color than my working yarn, so I can see where it is in my knitted fabric.
Smooth, so it’s easy to both insert and remove it.
For these reasons I usually use crochet thread, a relatively heavy one.
Materials used
Yarn: * Paintbox Yarns Simply DK, a good value, good quality 100% acrylic yarn, here in the color 155 Vintage Pink.
In this example I’m using a little stockinette swatch to show you how to insert a life line using a darning needle and thread. When doing so in a piece of knitted lace, you may find it easiest to do so after a plain knit of purl row if that’s possible in your patterning.
First, make sure you have your thread and darning needle ready.
Don’t cut your thread too short, or you may not have enough length to thread through all stitches, and allow for some stretch.
Next, take your darning needle and insert it through the first couple of stitches on the needle.
Move the darning needle behind the front leg of the various stitches. Take care not to pierce any strands of yarn.
After the first few stitches, pull the cotton thread through, taking care to leave a tail outside the piece of knitting.
Then, you can insert the darning needle into the next couple of stitches and so on, to put all stitches on the thread.
Now we have to secure the life line.
To do so, I prefer making a loose knot in the ends of the cotton thread.
And this is the result!
When the life line is no longer needed, just undo the knot and pull the thread out of the knitting. Or follow the path of the life line through the stitches with a knitting needle before ripping back your knitting…
Thanks to my Patreon supporters for bringing you this freebie! Creating quality patterns and tutorials is a lot of work and resource-intensive. However, I find it important to give you free content like this tutorial. Thanks to the generous support of my Patreon supporters, I can make it happen. Thank you, patrons! Click here to join, or click here to read more about La Visch Designs on Patreon.
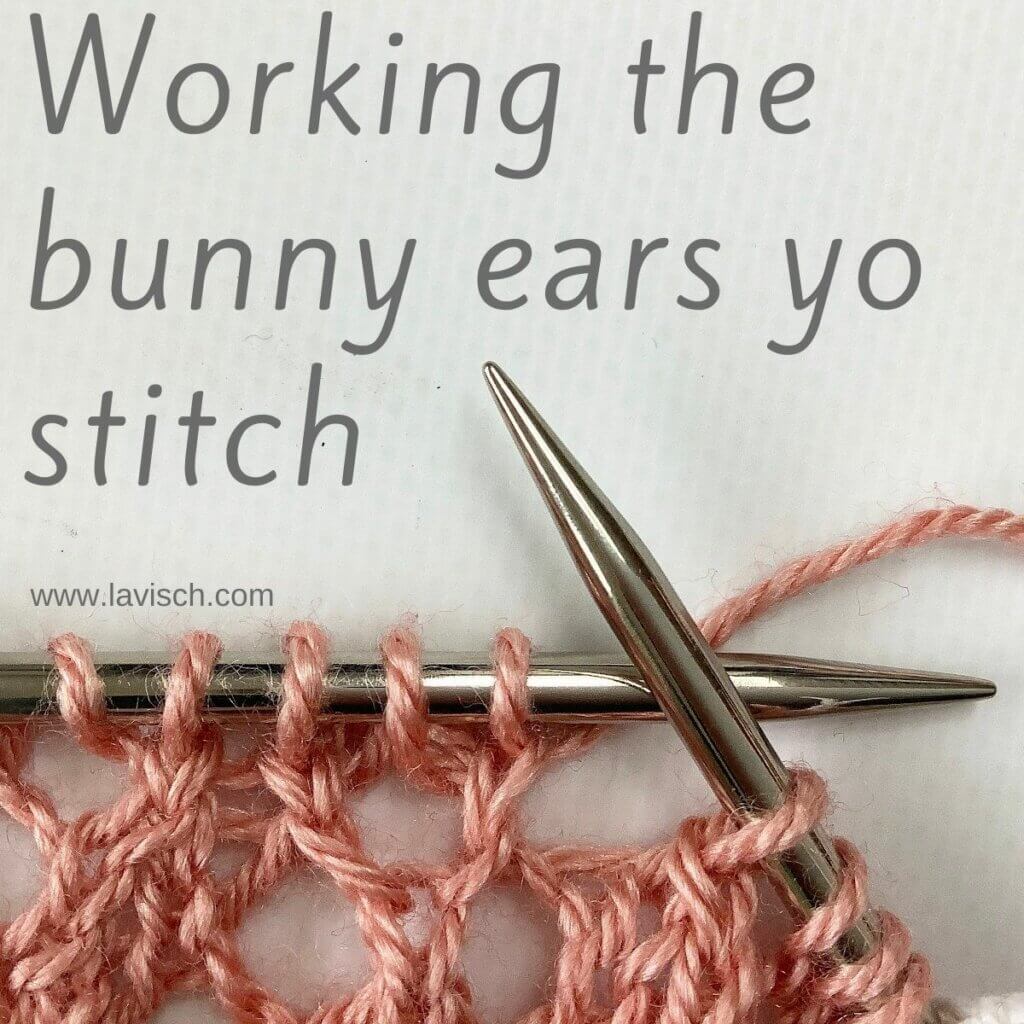
There are cases in which skipping the row on your needle for particular stitches is desired, and one is to knit or purl in the row below that one. In other words: you knit/purl into the stitch below where you normally would, exactly as the name suggests. Think, for example, off Fisherman’s Rib, but also off the bunny ears yo stitch, on its following wrong-side row.
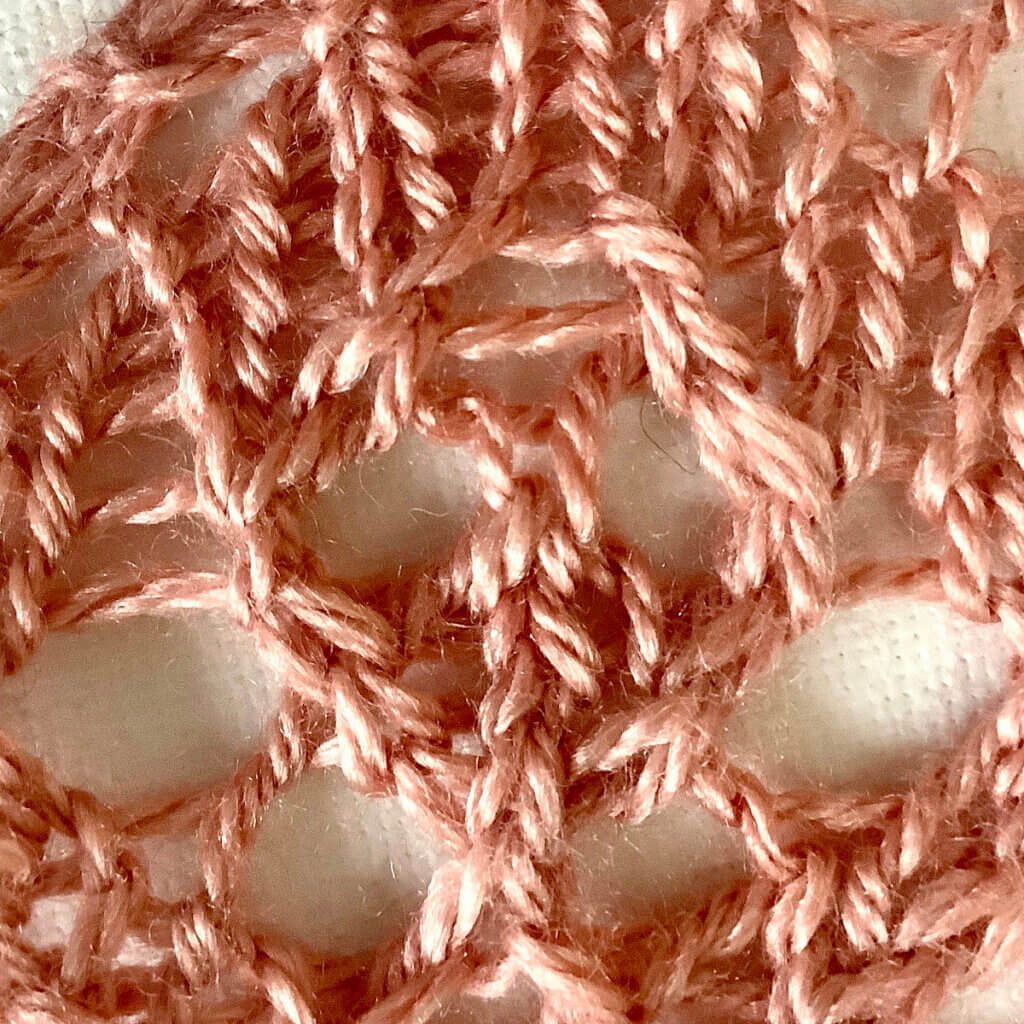
The challenge in working this stitch is recognizing the stitch to insert your needle in. So that’s what I’ll be showing you in this tutorial. I’ll be using the same project I also used for the bunny ears yo tutorial, so please don’t be alarmed by all the lace. The p1b stitch in itself does not involve any lace knitting. To show you the difference between using a regular purl and a p1b stitch in bunny ear yo lace, take a look below:
With regular p
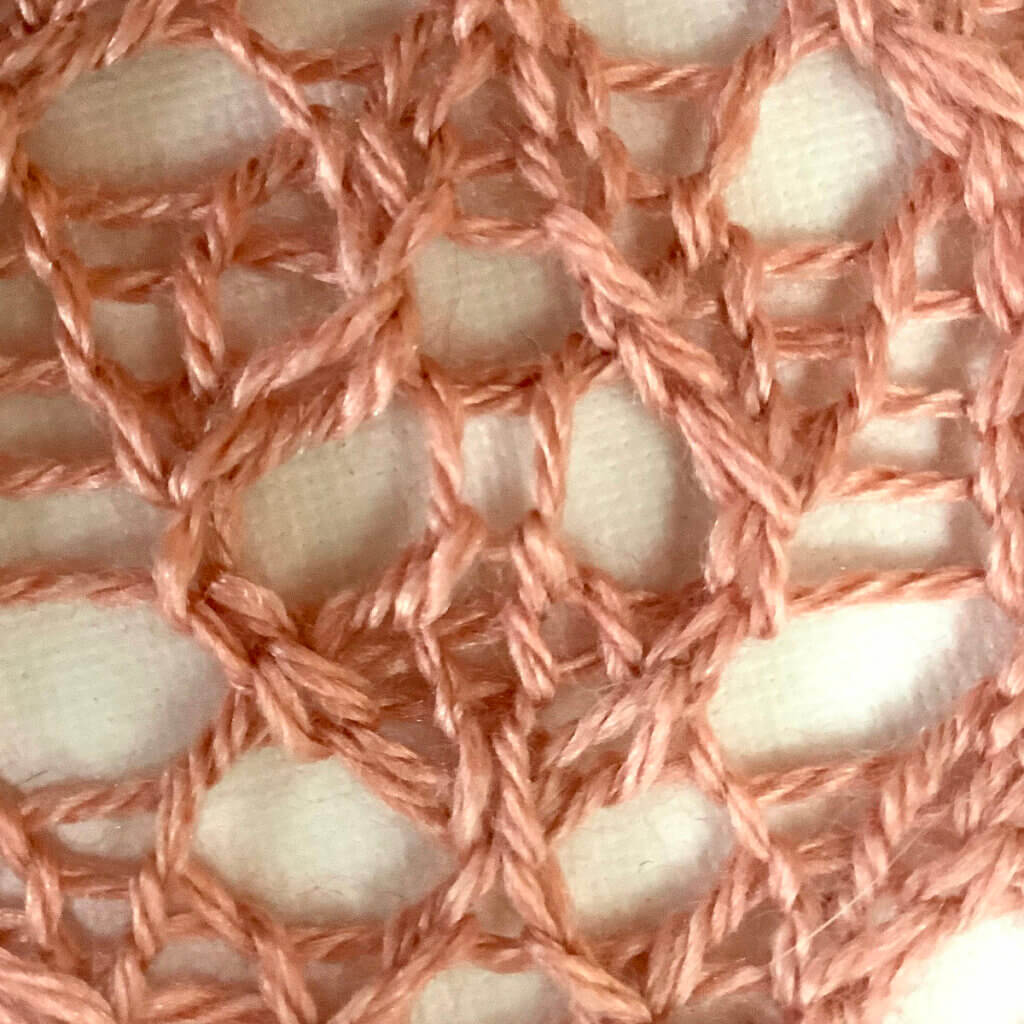
With p1b
See how they differ? In the one on the left there is a horizontal thread over the yo part of the stitch. In the picture on the right the new stitch is made catching that horizontal thread too and thus keeping the yarn over open!
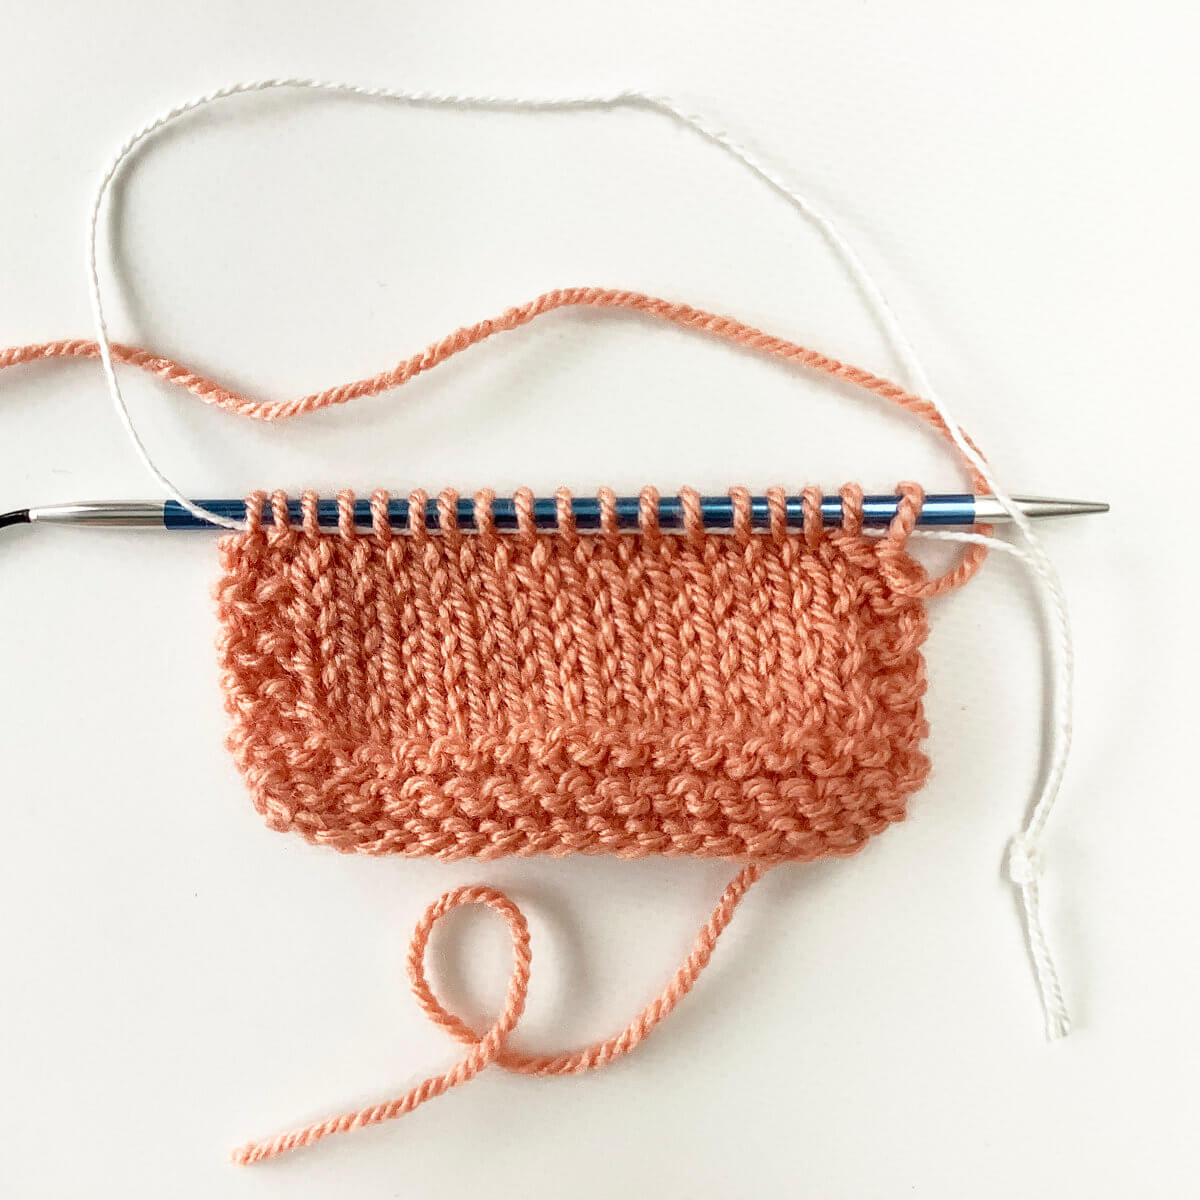
Materials used
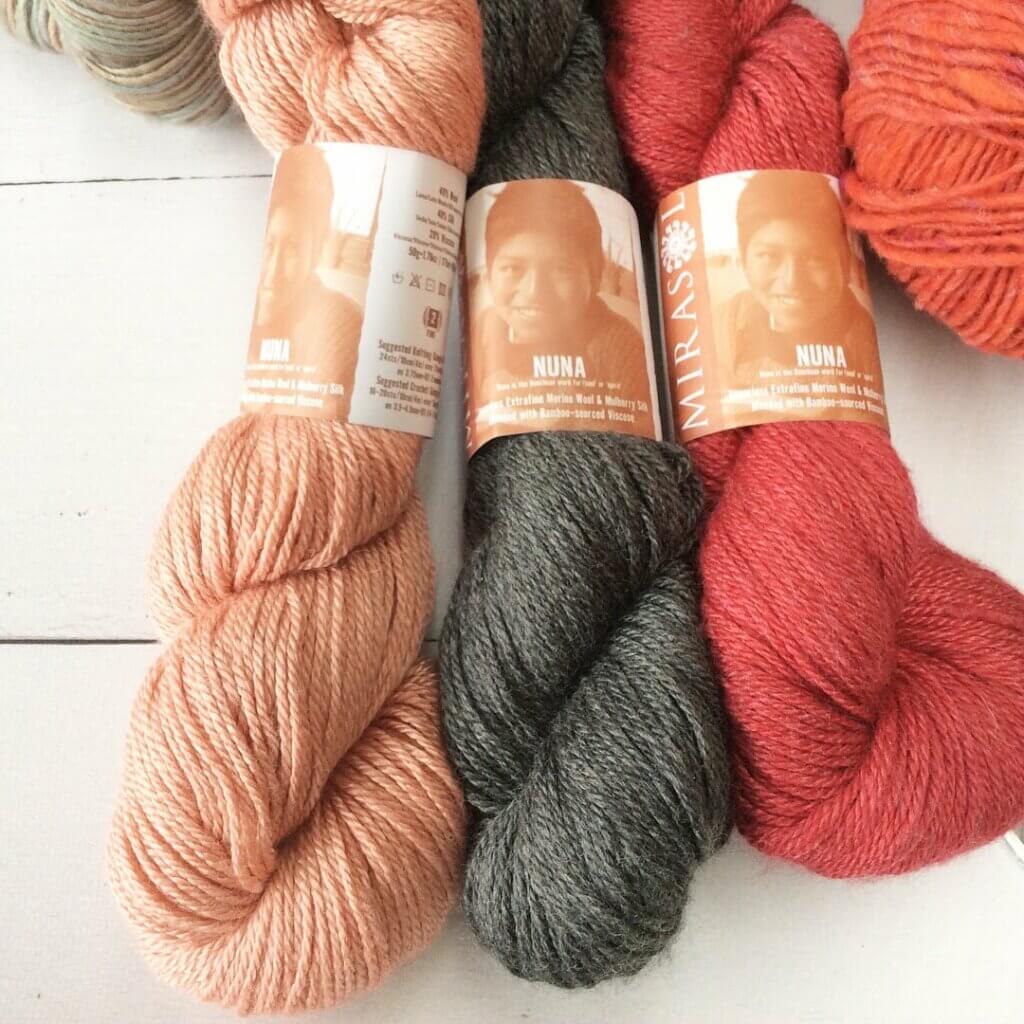
Yarn: Nuna by Mirasol Yarn (40% merino, 40% silk, 20% rayon from bamboo; 175 m (191 yds) / 50 g), here in the color 1046 Coral.
Needles: To be honest, I don’t recall what the brand is of the needles I used in this tutorial. I do know I used the 4 mm (US 6) size with a cable length of 80 cm (32 inches).
Working a p1b step by step
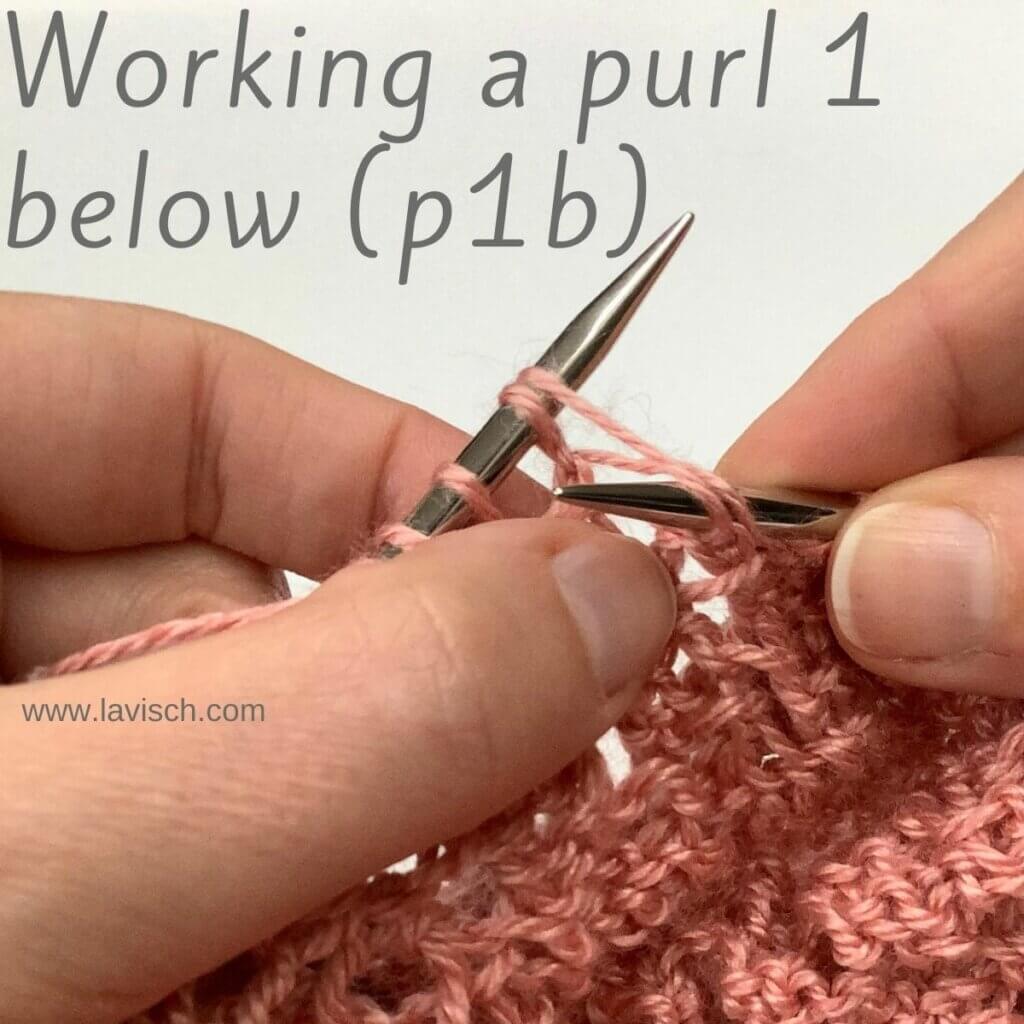
In patterns, you may encounter the following description of this stitch: Purl 1 below (p1b): Purl into the stitch 1 row below the one on the needle by inserting the needle from back to front. Purl this stitch, then pull the worked stitch and the stitch above off the needle together. But how to actually do this? Read on!
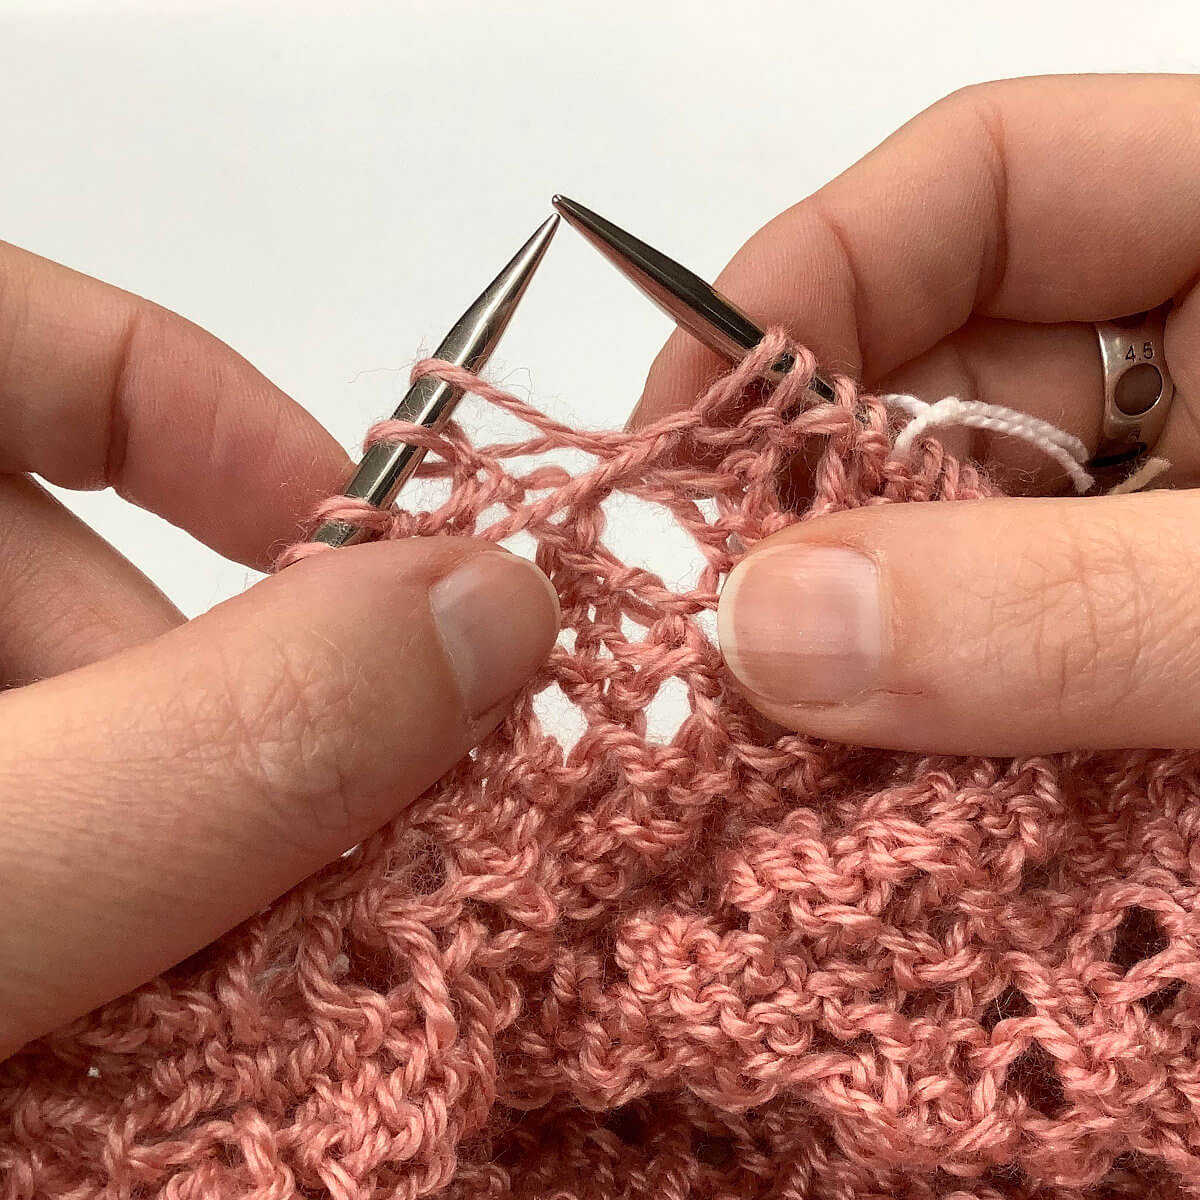
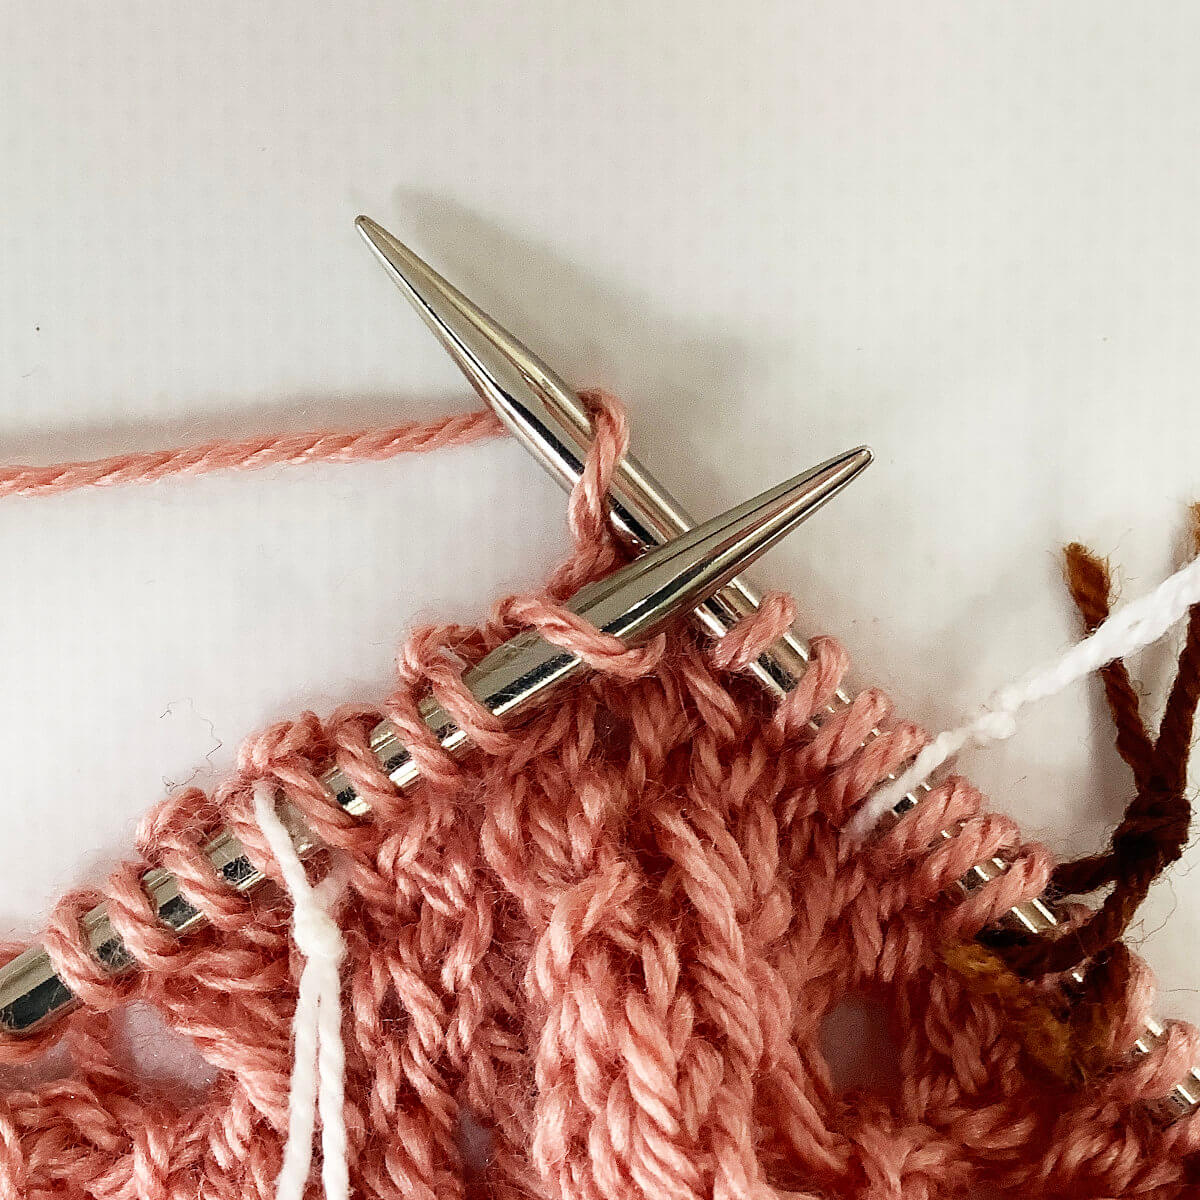
First, work your way across the row until you’ve reached the point where you want to make the stitch.
See that first stitch on the left-hand needle? That’s the yo in the middle of the bey stitch where I’ll be making the p1b stitch.
Insert the right-hand needle purl wise
Normally, you’d insert the needle directly into the loop that’s on the left-hand needle. However, in this case we want to insert the needle into the stitch below that one.
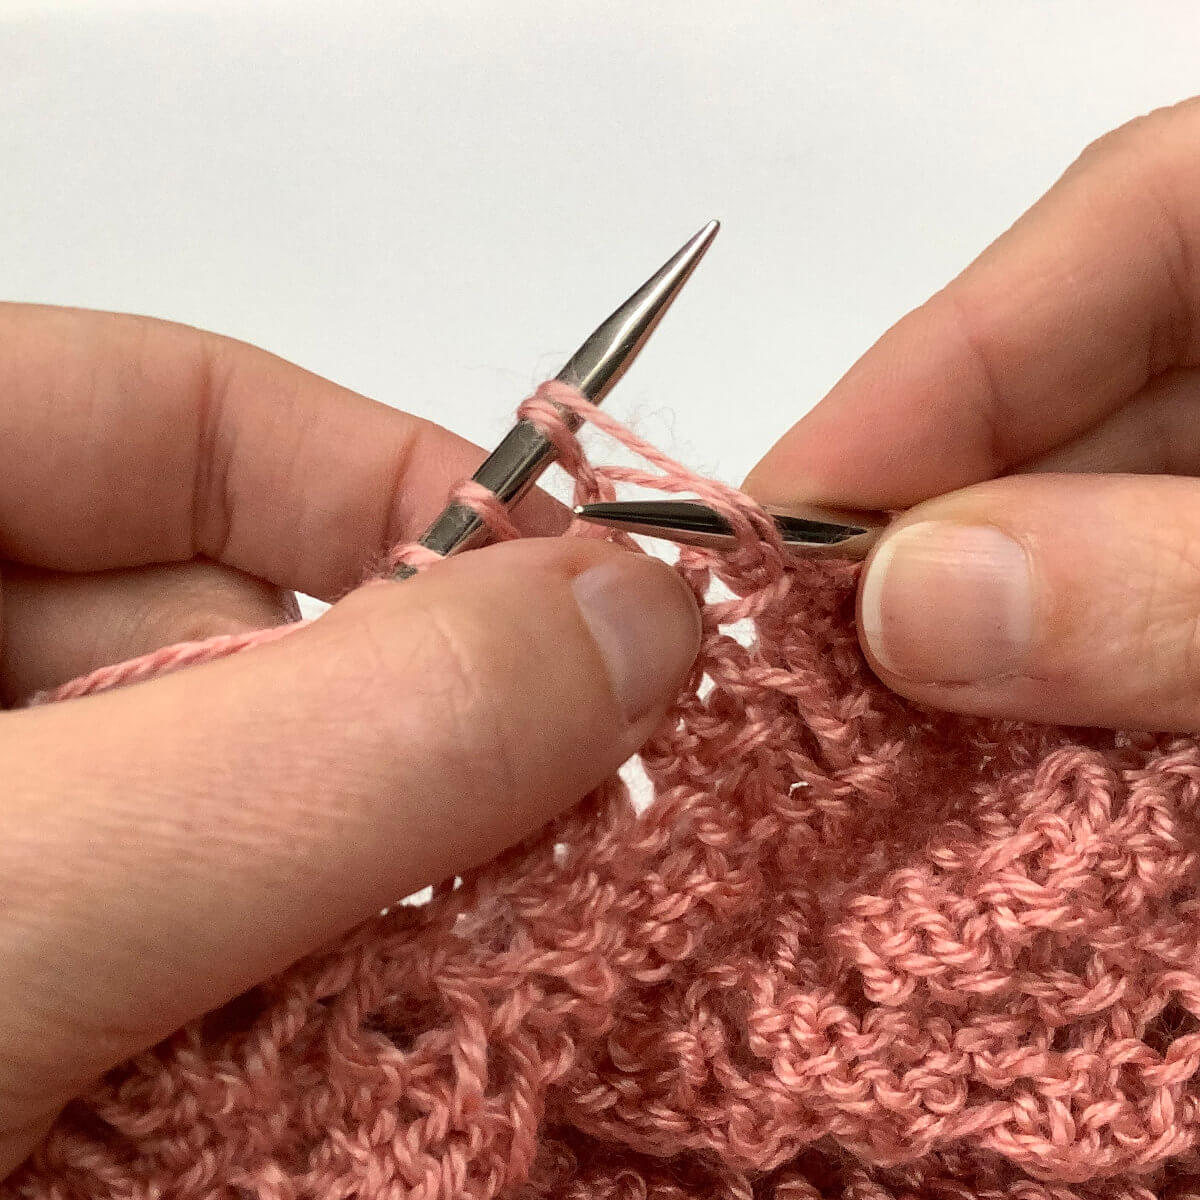
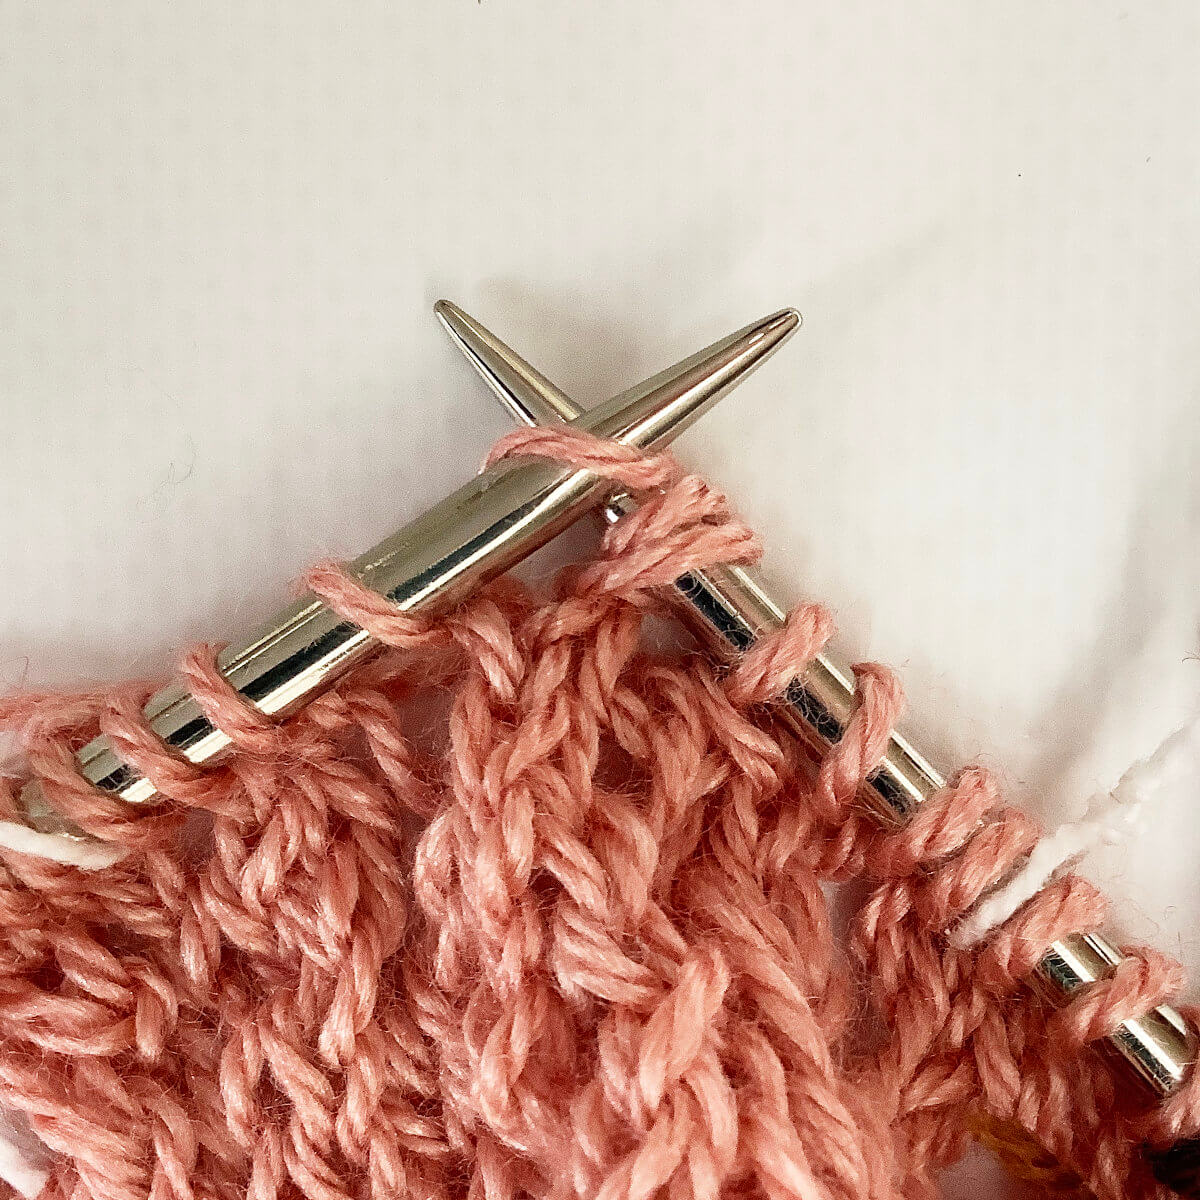
Now wrap your working yarn around the needle and pull it through.
See that you’re actually pulling it through 2 stitches at once? That is, the one on the needle and the one directly below it. To finish the stitch just slip the top stitch off the left-hand needle without actually working it. Because the fabric is secured by purling into the stitch below it, the stitch won’t run down unraveling.
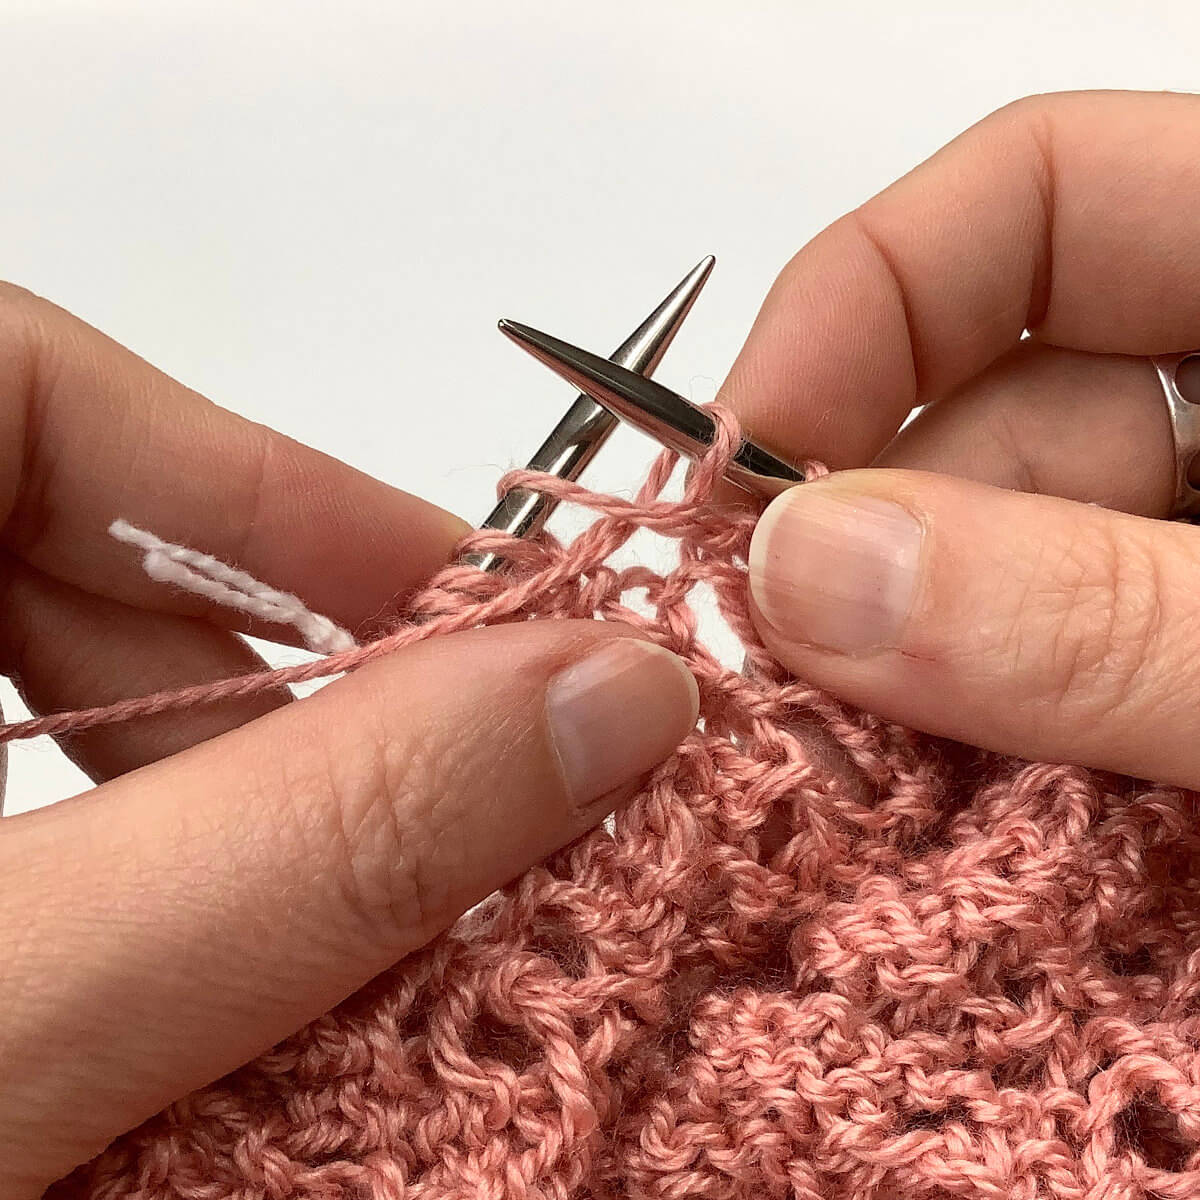
The below picture shows how it looks on the purl side of the fabric after I’ve worked a regular purl stitch in the 3rd and last stitch of the bey.
You can see the 2 strands that are caught by the p1b pretty well.
Turning the fabric around, this is how it looks on the right (knit) side of the fabric.
I really like how it looks!
Thanks to my Patreon supporters for bringing you this freebie! Creating quality patterns and tutorials is a lot of work and resource-intensive. However, I find it important to give you free content like this tutorial. Thanks to the generous support of my Patreon supporters, I can make it happen. Thank you, patrons! Click here to join, or click here to read more about La Visch Designs on Patreon.
In this tutorial I’m going to show you a stitch that I’m using in a new design: the bunny ears yarn over stitch, or “bey” for short. It uses a bunny ears decrease combined with a yarn over. Now, you may wonder what a bunny ears decrease is. I’ll tell you! It’s a symmetrical way of decreasing 3 stitches to only 2! I’ll be making a tutorial on this decrease and it’s variations soon.
Back to the bunny ears yo stitch. In this stitch a yarn over is placed between both parts of the decrease, essentially negating the decrease. Adding the yo in between both parts of the decrease make it look like 2 directional decreases on both sides of a yo, but without actually increasing or decreasing anything. The result is a very pretty stitch that does wonderfully in lace patterning as pictured here. Let’s get started with how to actually work this stitch!
Materials used
Yarn: Nuna by Mirasol Yarn (40% merino, 40% silk, 20% rayon from bamboo; 175 m (191 yds) / 50 g), here in the color 1046 Coral.
Needles: To be honest, I don’t recall what the brand is of the needles I used in this tutorial. I do know I used the 4 mm (US 6) size with a cable length of 80 cm (32 inches).
Working the bunny ears yo stitch step by step
In patterns, you may encounter the following description of this stitch: Bunny ears yo (bey): Knit 2 stitches together but leave the second stitch on the left needle, yo, next work skp over the next 2 stitches. But how to actually do this? Read on!
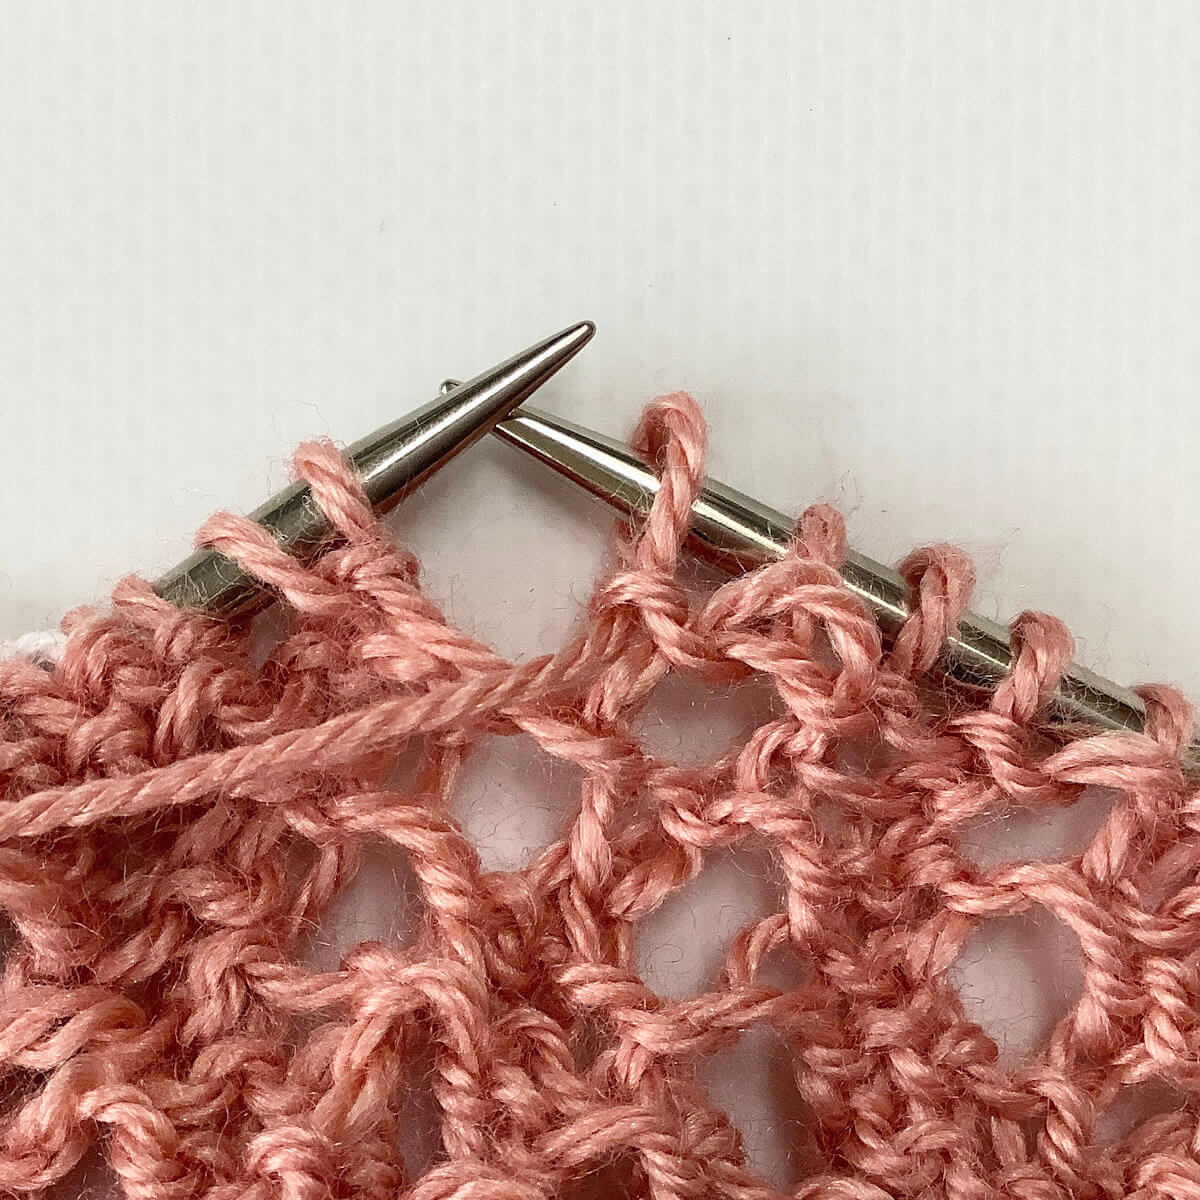
First, work your way across the row until you’ve reached the point where you want to make the stitch.
See those 3 stitches on the left-hand needle? That’s where I’ll be making the bey stitch.
Next, insert the tip of the right-hand needle into the first 2 stitches at the same time as if to knit.
Over these stitches, we’ll be doing the first steps of a k2tog.
Wrap the yarn around the needle…
… and pull the yarn through the 2 stitches.
Next, slide only 1 of the 2 original stitches of the left-hand needle.
With a regular k2tog, both stitches would be moved off the needle. So this is where it starts to go different.
Next, wrap the yarn around the needle.
This is where we make the “yarn over” part of the stitch.
Now we’re starting the left leaning decrease part of the stitch.
This we’ll be working on the 2 remaining stitches on the left-hand needle: 1 stitch we haven’t handled yet, and 1 stitch that we didn’t move off the needle when working the k2tog right-leaning decrease. This part of the stitch can be worked both as ssk and skp, but since I personally prefer skp I’ll be showing this in the tutorial.
To start insert the tip of the right-hand needle into the first stitch as if to knit …
… and slip it onto the right-hand needle without actually knitting it.
This is how it then looks:
Next, we are going to knit the second stitch.
To do so, we start with inserting the right-hand needle into the first stitch on the other needle as shown below.
Wrap the yarn around the needle…
. …pull it through the stitch you inserted the right-hand needle in…
…and slip the original stitch off the left-hand needle.
Next, insert the left-hand needle into the second stitch counted from the tip of the right-hand needle…
… after that, pull it over the first stitch from the tip of the right-hand needle to complete the decrease.
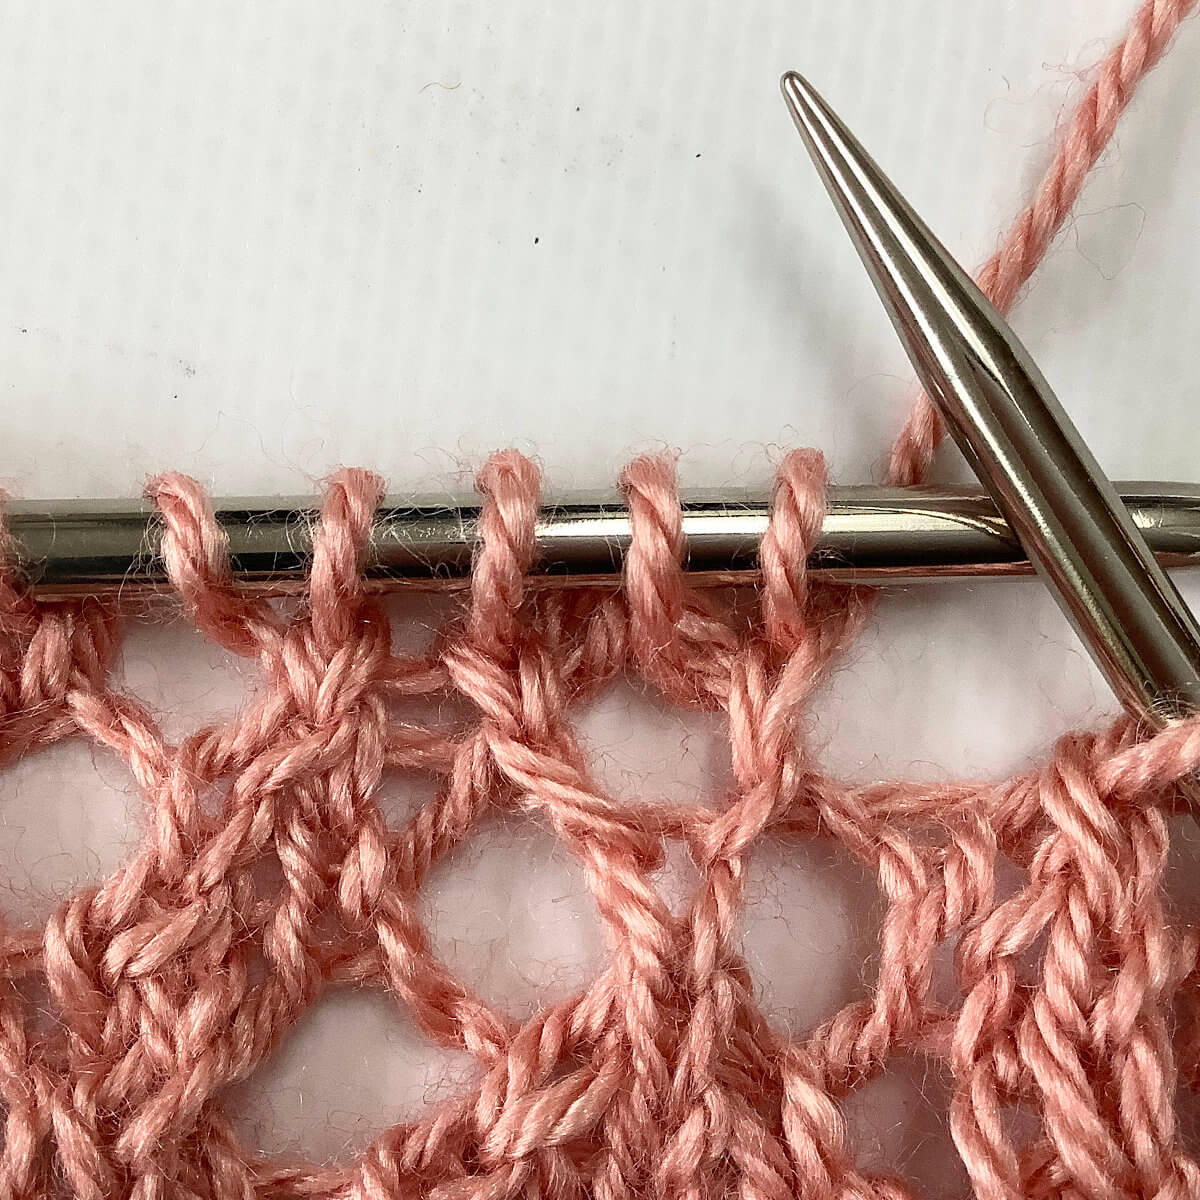
Do you see how it slants to the left? With this the bunny ears yarn over stitch itself is finished. But, for optimal results, we’re not done yet. Take a look at the next section to see why.
Working the WS row after the bey row
After working a row where bunny ear yo’s are worked there, of course, also follows a wrong side purl row. However, when working regular purl stitches over the bey stitches, this creates a horizontal thread over the yo part of the stitch. This is, of course, no problem if you like how this looks. You can see this below on the left. But, if you prefer the bey stitch to really look like a big yo, flanked by directional decreases, we really have to do something different from a regular purl stitch. The solution is working a purl 1 below or p1b instead. This gives the result as shown on the right:
Please note that the picture on the left was right at the beginning of my project, in the set-up section. The other one was further on in the body of the project, hence the difference in surrounding fabric.
With regular p
With p1b
A tutorial for the purl 1 below or p1b will follow soon!
Thanks to my Patreon supporters for bringing you this freebie! Creating quality patterns and tutorials is a lot of work and resource-intensive. However, I find it important to give you free content like this tutorial. Thanks to the generous support of my Patreon supporters, I can make it happen. Thank you, patrons! Click here to join, or click here to read more about La Visch Designs on Patreon.
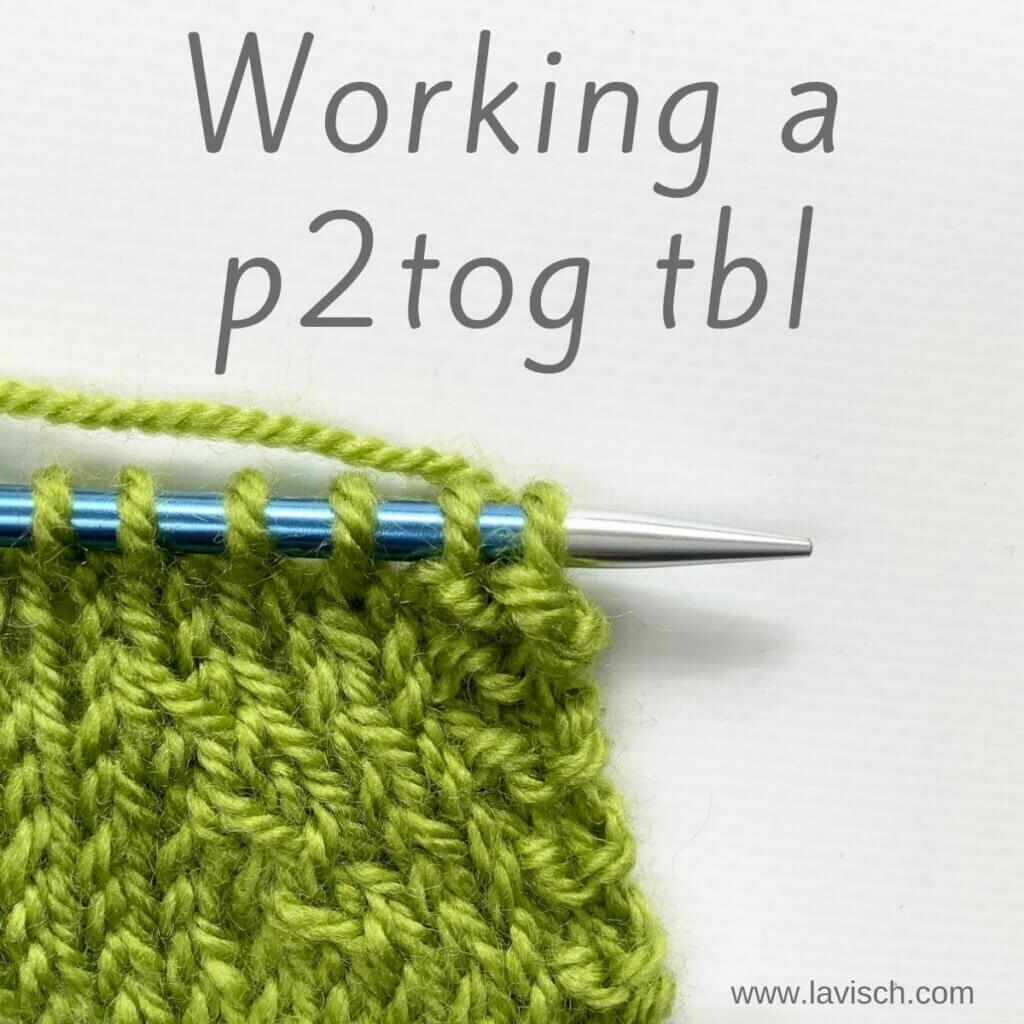
Last time I showed you how to do a decrease worked on the wrong side of the fabric, that looks like a k2tog right leaning decrease on the right side: p2tog. In this tutorial it’s time to focus on the left leaning equivalent. In other words: a decrease worked on the wrong side, that looks like a skp or ssk left leaning decrease on the right side of the fabric. This is the “purl 2 stitches together through the back loop” decrease, or “p2tog tbl” for short.
Below I’ll show you how to work this decrease step by step.
Materials
Yarn: * Paintbox Yarns Simply DK, a good value, good quality 100% acrylic yarn, here in the color 128 Lime Green.
Work your way across the row until you’ve reached the point where you want to make the decrease
In this case, I want to work the decrease 4 stitches in from the left side of the swatch.
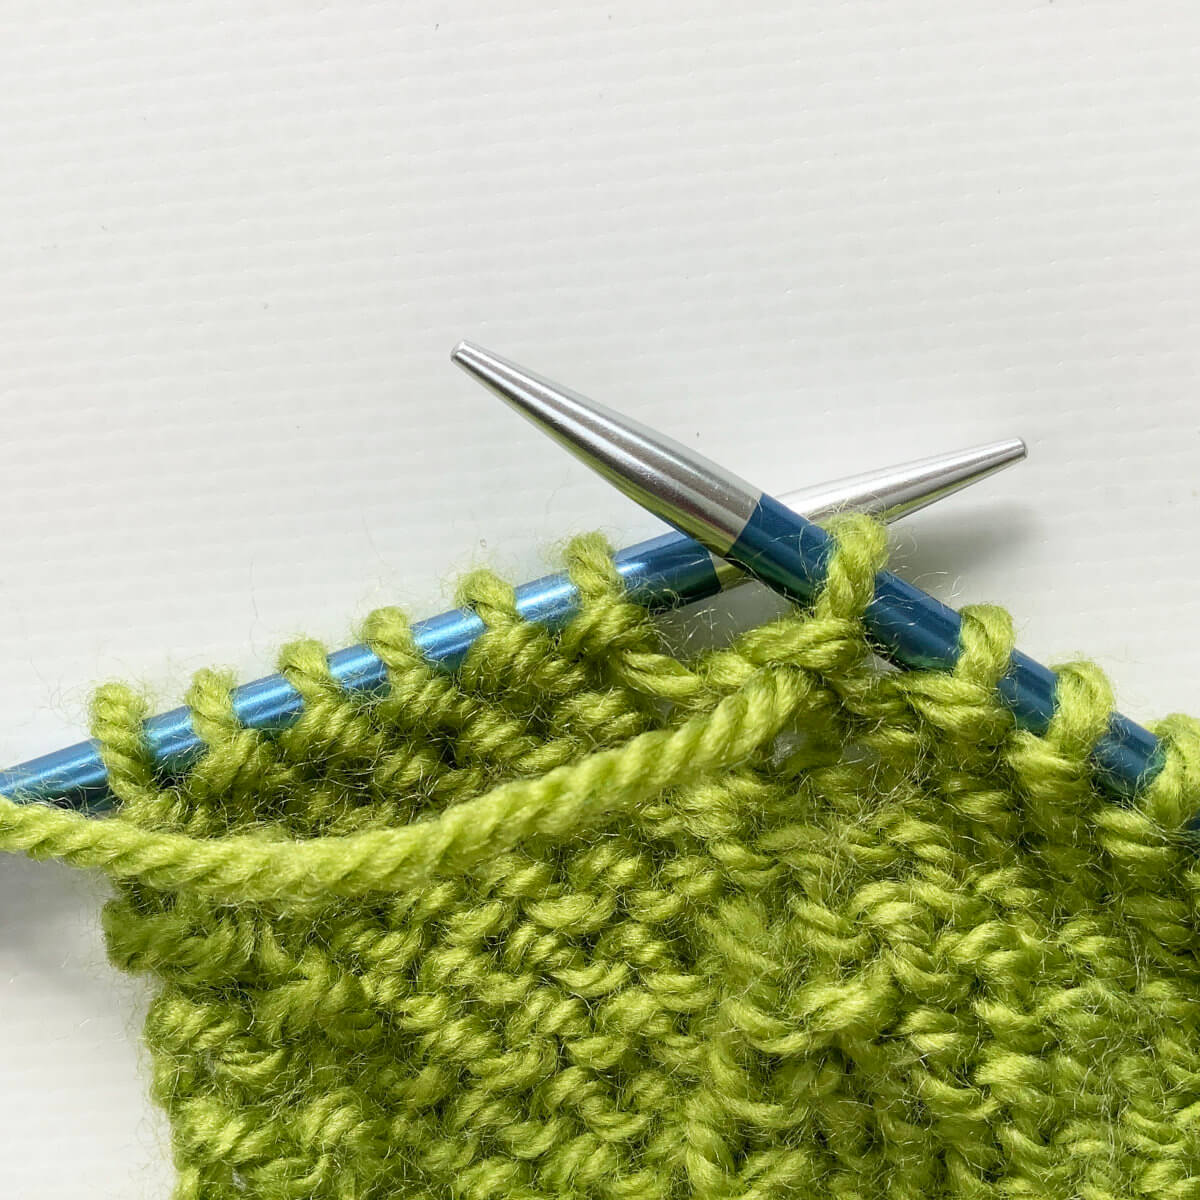
Pull down the fabric below the 2 stitches you’ll be working the decrease on
This will make it easier to both see where to insert the needle and to actually insert it.
Insert the needle
Now insert the needle from left to right through the back loop of the first two stitches on the left-hand needle.
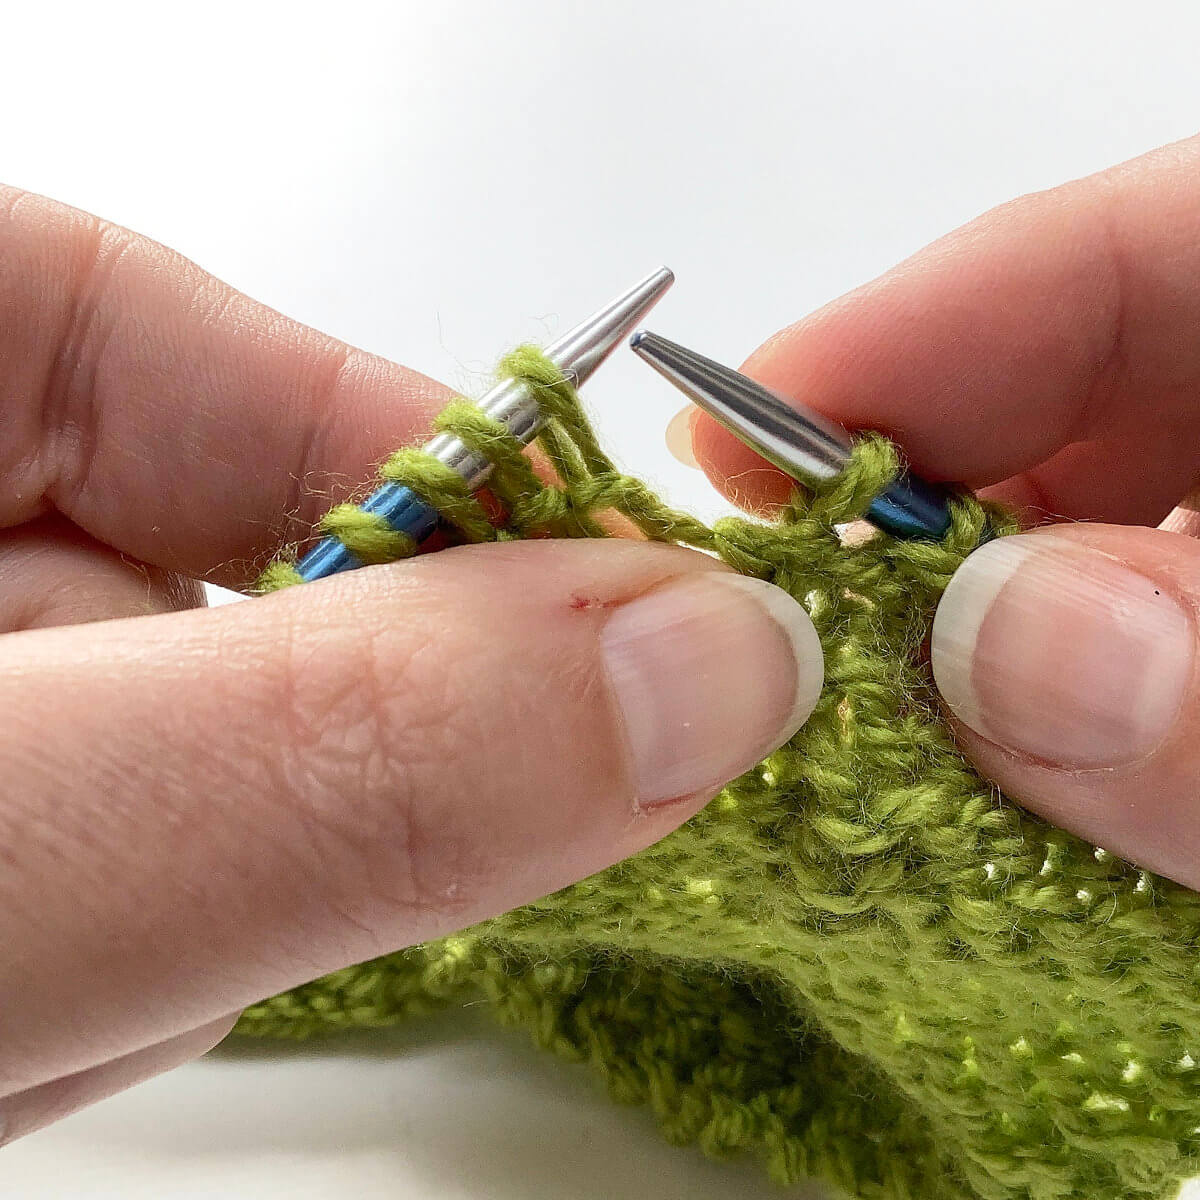
Wrap the working yarn around the right-hand needle …
… and pull the yarn through the two stitches
To finish the decrease slip the two stitches worked of the needle.
This is how this then looks.
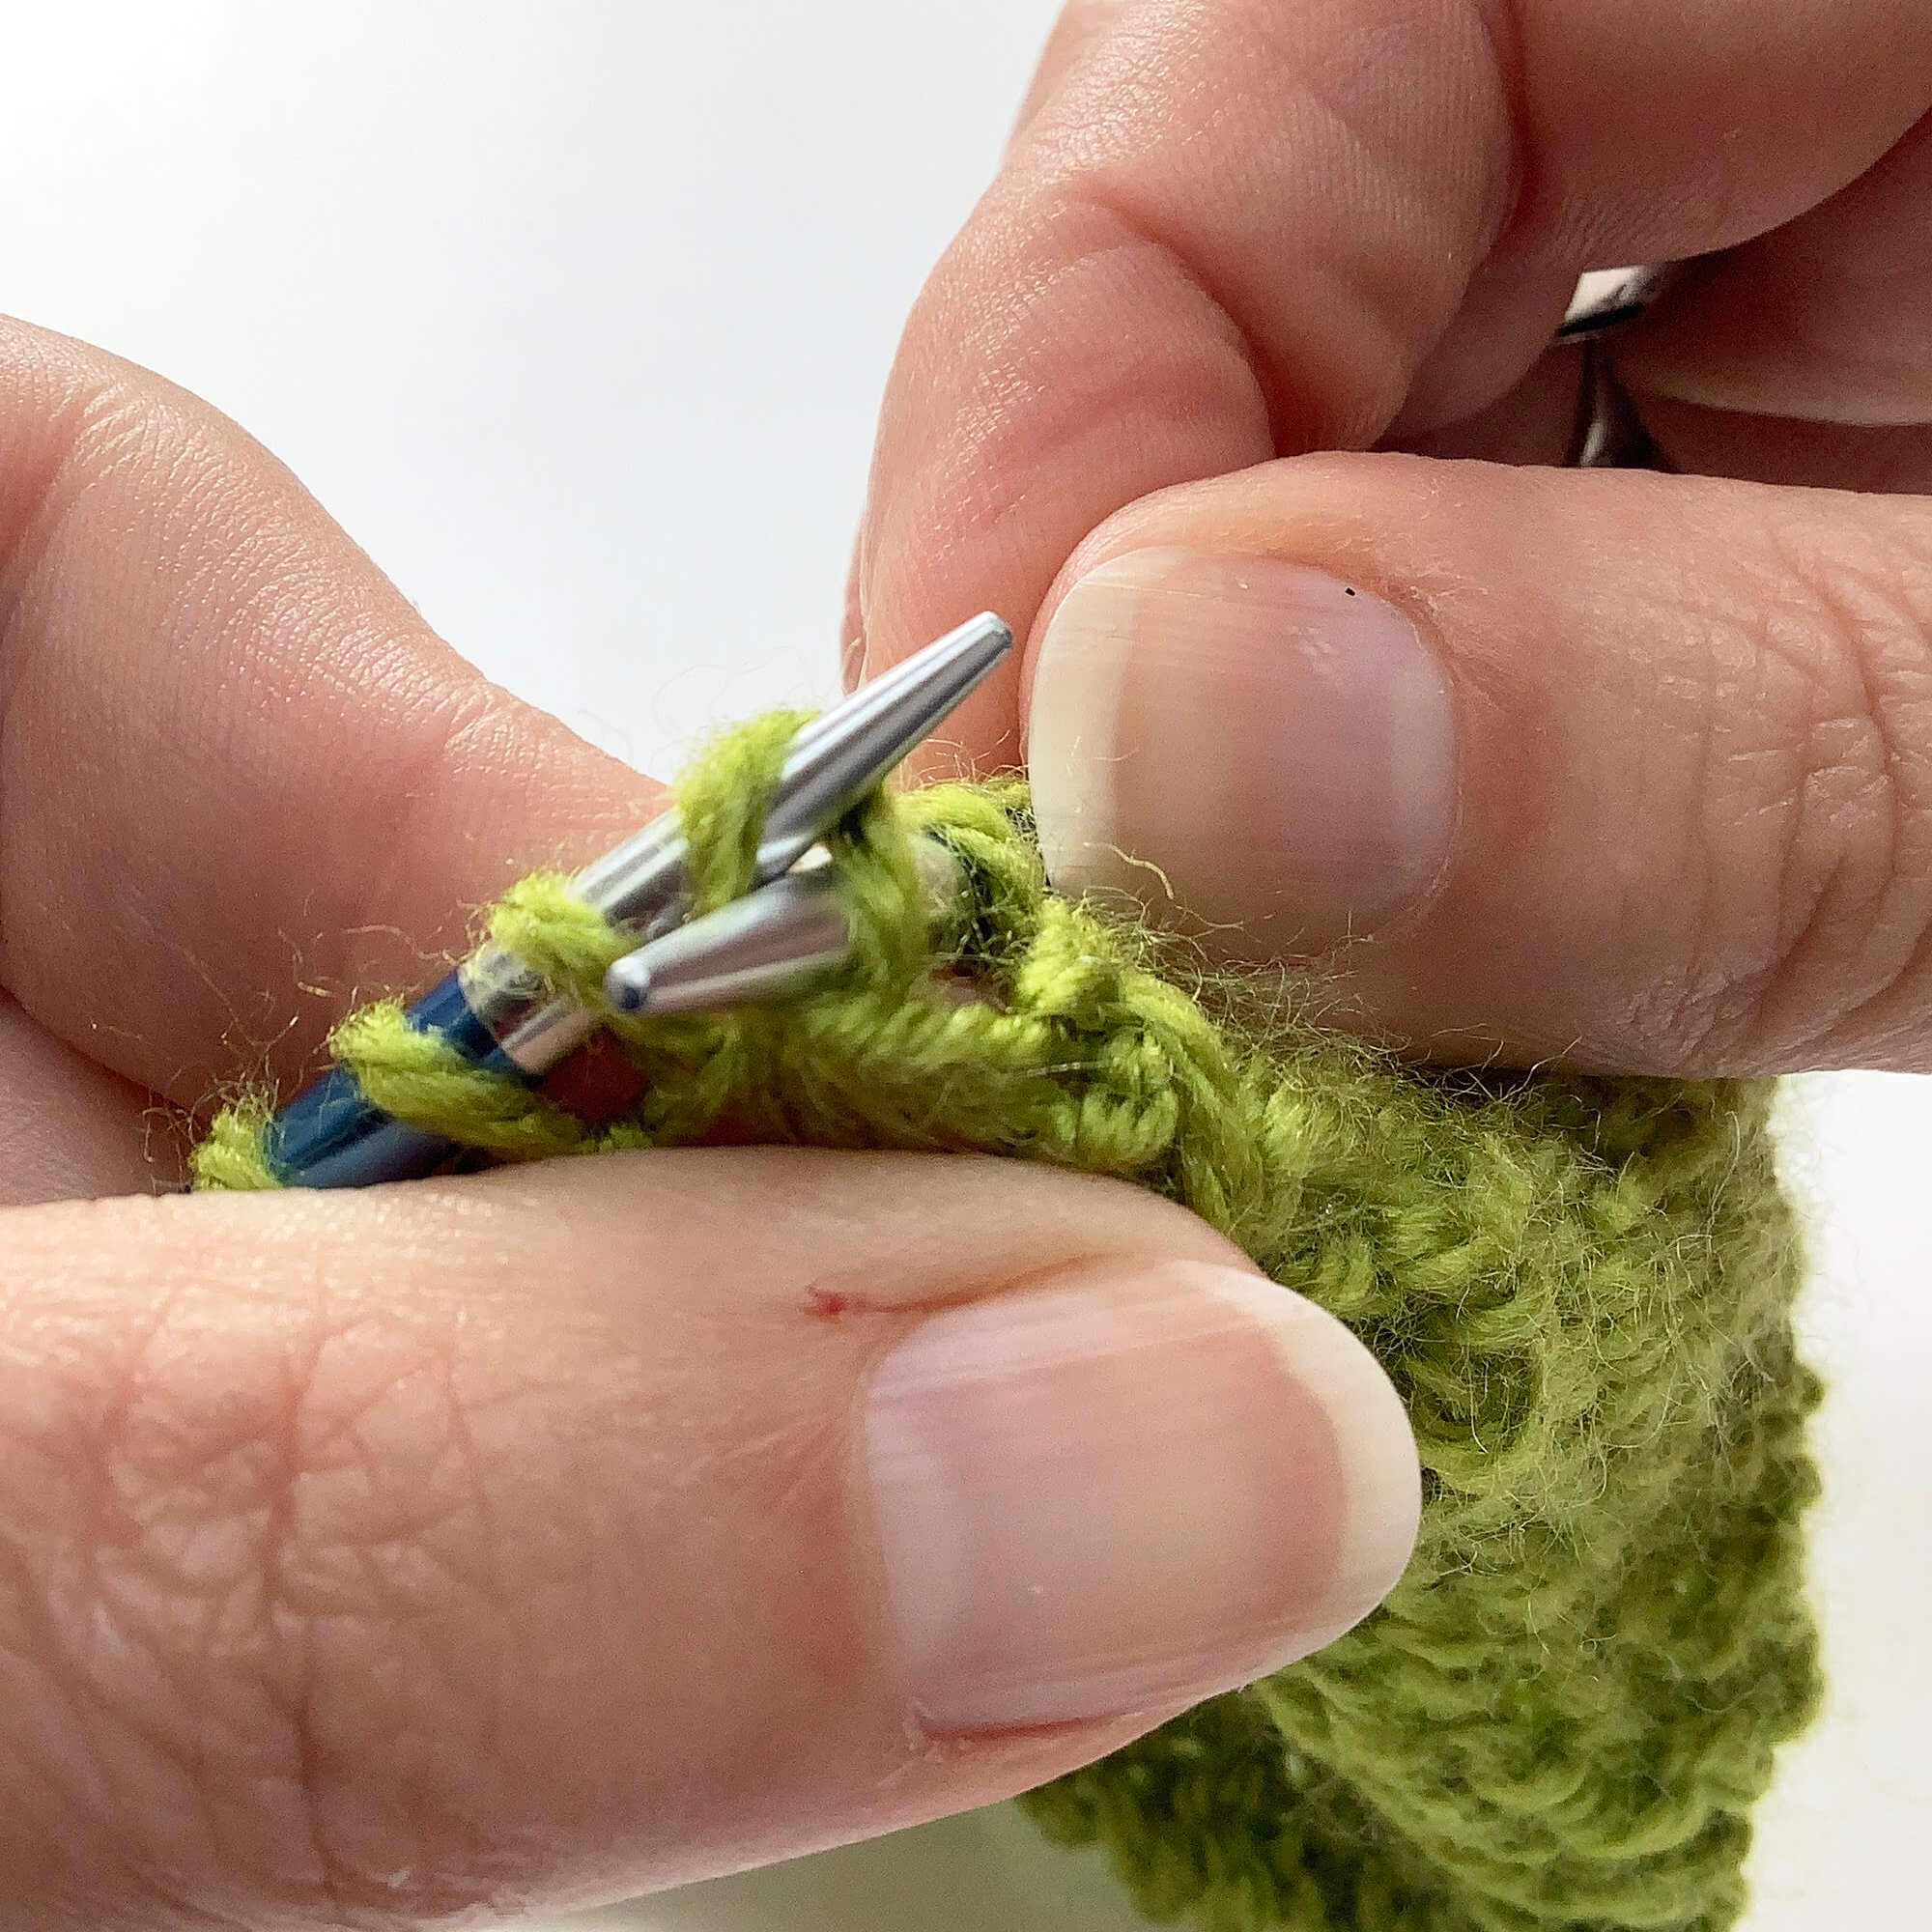
The result
When viewed from the right side of the fabric, this decrease looks exactly look a skp!
Thanks to my Patreon supporters for bringing you this freebie! Creating quality patterns and tutorials is a lot of work and resource-intensive. However, I find it important to give you free content like this tutorial. Thanks to the generous support of my Patreon supporters, I can make it happen. Thank you, patrons! Click here to join, or click here to read more about La Visch Designs on Patreon.